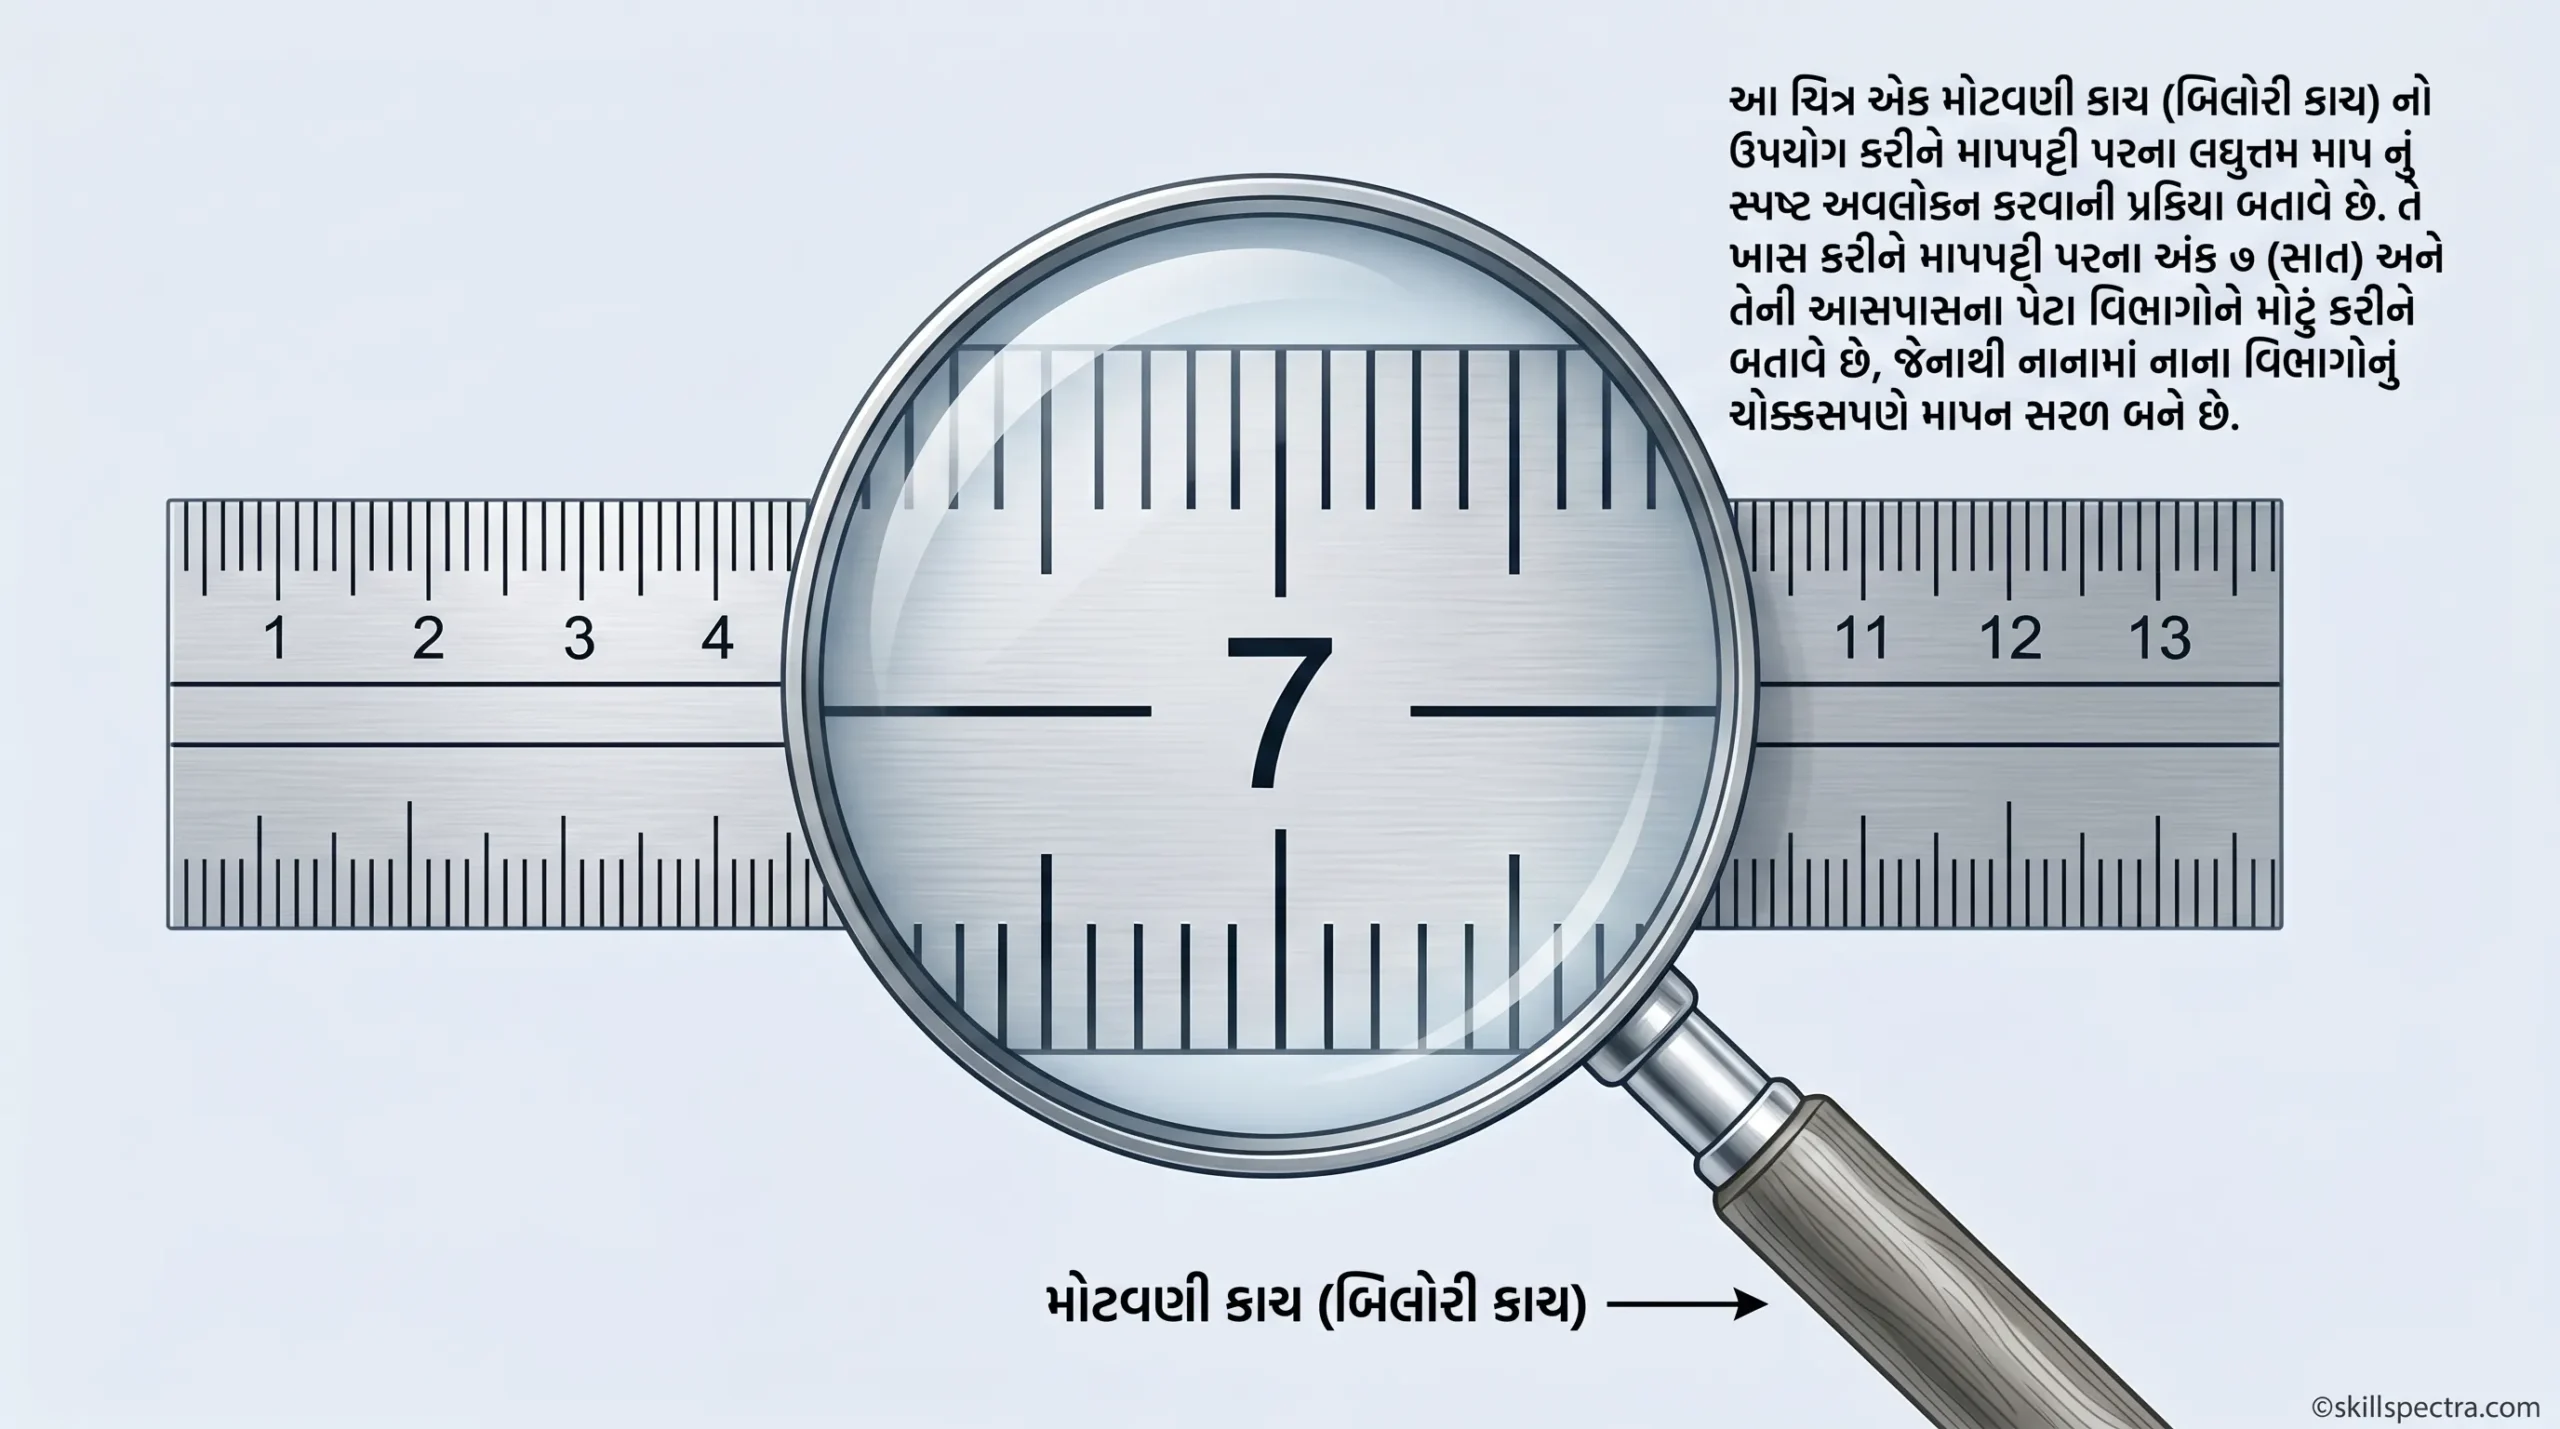
🛠️ Automotive Mechanic Diesel: Measuring and Marking Practice
નમસ્કાર વિદ્યાર્થી મિત્રો! આજે આપણે Mechanic Diesel Reelated Theory માં લંબાઈના માપન (Length Measurement) અને તેને લગતા સાધનો વિશે વિગતવાર શીખીશું.
📏 Length Measurement (લંબાઈનું માપન)
Objectives: આ લેસનના અંતે તમે સમજી શકશો:
- International system of units (SI) મુજબ લંબાઈના base unit નું નામ જણાવવું.
- Metre ના multiples અને તેની values જણાવવી.
Introduction
જ્યારે આપણે કોઈ object (વસ્તુ) ને measure કરીએ છીએ, ત્યારે આપણે ખરેખર તેને known standard of measurement (માપનના જાણીતા ધોરણ) સાથે compare (સરખામણી) કરીએ છીએ. 📏
SI system મુજબ લંબાઈનો base unit Metre (m) છે.
Base Unit Table 📊
| Unit | Equivalent Value |
|---|---|
| Metre (m) | 1000 mm |
| Centimetre (cm) | 10 mm |
| Millimetre (mm) | 1000 micrometre |
| Micrometre (µm) | 0.001 mm |
Measurement in engineering practice ⚙️
સામાન્ય રીતે, engineering practice માં લંબાઈ માપવા માટેનો preferred unit Millimetre (mm) છે. ભલે પરિમાણ (dimensions) મોટા હોય કે નાના, તેને mm માં જ દર્શાવવામાં આવે છે.
The British system of length measurement 🇬🇧
લંબાઈ માપવાની બીજી વૈકલ્પિક પદ્ધતિ British system છે. આ system માં base unit Imperial Standard Yard છે. જોકે, હવે મોટાભાગના દેશો (Great Britain સહિત) SI units પર શિફ્ટ થઈ ગયા છે. Steel rule અને Vernier caliper માં હજુ પણ નીચેની બાજુ metric (mm) અને ઉપરની બાજુ imperial (inches) ના માપ જોવા મળે છે.
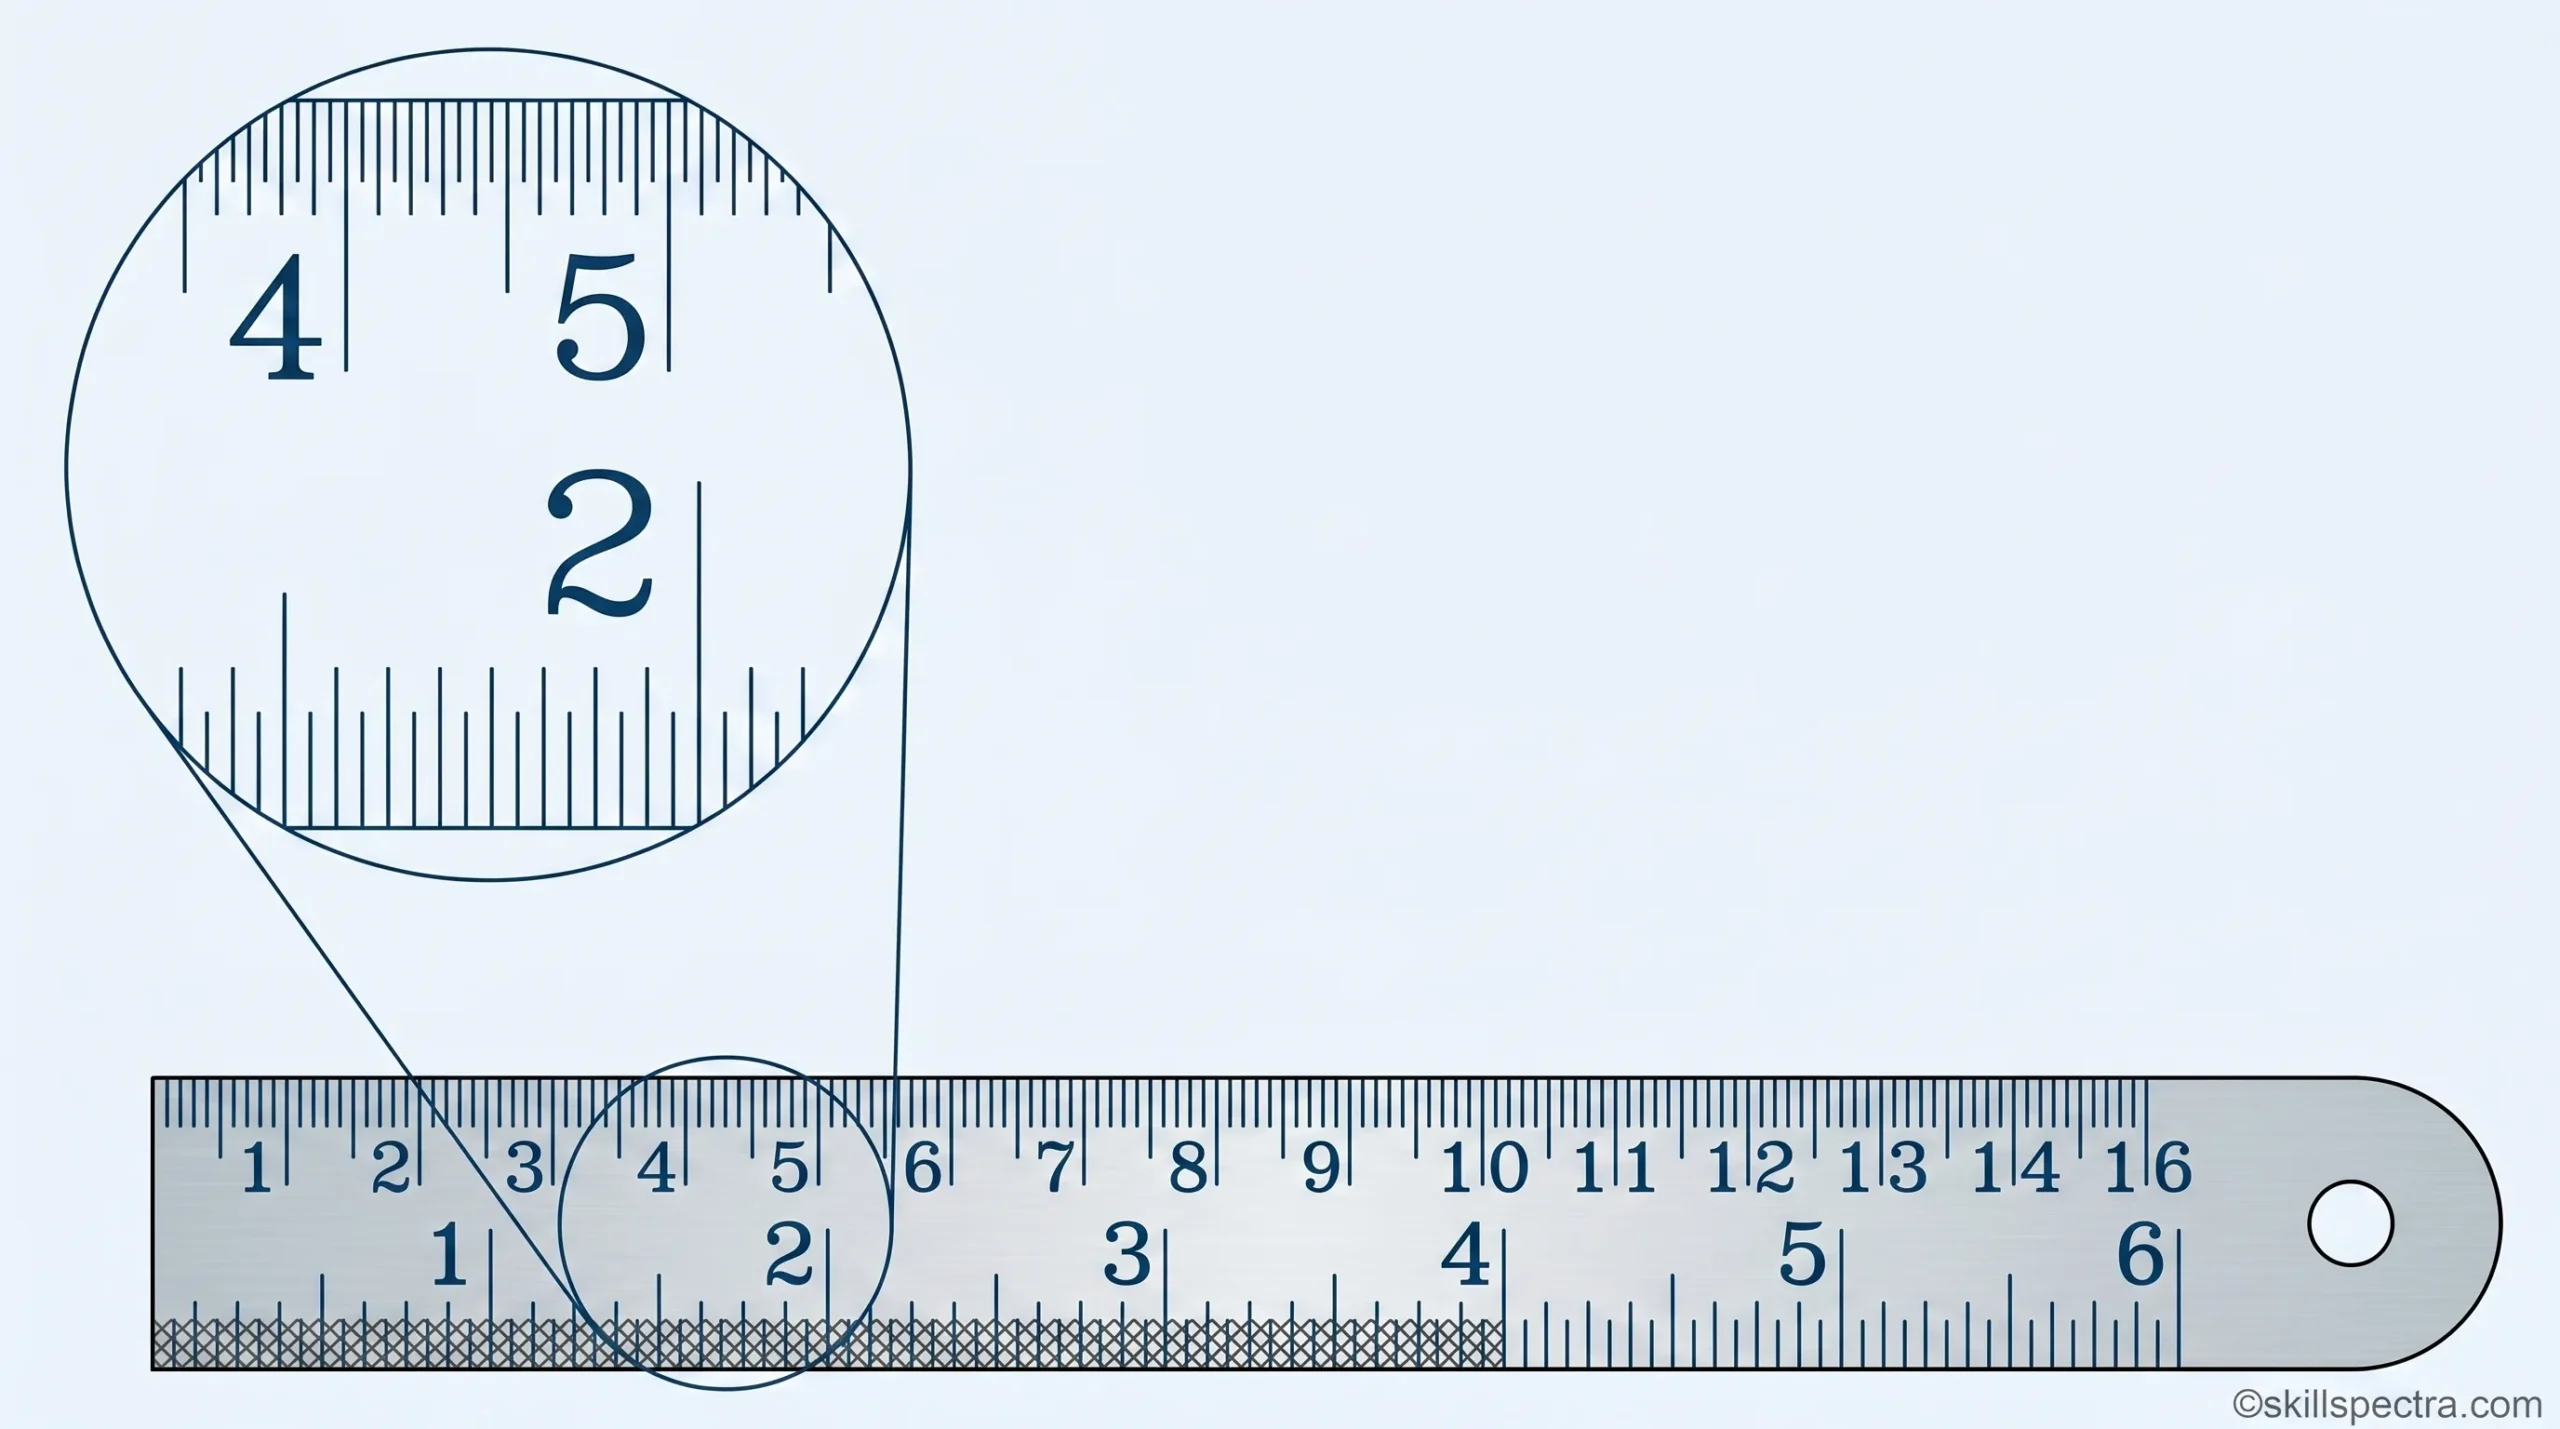
📏 Engineer’s Steel Rule
Objectives: આ લેસનના અંતે તમે સમજી શકશો:
- Engineer’s steel rule ના constructional features જણાવવા.
- Steel rule ના uses (ઉપયોગો) સમજાવવા.
- Steel rule ની maintenance માટેની બાબતો જણાવવી.
General Description
જ્યારે drawing માં tolerance (છૂટછાટ) વિશે કંઈ લખ્યું ન હોય, ત્યારે તે માપ Steel rule થી લેવામાં આવ્યા છે તેમ માનવામાં આવે છે.
- Material: Steel rule એ spring steel અથવા stainless steel માંથી બનાવવામાં આવે છે. તેના edges (ધાર) ને એકદમ સીધા ground કરવામાં આવે છે. 🛡️
- Finish: તેની સપાટી satin-chrome finish વાળી હોય છે જેથી glare (ઝળહળાટ) ઓછો થાય અને કાટ (rusting) ન લાગે.
Sizes of steel rules 📏
Steel rules અલગ-અલગ લંબાઈમાં ઉપલબ્ધ છે, જેમ કે:
- 150 mm
- 300 mm
- 600 mm
Graduation & Accuracy: Engineer’s steel rule પર 10 mm, 5 mm, 1 mm અને 0.5 mm ના કાપા (graduations) હોય છે. આ સાધનની reading accuracy 0.5 mm છે.
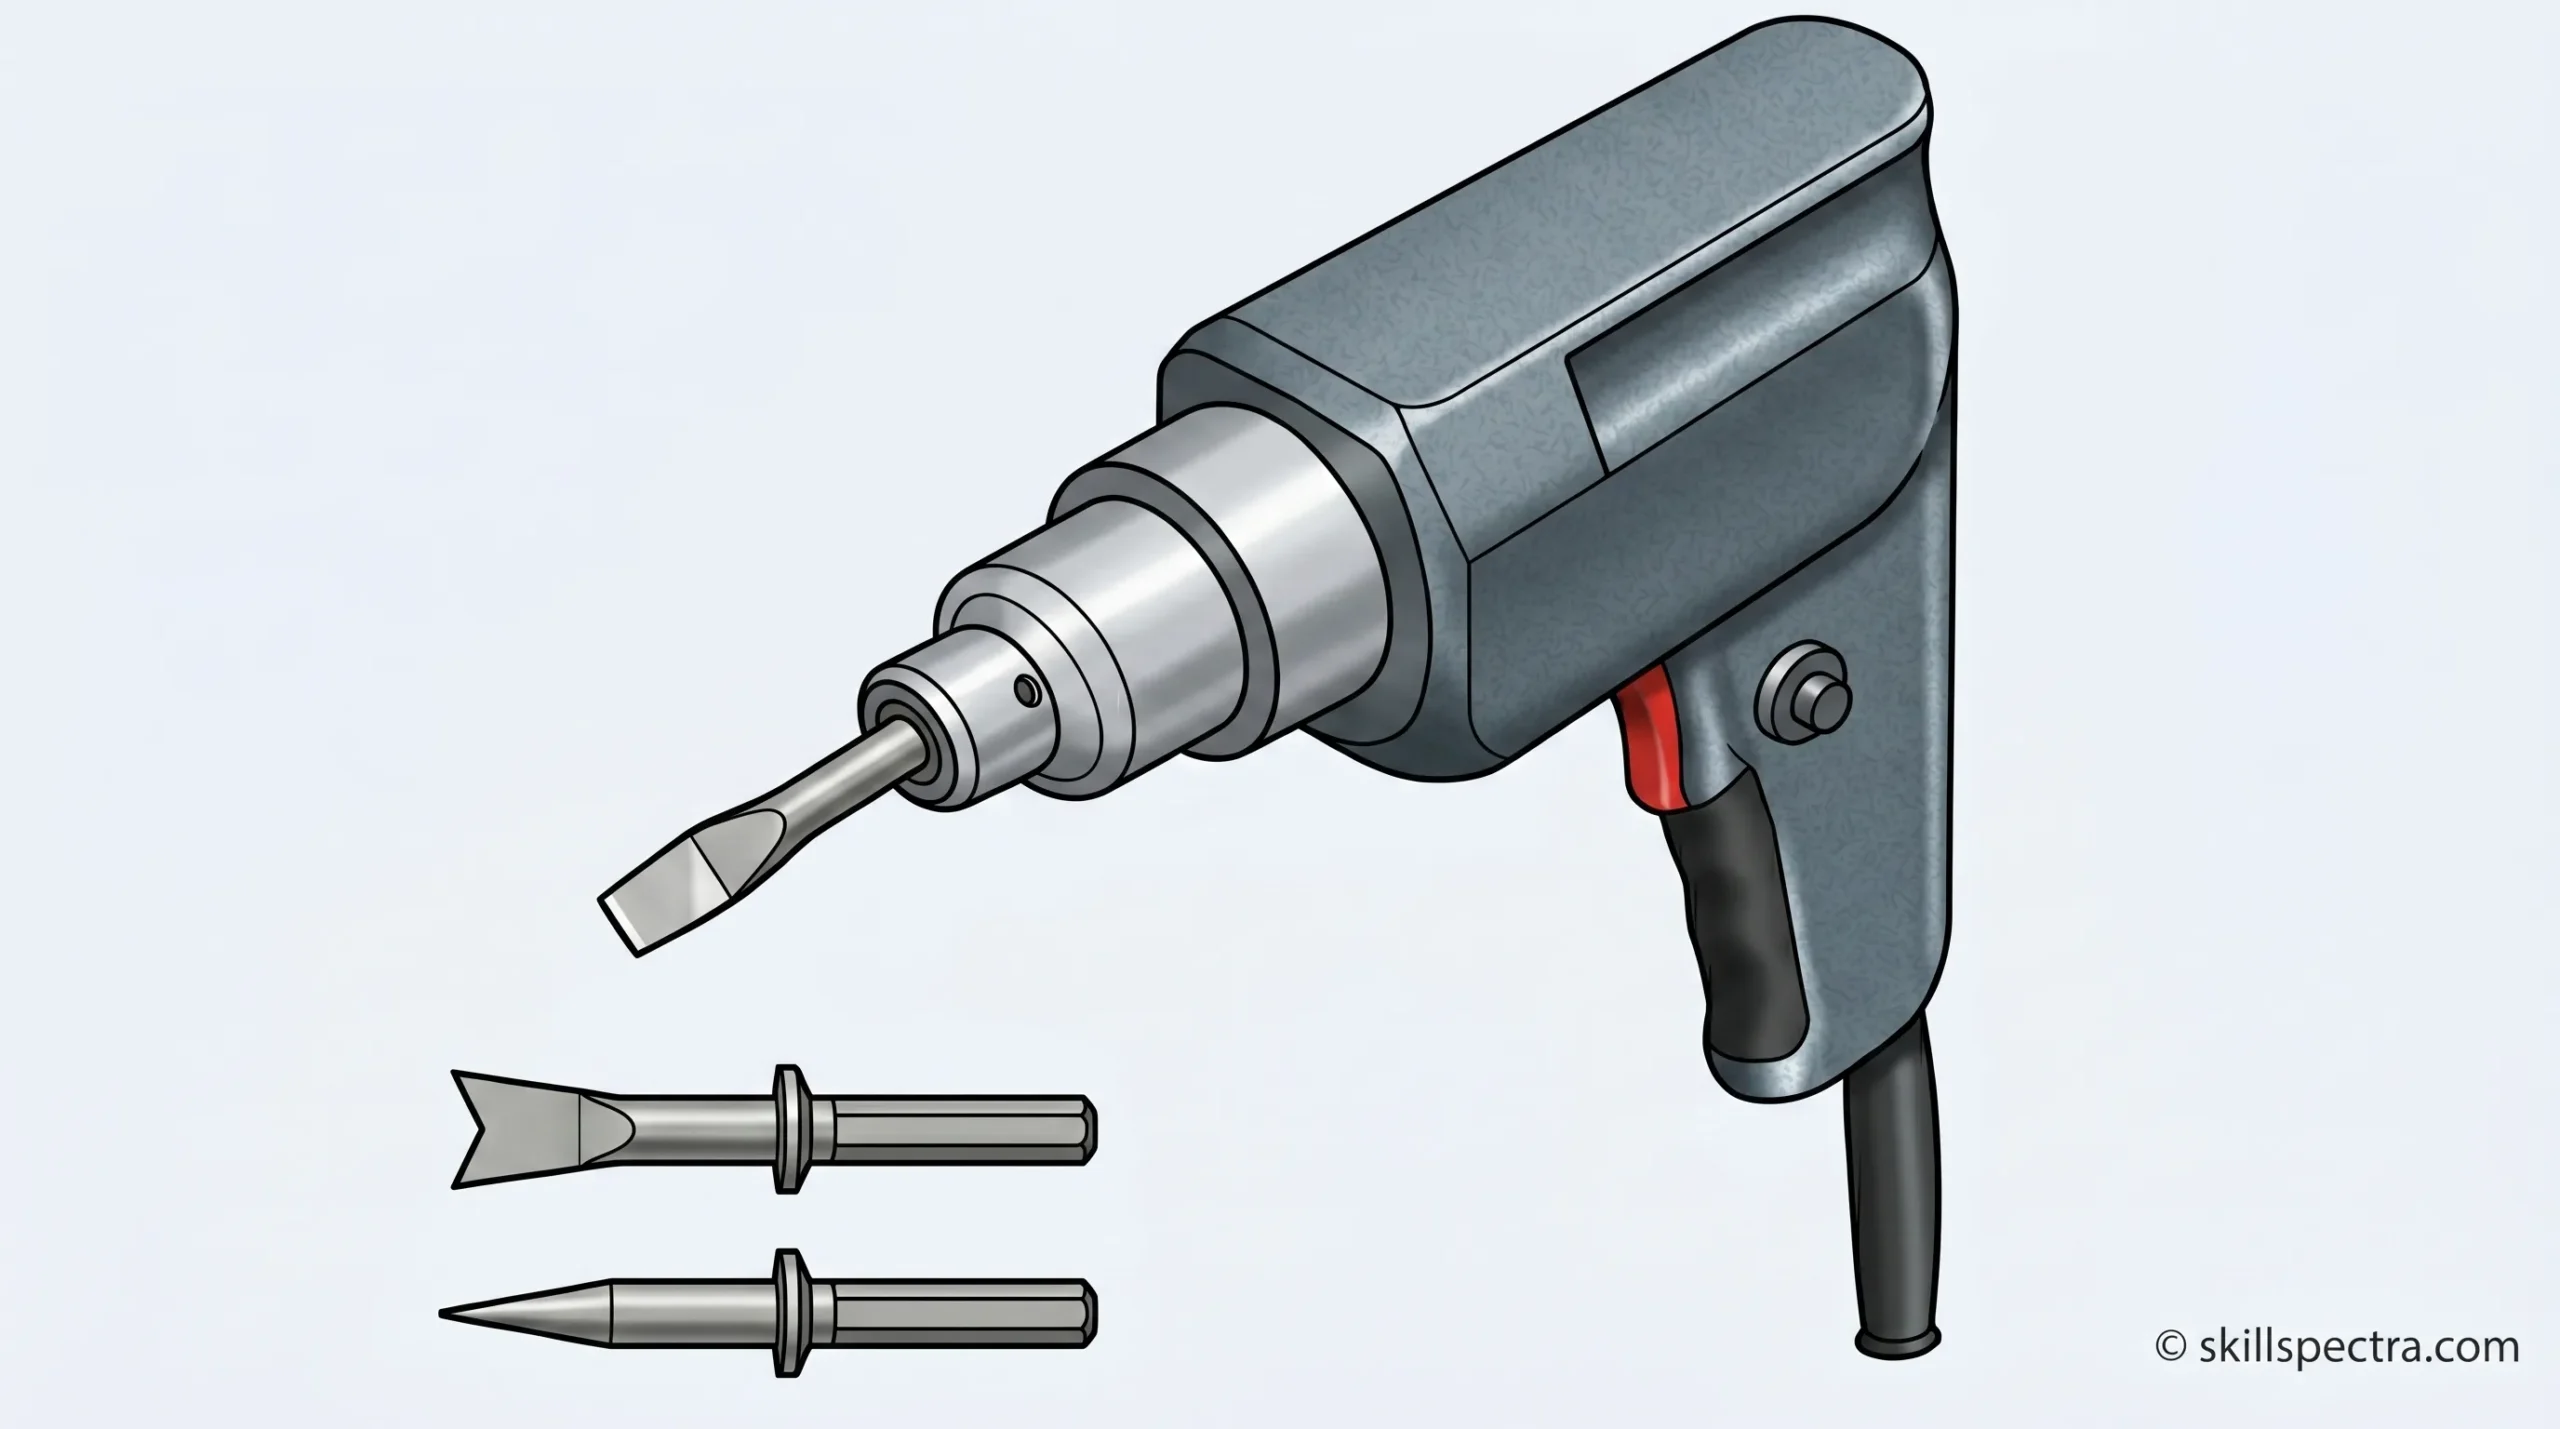
🔧 Air Impact Wrench, Air Ratchet
Objectives: આ લેસનના અંતે તમે સમજી શકશો:
- Air impact wrench નો ઉપયોગ સમજાવવો.
- Air impact wrench નો working principle સમજાવવો.
Air Impact Wrench 🛠️
Air Impact Wrench ને Impact wrench, Air Rattle Gun અથવા Windy gun તરીકે પણ ઓળખવામાં આવે છે. આ એક socket wrench power tool છે જે high torque (વધારે તાકાત) આપવા માટે વપરાય છે. તે rotating mass માં energy store કરીને અચાનક output shaft પર deliver કરે છે.
- Power Source: સામાન્ય રીતે Compressed air નો ઉપયોગ થાય છે, પરંતુ electric power અથવા cordless battery devices પણ વપરાય છે.
- Usage: તેનો ઉપયોગ ખાસ hardened impact socket extension અને joints સાથે કરવામાં આવે છે જેથી અચાનક આવતા જોર (sudden force) ને સહન કરી શકાય. સામાન્ય રીતે 6 inch pin socket નો ઉપયોગ થાય છે.
Air Ratchet ⚙️
Air ratchet એ સામાન્ય ratchet wrench જેવું જ દેખાય છે, પરંતુ તે air motor દ્વારા ચાલે છે.
- તેમાં અલગ-અલગ size ના square drive હોય છે.
- જ્યારે તમે trigger દબાવો છો, ત્યારે air motor active થઈને socket drive ને ફેરવે છે.
- તેની દિશા (clockwise કે anti-clockwise) બદલી શકાય છે.
- Note: Air ratchet માં speed વધારે હોય છે પણ torque ઓછો હોય છે. જો વધારે તાકાતની જરૂર હોય, તો impact wrench વાપરવું જોઈએ.
⚒️ Air Chisel
Air chisel નો ઉપયોગ વાહનની બોડી શીટ (body sheet) ના નટ-બોલ્ટ કાપવા માટે થાય છે. 🚗
Important: Compressed air એ hand chisel અને hammer (હથોડી) કરતા વધારે force અને efficiency આપે છે.
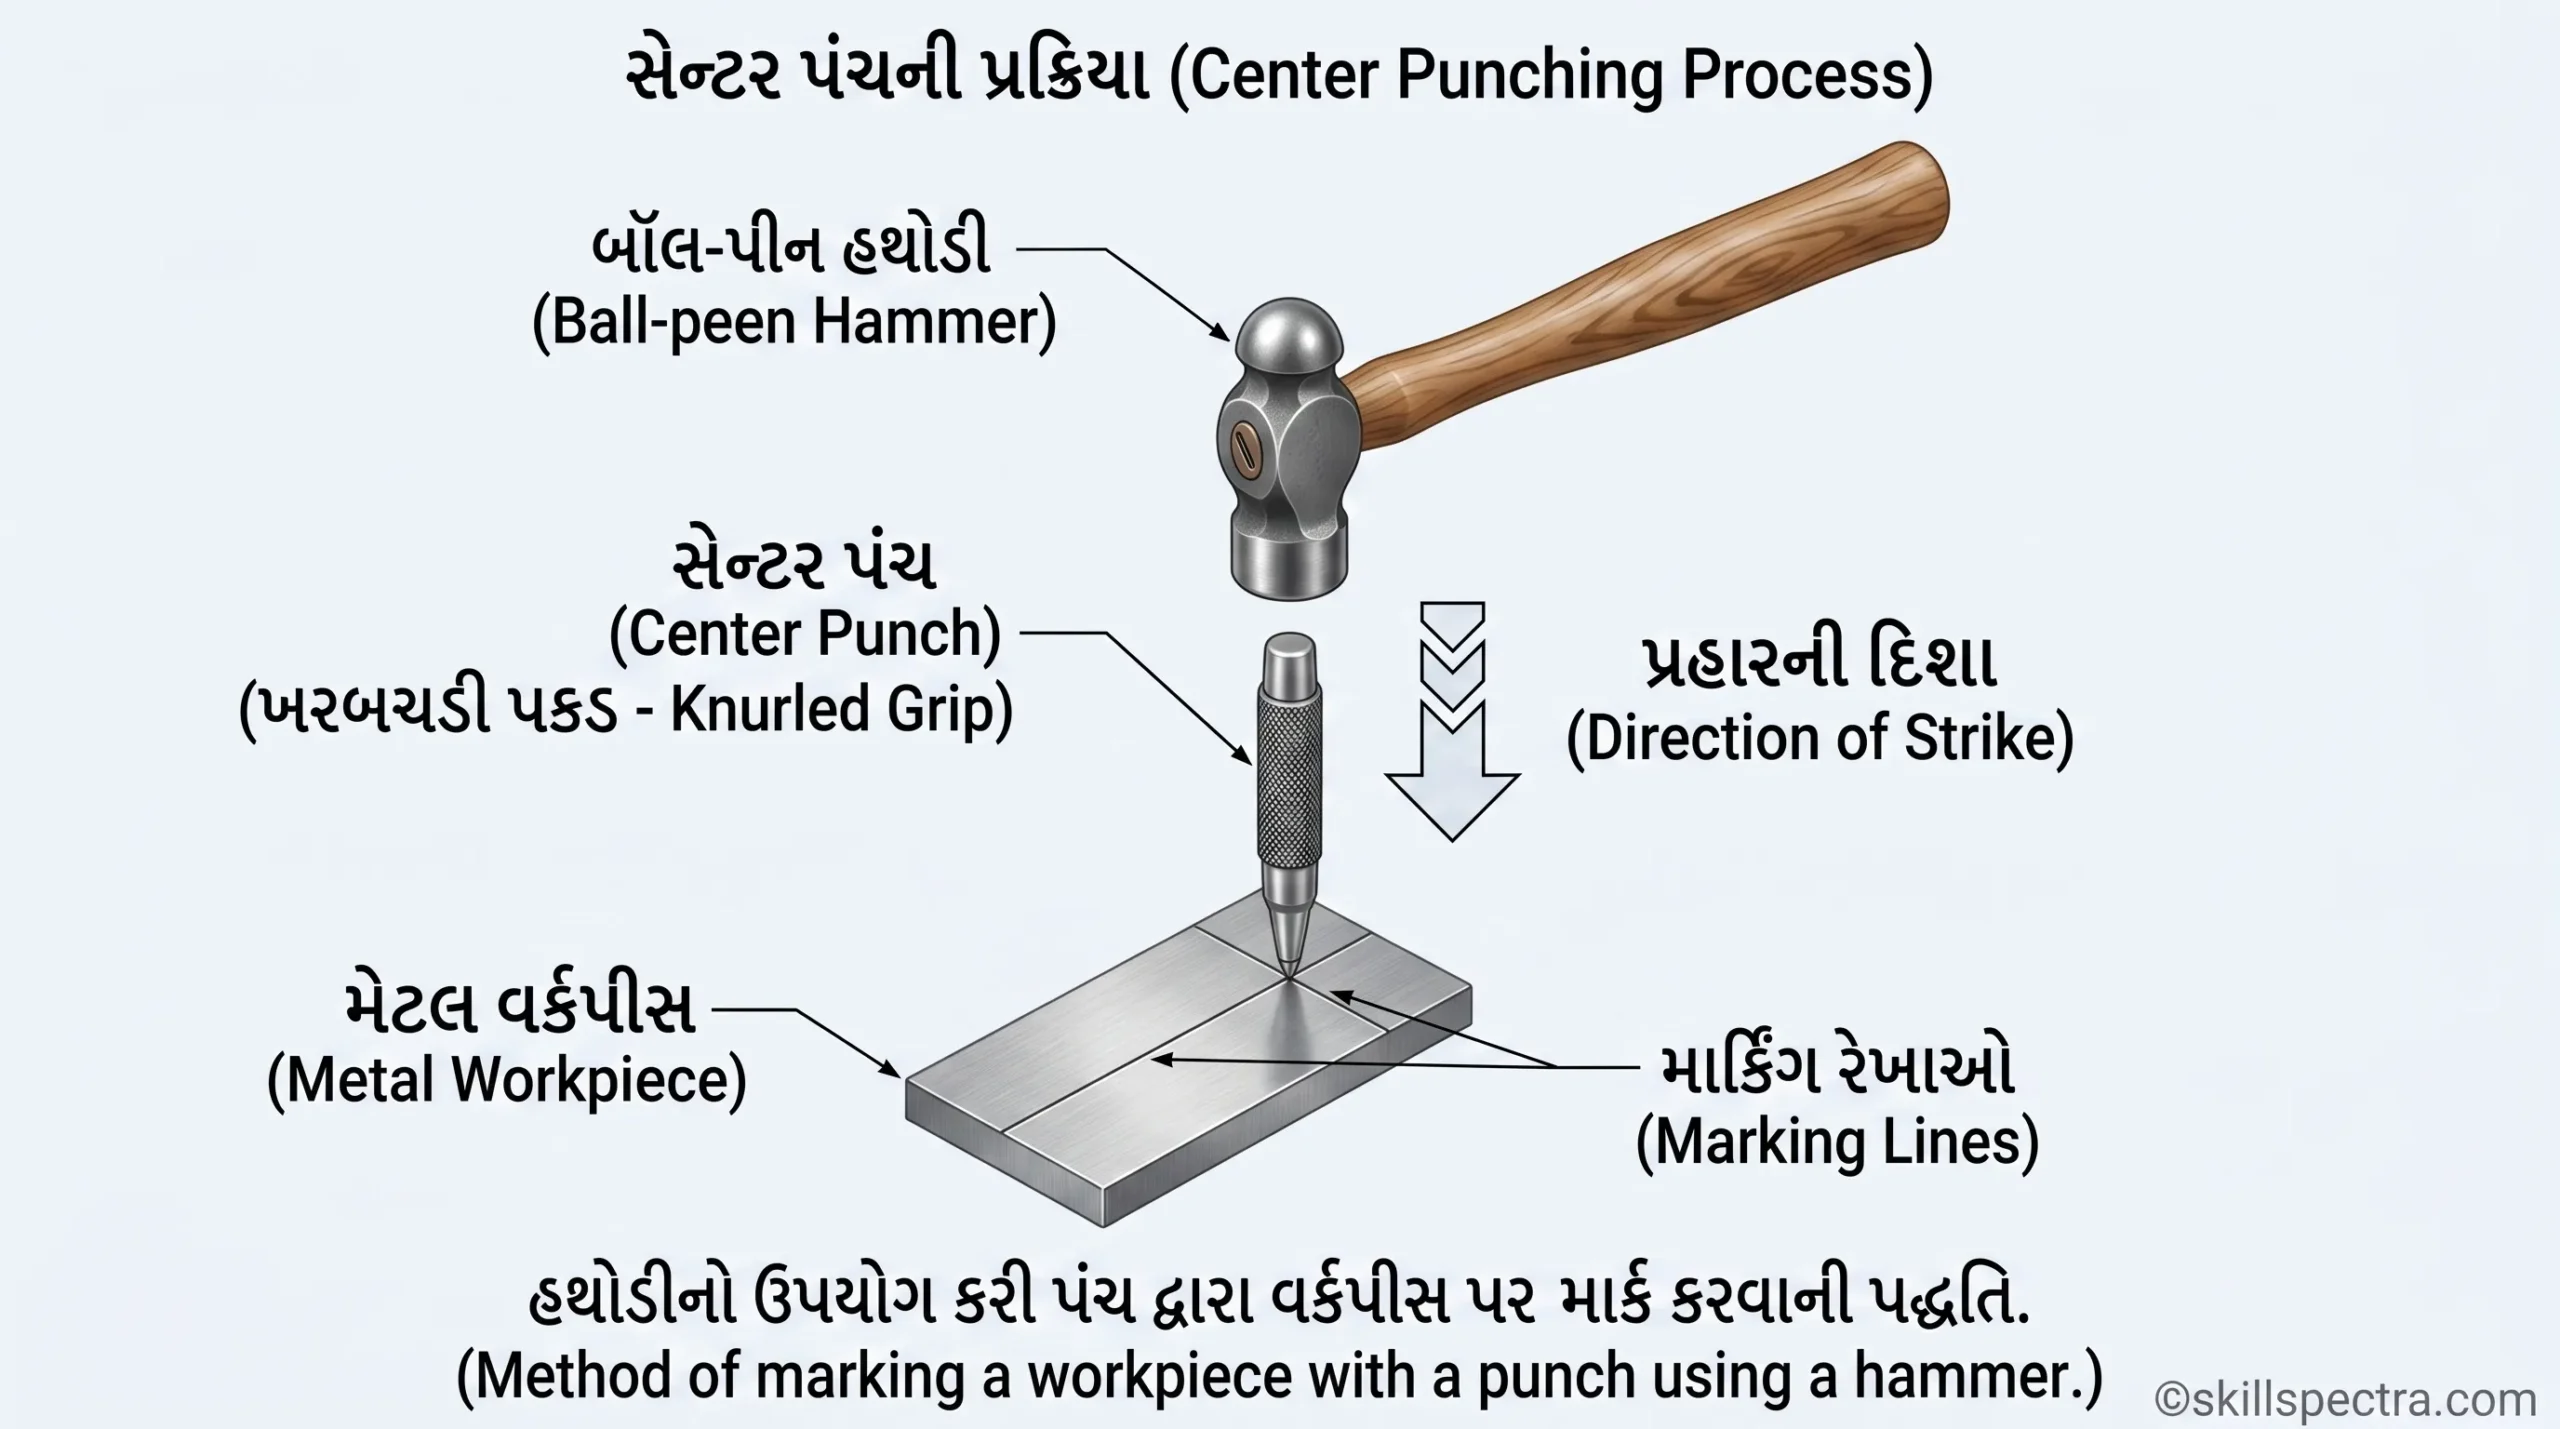
🔨 Punches
Objective: આ લેસનના અંતે તમે સમજી શકશો:
- Punches ના applications (ઉપયોગો) જણાવવા.
Punches નો ઉપયોગ sheet metal અથવા અન્ય કામોમાં position માર્ક કરવા માટે થાય છે.
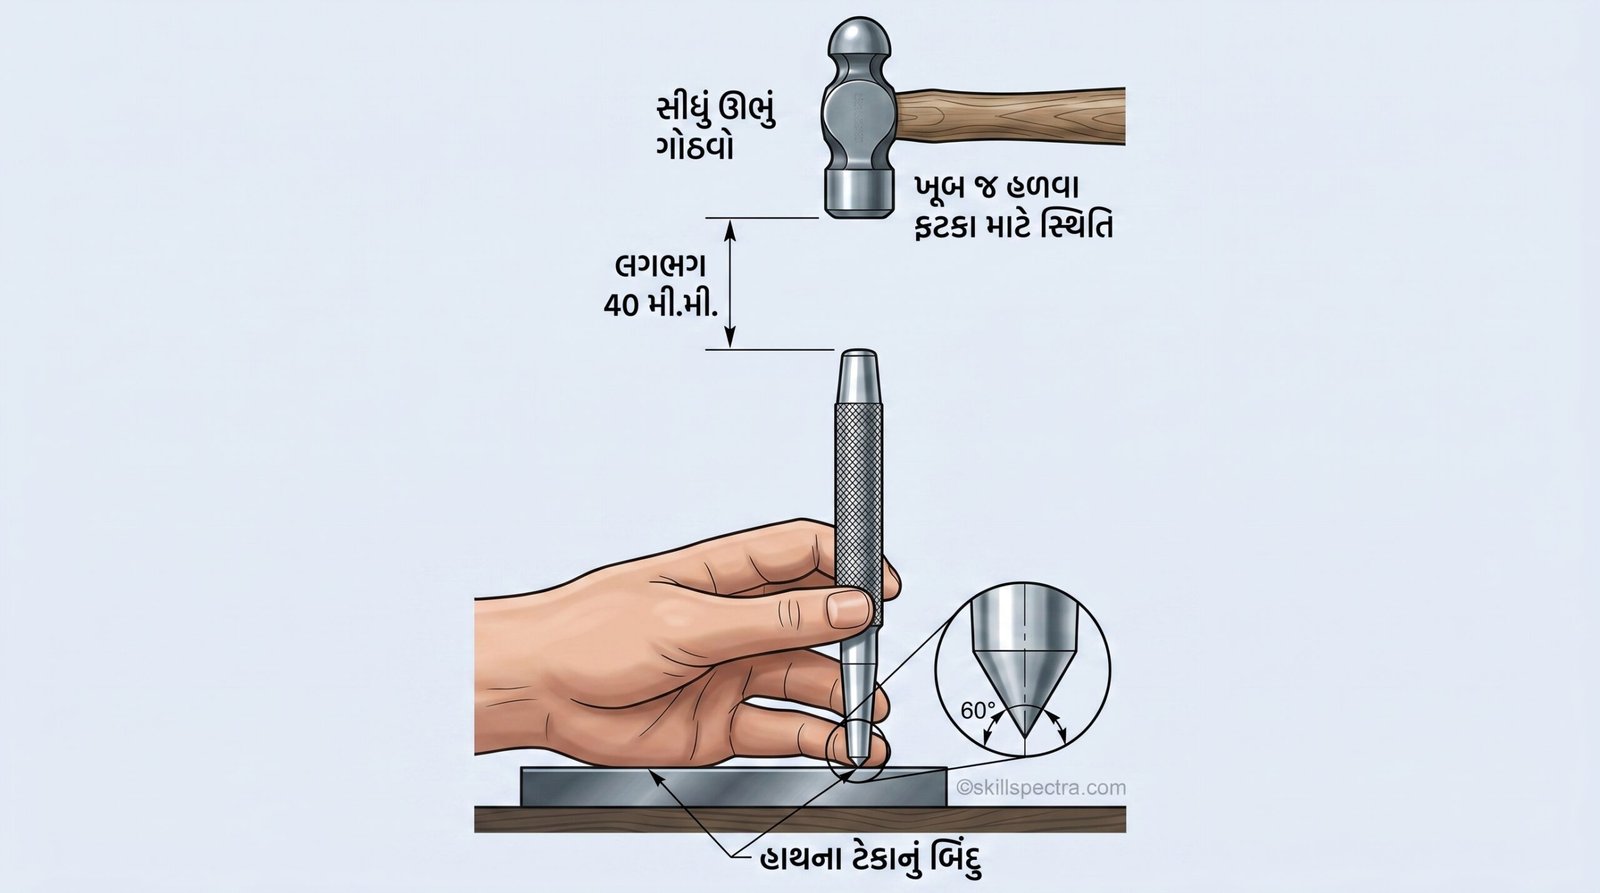
Prick Punches 📍
આ પંચનો ઉપયોગ scribed lines (કરેલી લીટીઓ) પર witness marks બનાવવા માટે થાય છે.
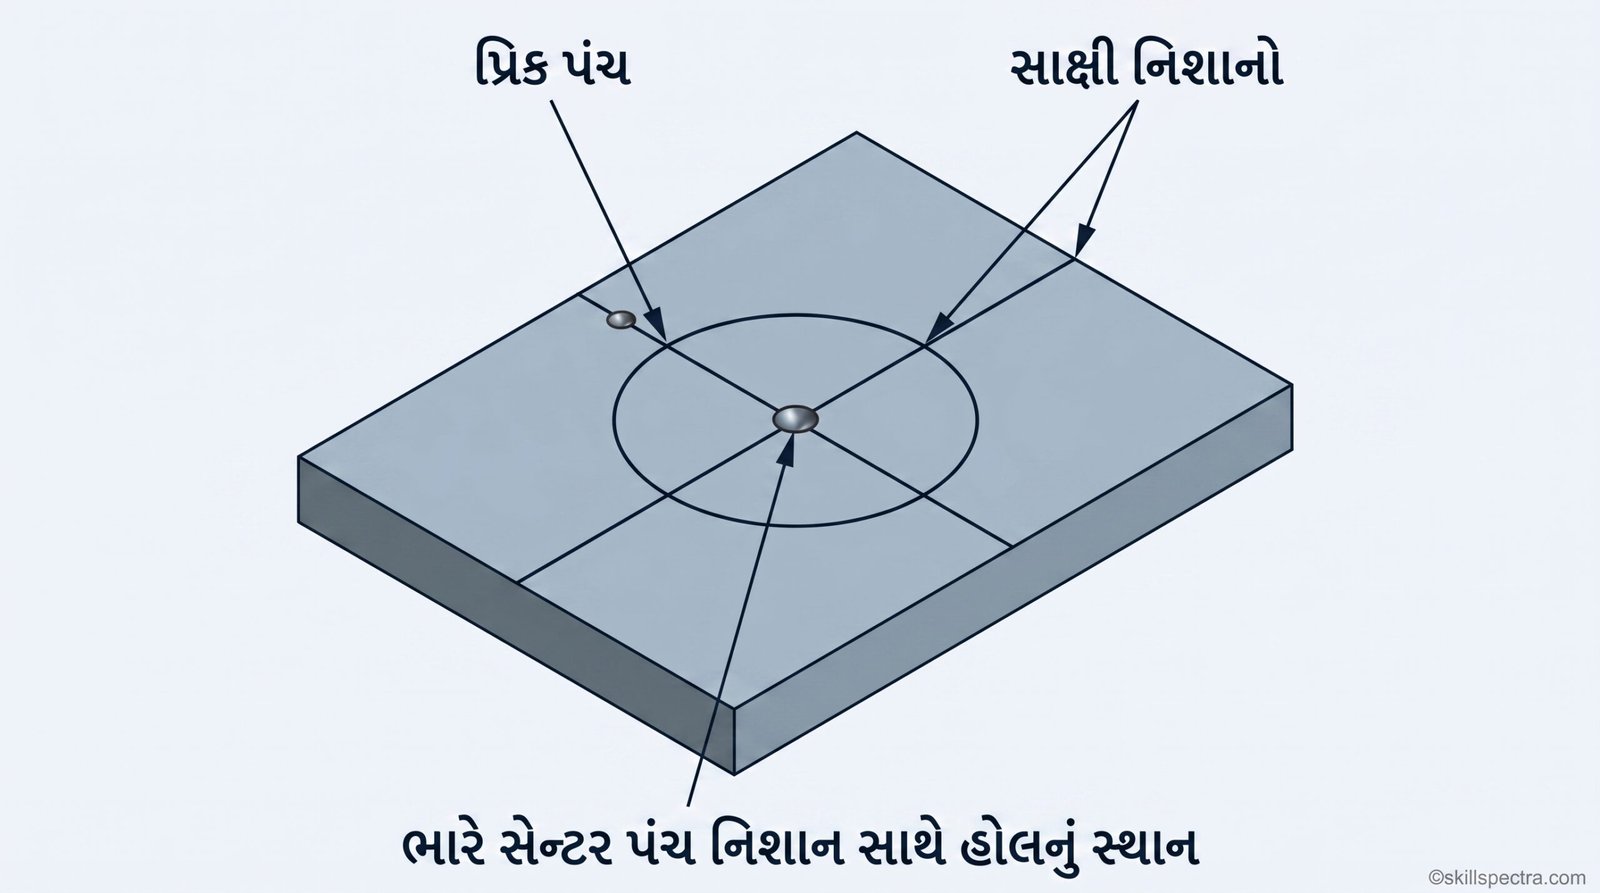
- આનાથી માર્કિંગ લાઈન્સ ચોકસાઈથી જોઈ શકાય છે.
- Centre punching કરતા પહેલા સેન્ટર પોઝિશન ચેક કરવા માટે પણ આનો ઉપયોગ થાય છે.
- Scribing circles માટે compasses ના pivot points નક્કી કરવા માટે.
એક 100 mm prick punch જેની body 7 mm diameter ની હોય, તેમાં 2.5 mm diameter નો point હોઈ શકે છે જે 60° અથવા 30° ના એન્ગલ પર ground (ઘસેલો) હોય છે.
Keywords 🌐
- Automotive Mechanic Diesel Theory
- Engineering Steel Rule uses in Gujarati
- Air Impact Wrench working principle
- Difference between Air Ratchet and Impact Wrench
- ITI Mechanic Diesel Measuring Tools
- Steel Rule Accuracy and Graduation
- Types of Punches in Engineering
- Gujarati Technical Education Mechanic Diesel
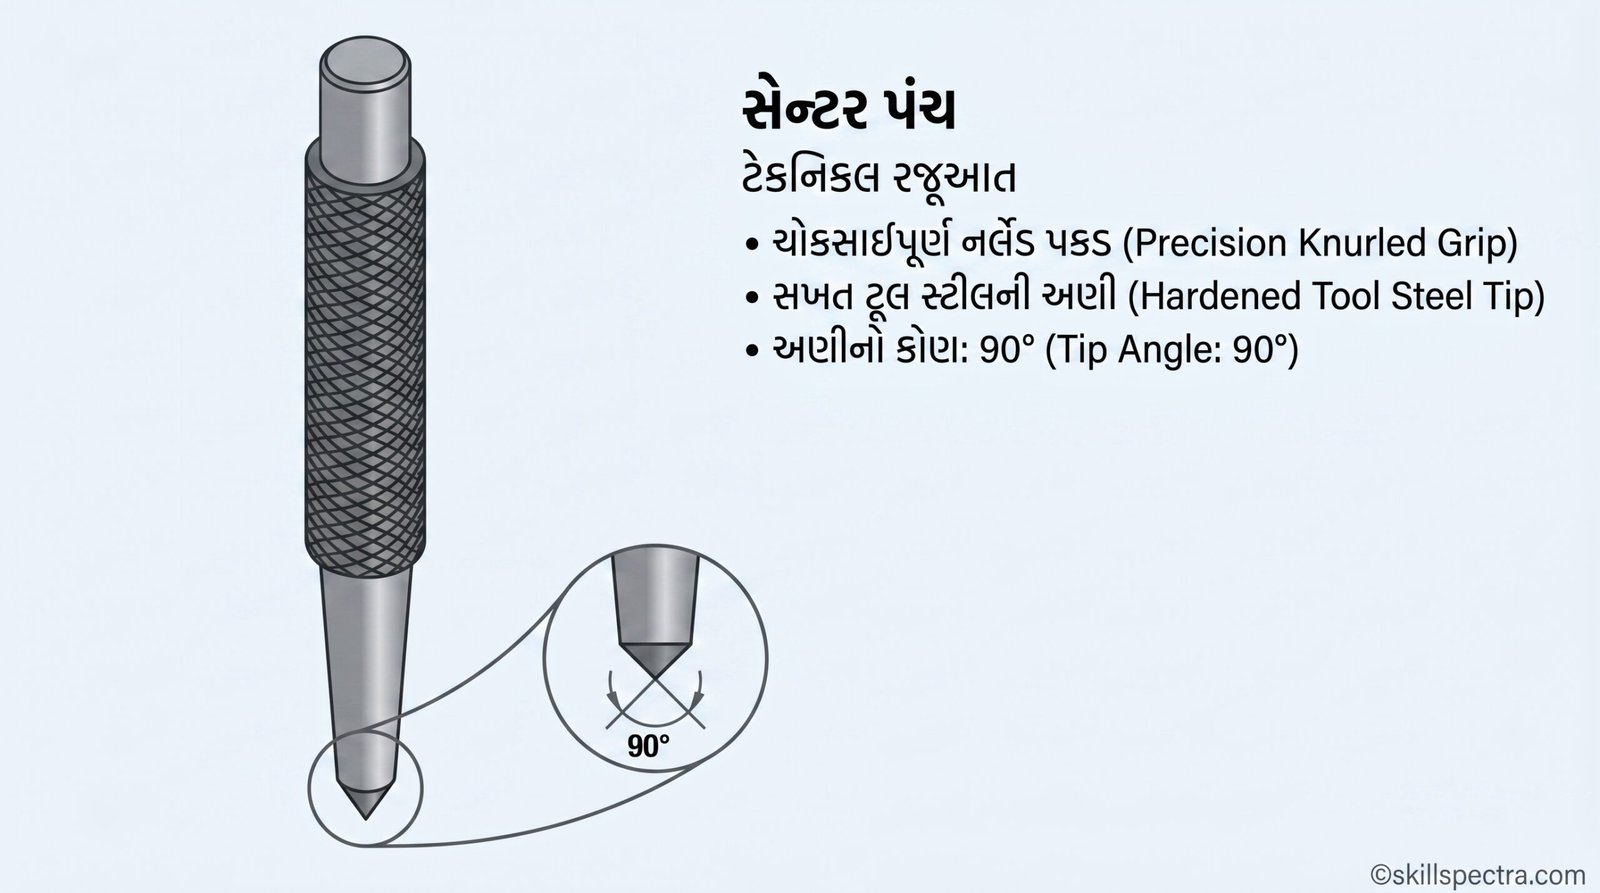
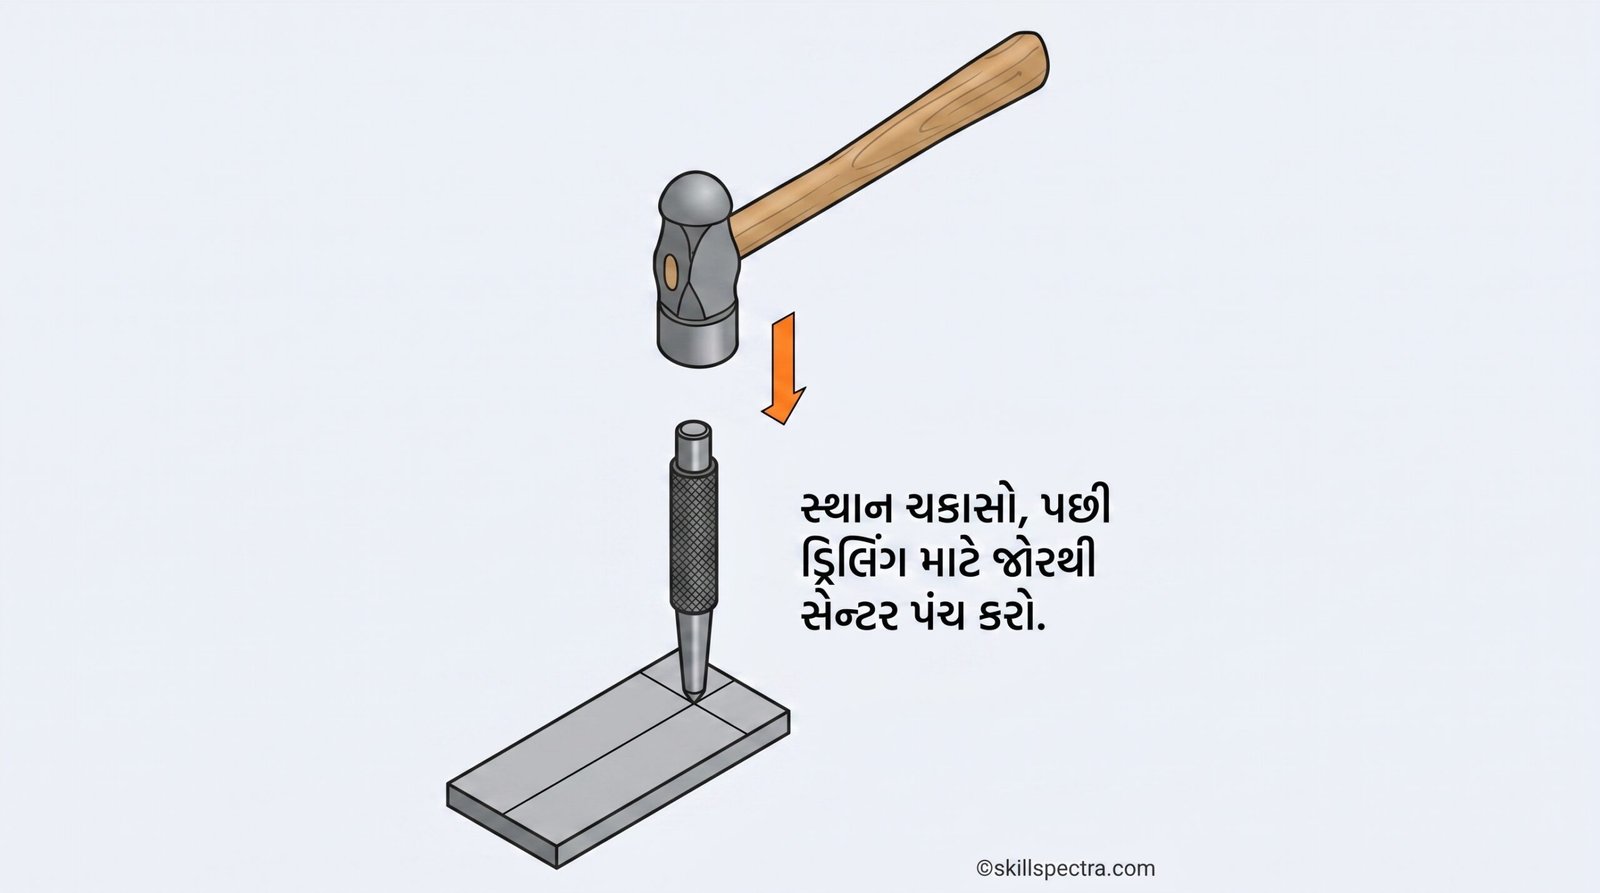
Centre punches 📍
આ punches દેખાવમાં prick punch જેવા જ હોય છે, પરંતુ તે સામાન્ય રીતે prick punch કરતા મોટા હોય છે.
એક 100 mm centre punch માં 10 mm diameter ની body અને 6 mm diameter નો point હોઈ શકે છે જે 90° ના એન્ગલ પર ground થયેલો હોય છે.
Centre punches નો ઉપયોગ નીચે મુજબ થાય છે:
- Scribed lines પર deeper witness marks (ઊંડા નિશાન) બનાવવા માટે. Centre position લોકેટ કરવા માટે અને ડ્રિલ (drill) ને સાચી રીતે શરૂ કરવામાં મદદ કરવા માટે
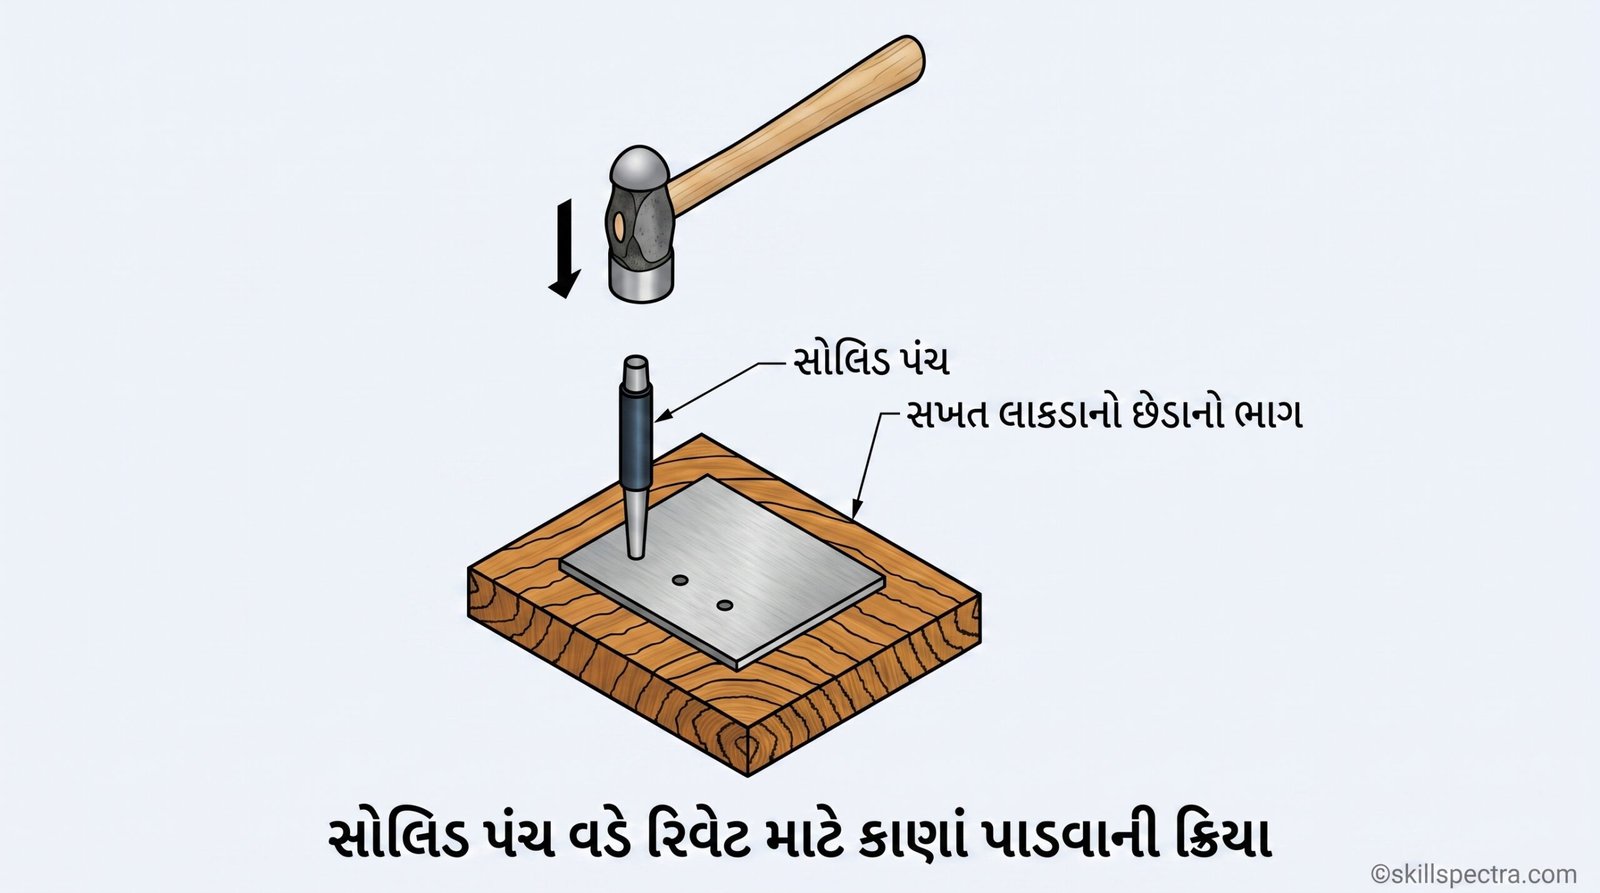
Solid punch 🔨
Sheet metal ના riveting માં, holes એકસમાન અંતરે (equally spaced) અને સીધી લાઈનમાં હોવા જોઈએ. મેટલમાં આ હોલ સામાન્ય રીતે solid punches વડે પાડવામાં આવે છે.
Letter and number punches 🔢🔠 આ punches ને letter stamps અથવા number stamps તરીકે ઓળખવામાં આવે છે. Letter punches નો ઉપયોગ workpiece પર અક્ષર કે નંબરની છાપ (impression) ઉપસાવવા (emboss) માટે થાય છે. તે મોટેભાગે reverse image (ઊંધી છાપ) માં હોય છે, જેથી અંતિમ પરિણામ સીધું વાંચી શકાય. જોકે, તે positive image માં પણ હોઈ શકે છે. Die અથવા mold બનાવતી વખતે આ અનિવાર્ય છે, જેથી ફિનિશ્ડ પ્રોડક્ટ વાંચી શકાય તેવી બને, કારણ કે die પોતે એક negative image હોય છે.
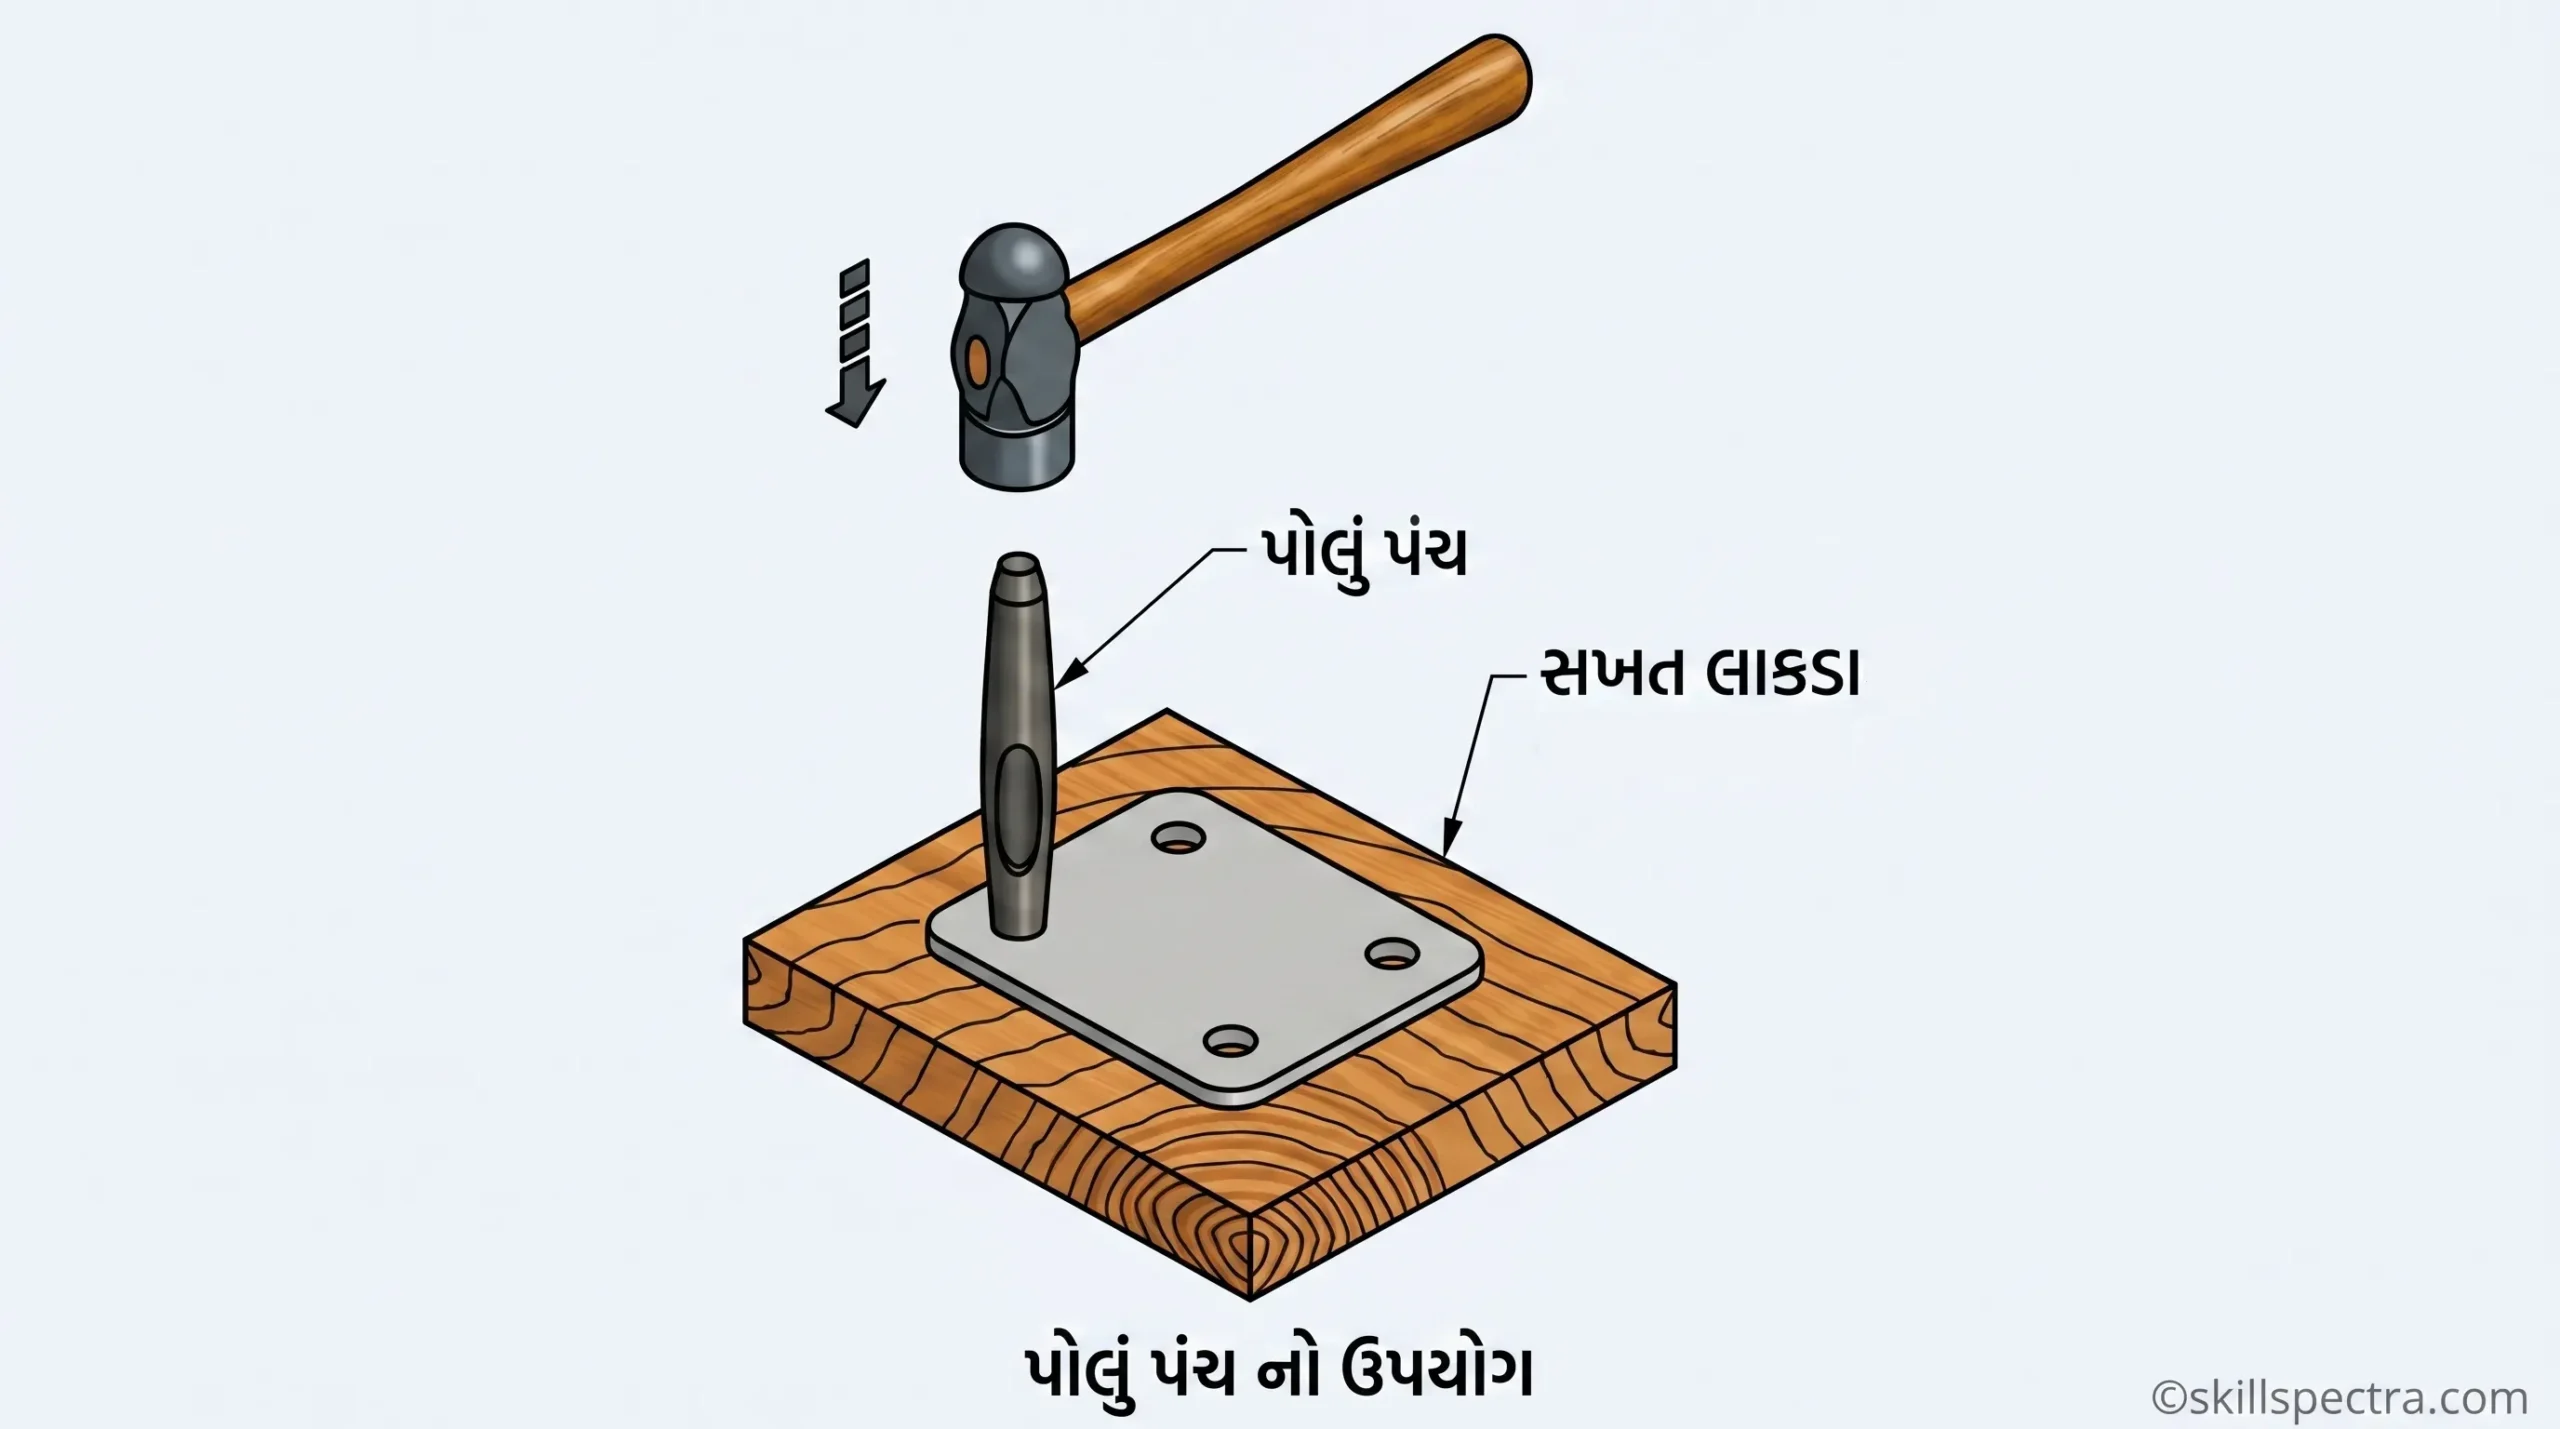
Hollow punch ⭕
આ punches નો ઉપયોગ પાતળી sheet metal, ચામડું (leather), પ્લાસ્ટિક, કોર્ક વગેરેમાં હોલ પાડવા માટે થાય છે. Gaskets, seals અને spacers બનાવવા માટે hollow punches નો ઉપયોગ થાય છે.
જ્યારે solid અથવા hollow punches નો ઉપયોગ કરતા હોઈએ, ત્યારે મટીરીયલને લાકડાના બ્લોક (જેના grain નો છેડો ઉપર હોય) અથવા સીસા (lead) ના સપોર્ટ પર રાખવું જોઈએ. આનાથી પંચિંગ કરતી વખતે પંચની ટીપ (tip) ને નુકસાન થતું અટકશે.
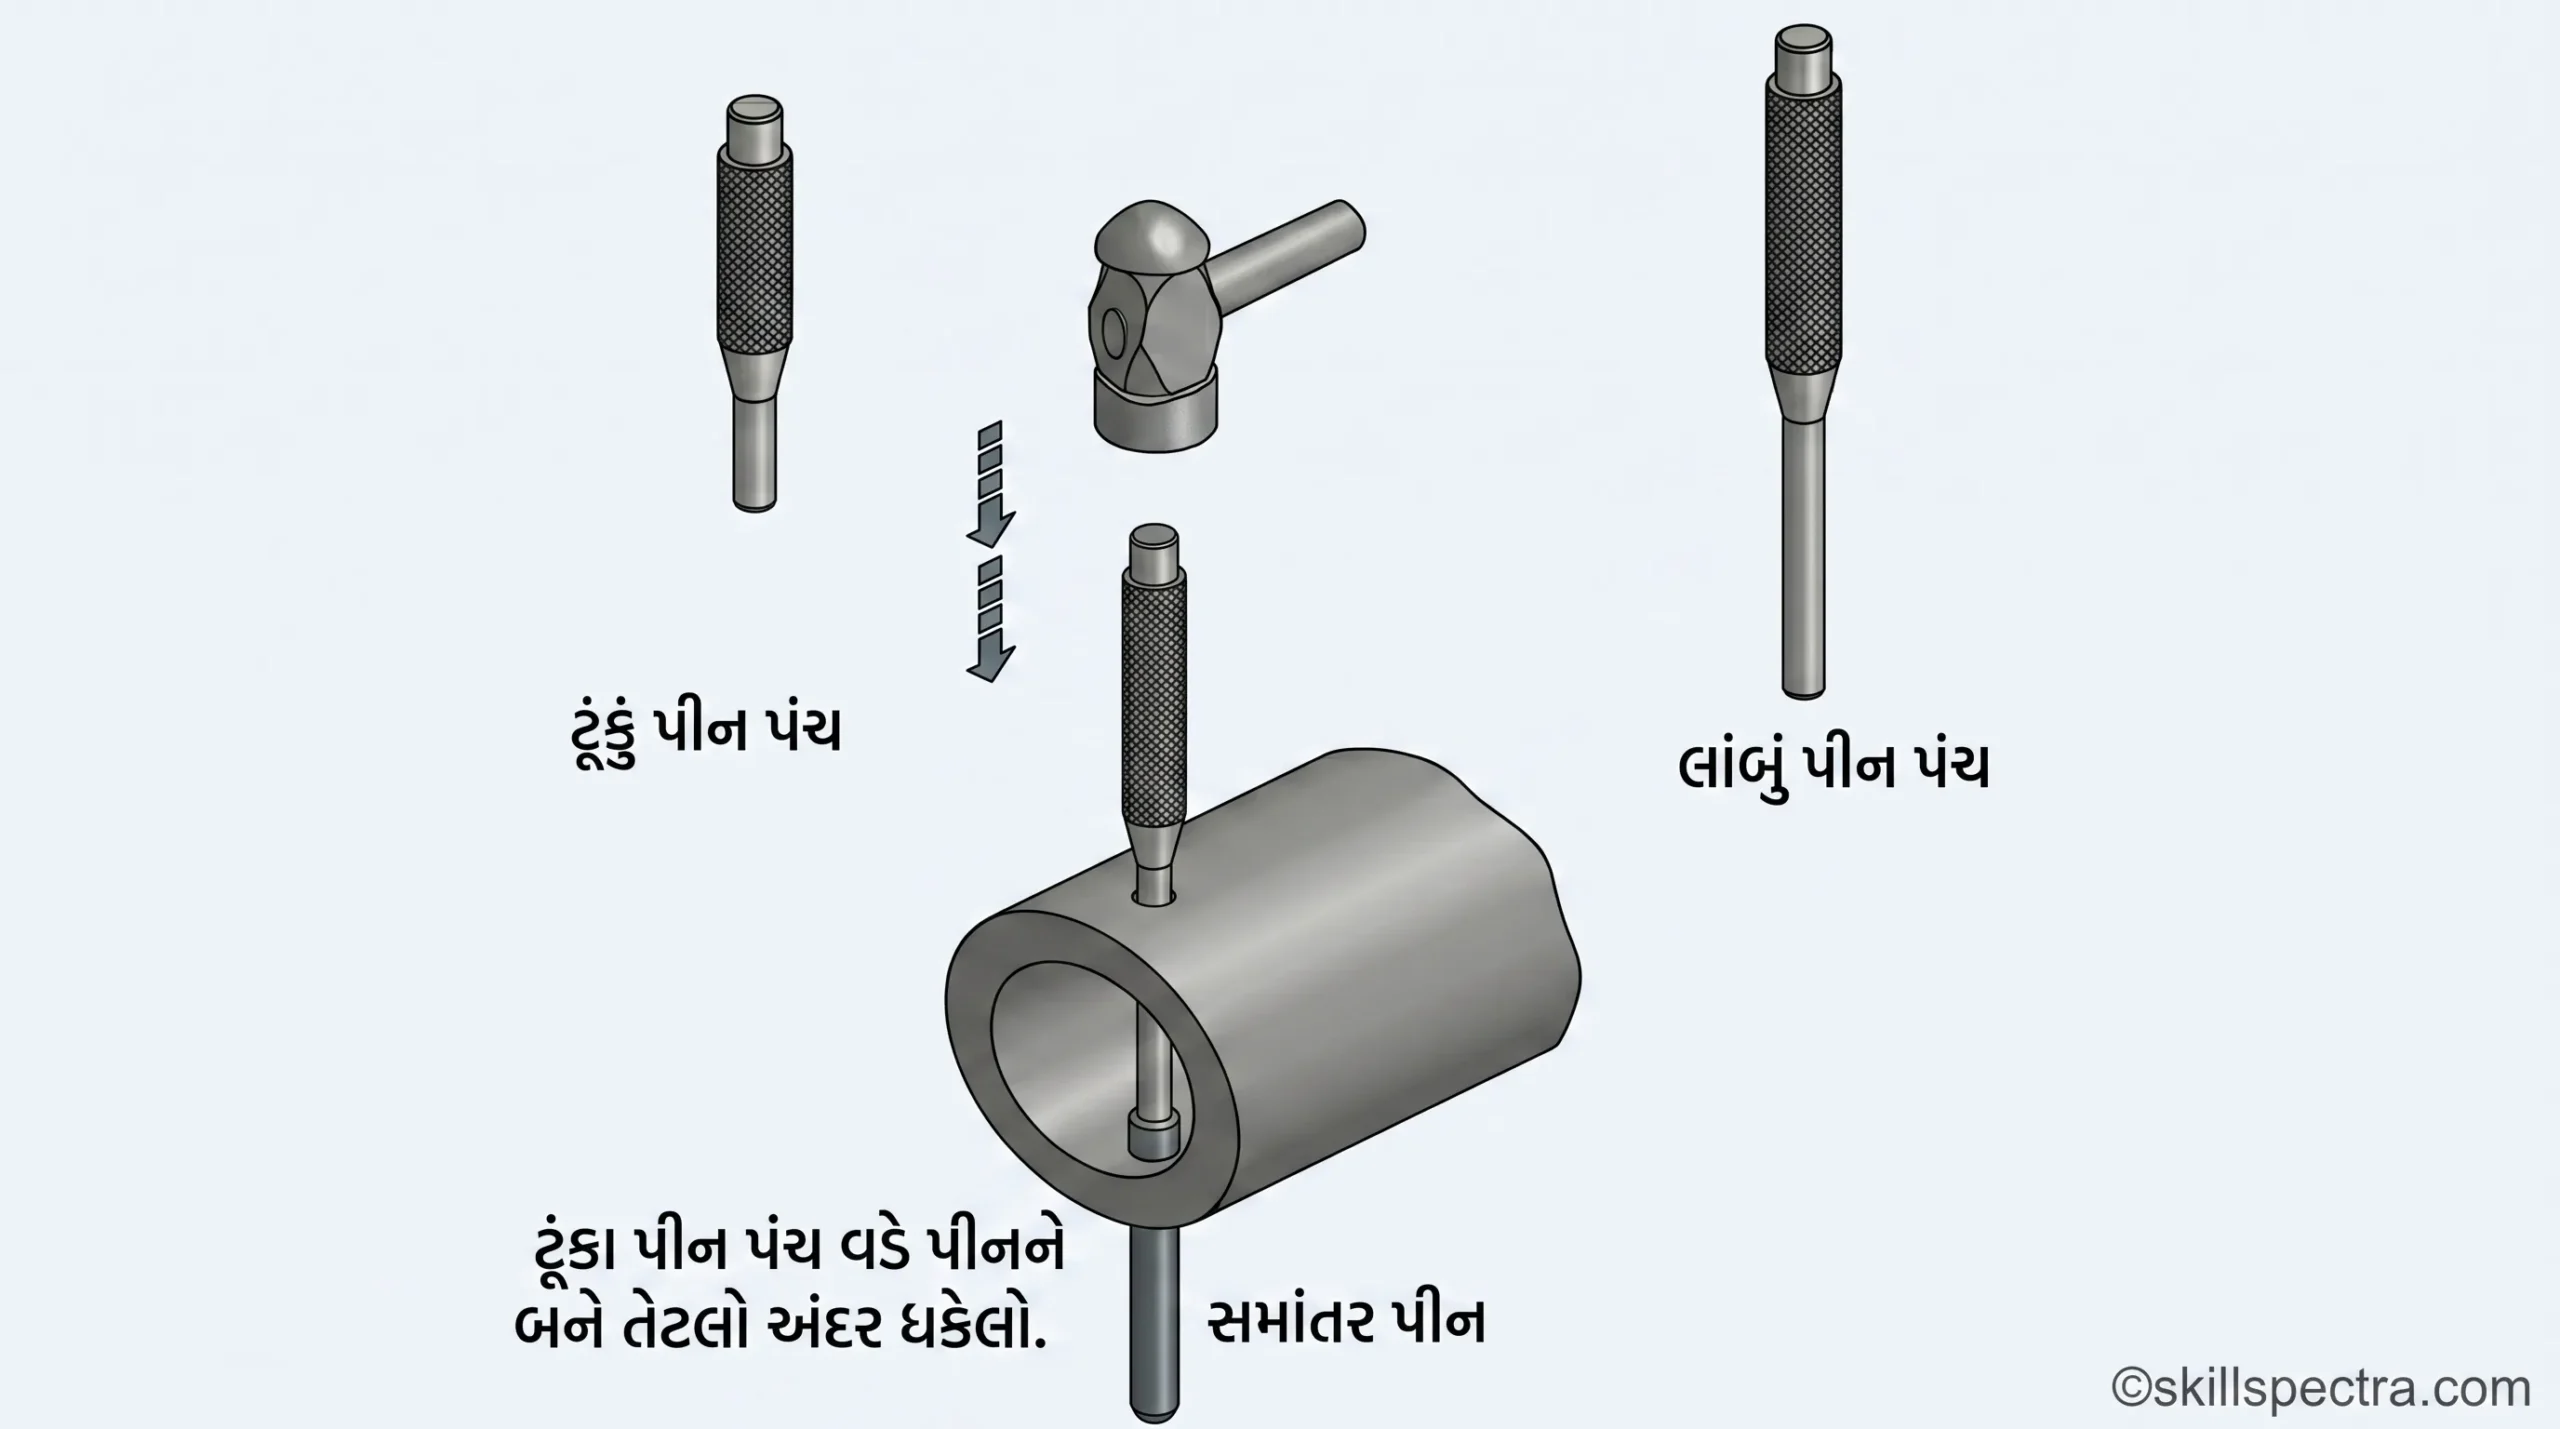
Pin punches
📌Pin punches નો ઉપયોગ લોકેટિંગ અથવા લોકીંગ પિન, ડાબેલ (dowels) અને રિવેટ્સ (rivets) ને તેમના હોલમાંથી બહાર કાઢવા માટે થાય છે.
Pin punches 3, 4, 5, 6 અને 8 mm ના વ્યાસવાળા 5 પિનના સેટમાં ઉપલબ્ધ હોય છે, જેની body knurled હોય છે અને લંબાઈ આશરે 150 mm હોય છે.
📍 Chisel (છીણી) 🛠️
Objectives: At the end of this lesson you shall be able toઉદ્દેશ્યો: આ લેસનના અંતે તમે સમર્થ હશો:
- List the uses of a cold chisel (cold chisel ના ઉપયોગોની યાદી બનાવવા)
- Name the parts of a cold chisel (cold chisel ના ભાગોના નામ આપવા)
- State the different types of chisel (chisel ના વિવિધ પ્રકારો જણાવવા)
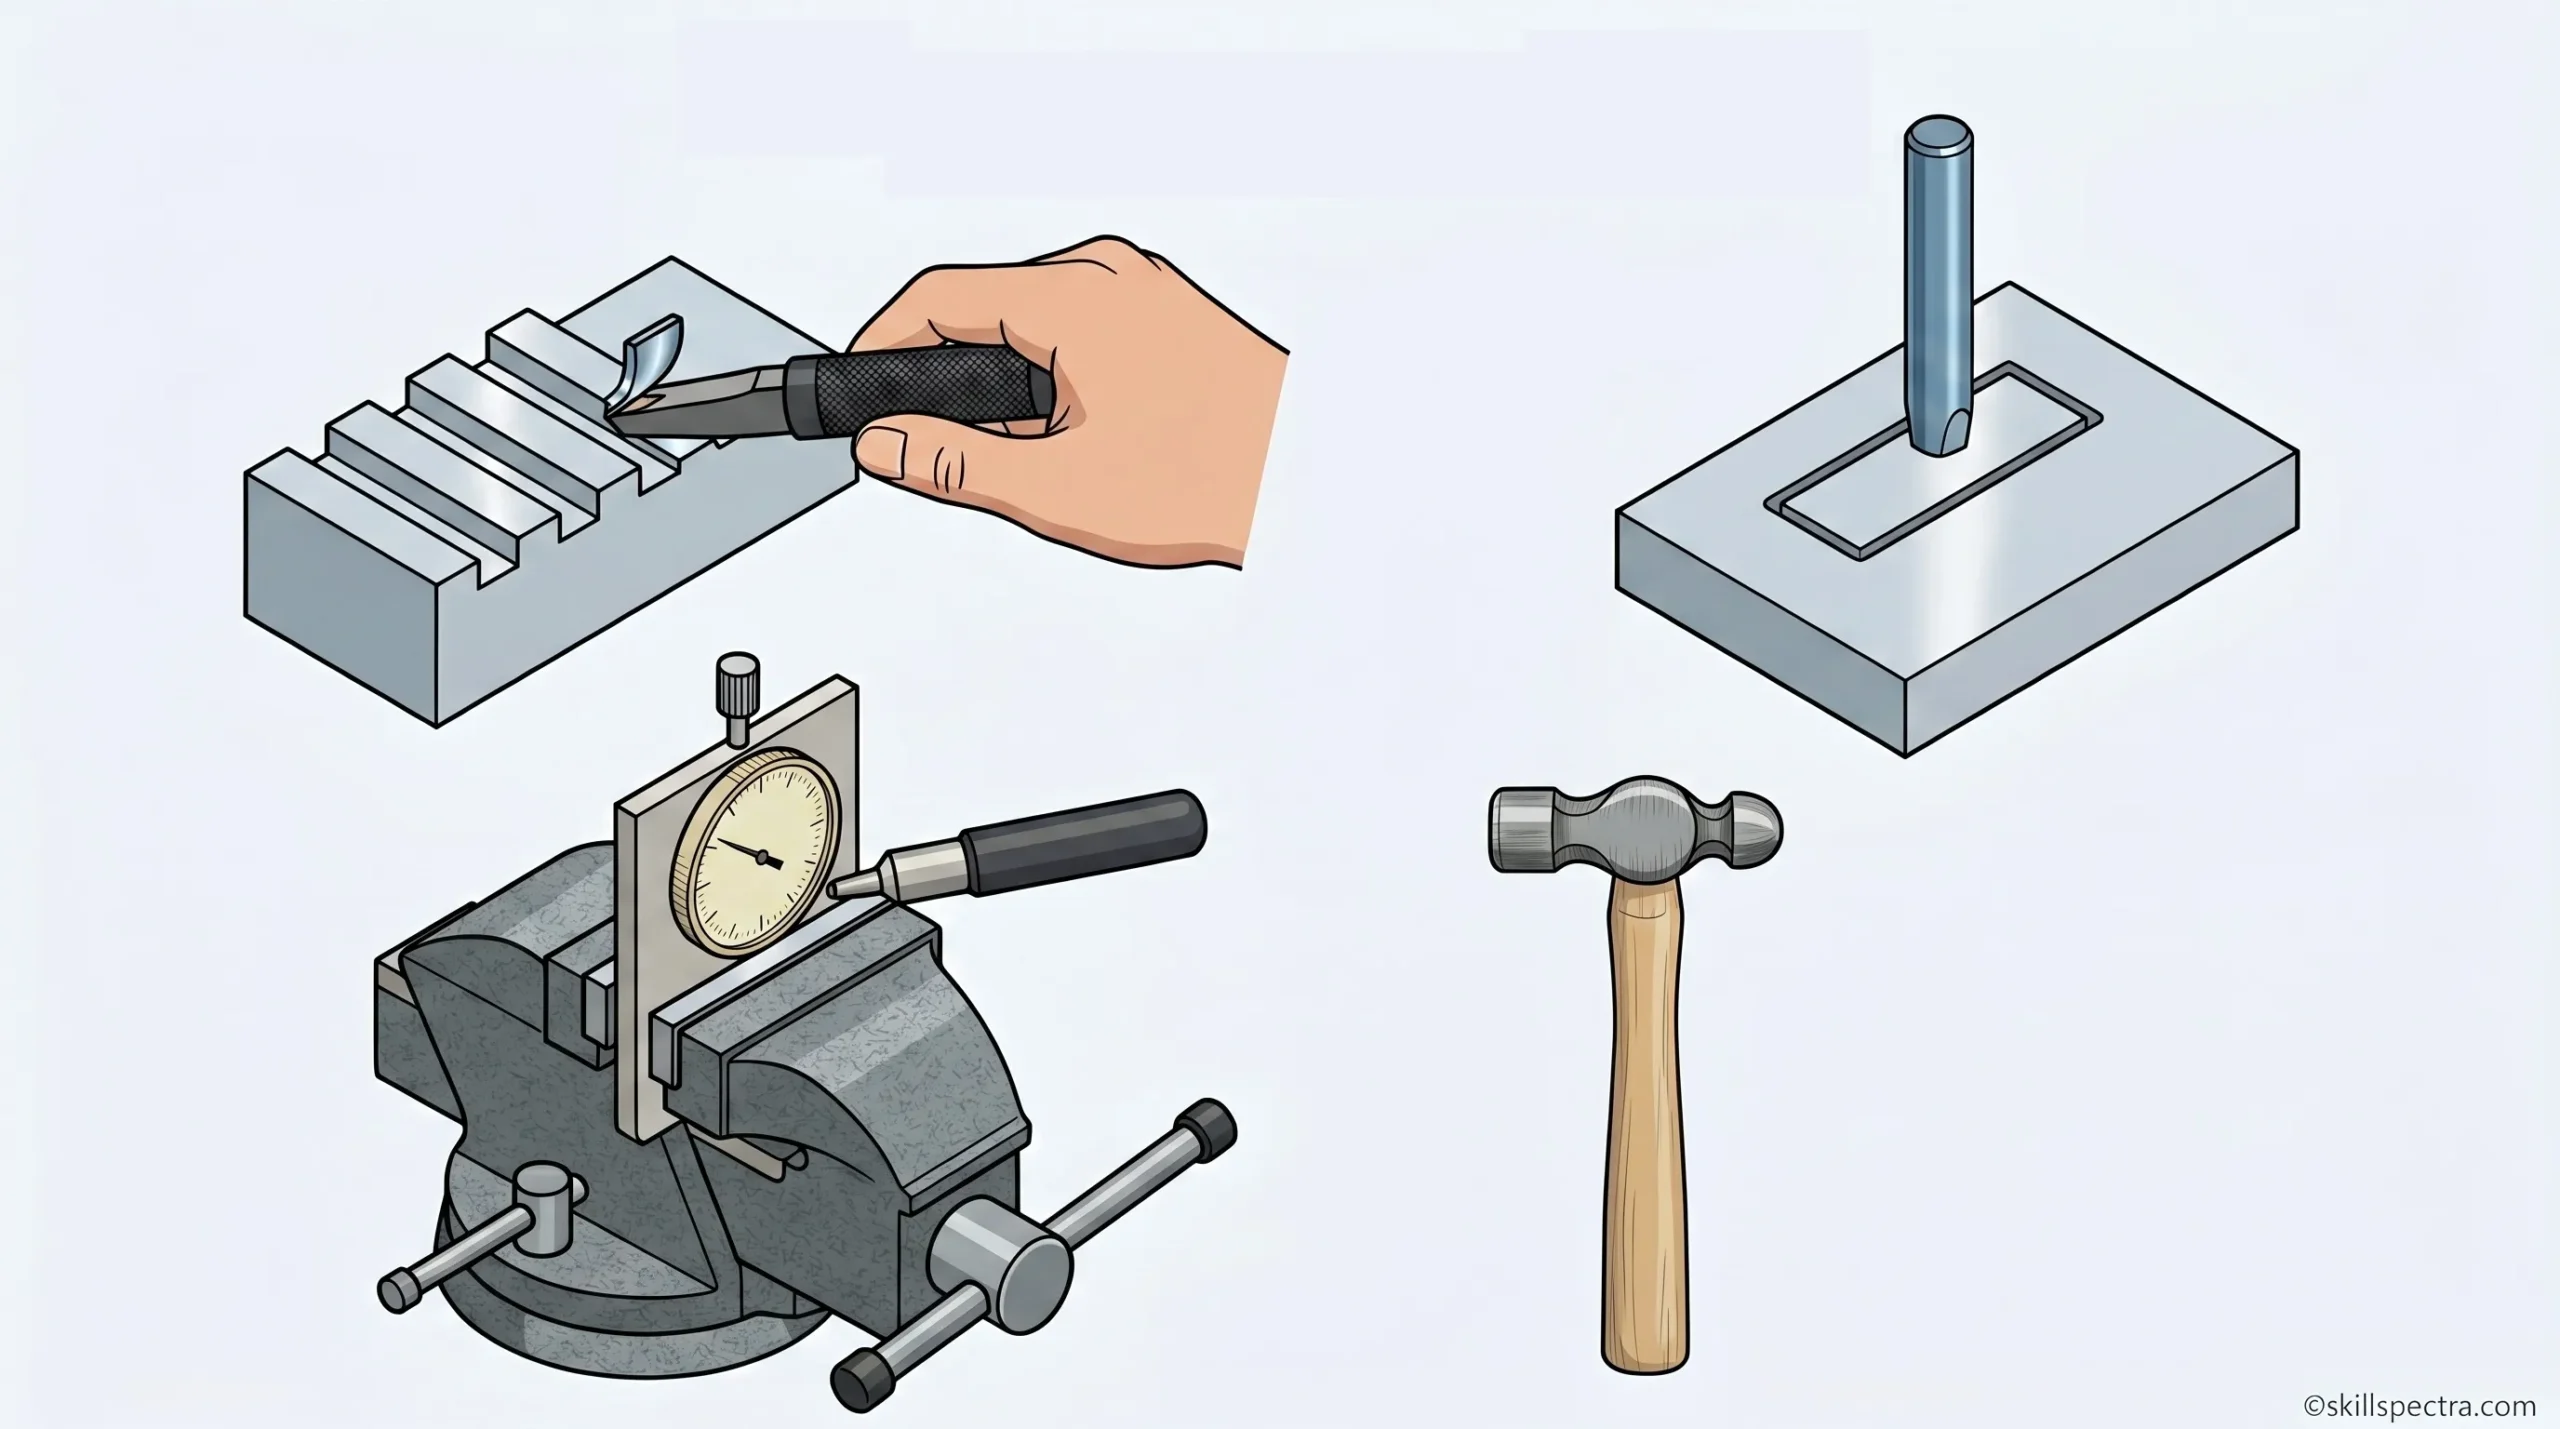
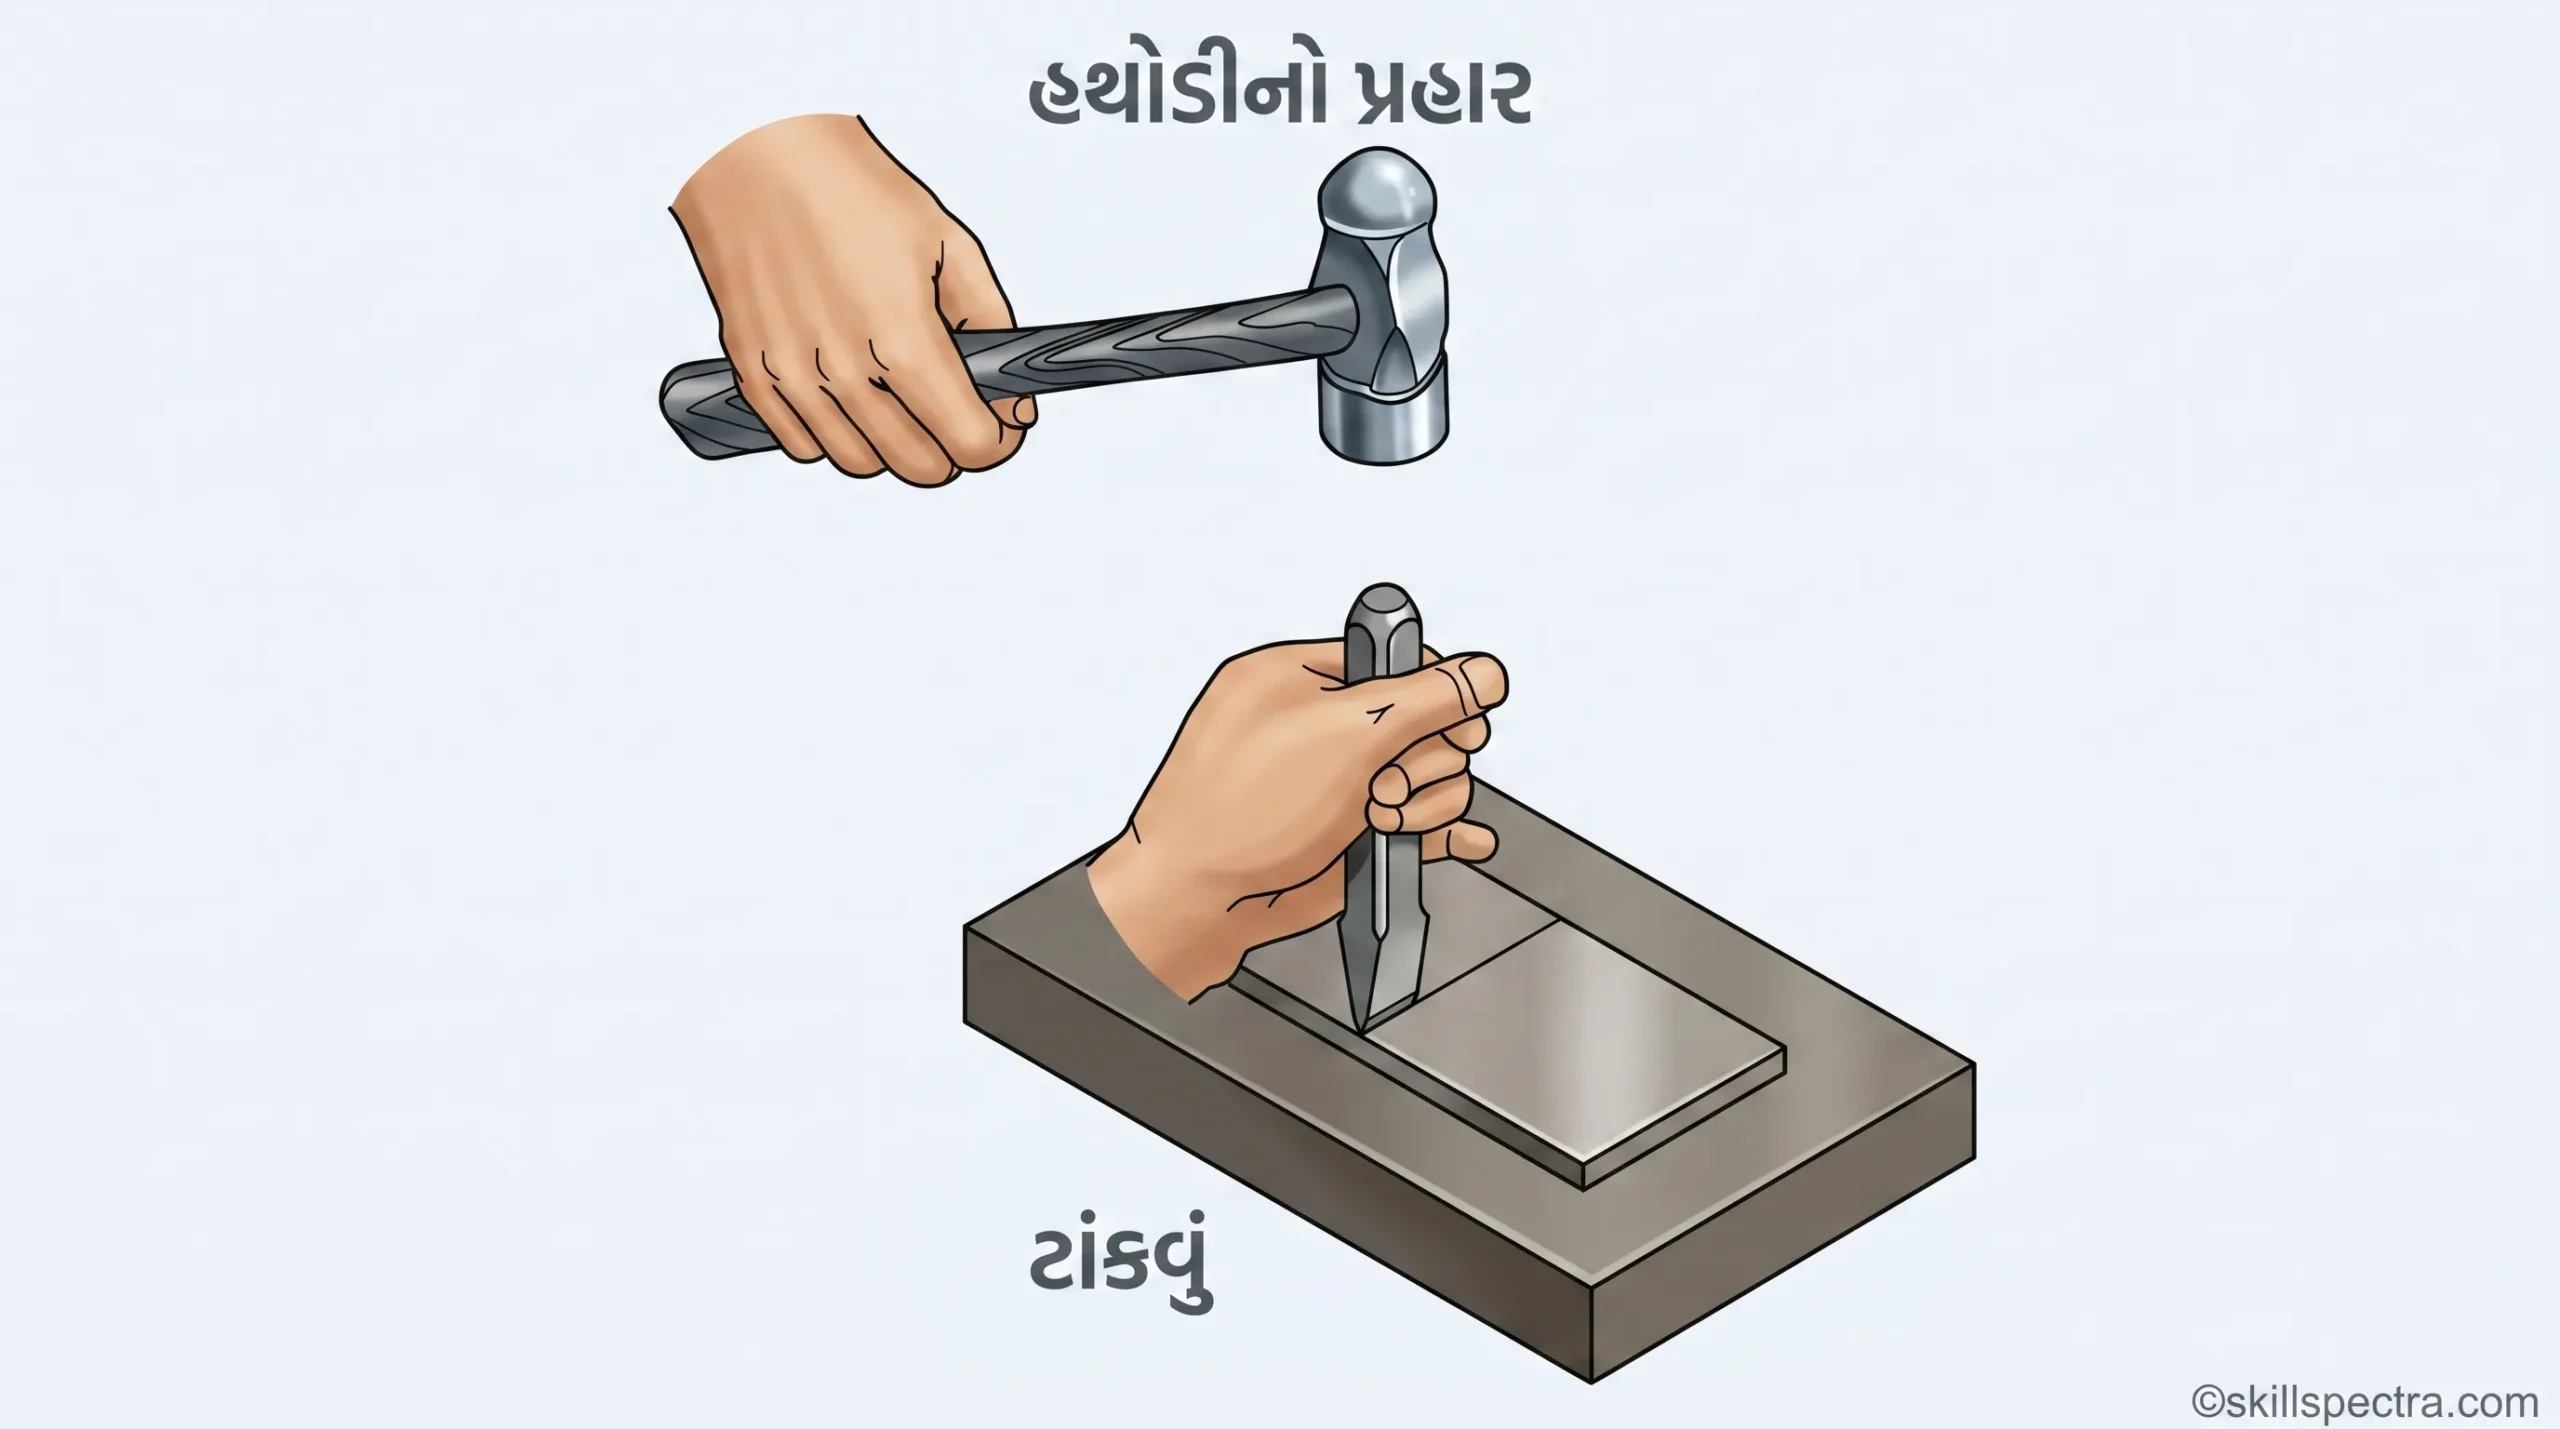
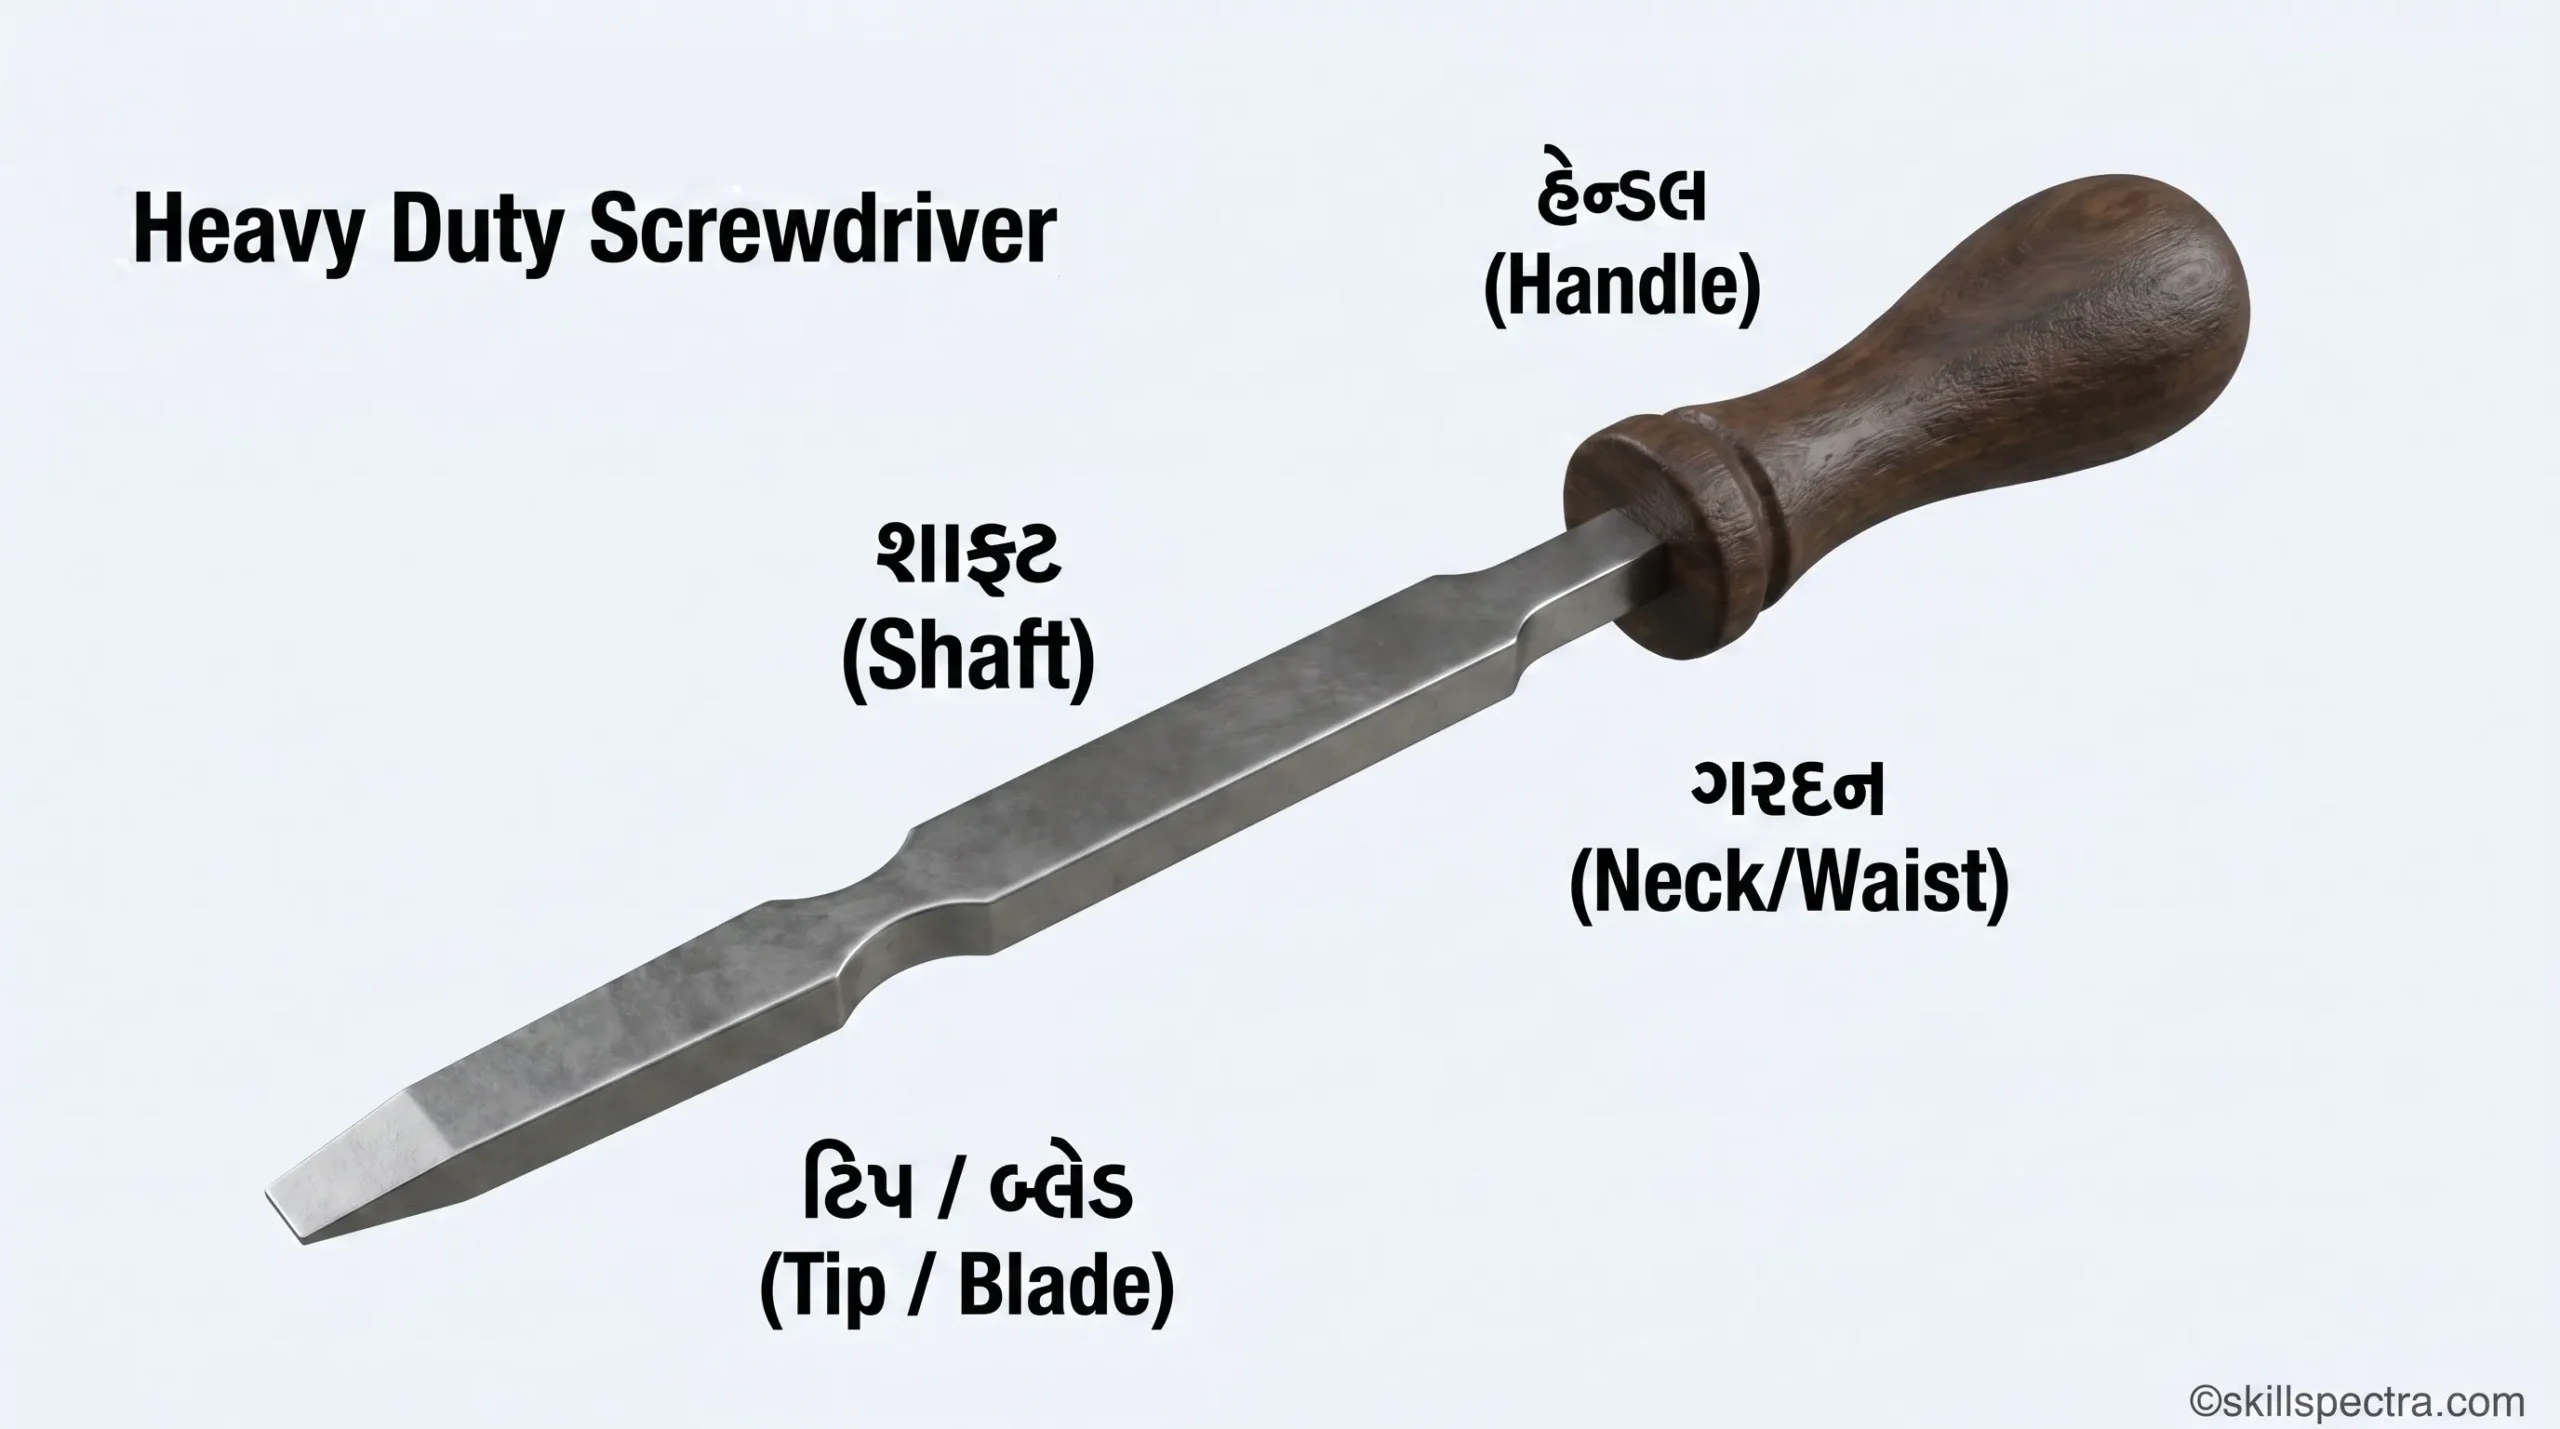
Cold chisel એ એક હાથથી ચલાવવાનું cutting tool છે જેનો ઉપયોગ ફિટર્સ દ્વારા chipping અને cutting off ઓપરેશન માટે કરવામાં આવે છે.
Chipping એ છીણી (chisel) અને હથોડી (hammer) ની મદદથી વધારાની ધાતુ દૂર કરવાની પ્રક્રિયા છે. ચિપિંગ કરેલી સપાટી ખરબચડી હોવાથી, તેને filing દ્વારા ફિનિશિંગ આપવું જોઈએ.
Parts of a chisel: Chisel ના ભાગો: Chisel માં નીચે મુજબના ભાગો હોય છે.
- Head (માથું)
- Body (શરીર)
- Point or cutting edge (પોઈન્ટ અથવા કટિંગ એજ)
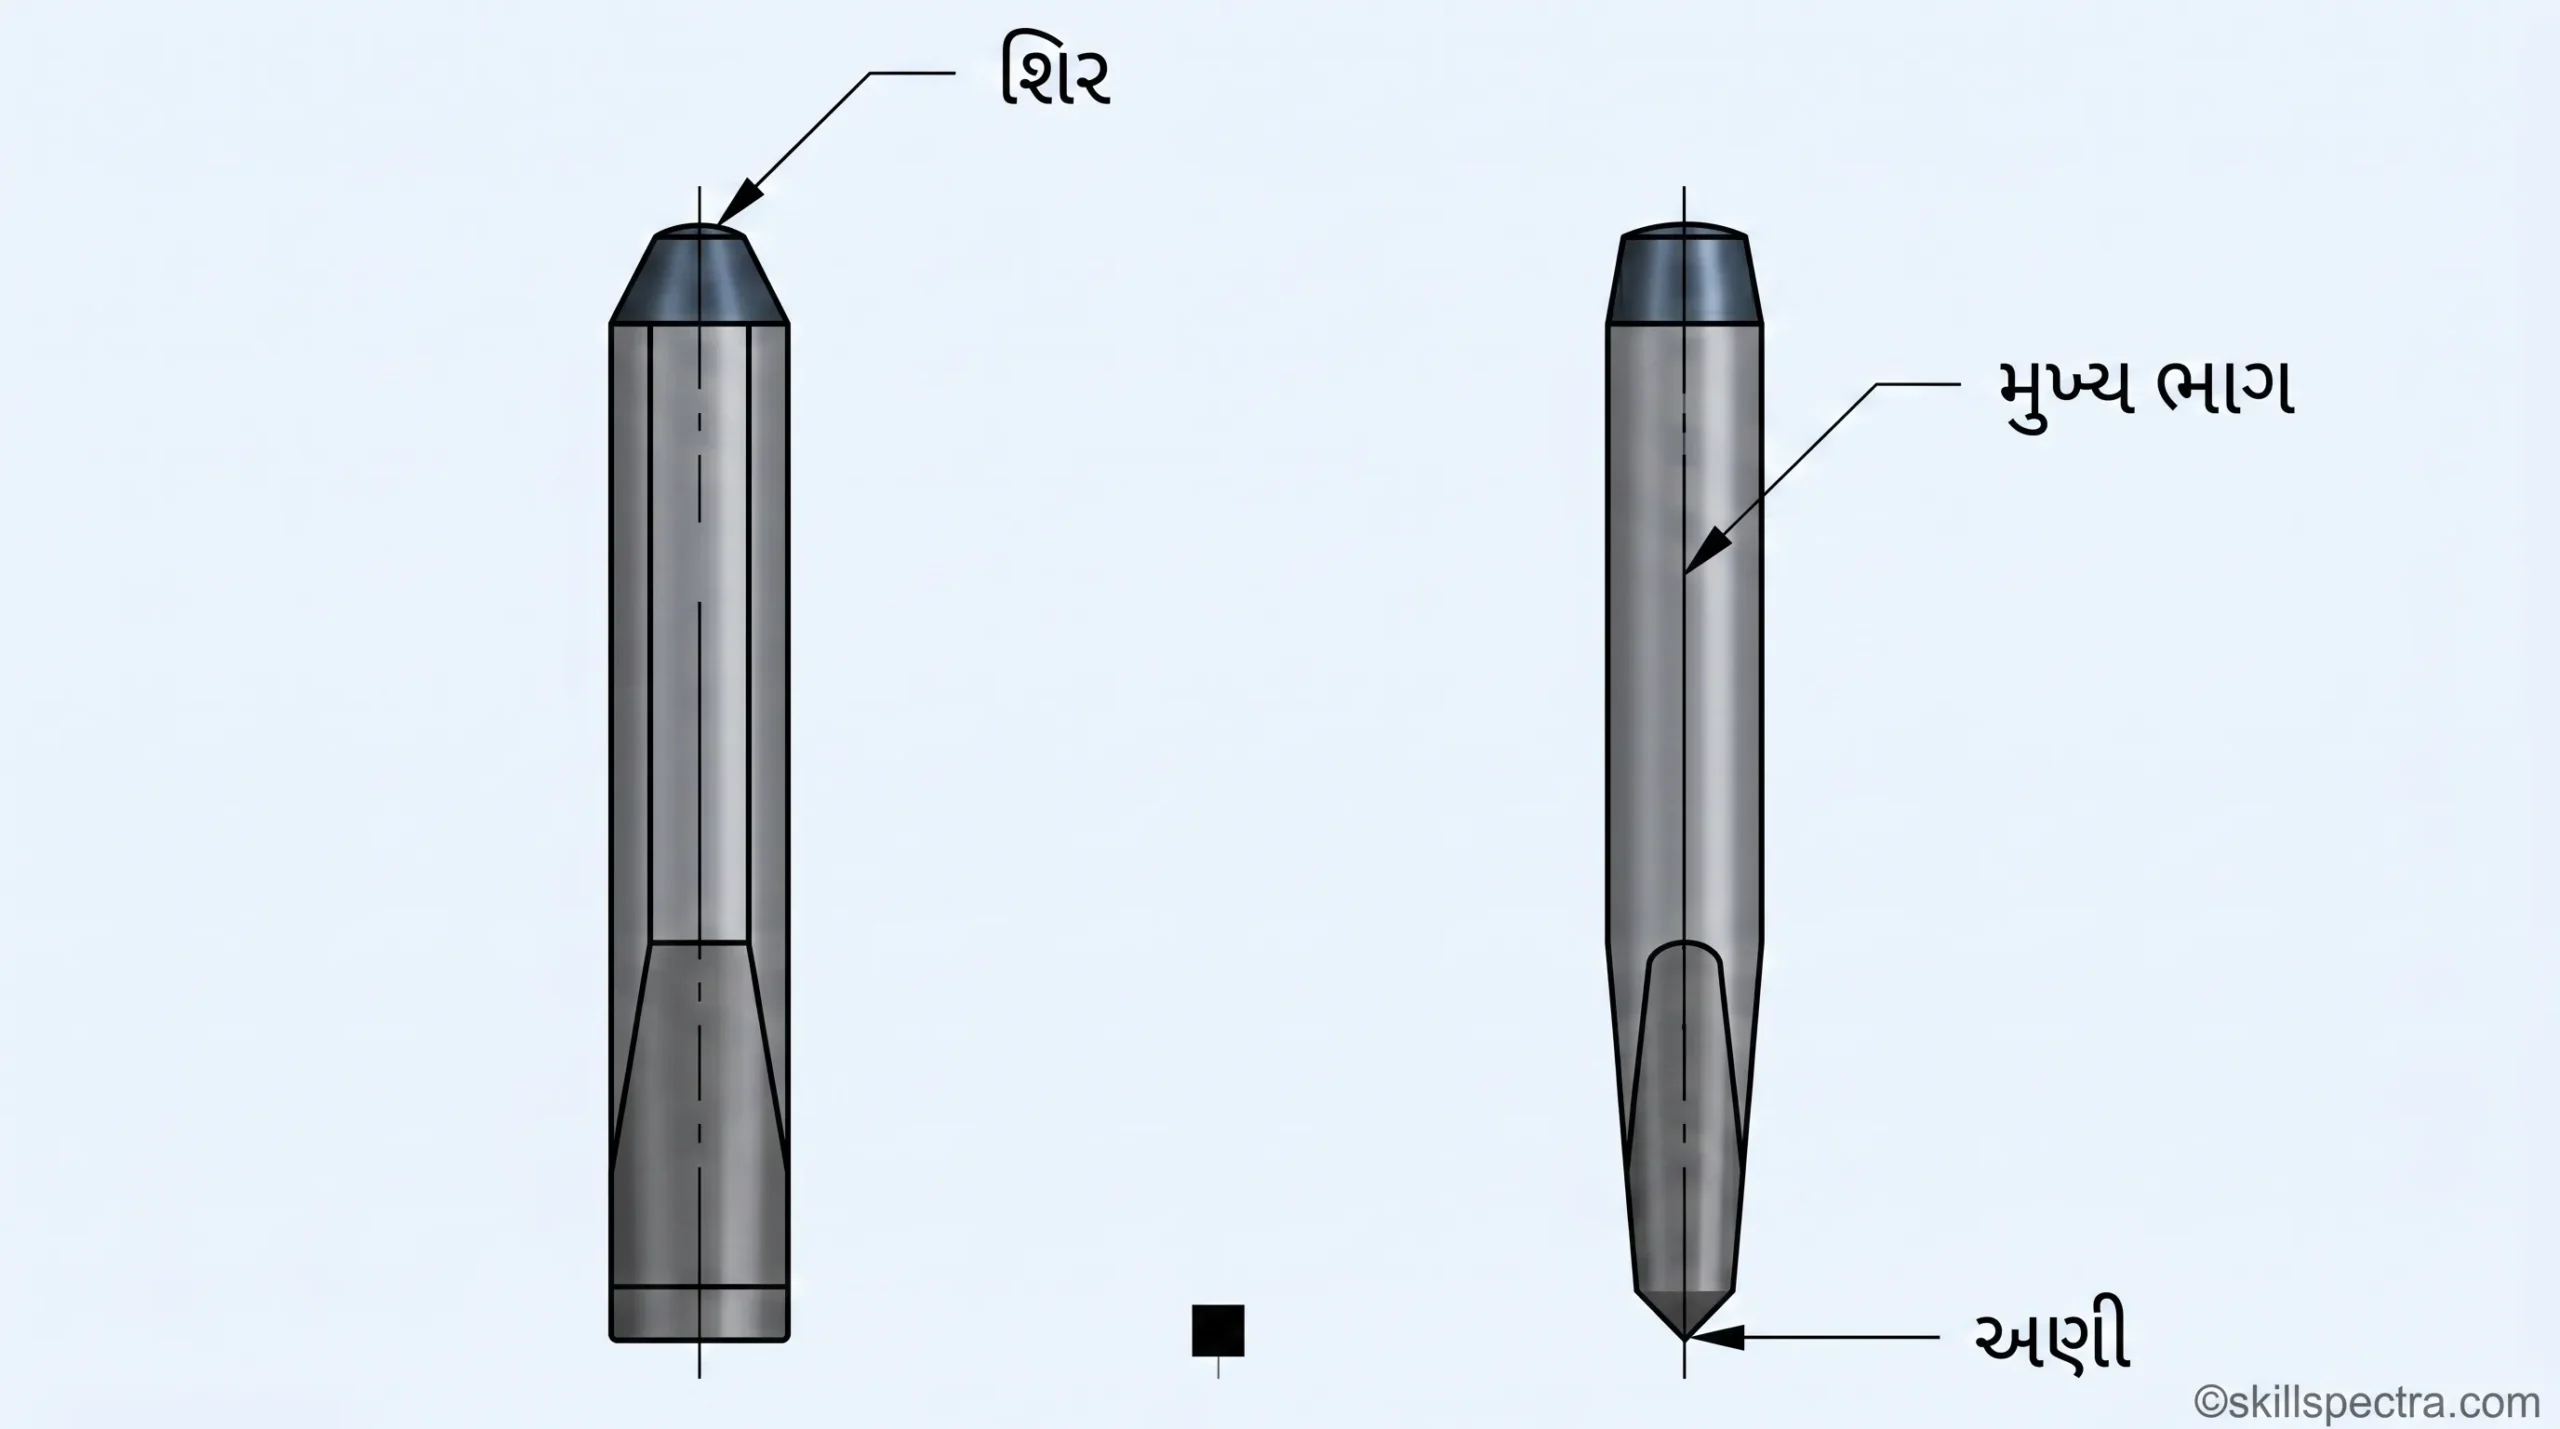
Chisels high carbon steel અથવા chrome vanadium steel માંથી બનાવવામાં આવે છે. Chisel નો cross-section સામાન્ય રીતે hexagonal (ષટ્કોણ) અથવા octagonal (અષ્ટકોણ) હોય છે. તેની cutting edge ને hardened અને tempered કરવામાં આવે છે.
Chisel ના સામાન્ય પ્રકારો: Chisel ના ચાર મુખ્ય પ્રકારો છે;
- Flat chisel (1)
- Cross-cut chisel (2)
- Half round nose chisel
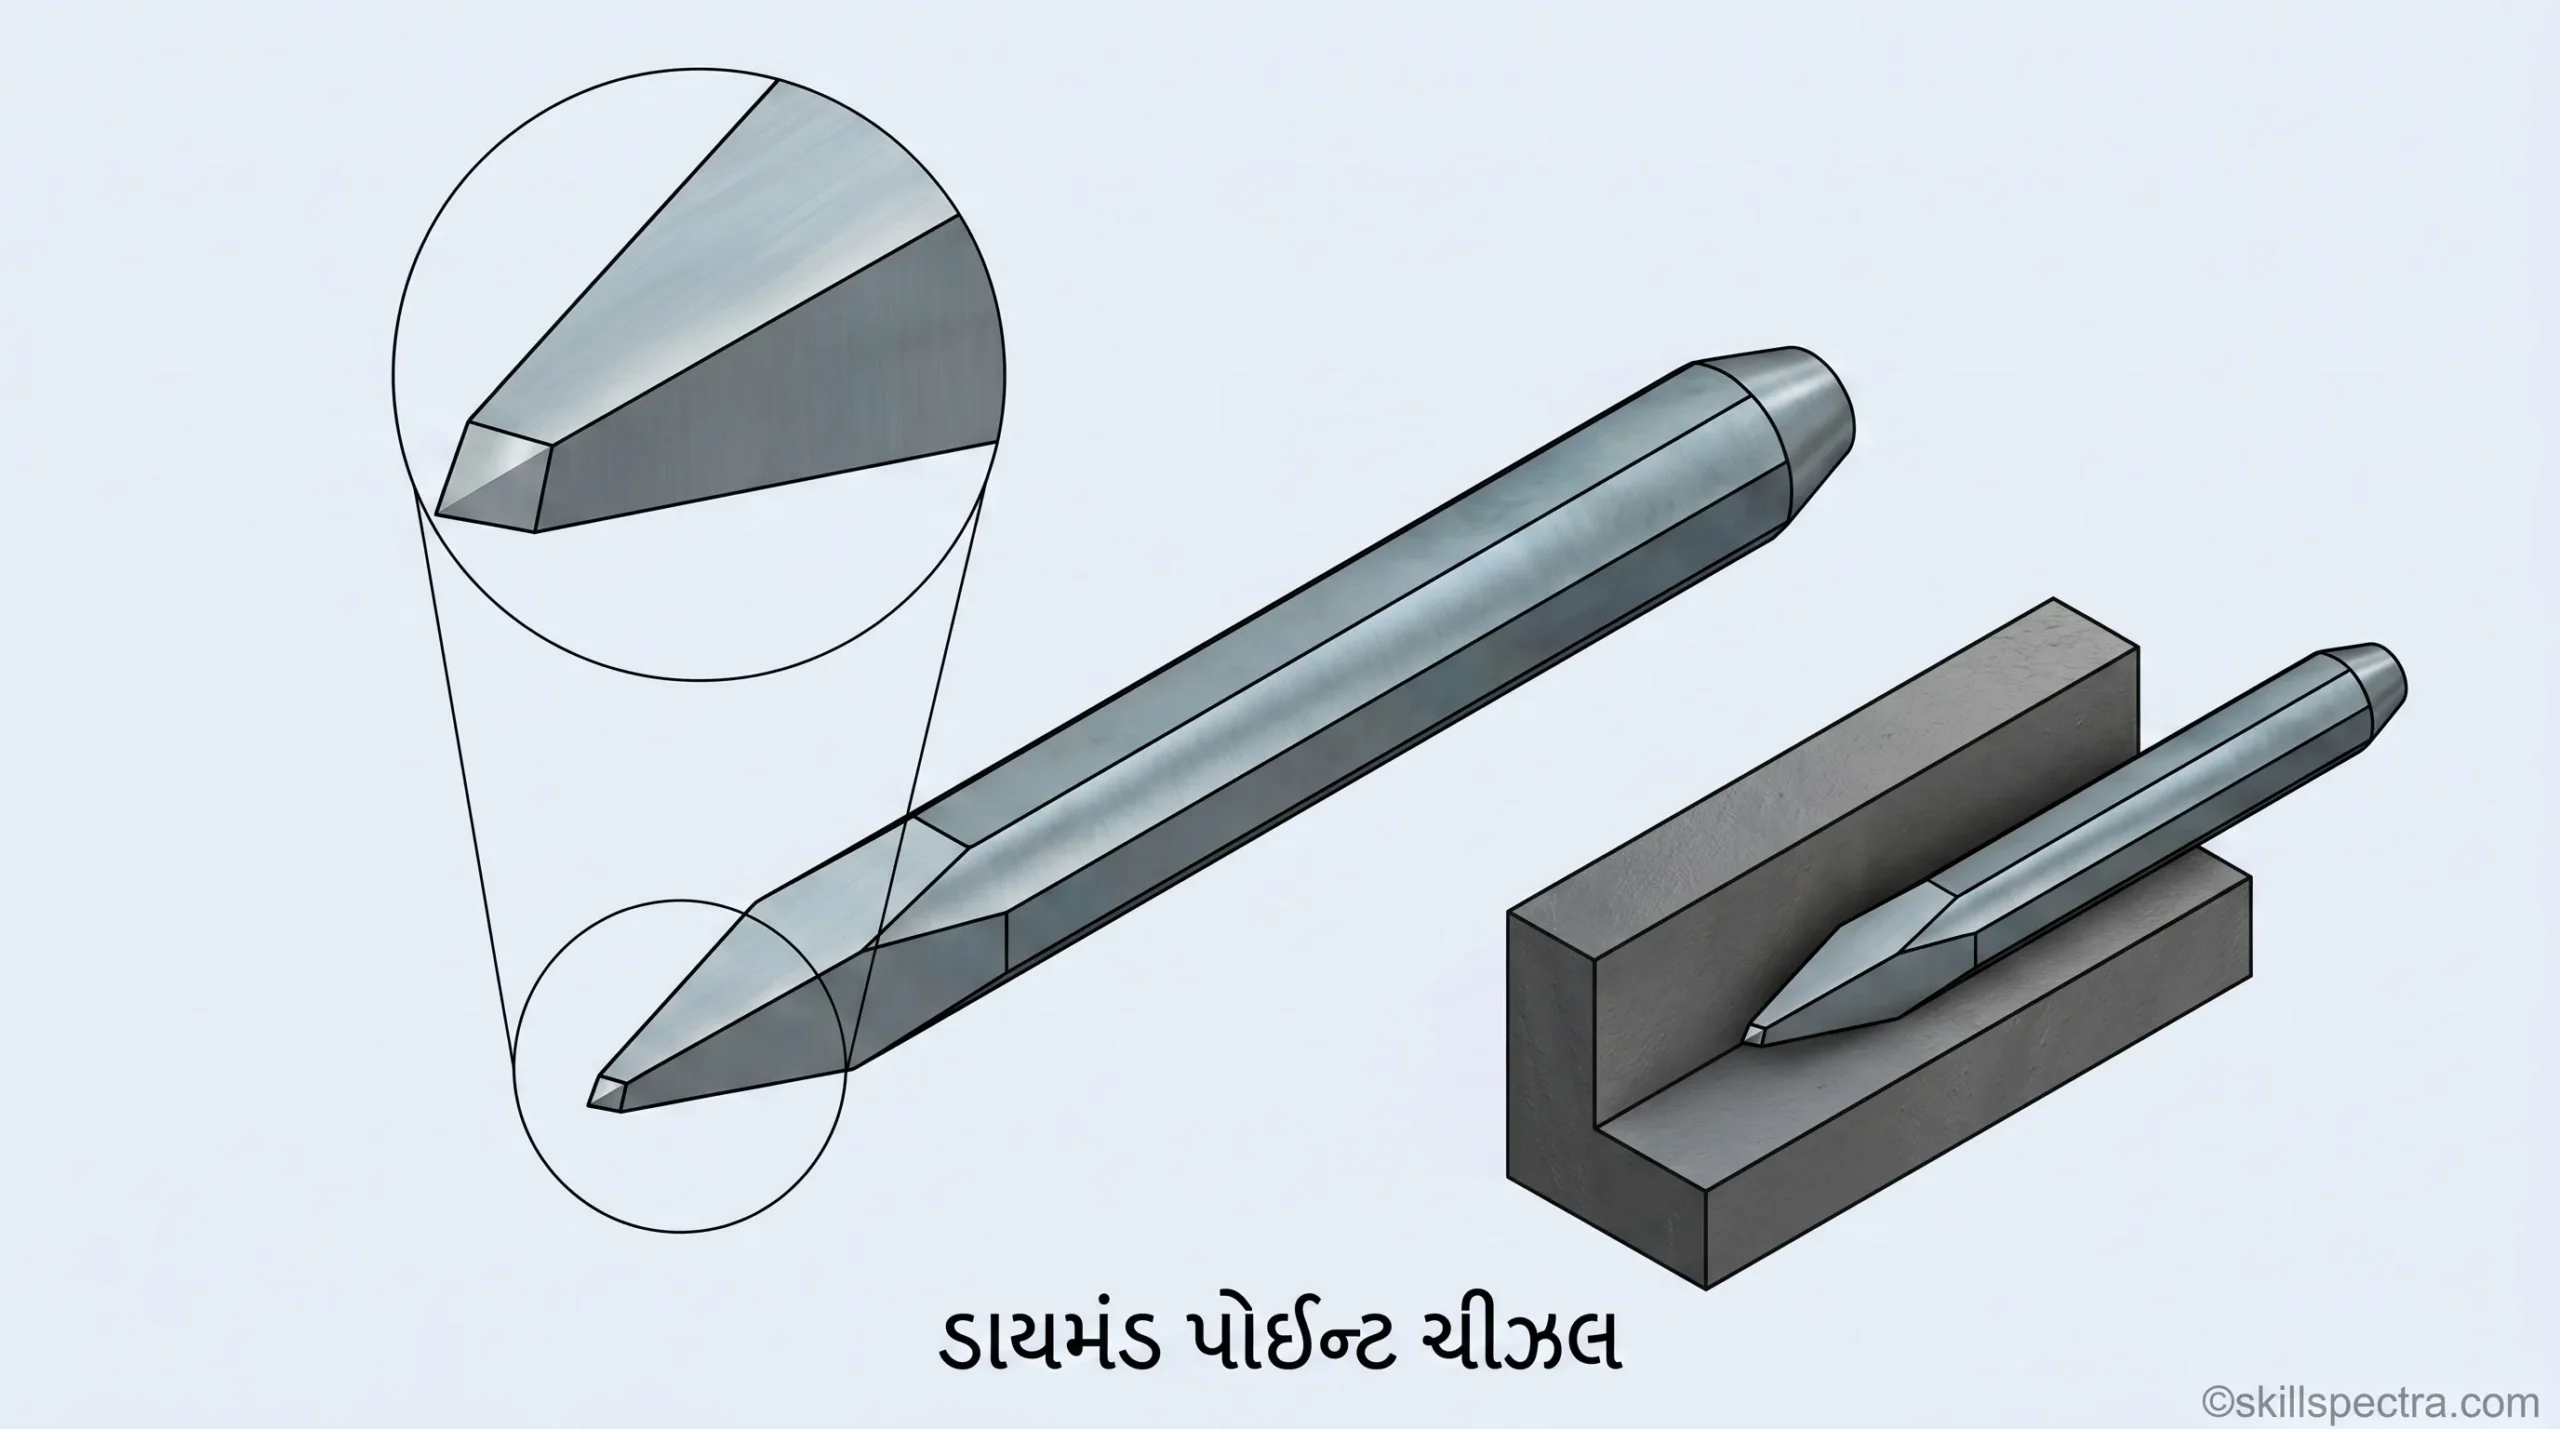
- Diamond point chisel
Flat chisel
These are used to remove metal from large flat surfaces and chip excess metal of weld joints and castings.
- આનો ઉપયોગ મોટી સપાટ સપાટીઓ પરથી ધાતુ દૂર કરવા અને weld joints તથા castings પરથી વધારાની ધાતુ કાઢવા માટે થાય છે.
Cross-cut or cape chisel:
These are used for cutting keyways, grooves and slots.
- Cross-cut અથવા cape chisel: આનો ઉપયોગ keyways, grooves અને slots કાપવા માટે થાય છે.

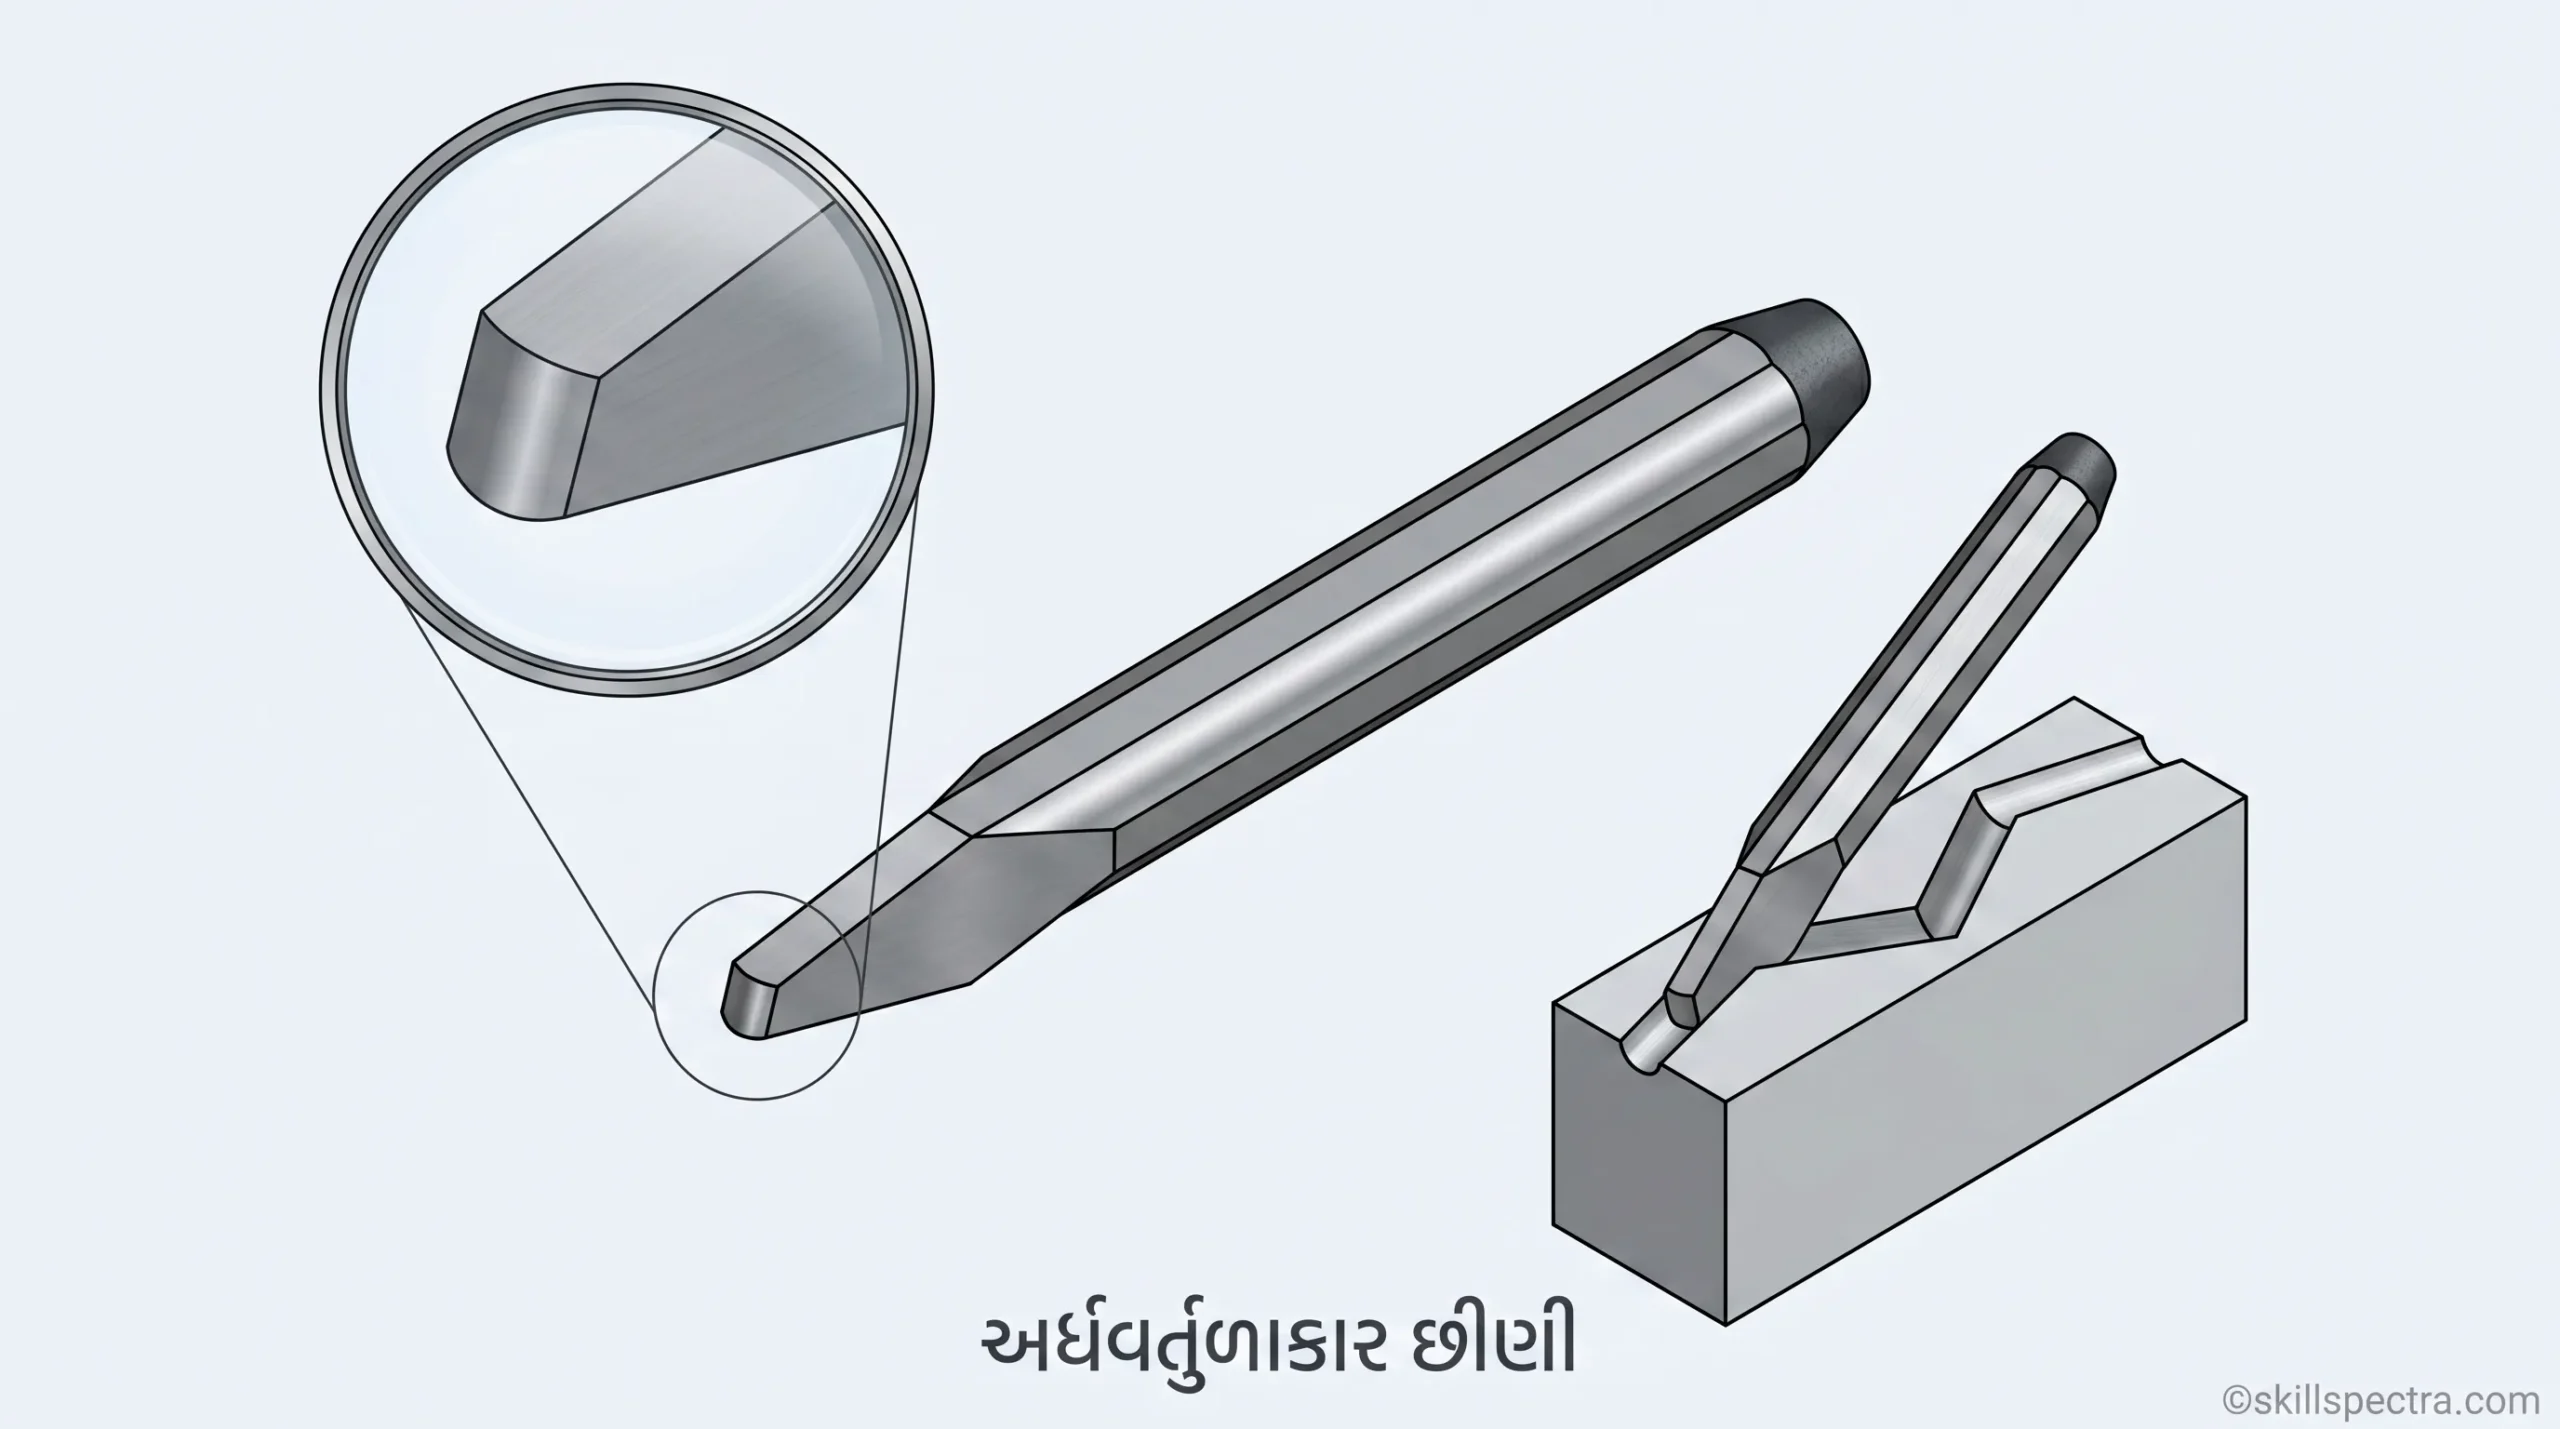
Half round nose chisel:
આ પ્રકારની છીણીનો ઉપયોગ વળાંકવાળી ખાંચો અથવા ઓઈલ ગ્રીવ્સ કાપવા માટે થાય છે.
Diamond point chisels:
ખૂણાઓ પર મટીરીયલને ચોરસ આકાર આપવા માટે આનો ઉપયોગ થાય છે.
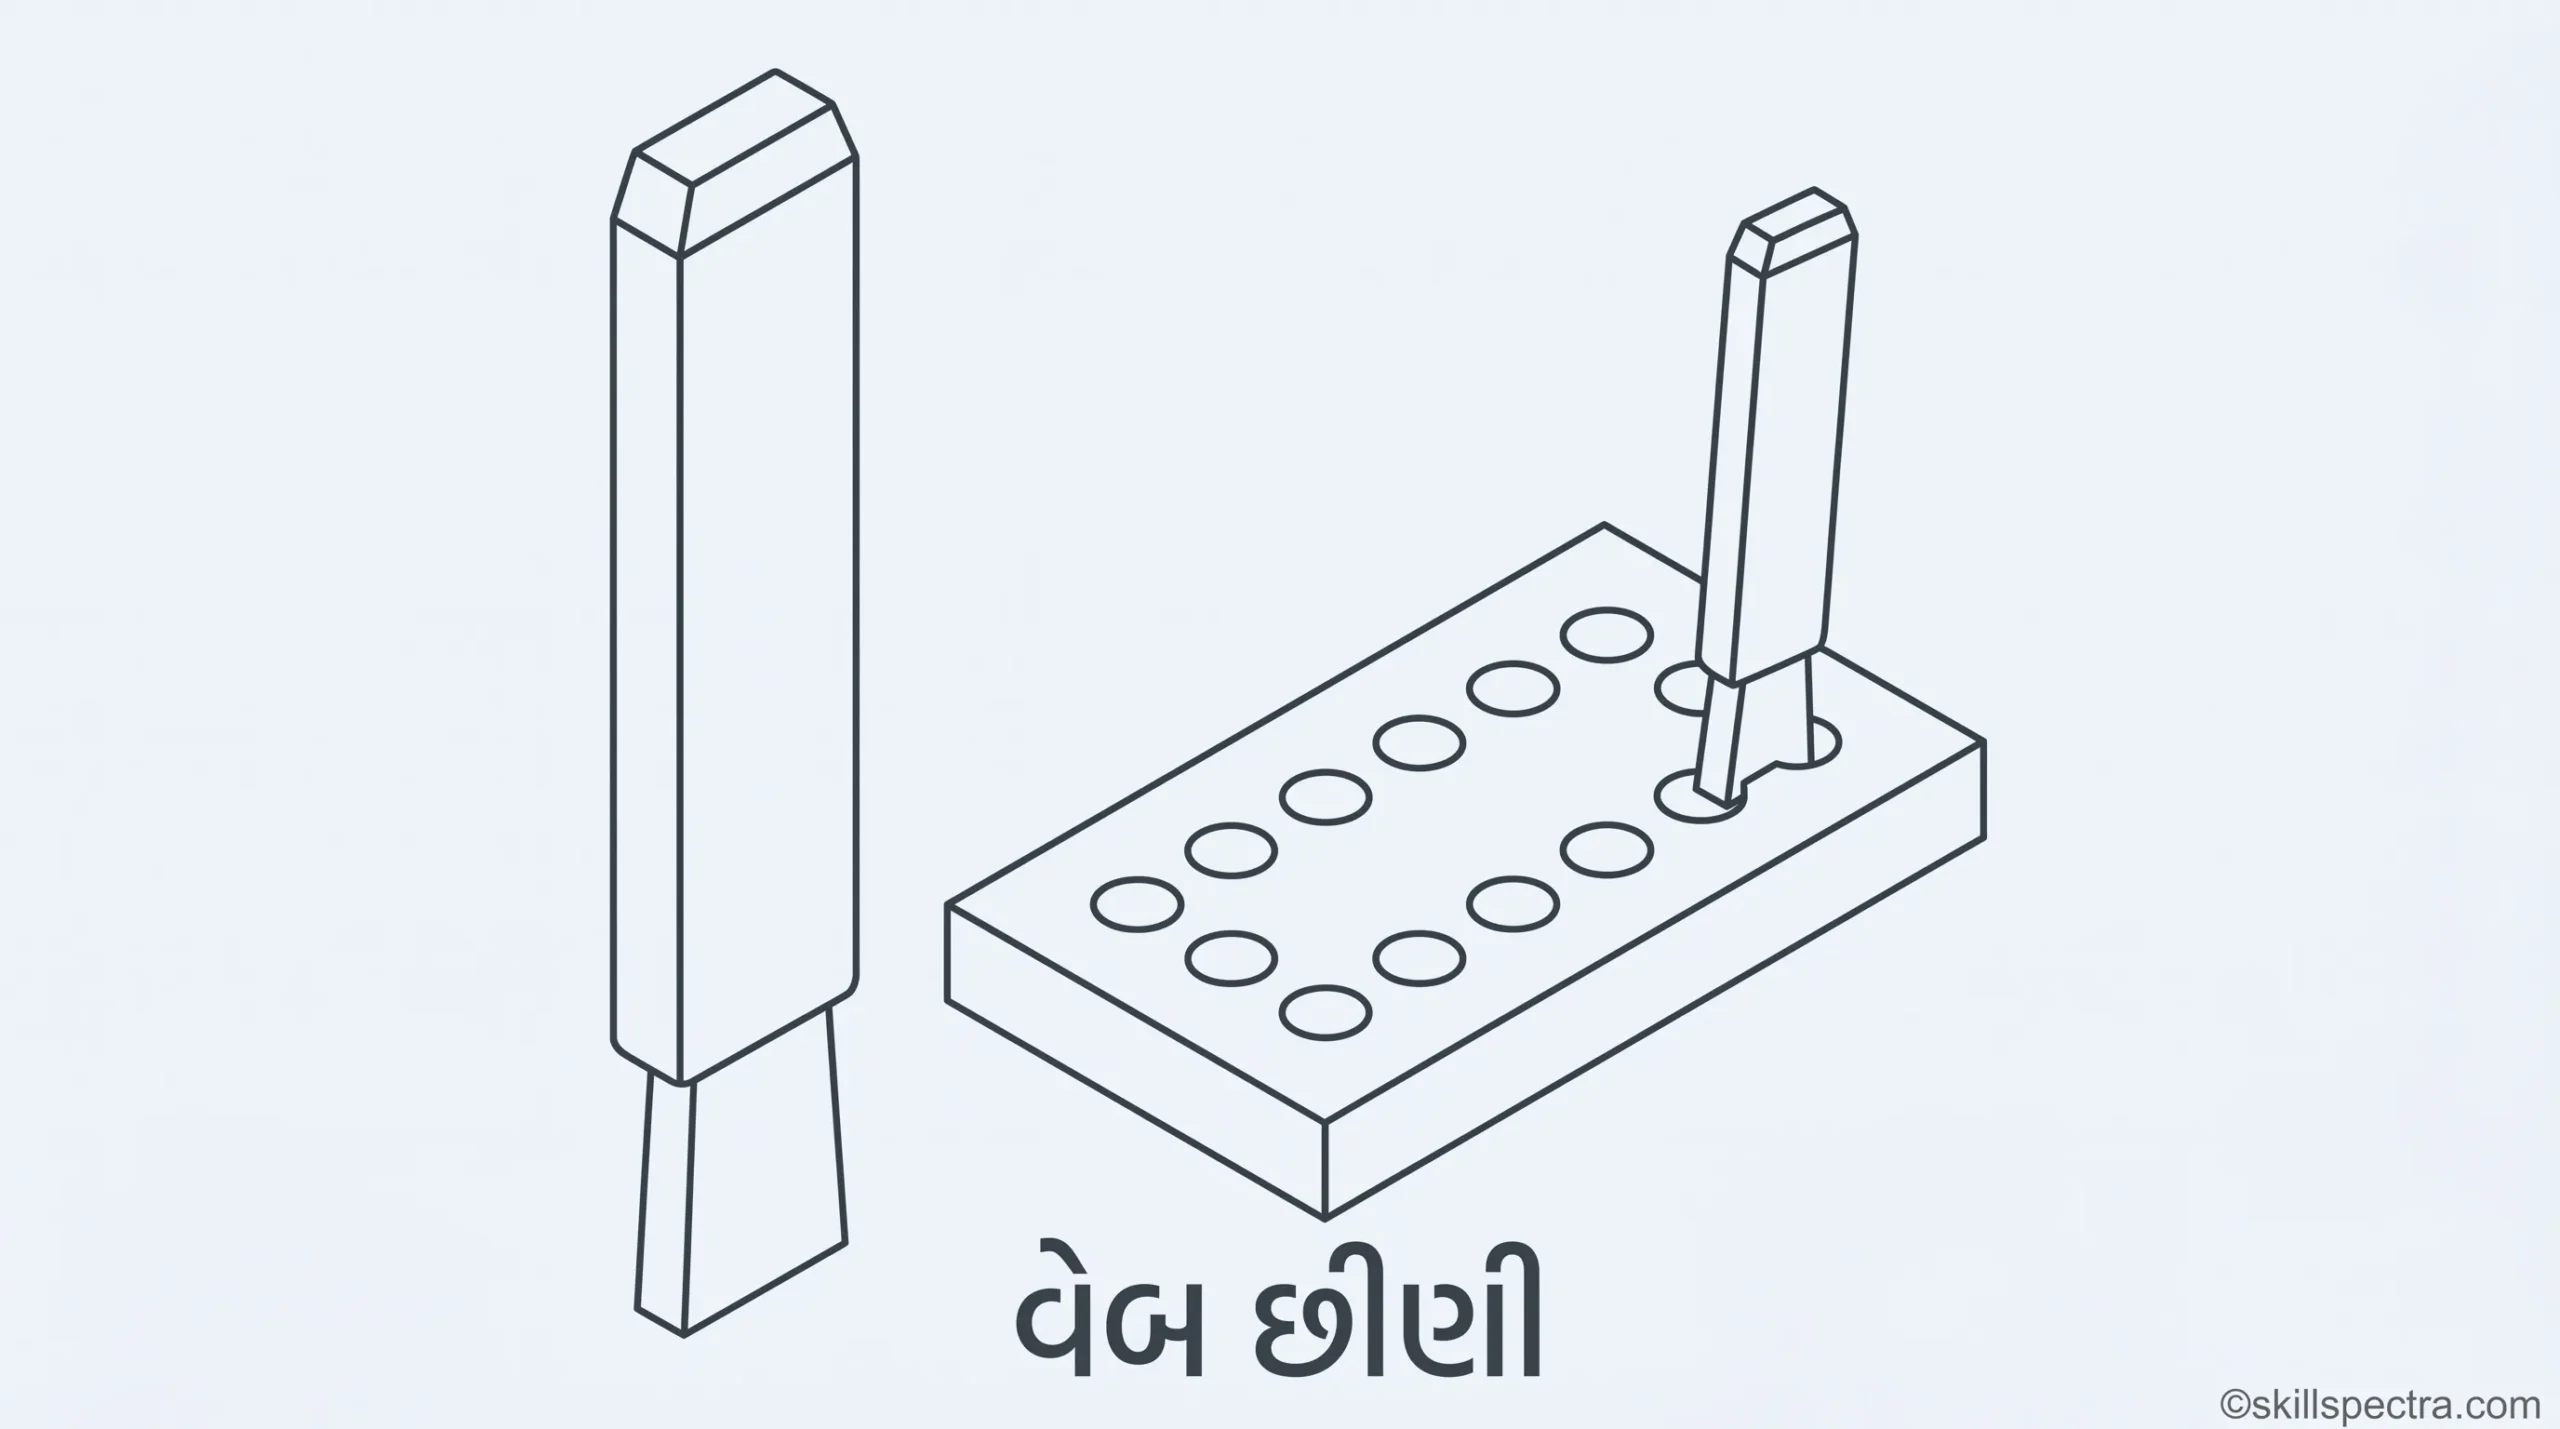
Web chisel/punching chisel:
ચેઈન ડ્રિલિંગ કર્યા પછી ધાતુને અલગ કરવા માટે આનો ઉપયોગ થાય છે.
(Chisel ને આ મુજબ વર્ગીકૃત કરવામાં આવે છે:
- Length (લંબાઈ)
- Width of cutting edge (કટિંગ એજની પહોળાઈ)
- Type (પ્રકાર)
- Cross-section of body (બોડીનો આકાર)
Angles of Chisels (Chisels ના ખૂણાઓ) 📐
Objectives: આ પાઠના અંતે તમે નીચેની બાબતો શીખી શકશો:
- અલગ-અલગ મટીરીયલ માટે પોઈન્ટ એંગલ પસંદ કરી શકશો.)
- Chisel ના વિવિધ કટિંગ એંગલ્સ જણાવી શકશો.
- Rake અને Clearance એંગલની અસરો જણાવી શકશો.
Point angles and materials (Fig 1)
Chisel નો સાચો પોઈન્ટ એંગલ કયા મટીરીયલ પર કામ કરવાનું છે તેના પર આધાર રાખે છે.નરમ મટીરીયલ માટે તીક્ષ્ણ ખૂણા અને સખત મટીરીયલ માટે પહોળા ખૂણા રાખવામાં આવે છે.
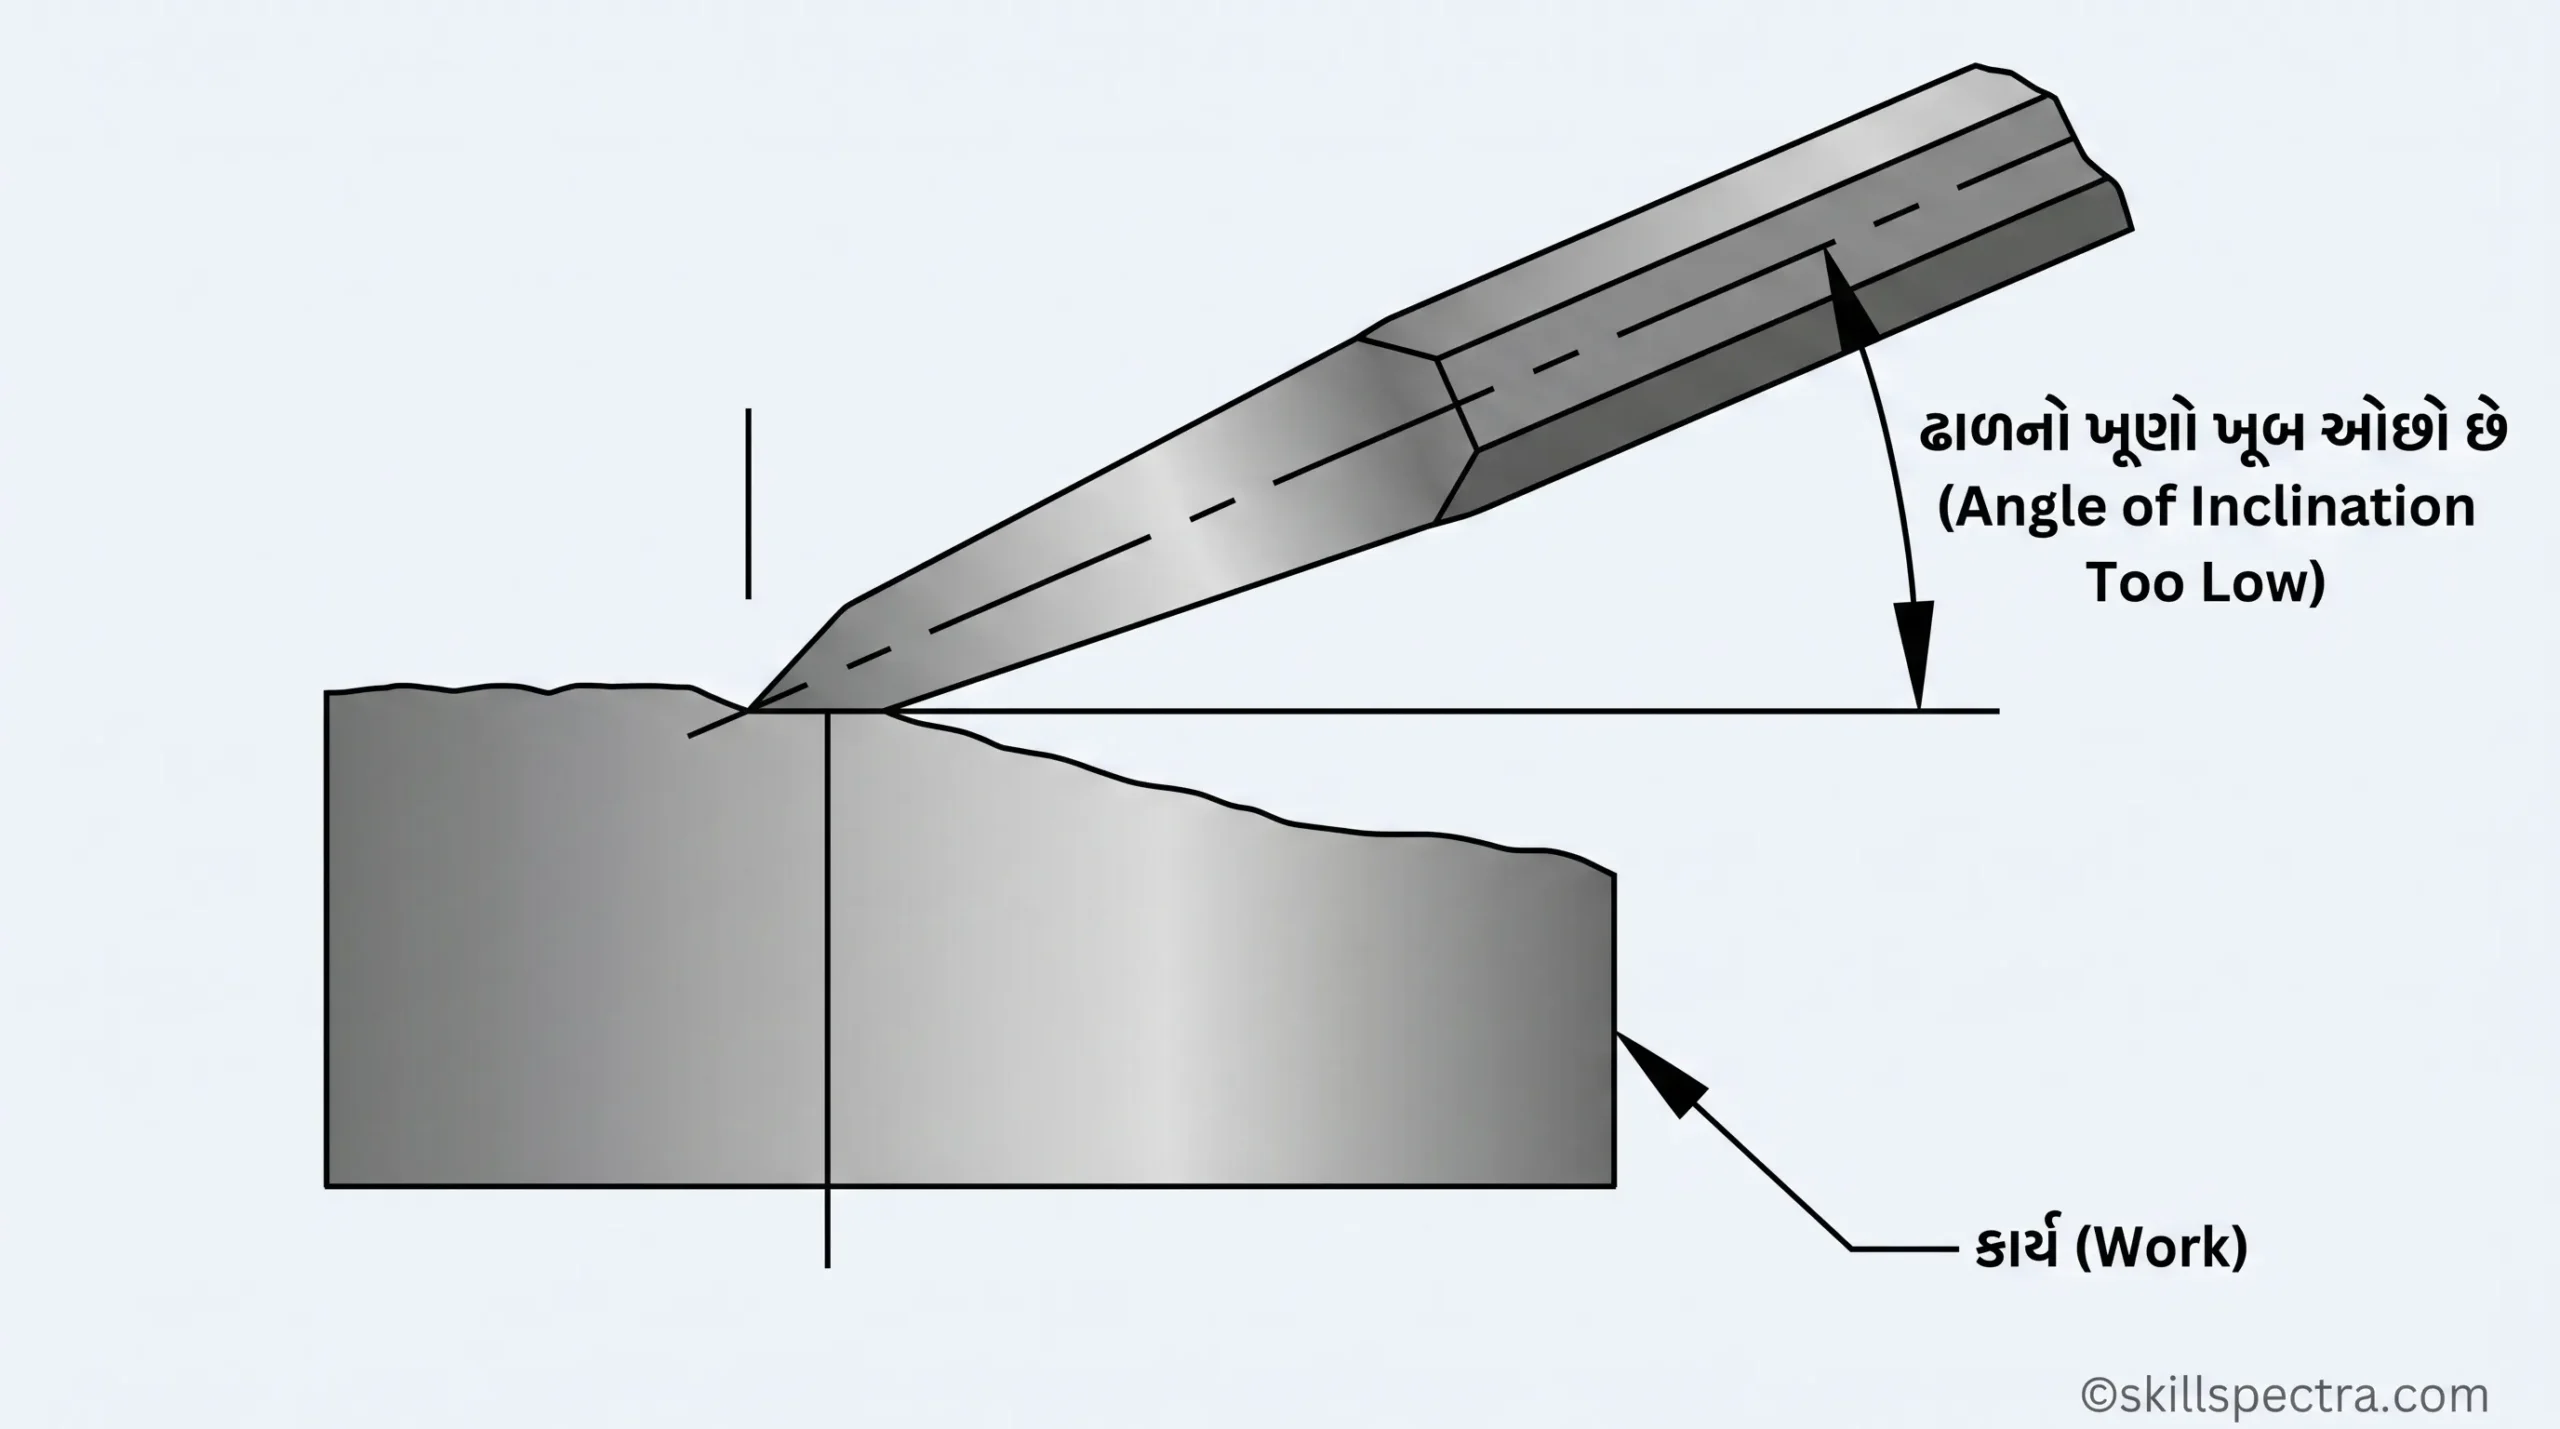
સાચો point angle અને angle of inclination એ સાચો rake અને clearance angle બનાવે છે.
Rake angle (Fig 1)
Rake angle એ કટિંગ પોઈન્ટની ઉપરની સપાટી અને વર્ક સરફેસ વચ્ચેનો ખૂણો છે.
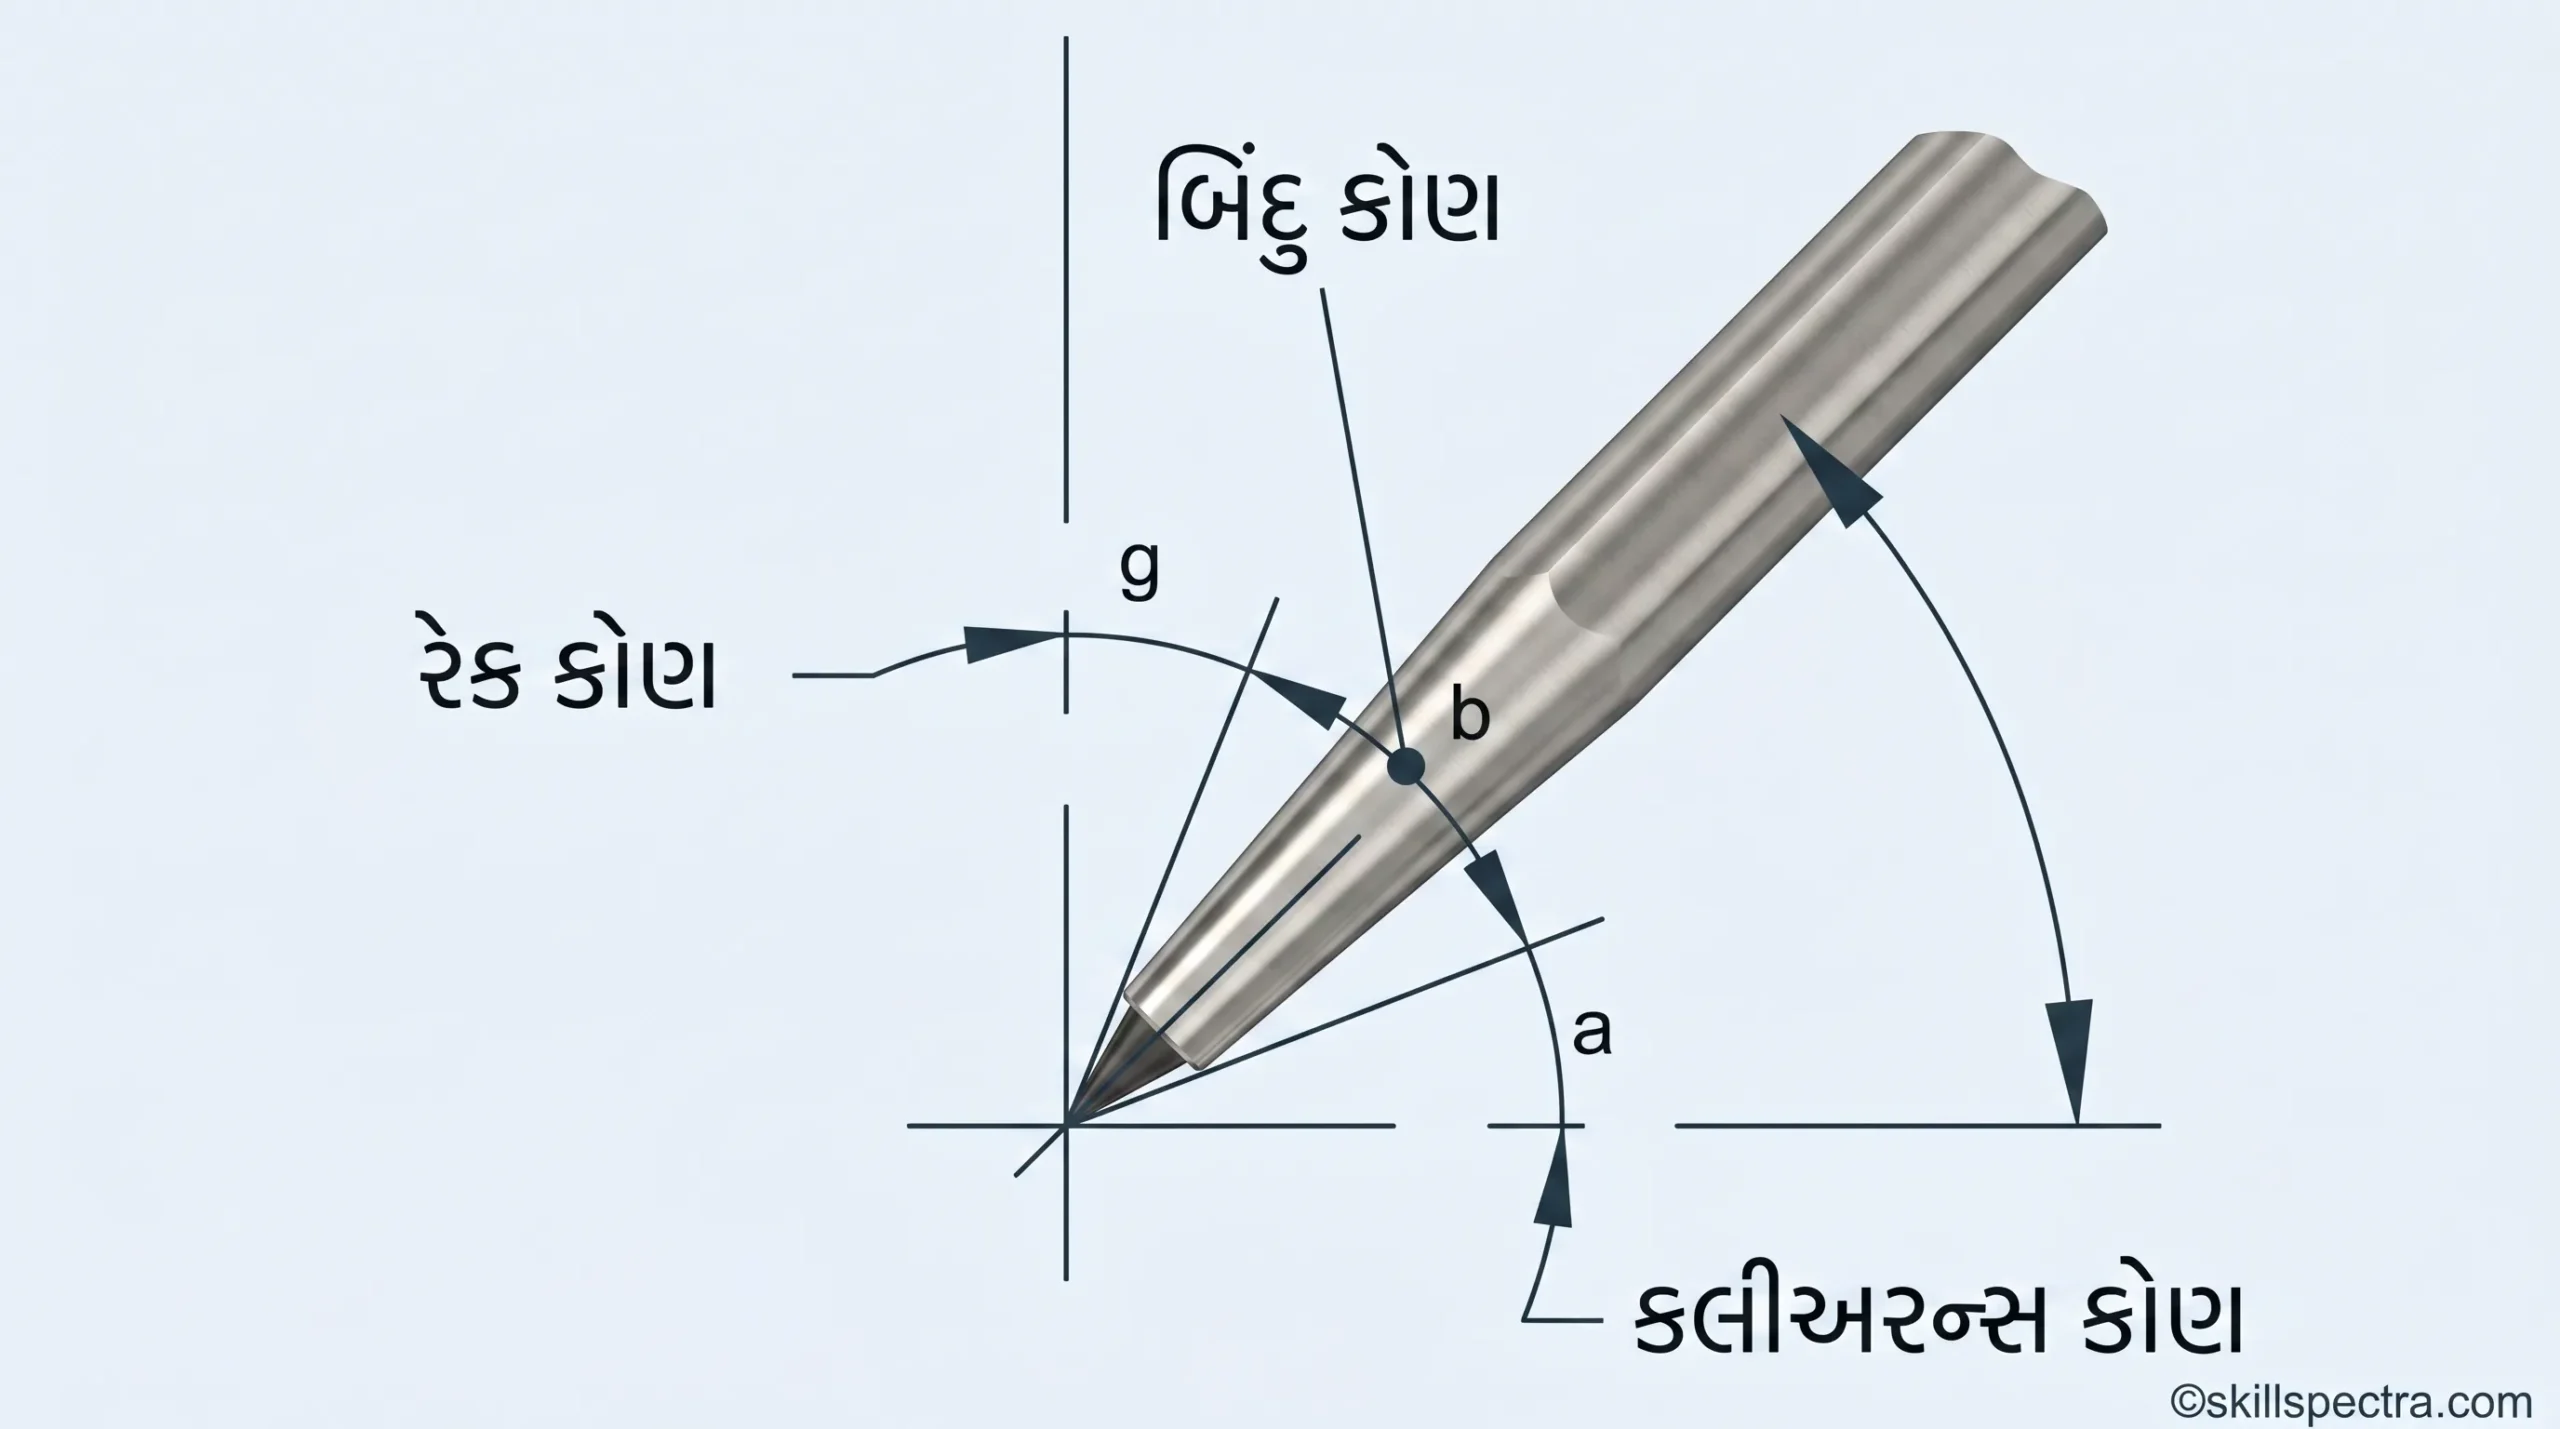
Clearance angle (Fig 1)
Clearance angle એ પોઈન્ટની નીચેની સપાટી અને વર્ક સરફેસ વચ્ચેનો ખૂણો છે.
- જો ક્લિયરન્સ એંગલ ખૂબ ઓછો કે ઝીરો હોય, તો રેક એંગલ વધે છે. કટિંગ એજ કામમાં ખૂંપશે નહીં અને છીણી લપસી જશે.)
- જો ક્લિયરન્સ એંગલ ખૂબ વધારે હોય, તો રેક એંગલ ઘટે છે. કટિંગ એજ મટીરીયલમાં અંદર ખૂંપી જશે અને કટ વધતો જશે.)
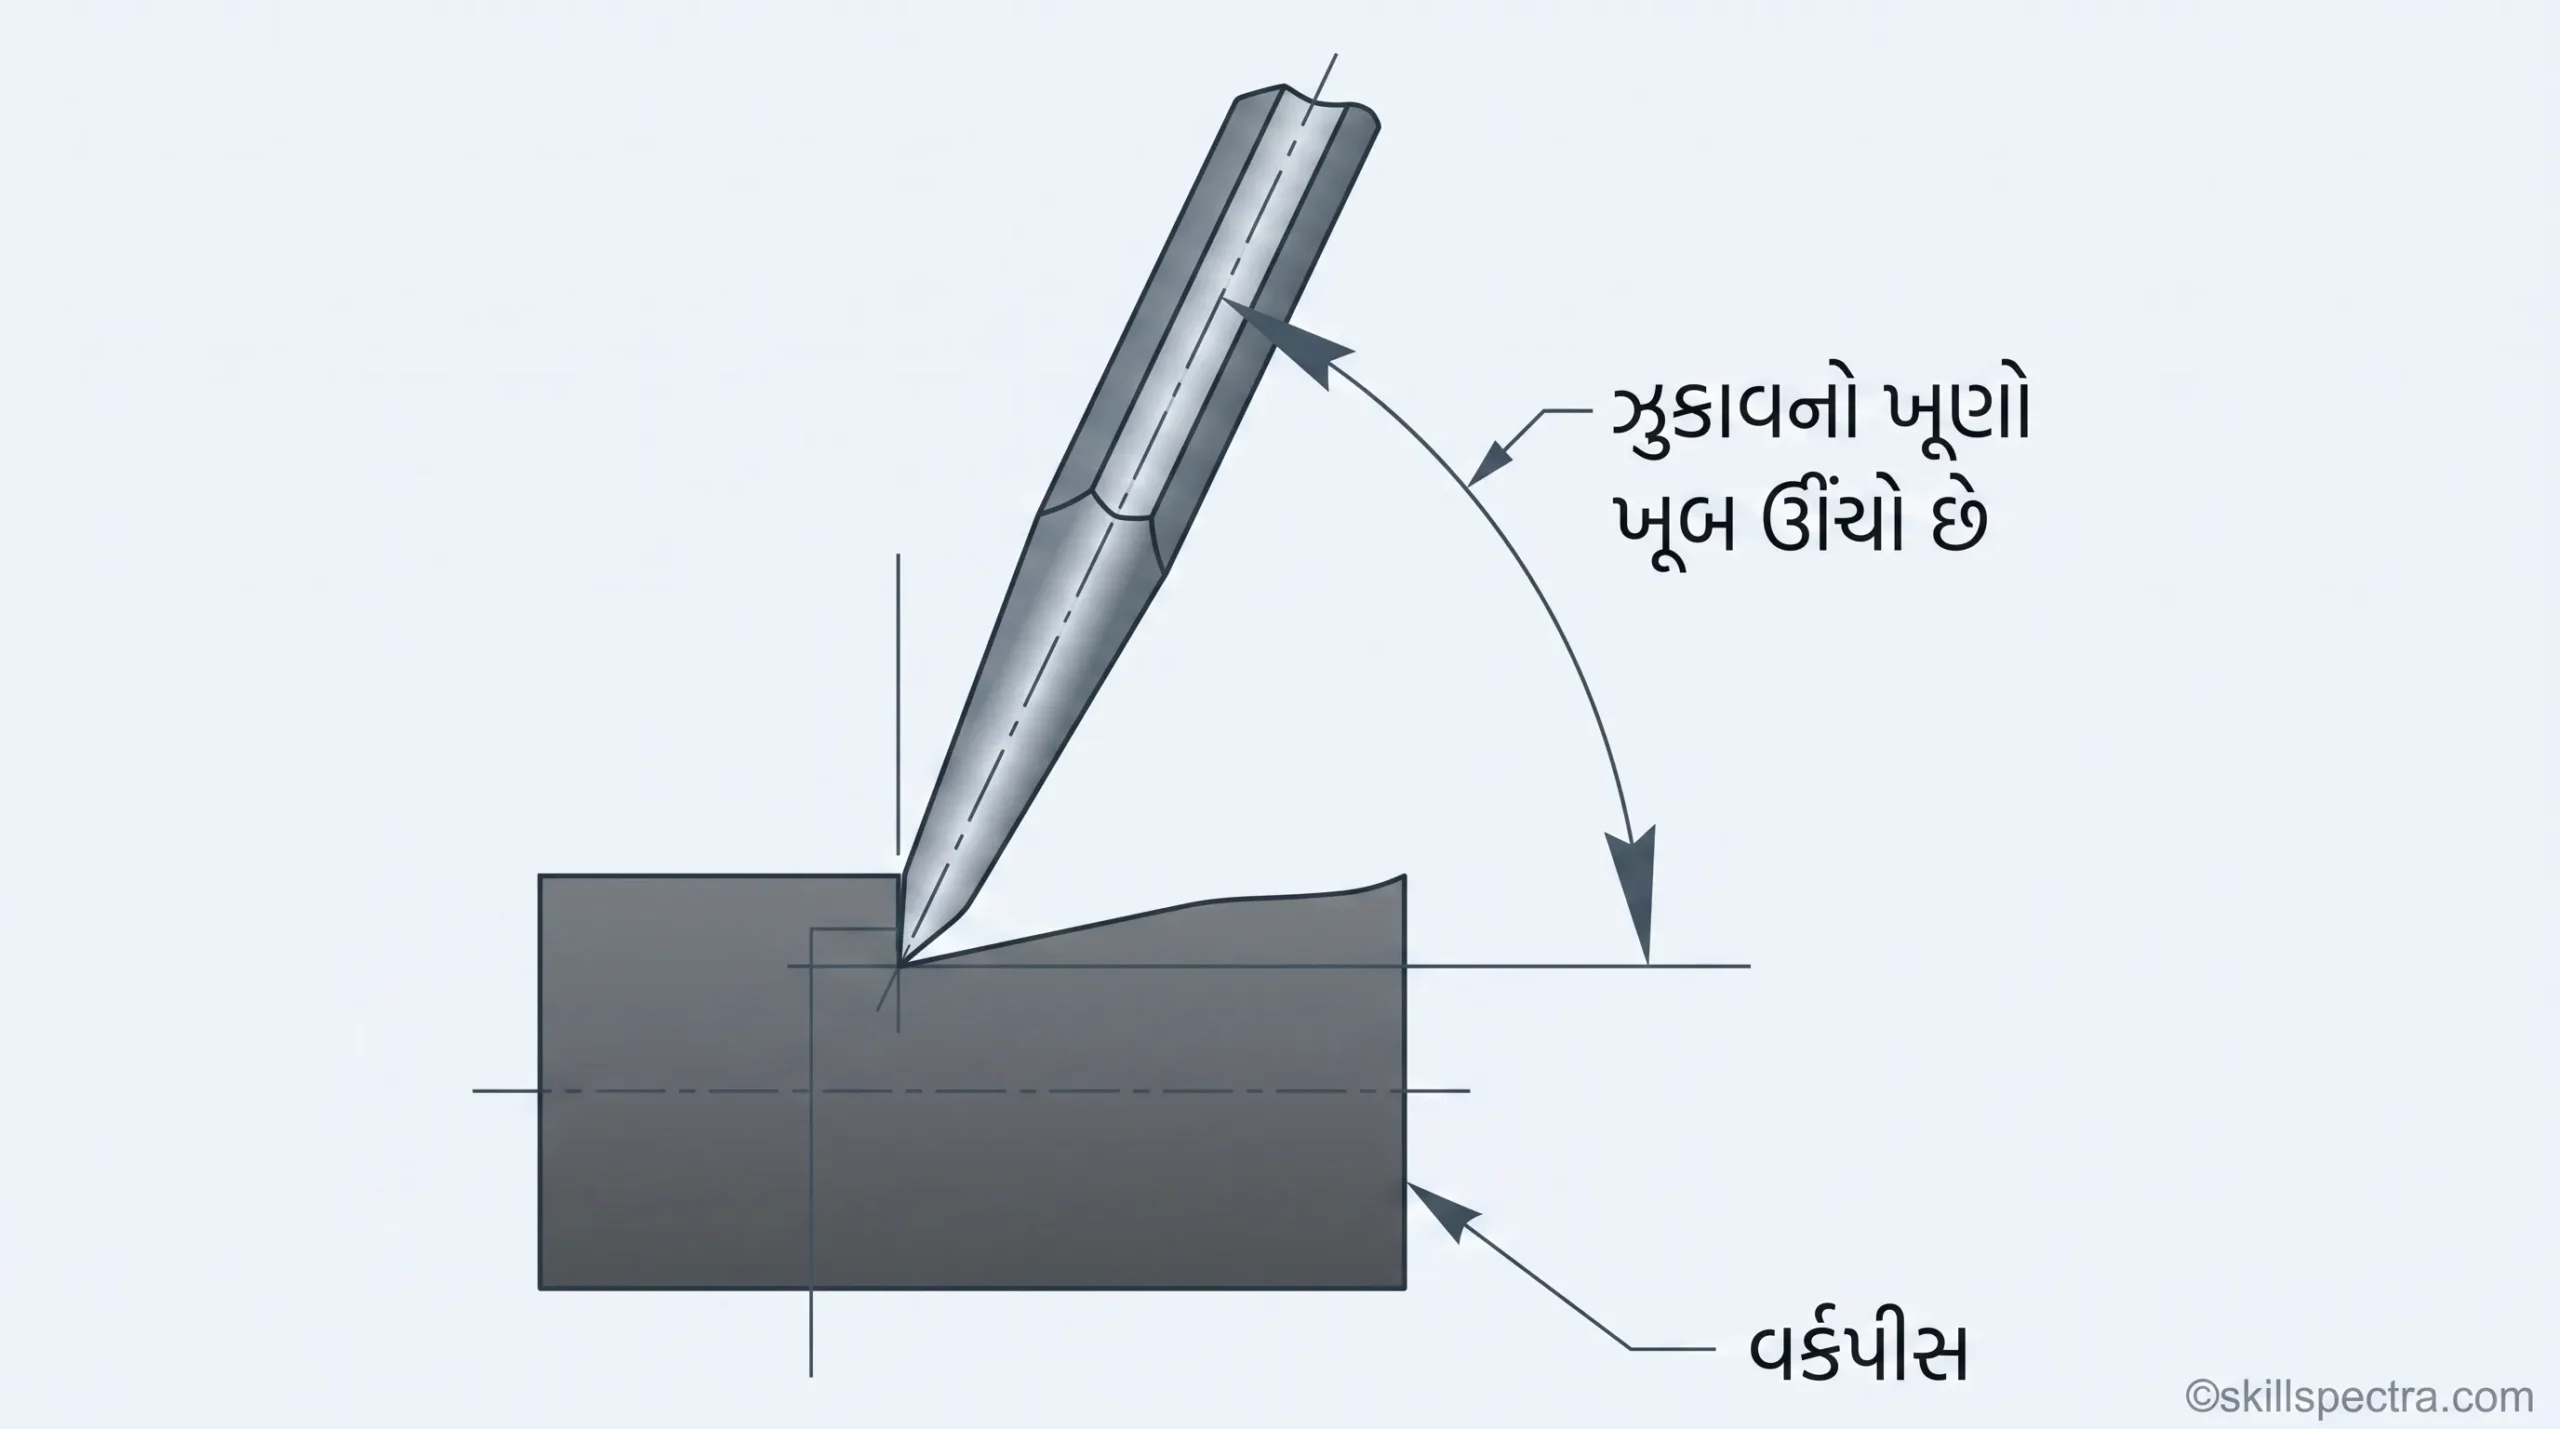
Table: Material wise Point Angle and Angle of Inclination 📊
| Material to be cut | Point angle | Angle of Inclination |
|---|---|---|
| High carbon steel | 65° | 39.5° |
| Cast iron | 60° | 37° |
| Mild steel | 55° | 34.5° |
| Brass | 50° | 32° |
| Copper | 45° | 29.5° |
| Aluminum | 30° | 22° |
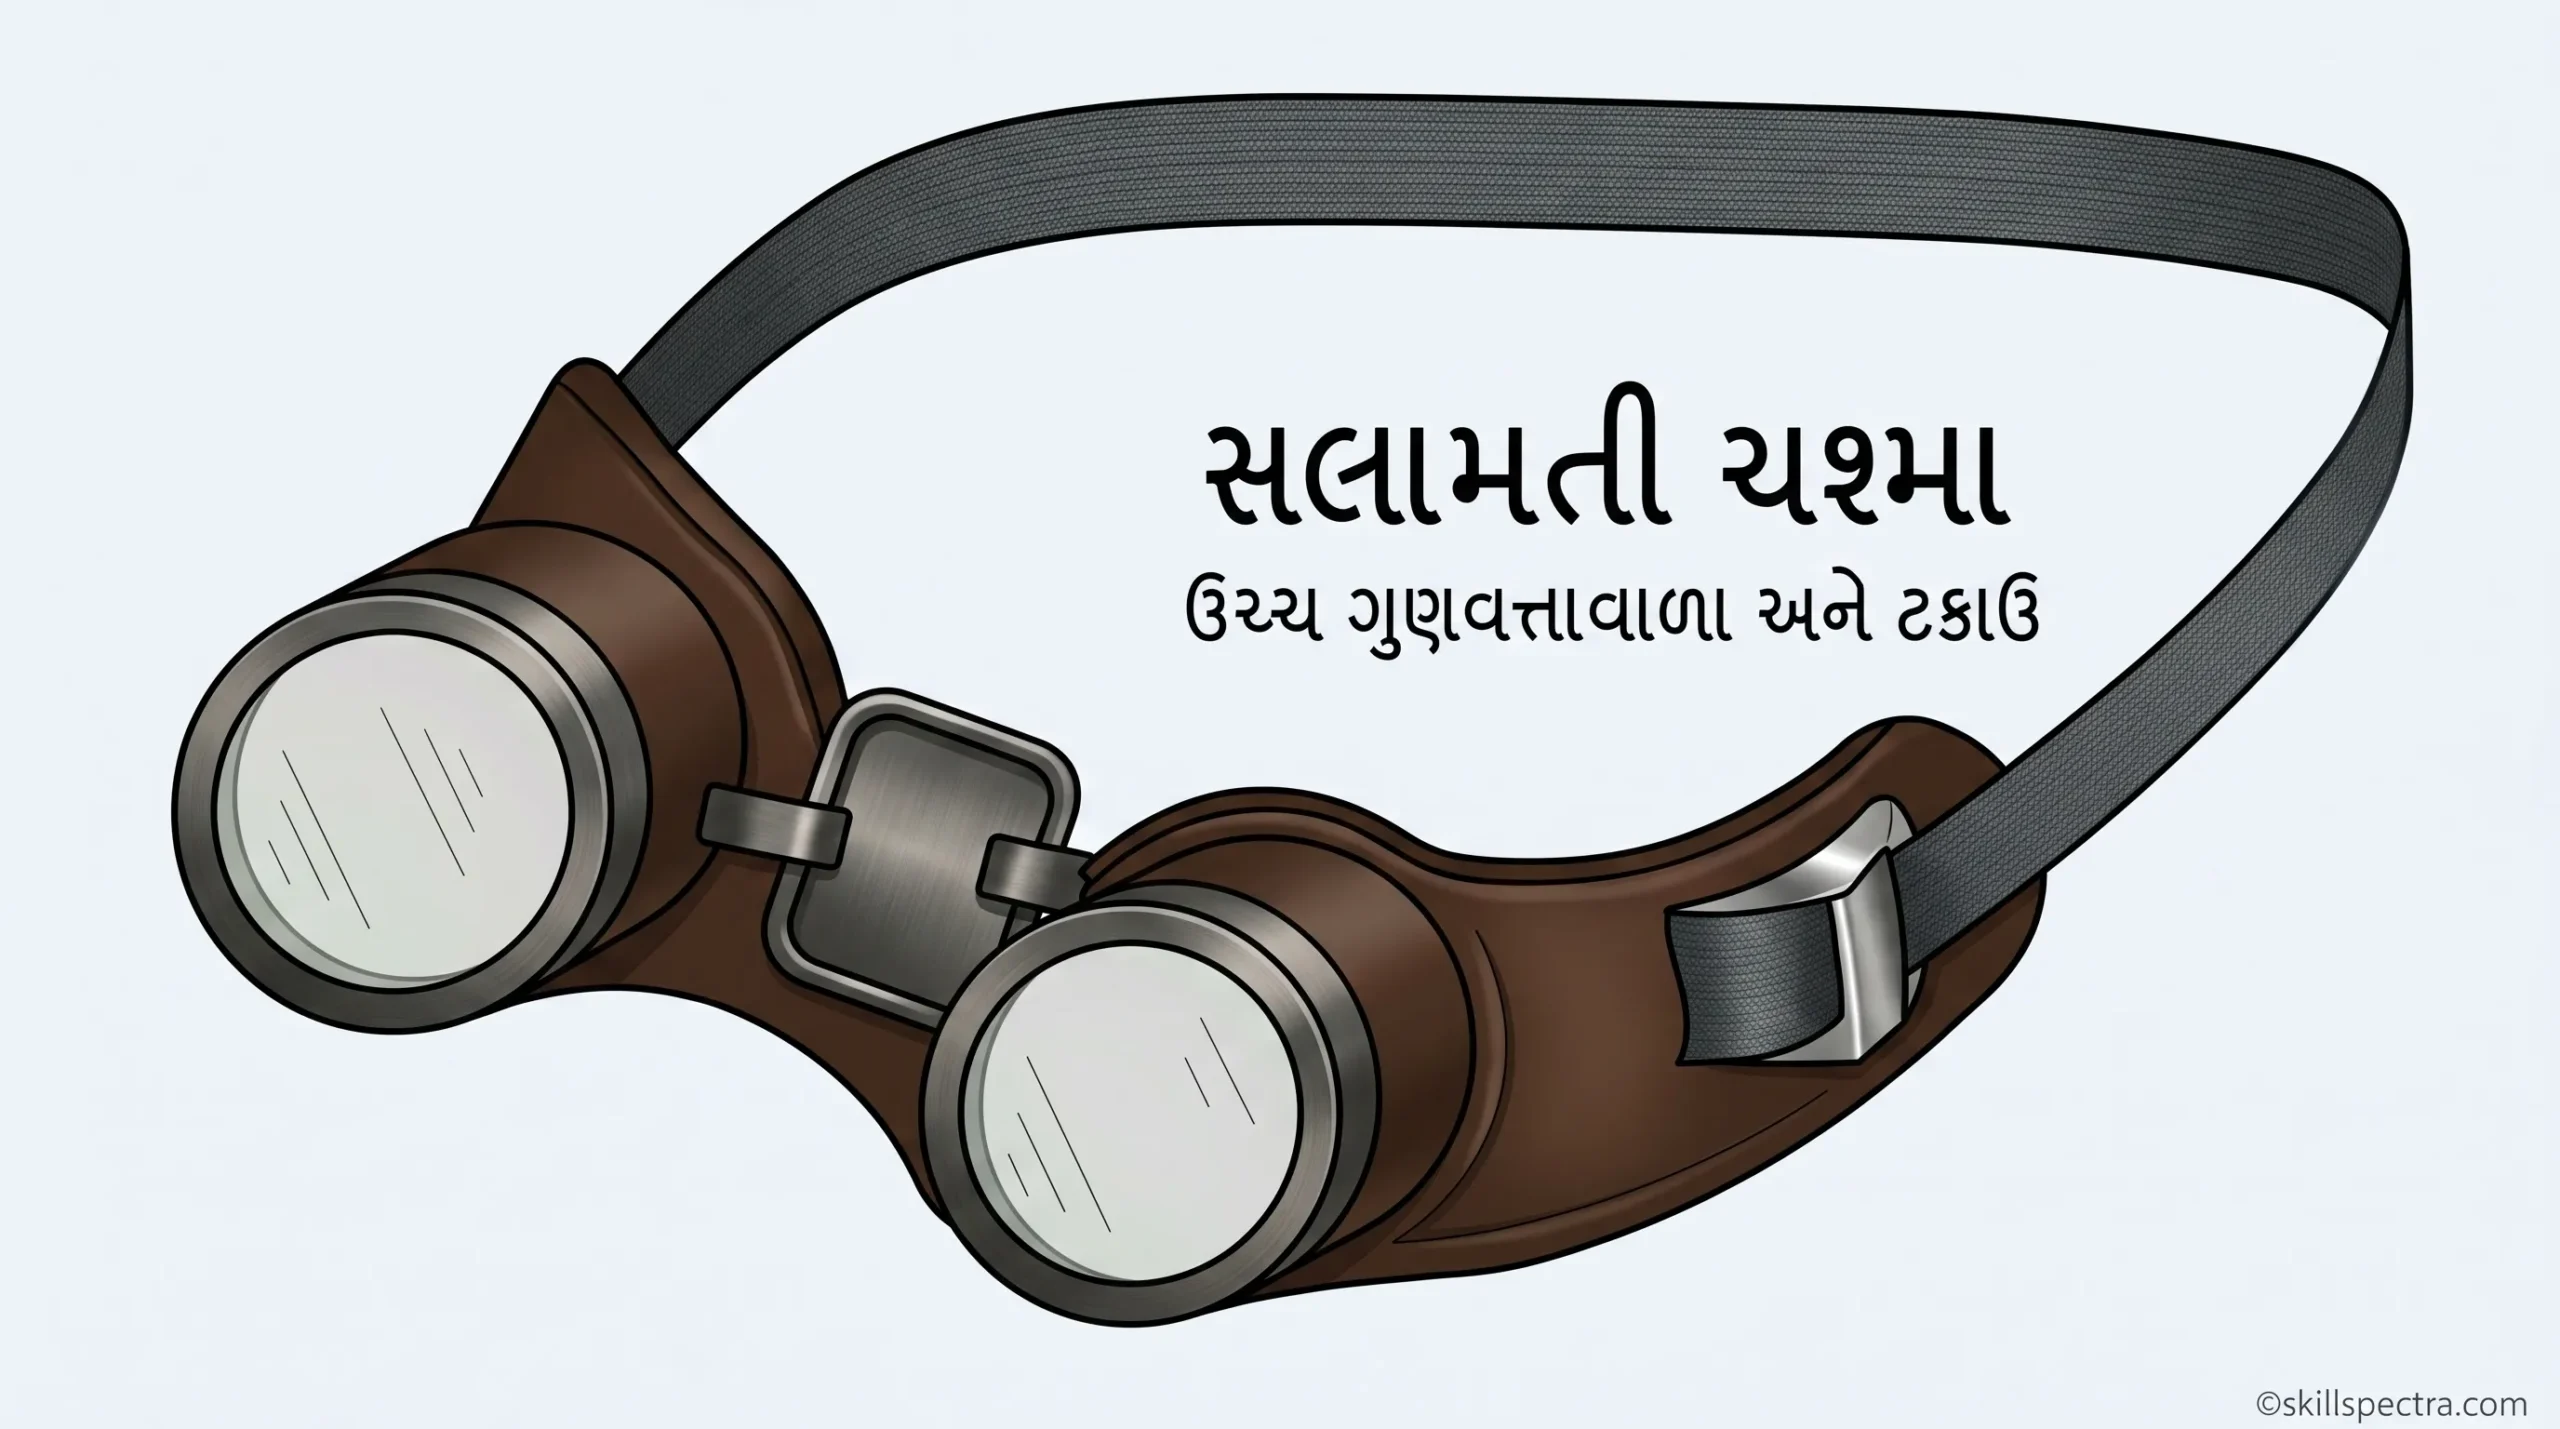
Chipping Goggles👁️🛡️
તેનો ઉપયોગ ચીપીંગ અથવા ગ્રાઇન્ડીંગ કરતી વખતે આંખોના રક્ષણ માટે થાય છે. તે બેકેલાઇટ ફ્રેમ, ચોખ્ખા કાચ અને માથા પર પકડ રાખવા માટે ઈલાસ્ટિક બેન્ડથી બનેલું હોય છે.) તે આરામદાયક ફિટિંગ, યોગ્ય હવાઉજાસ અને ચારે બાજુથી રક્ષણ મળે તે રીતે ડિઝાઇન કરવામાં આવ્યું છે.
Keywords:
- Mechanic Diesel Chisel Lesson
- Types of Chisels in Gujarati
- Chisel Point Angle Table
- Rake Angle and Clearance Angle explained
- ITI Mechanic Diesel Theory Gujarati
- Diamond Point Chisel Use
- Web Chisel application
- Chipping Goggles importance
- Hand tools for Mechanic Diesel
EO Description: “Learn about different types of chisels (Flat, Cross cut, Half round, Diamond point) and their angles like Point, Rake, and Clearance angle in a simple Gujarati-English mix language. Essential guide for ITI Mechanic Diesel students.”
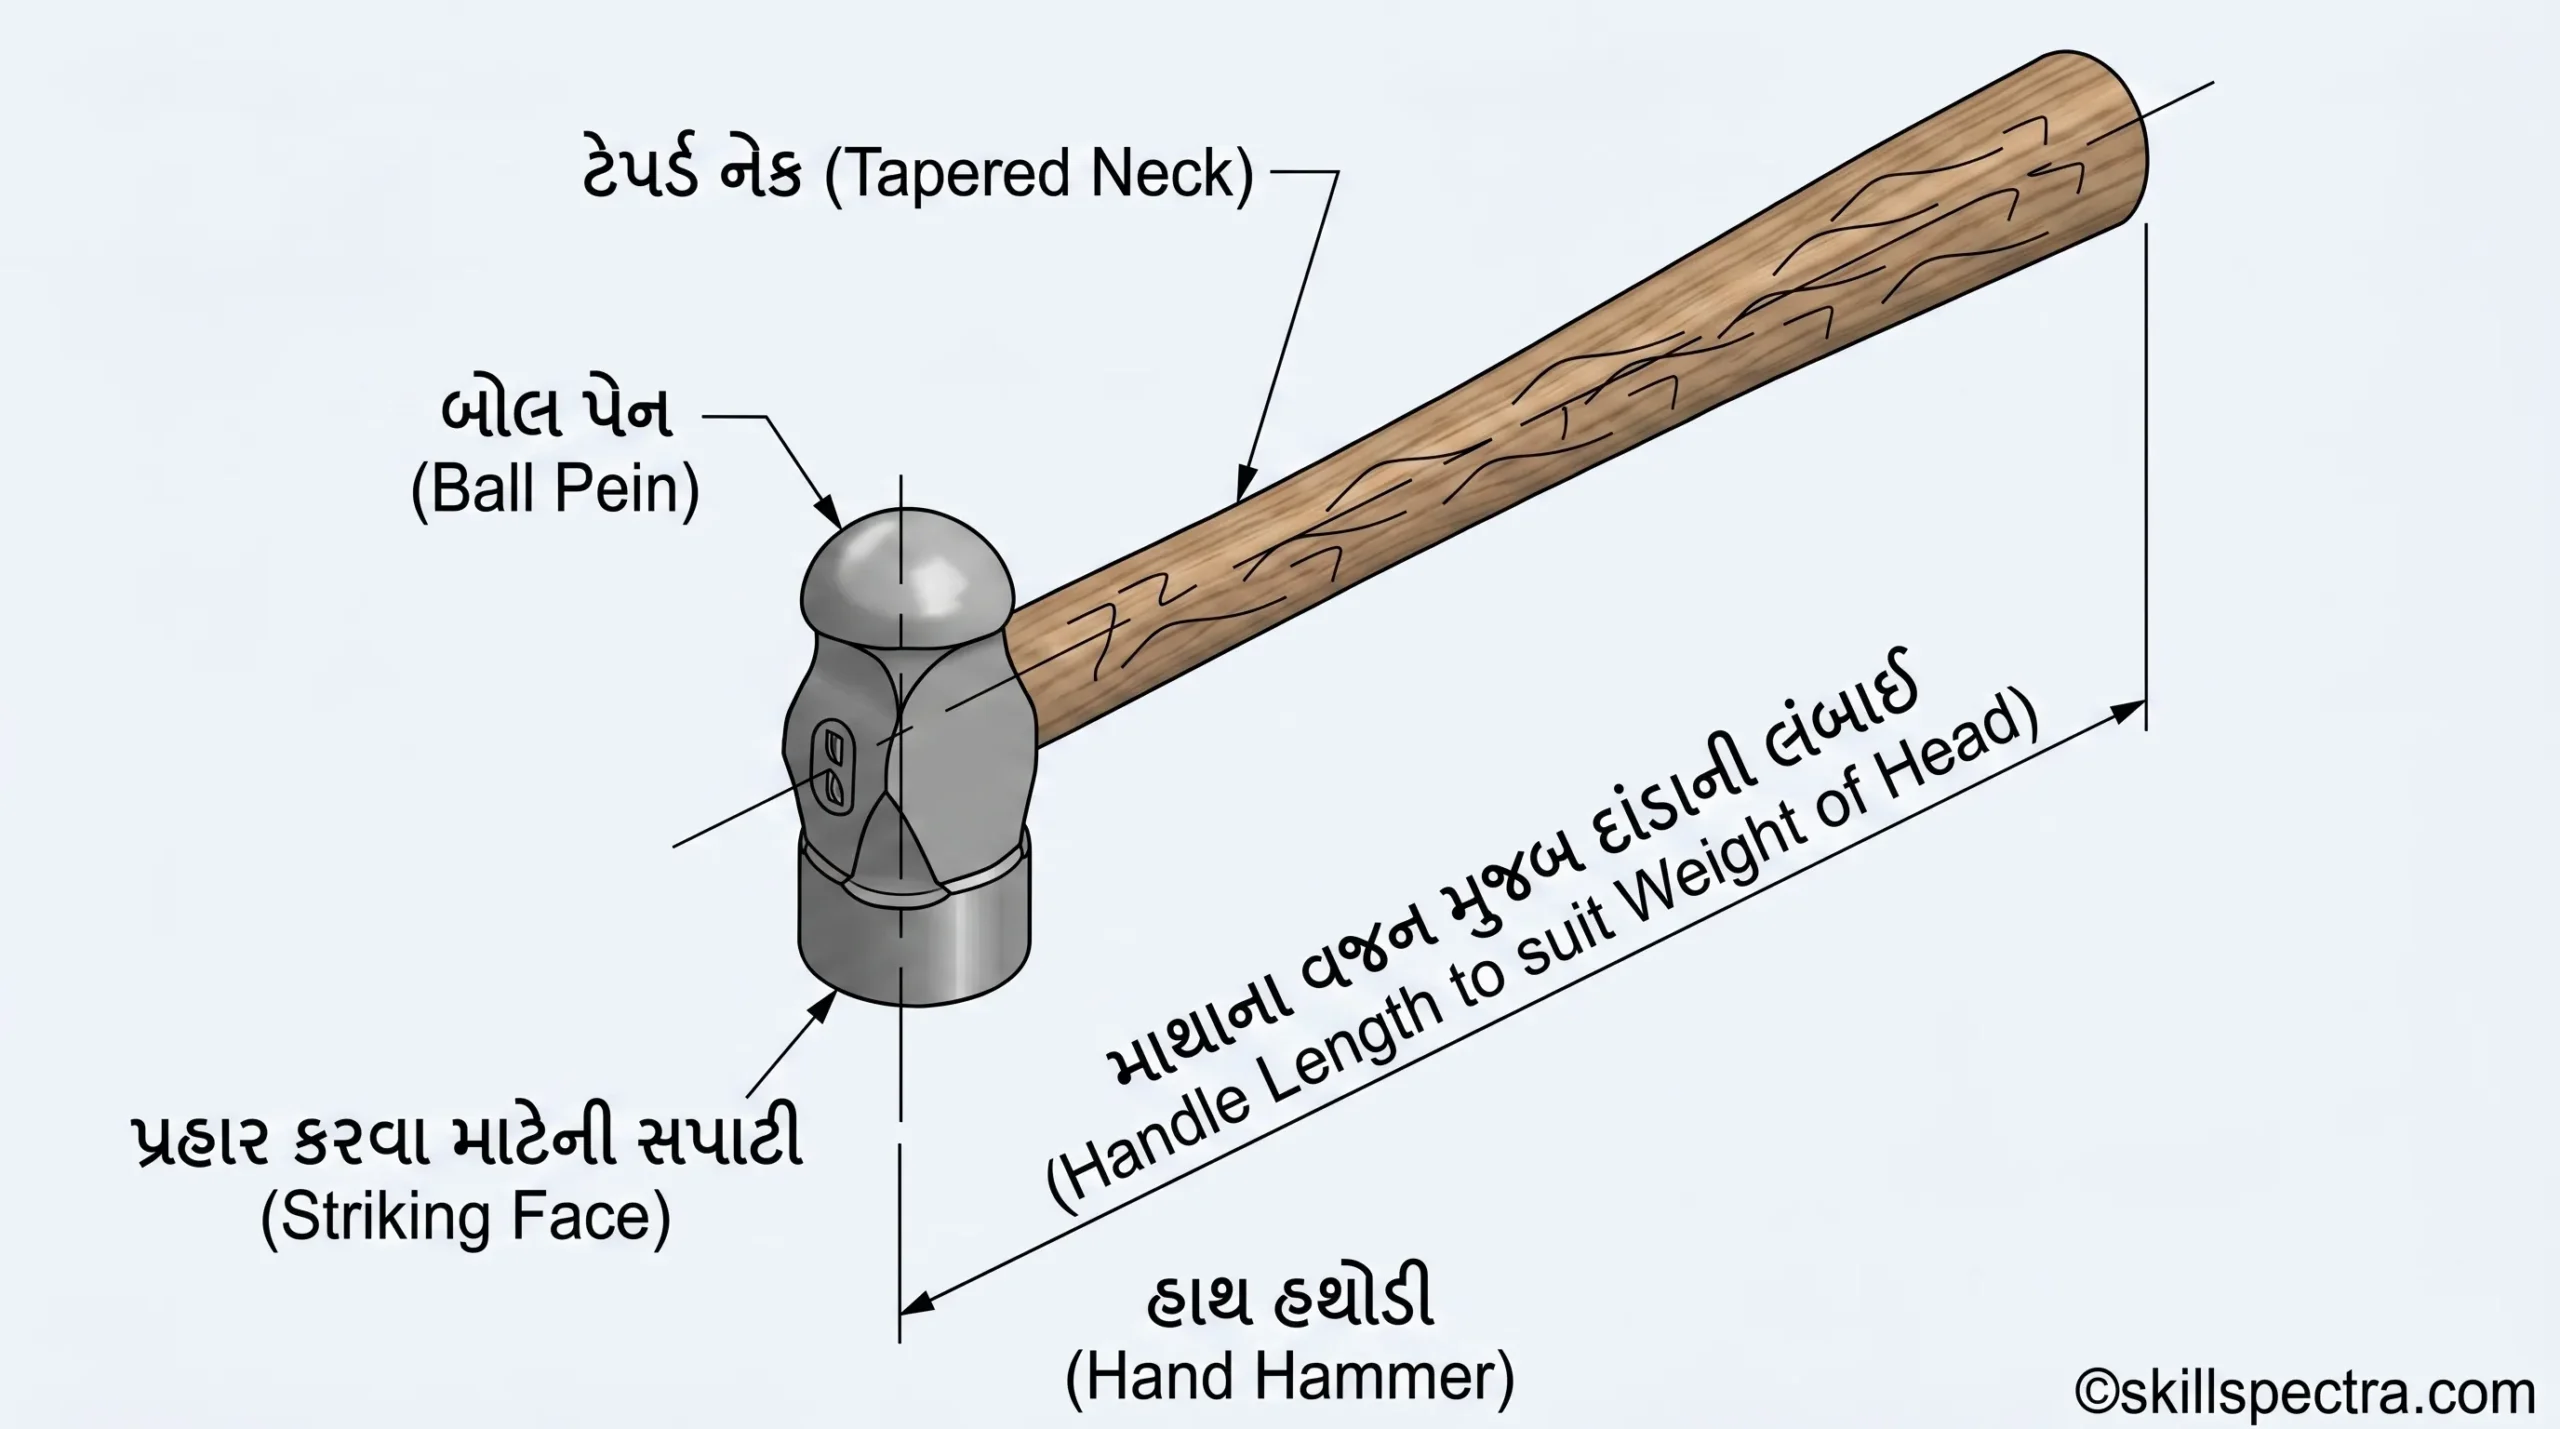
🔨 Hammers (એન્જિનિયર હથોડા) – સંપૂર્ણ માર્ગદર્શિકા
Objectives (ઉદ્દેશ્યો):
આ Lesson ના અંતે તમે નીચેની બાબતો શીખી શકશો:
- Engineer’s hammer ના uses (ઉપયોગો) જણાવવા.
- Engineer’s hammer ના parts (ભાગો) ના નામ અને તેમના functions (કાર્યો) સમજવા.
- Engineer’s hammer ના types (પ્રકારો) જણાવવા.
- Engineer’s hammer નું specification નક્કી કરવું.
🛠️ Introduction (પરિચય)
An engineer’s hammer (Fig 1) એ એક hand tool છે જેનો ઉપયોગ નીચે મુજબના કામો દરમિયાન striking (ફટકારવા) ના હેતુ માટે થાય છે:
- Punching (પંચિંગ કરવા)
- Bending (વાળવા માટે)
- Straightening (સીધું કરવા માટે)
- Chipping (ચીપિંગ કરવા માટે)
- Forging (ફોર્જિંગ કરવા માટે)
- Riveting (રિવેટિંગ કરવા માટે)
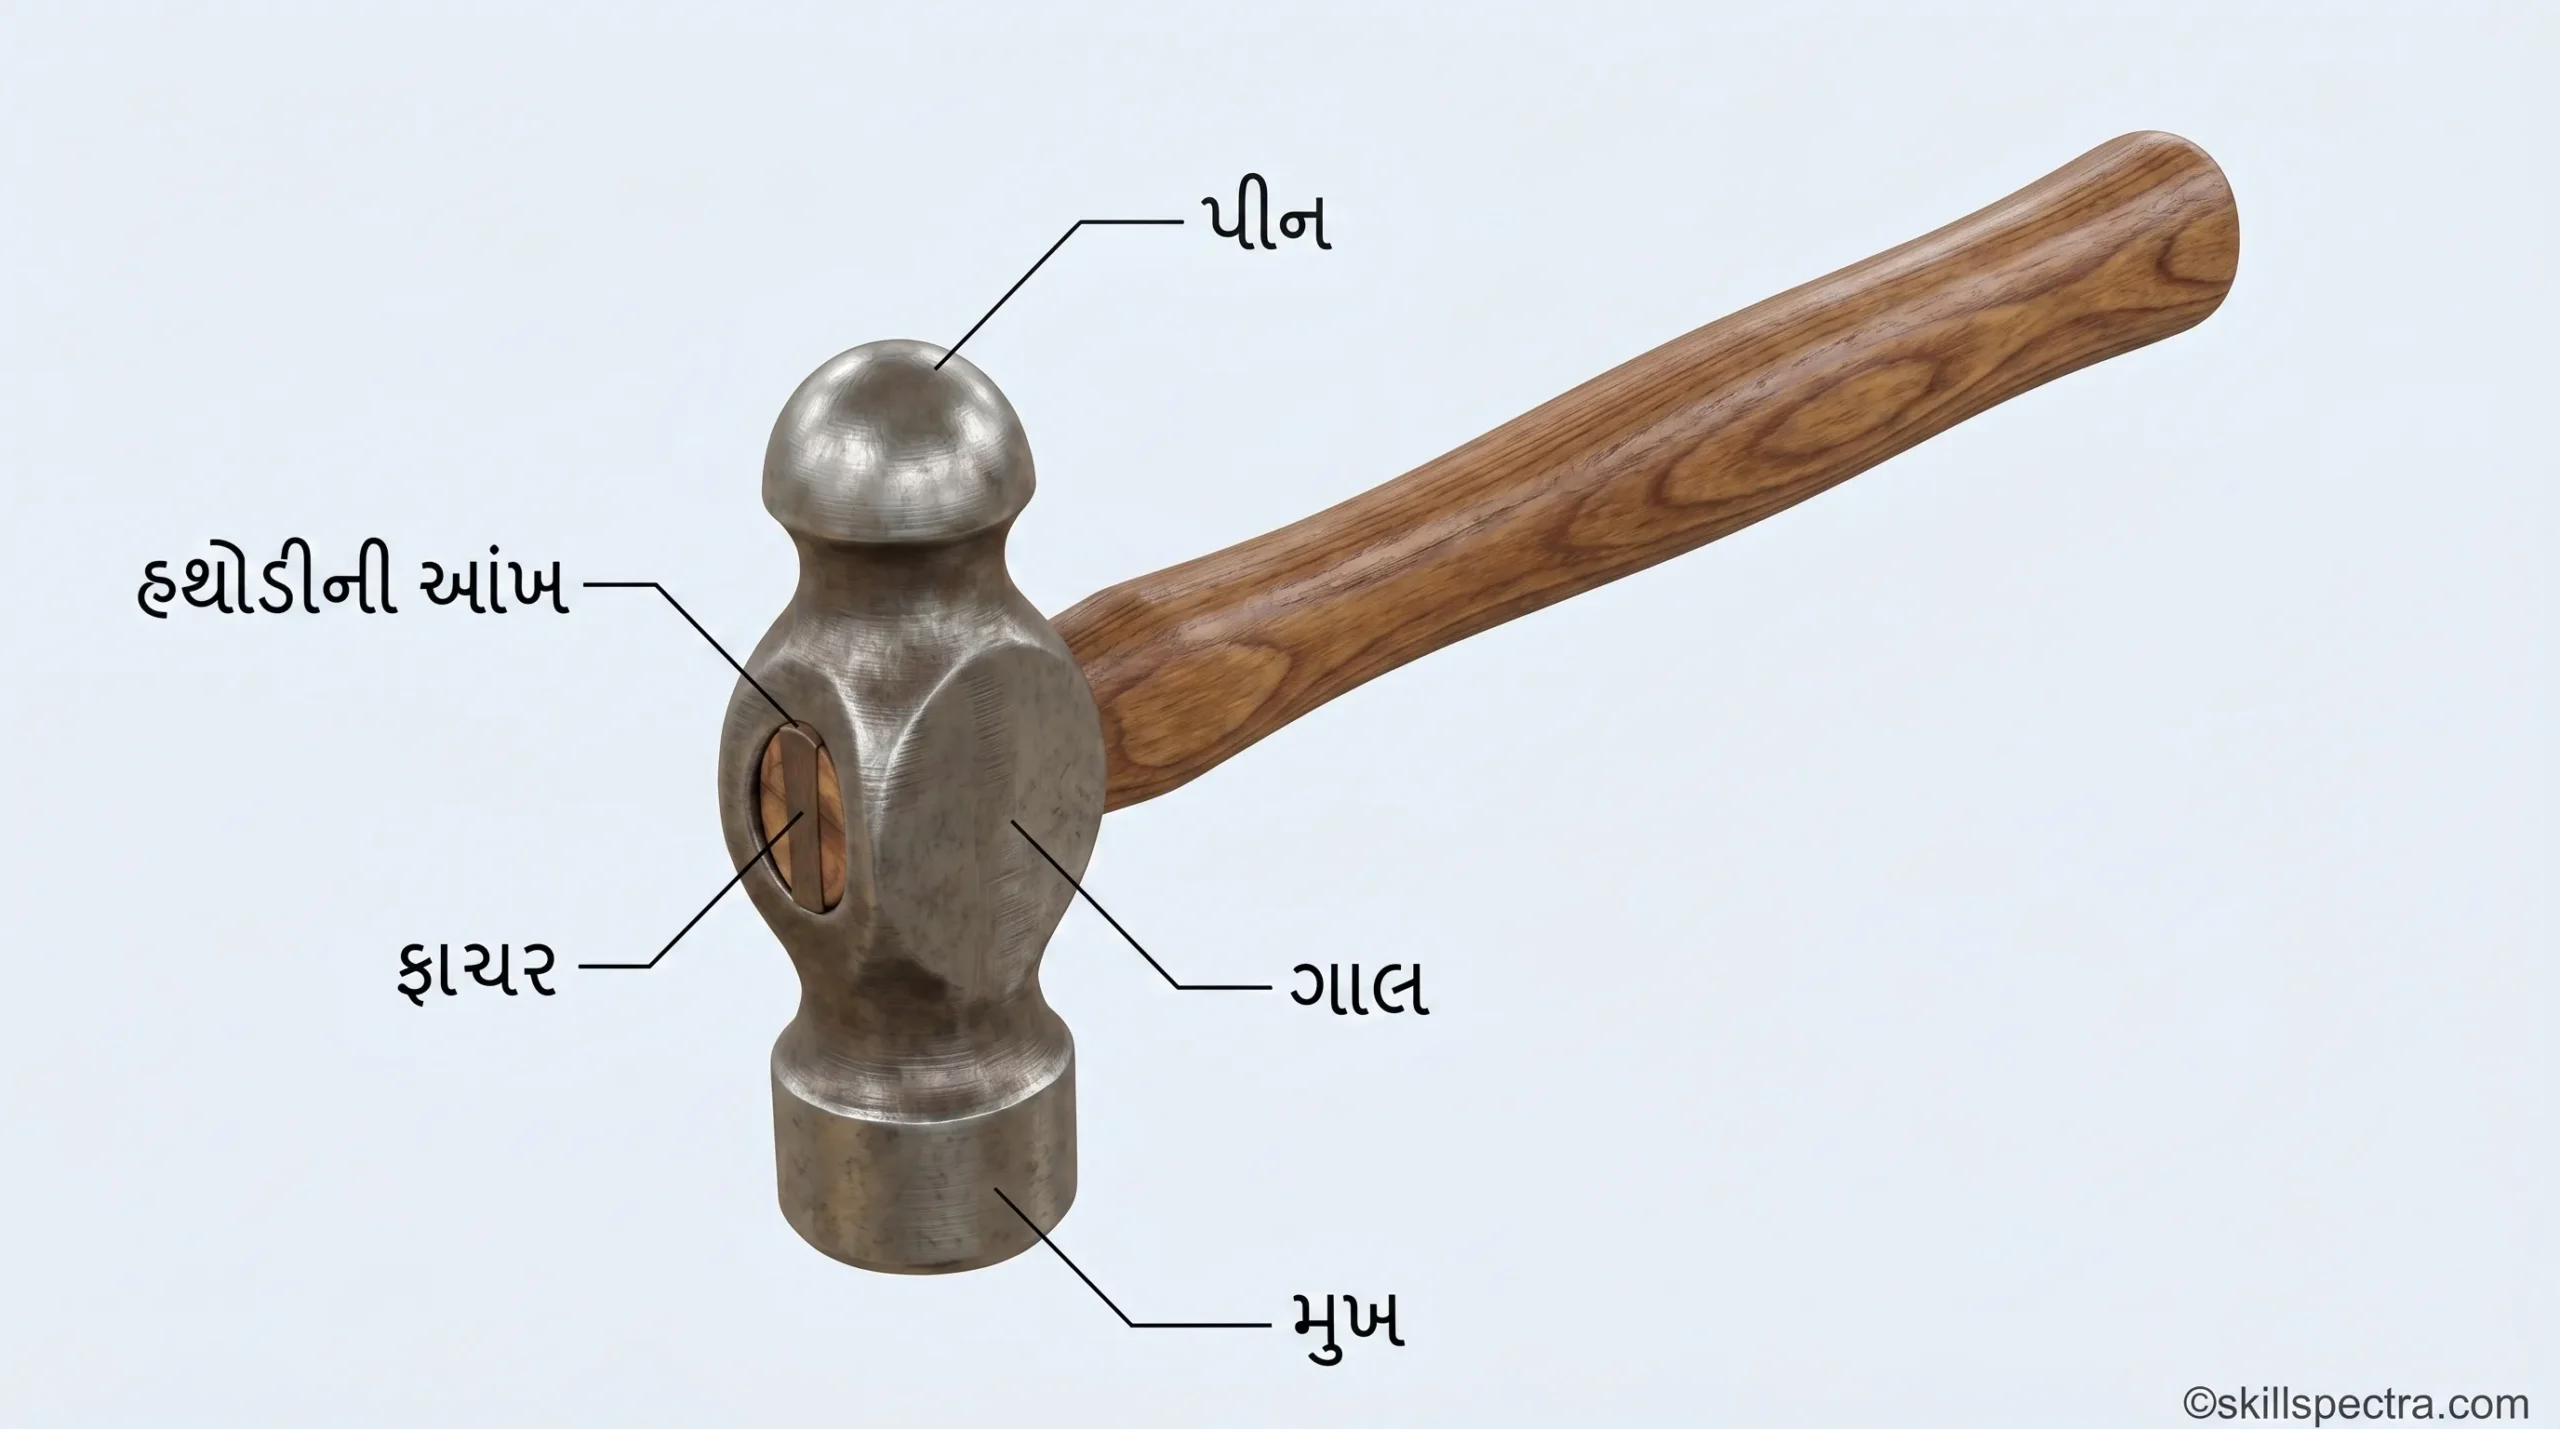
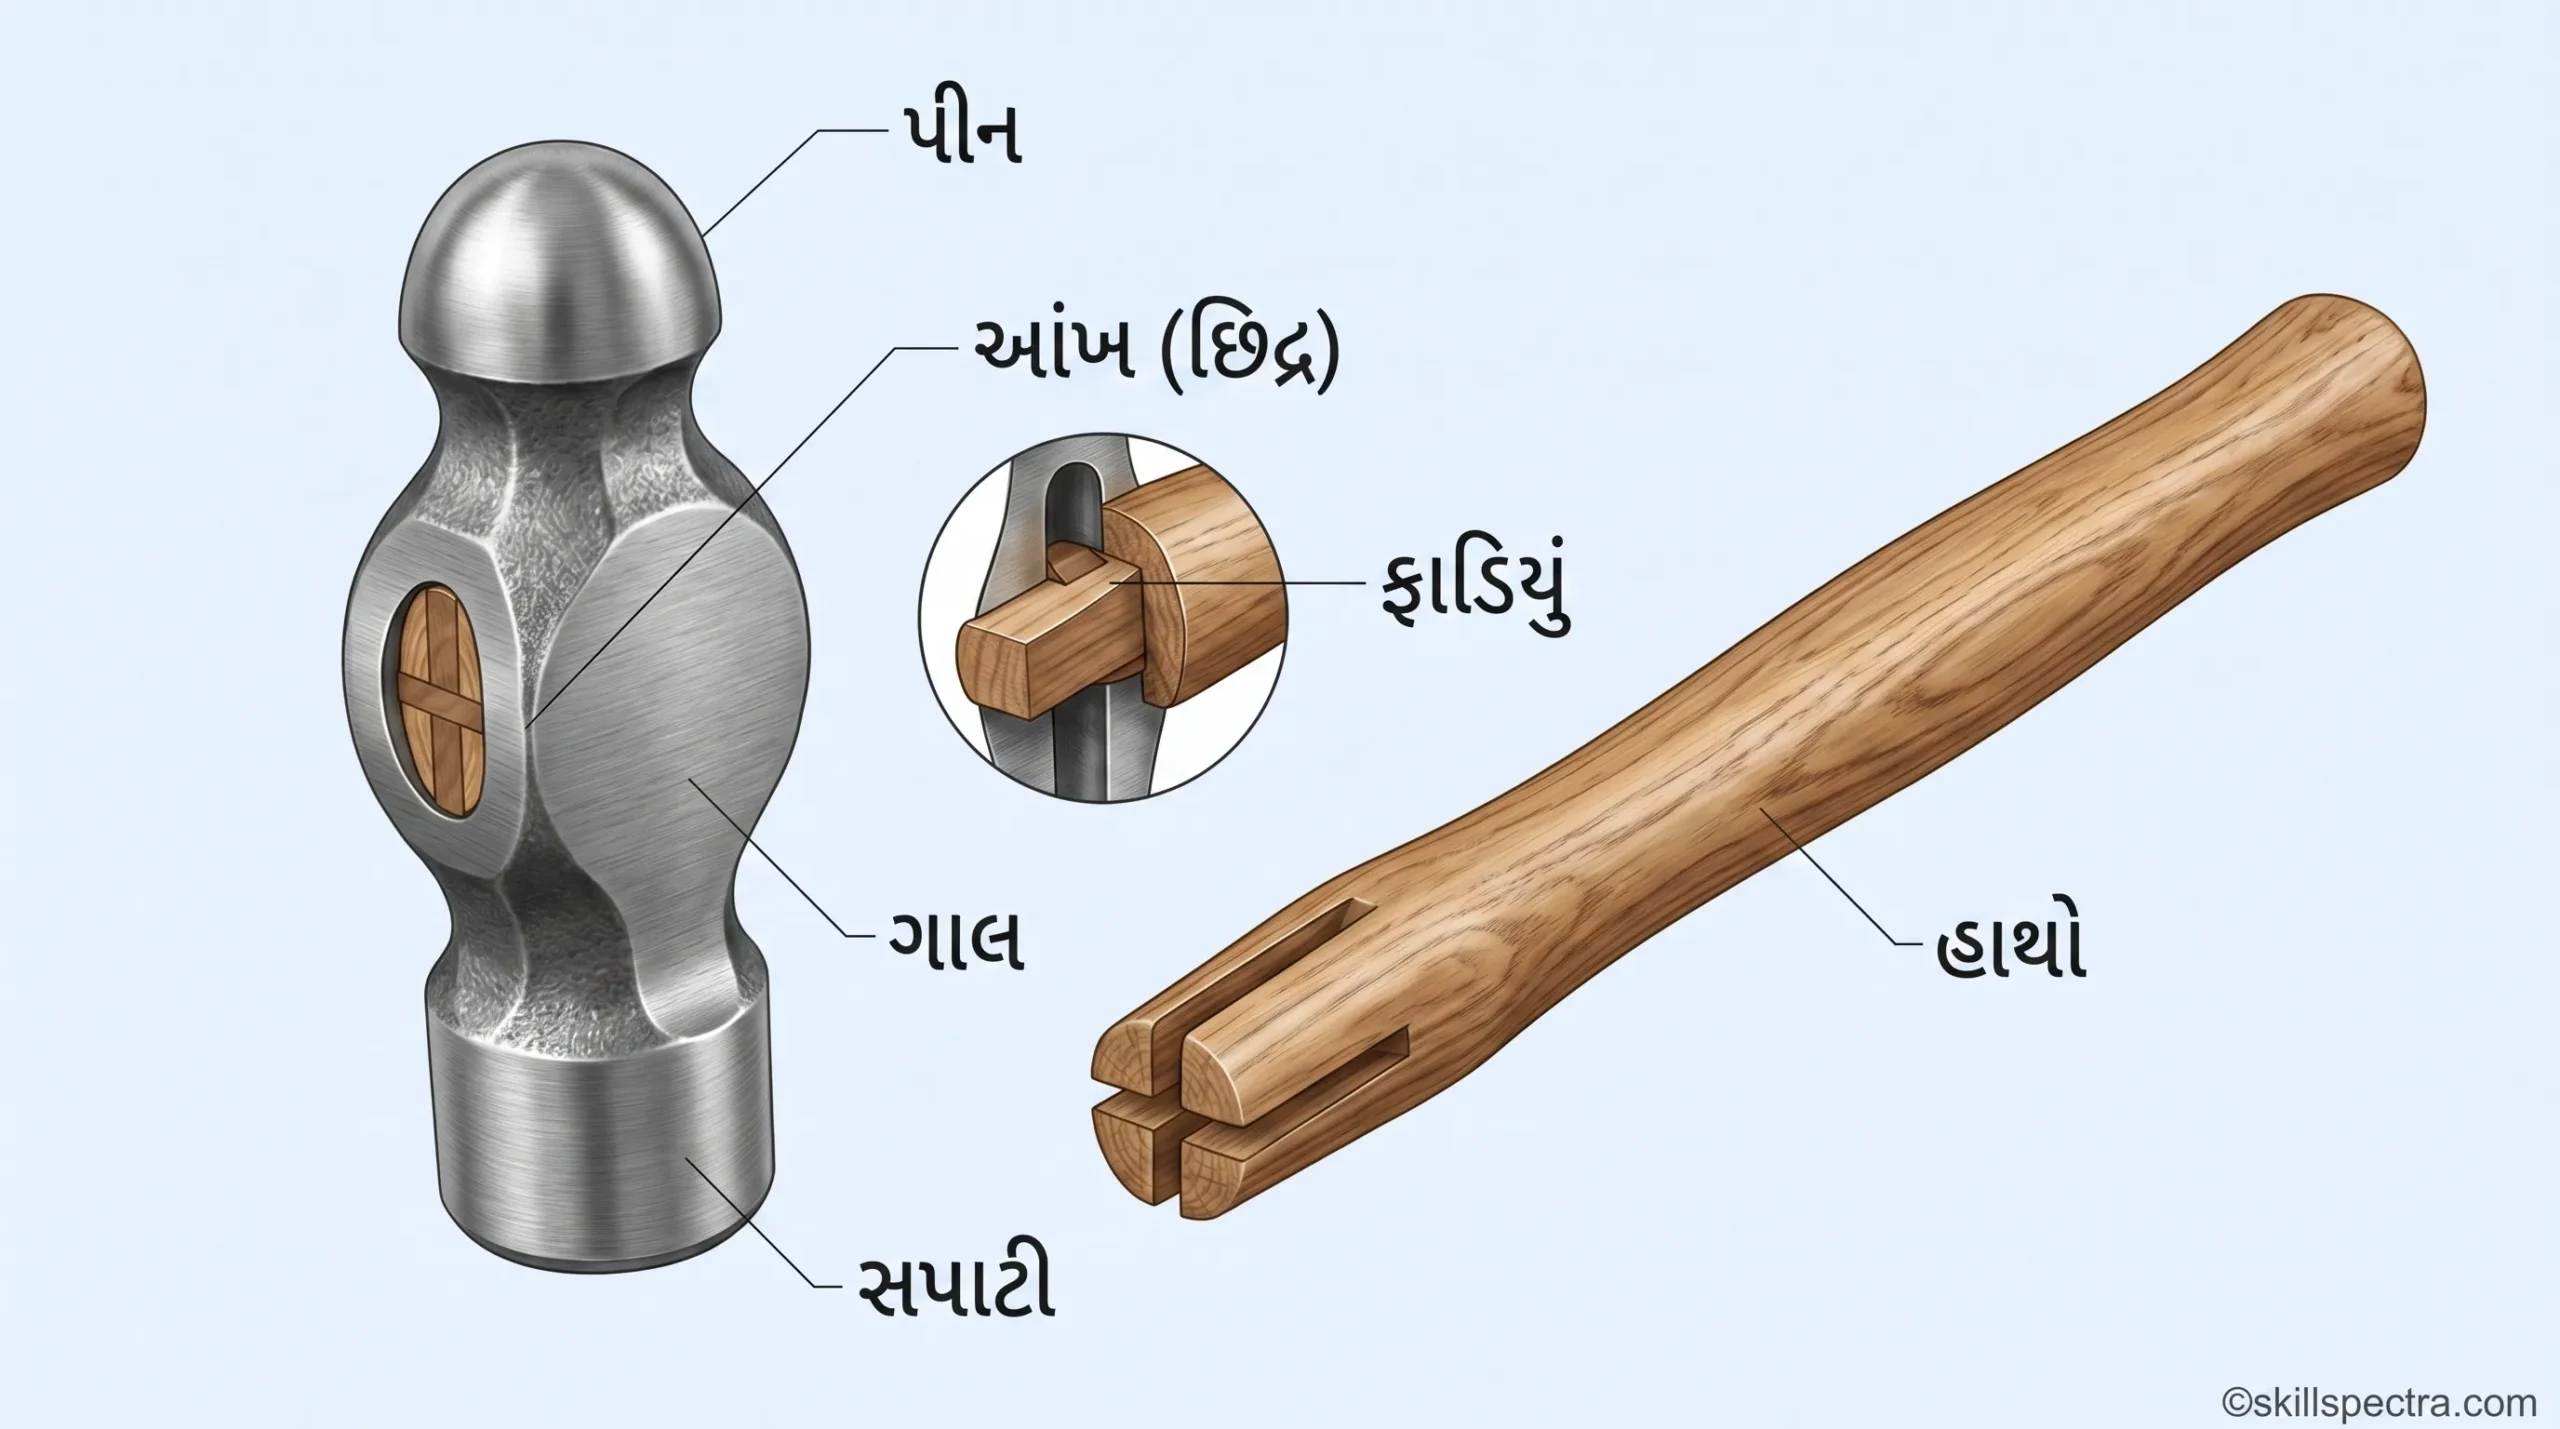
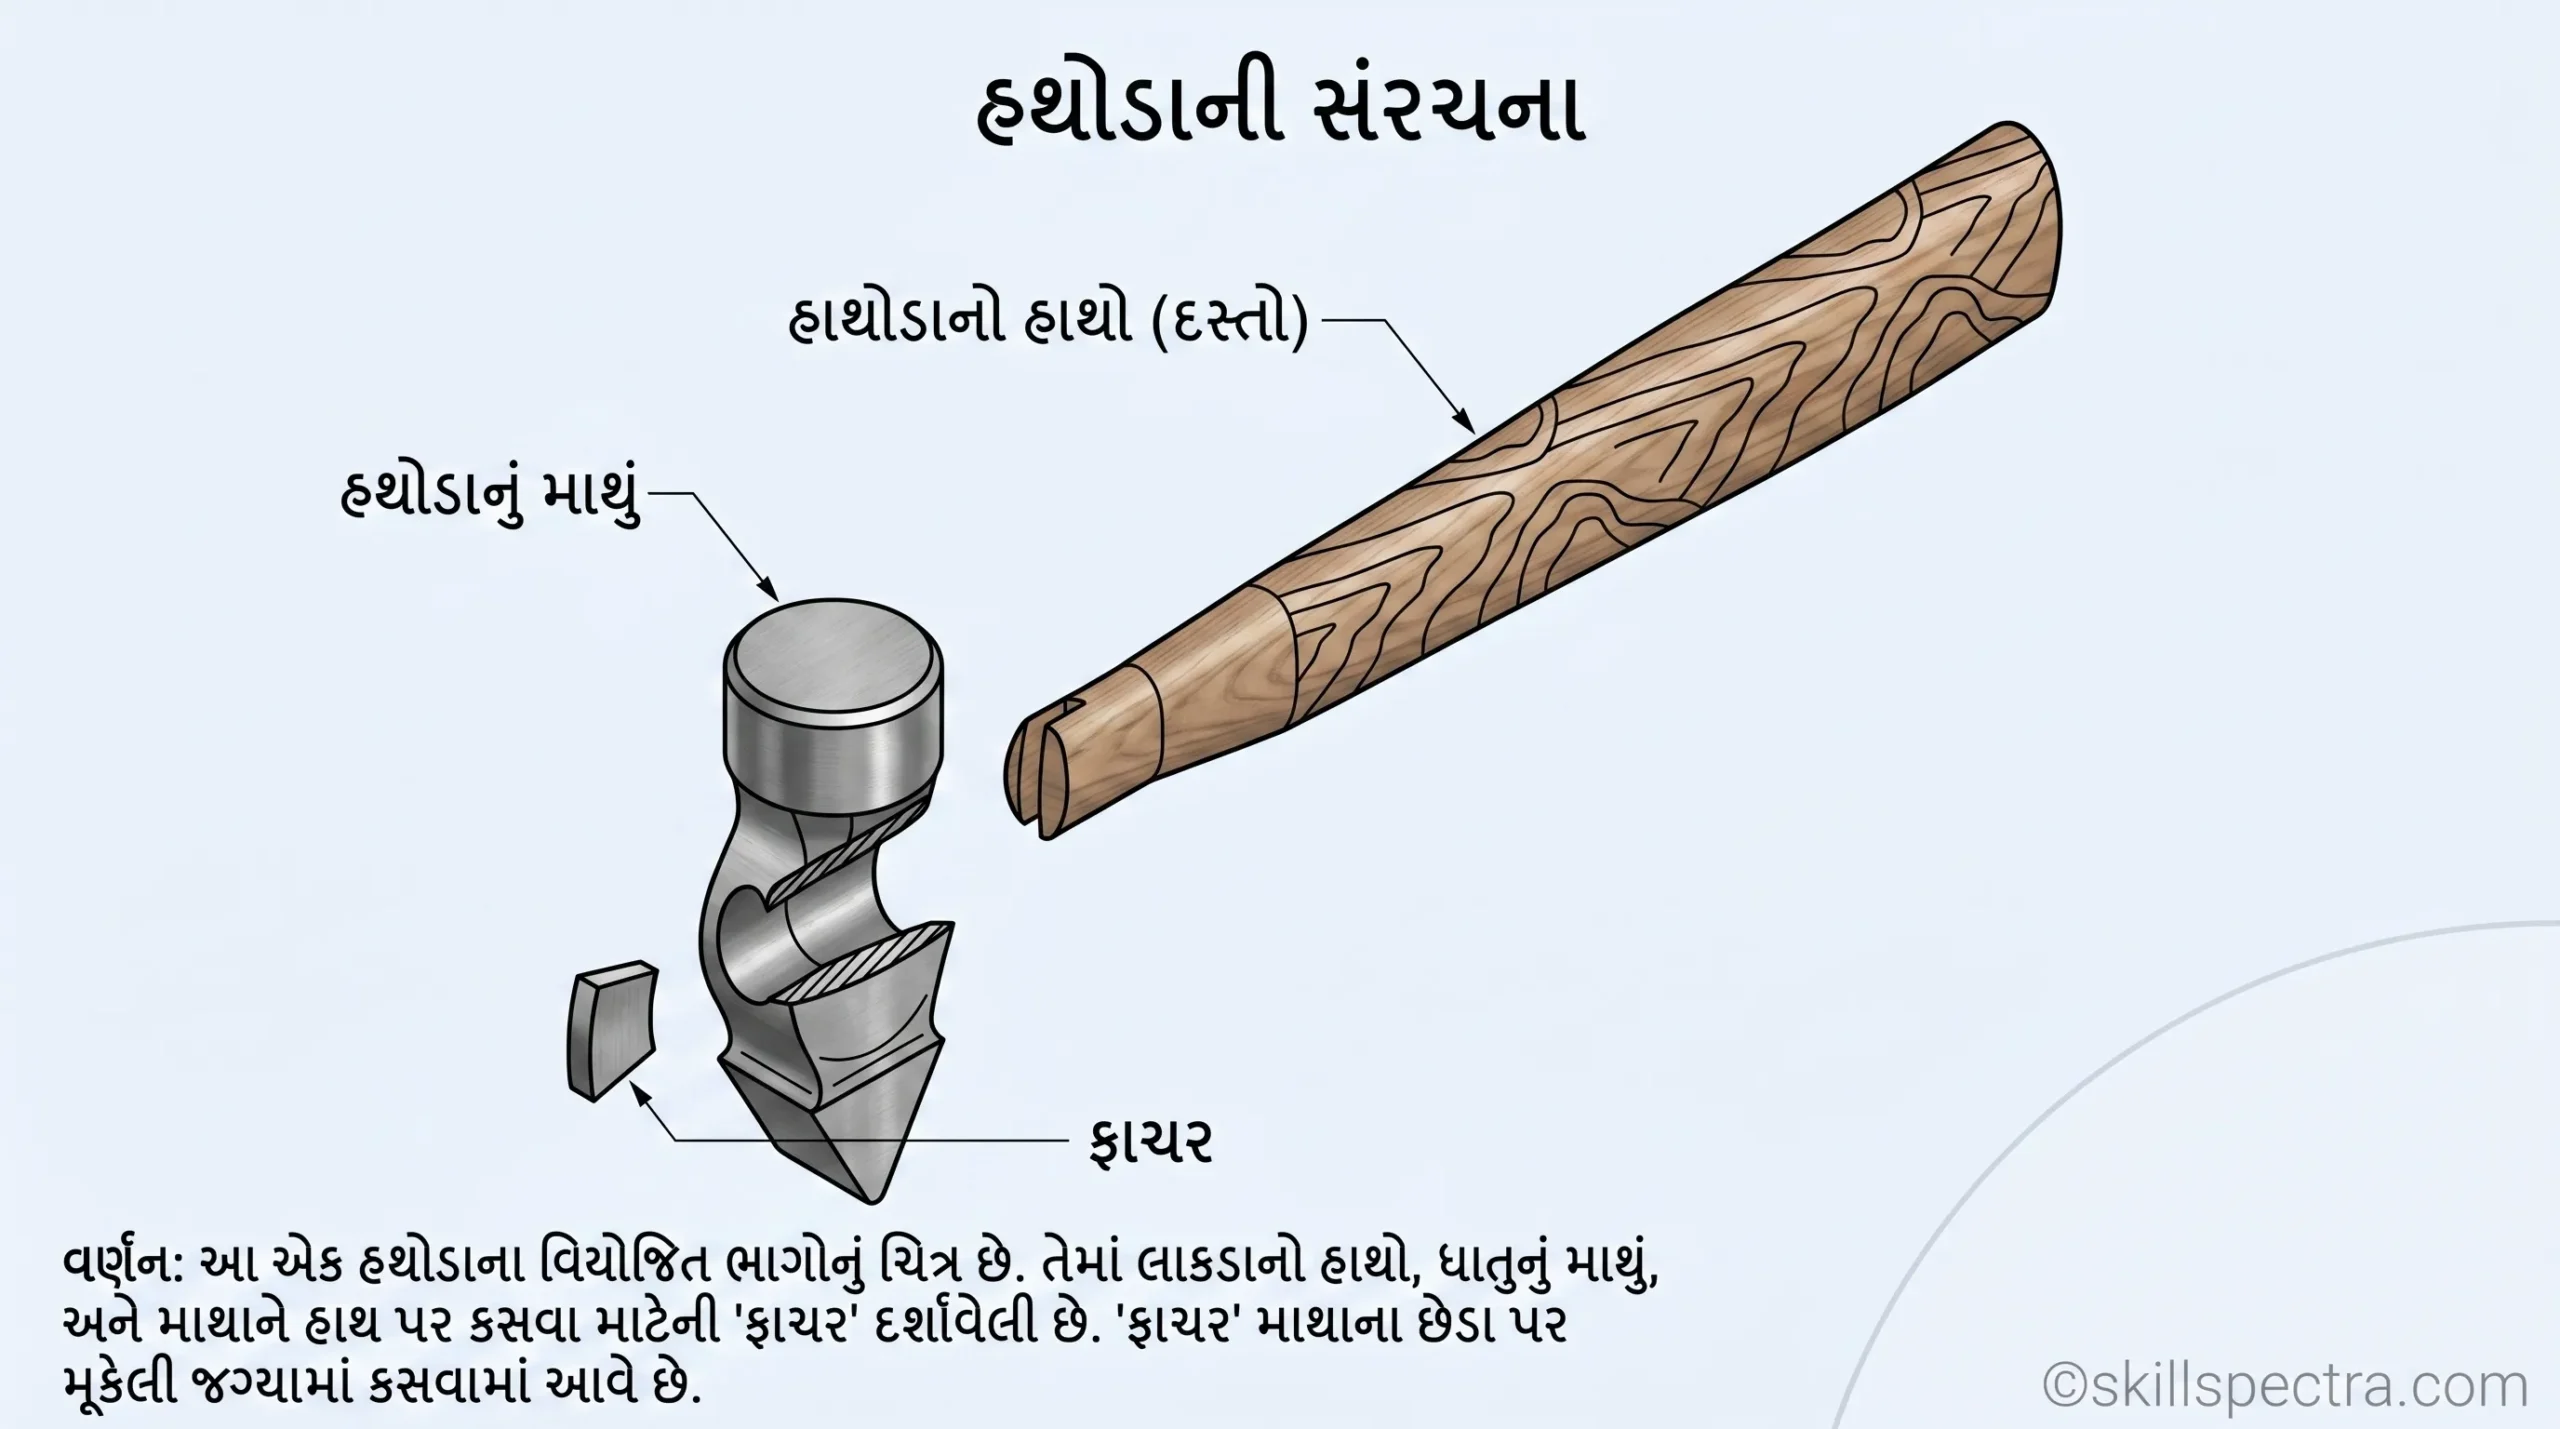
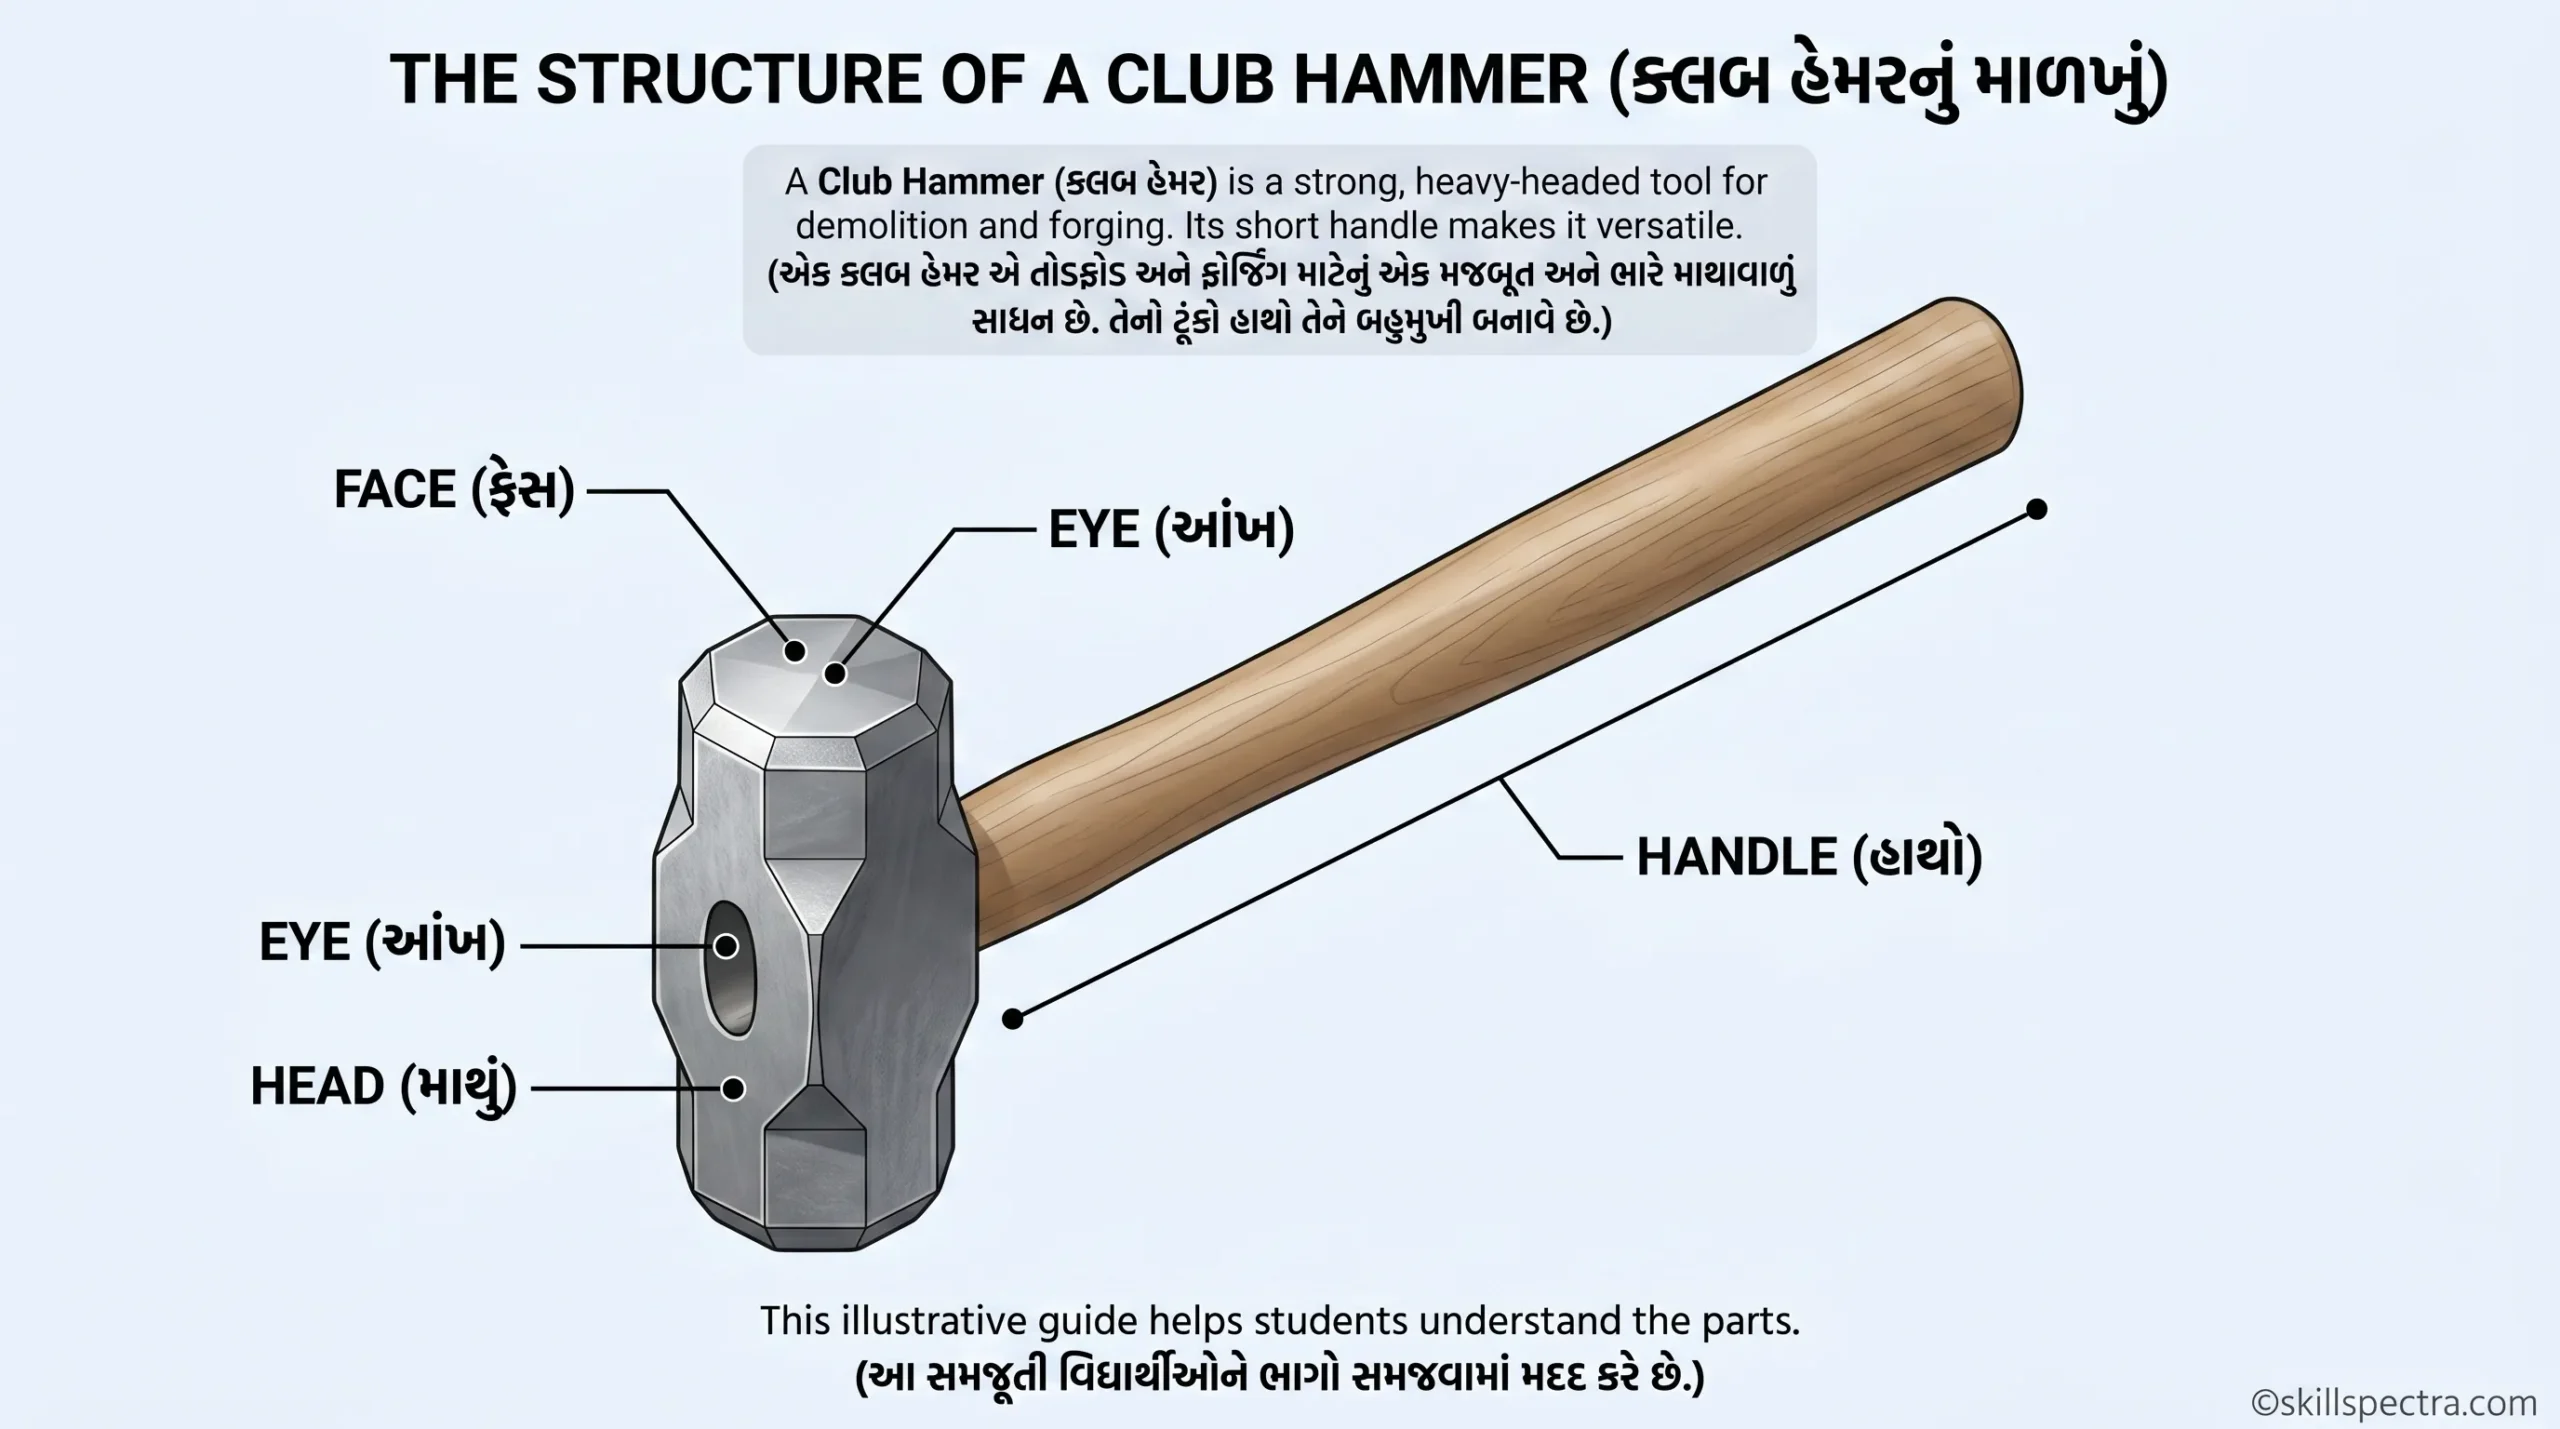
🔩 Major parts of a hammer (હથોડાના મુખ્ય ભાગો – Fig 2)
Hammer ના મુખ્ય બે ભાગો હોય છે: Head અને Handle.
- Head: આ drop-forged carbon steel માંથી બનાવવામાં આવે છે.
- Handle: લાકડાનું (wooden) handle હોવું જોઈએ જે shock absorb (ધ્રુજારી શોષી) શકે.
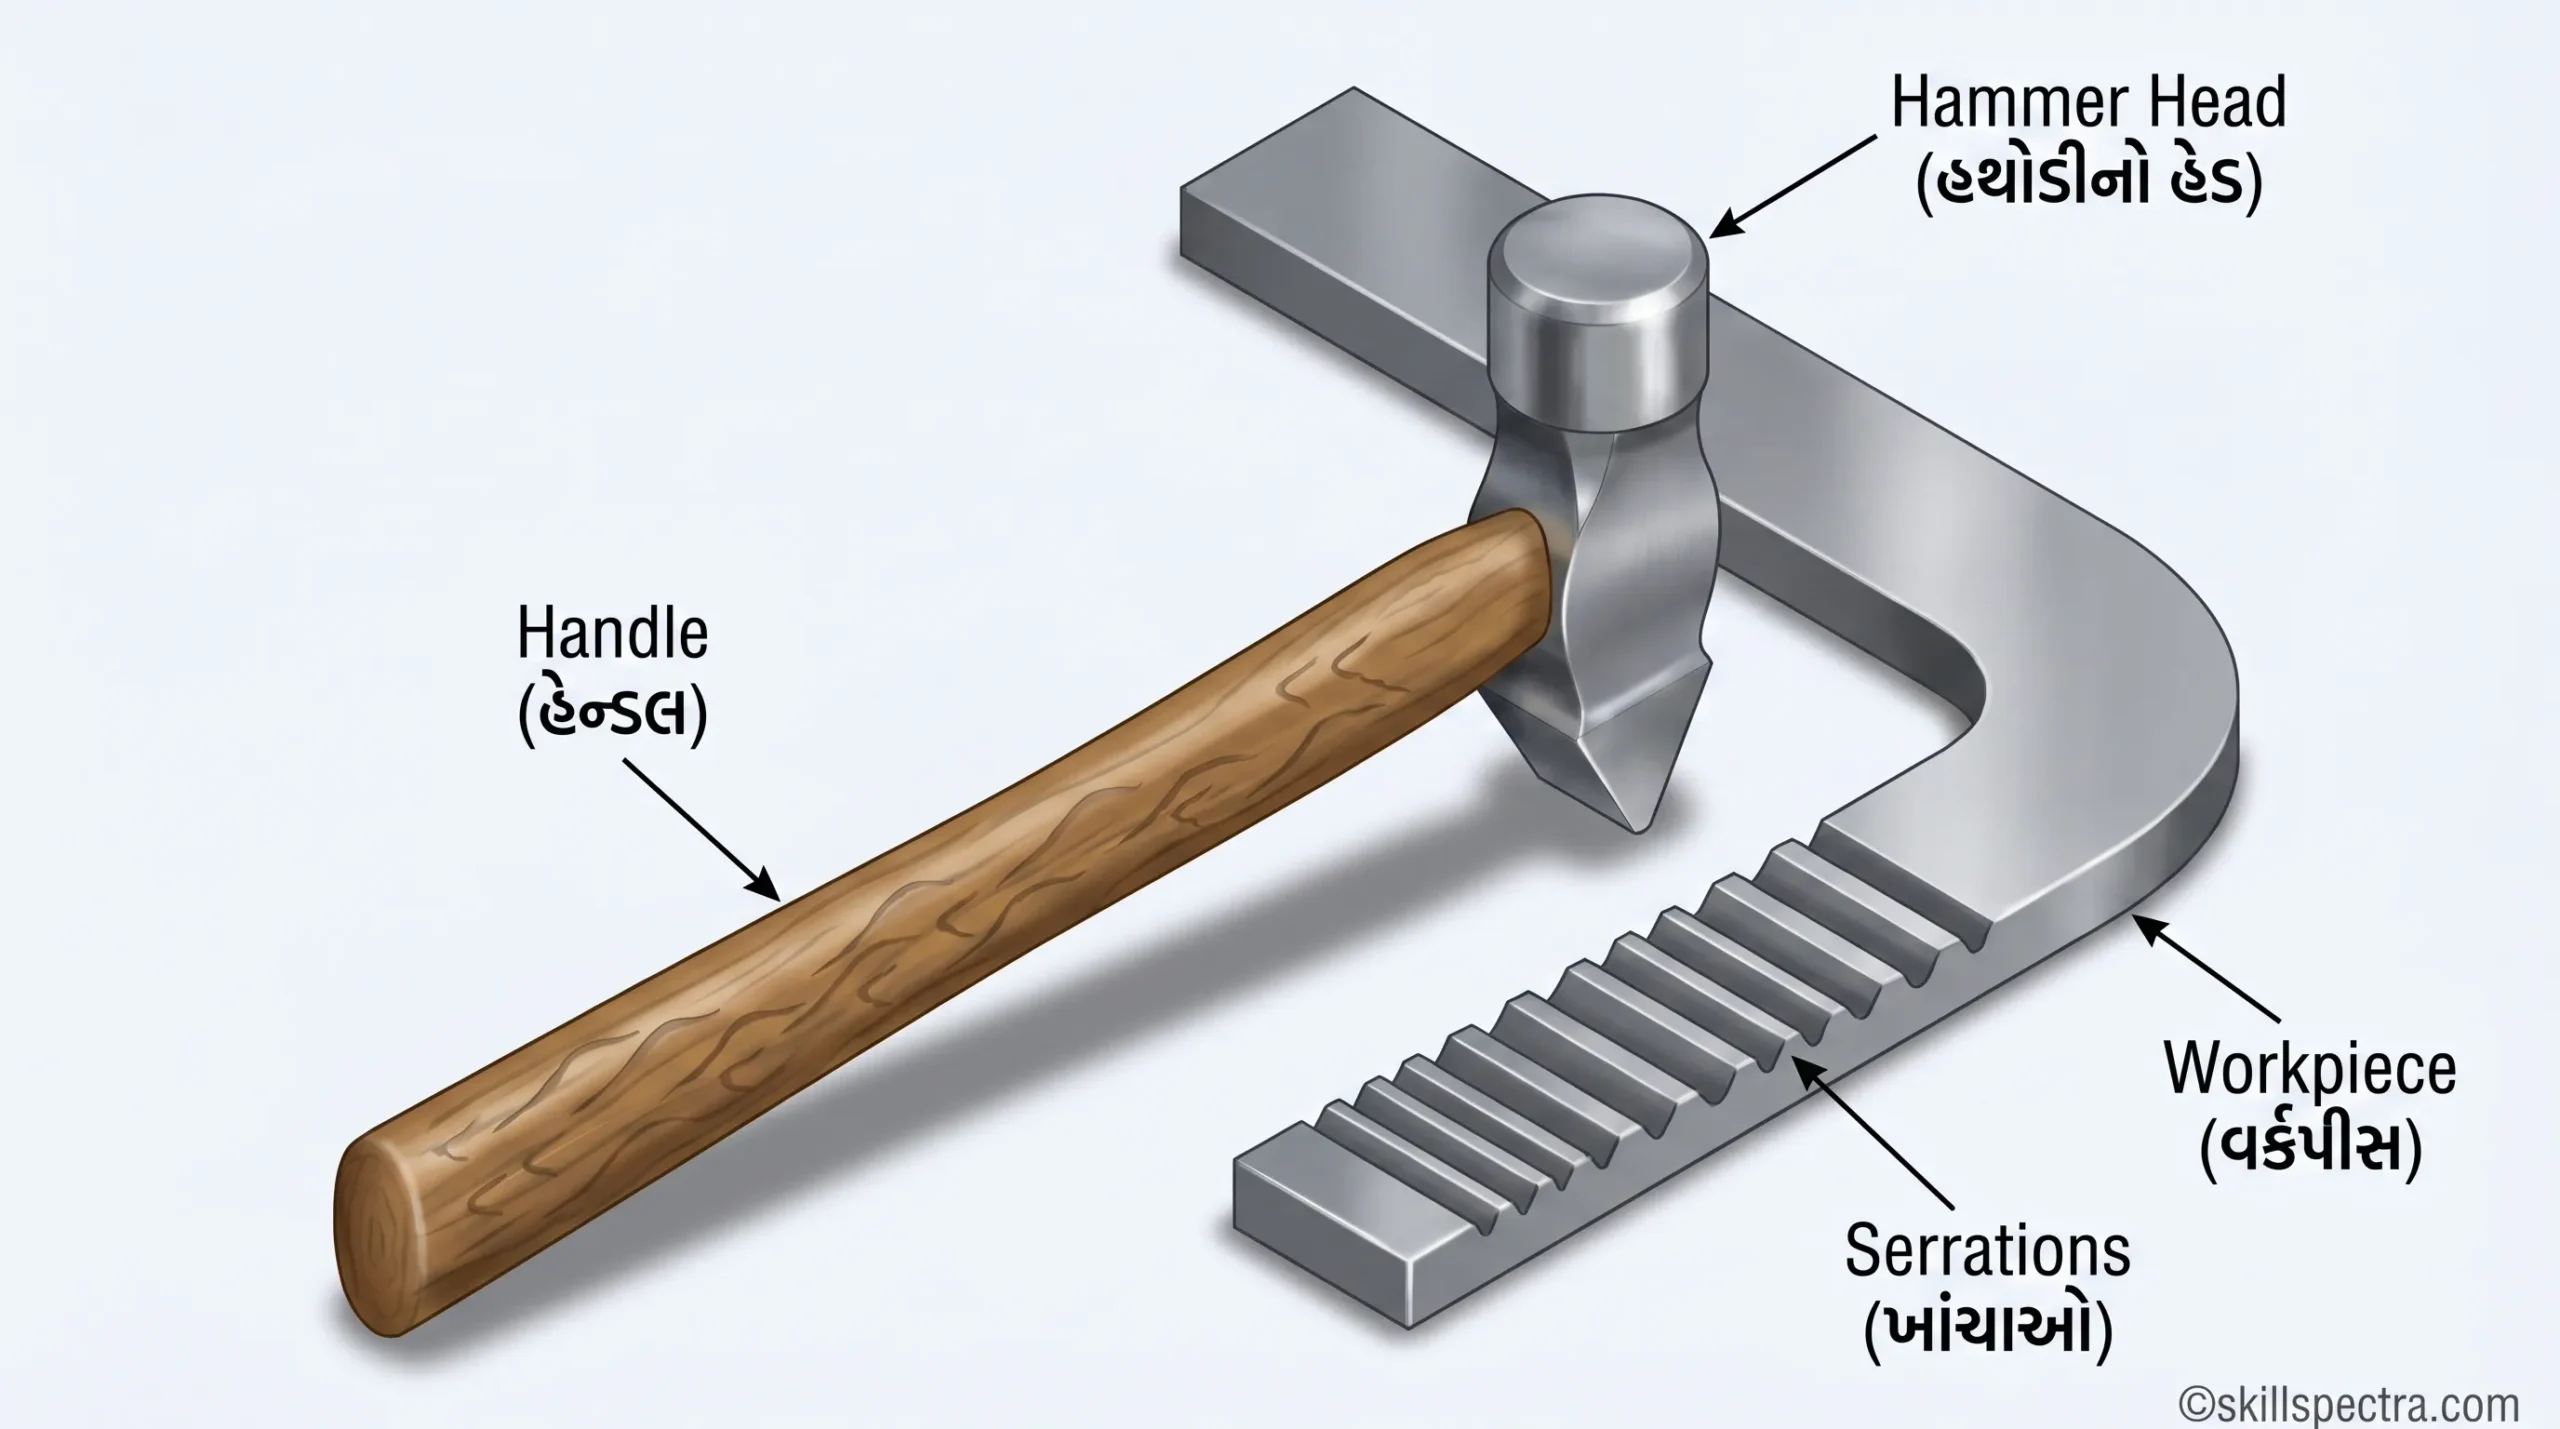
Hammer head ના ભાગો નીચે મુજબ છે:
- Face (1): આ striking portion (ફટકારવાનો ભાગ) છે. તેને સહેજ convexity (બહારની તરફ વળાંક) આપવામાં આવે છે જેથી તેની કિનારીઓ (edges) ધાતુમાં ખૂંપી ન જાય.
- Pein (2): આ head નો બીજો છેડો છે. તેનો ઉપયોગ shaping અને forming કામો જેવા કે riveting અને bending માટે થાય છે. (Fig 3) મુજબ તેના અલગ-અલગ આકારો હોય છે.
- Cheek (3): આ hammer-head નો વચ્ચેનો ભાગ છે. હથોડાનું weight (વજન) અહીં સ્ટેમ્પ (લખેલું) કરવામાં આવે છે. આ ભાગને soft રાખવામાં આવે છે.
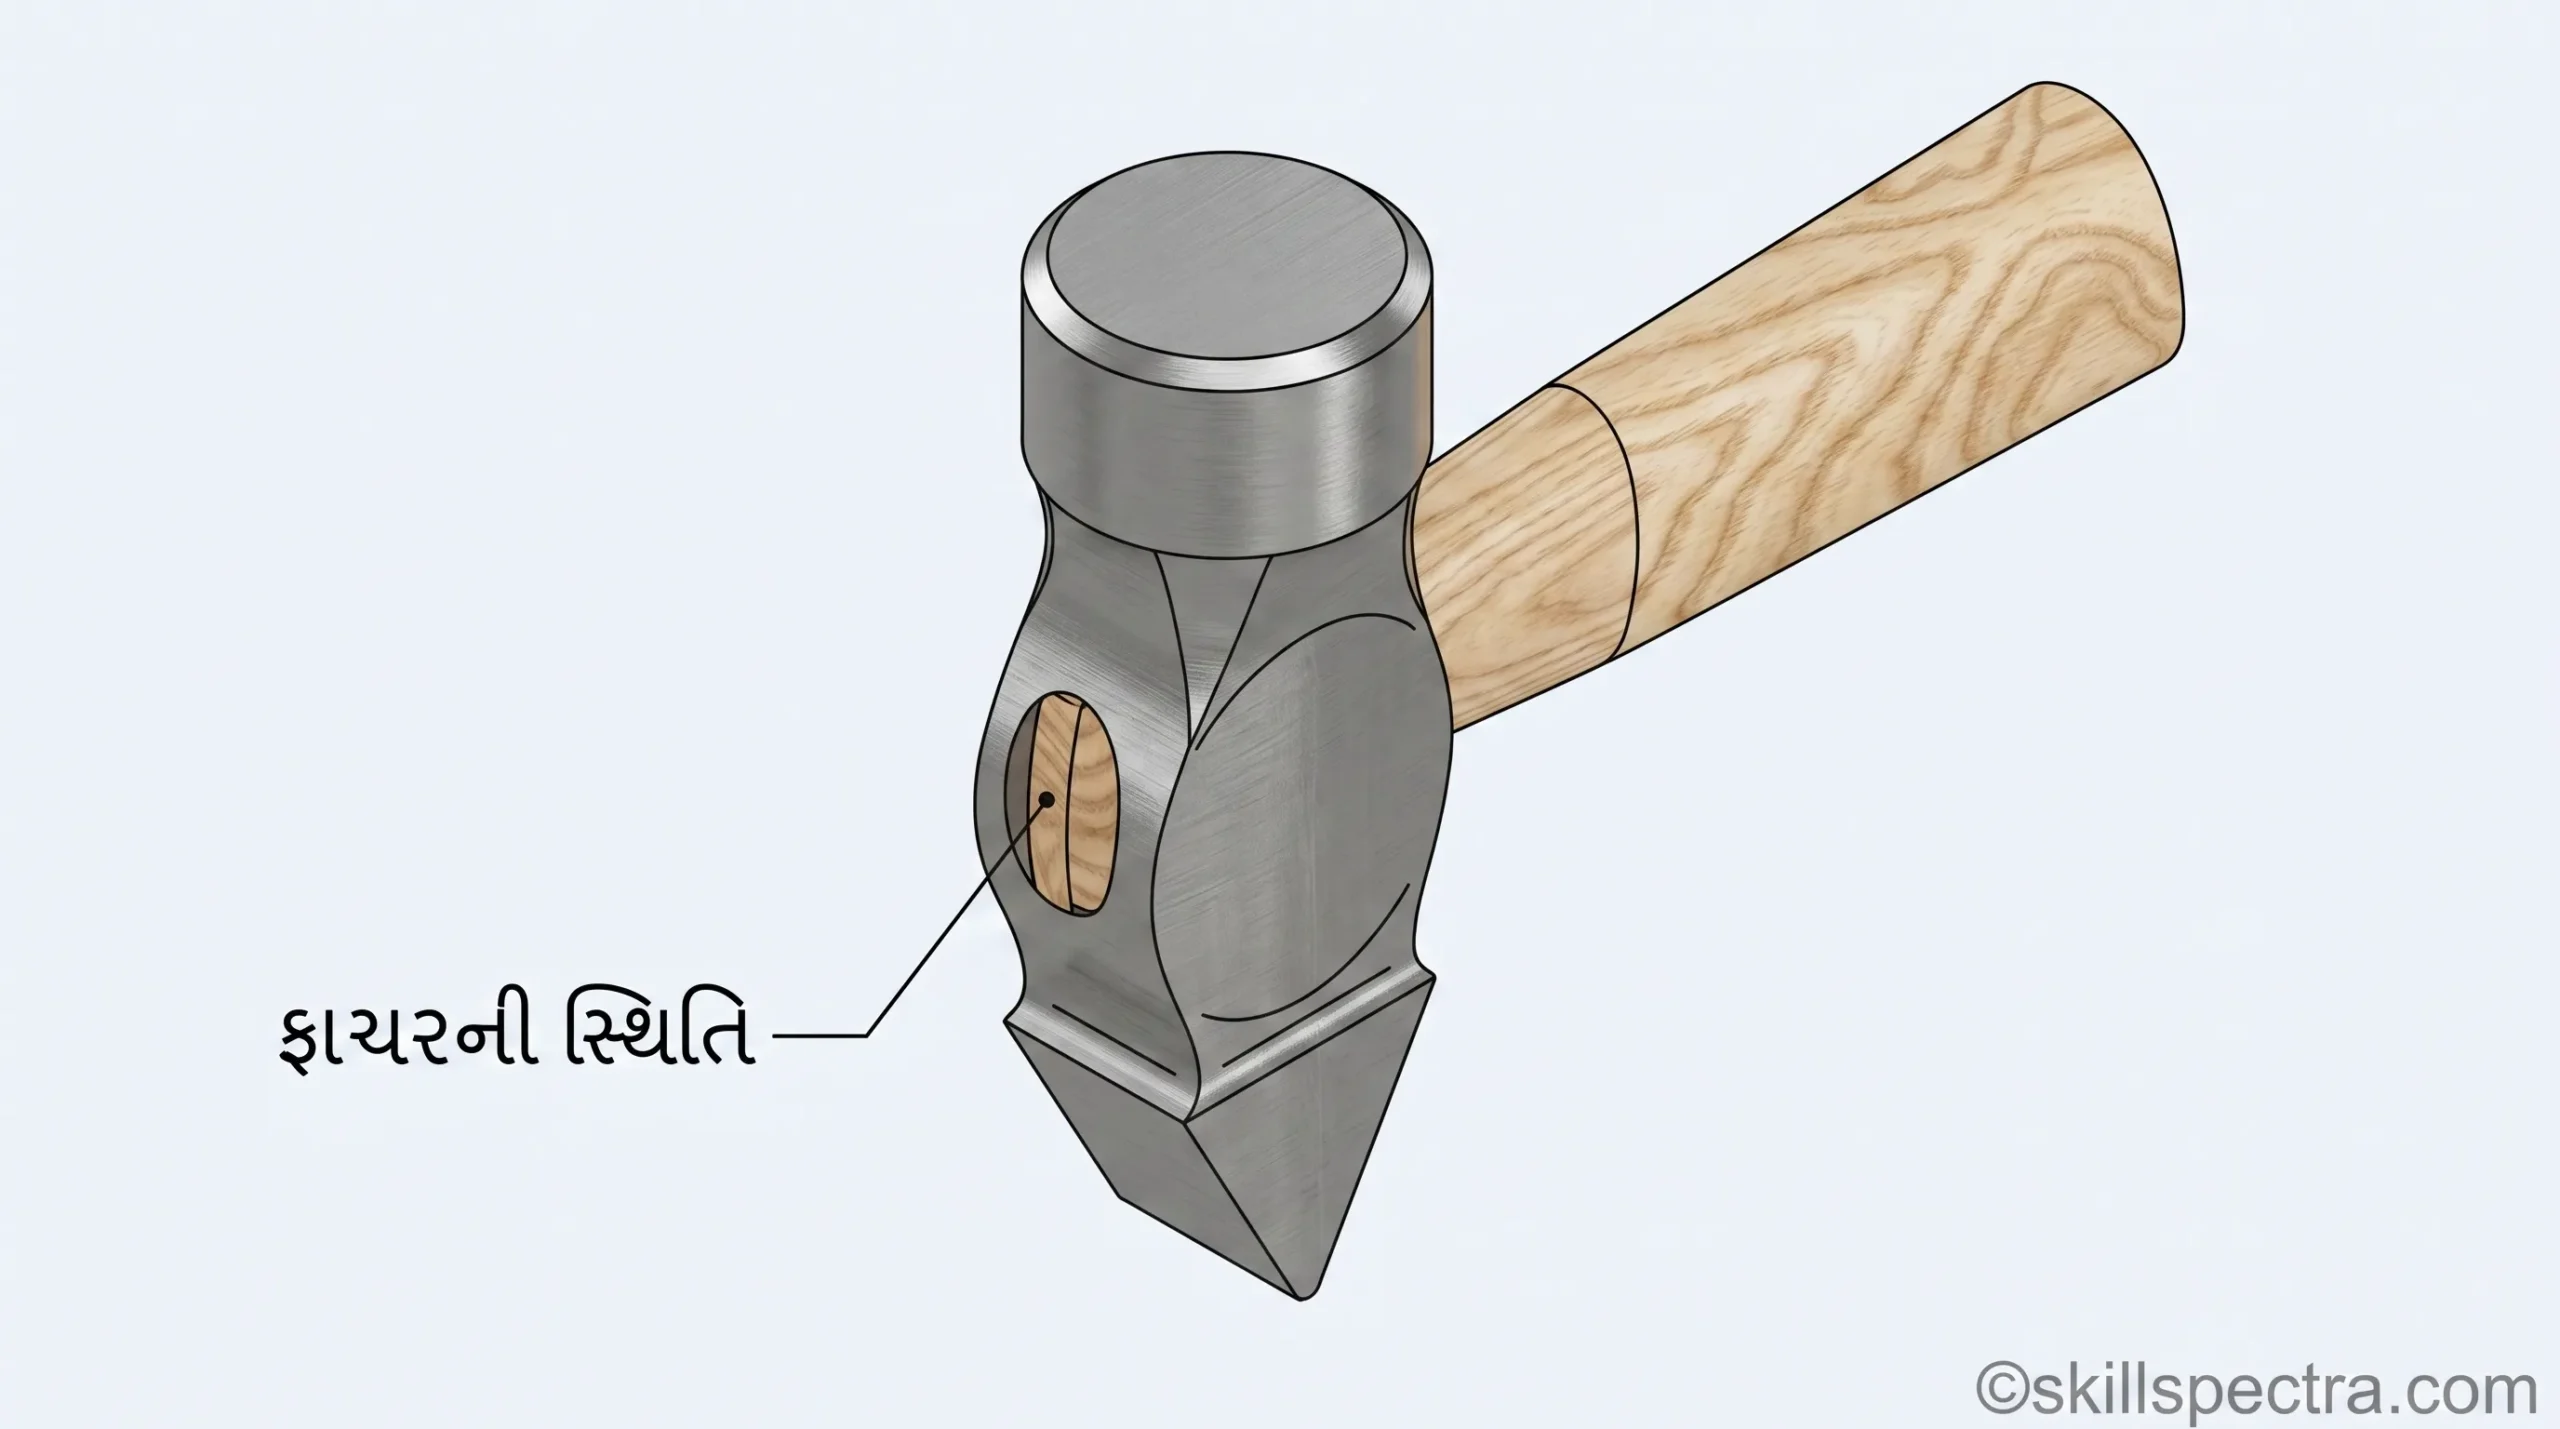
- Eyehole (4): આ છિદ્ર handle ને ફિટ કરવા માટે હોય છે. તેનો આકાર એવો હોય છે કે handle મજબૂત રીતે ફિટ થઈ શકે.
- Wedge (5): Wedges નો ઉપયોગ eyehole માં handle ને રિજિડ (સજ્જડ) રીતે ફિક્સ કરવા માટે થાય છે (Fig 4 & 5).
📏 Specification (વિશિષ્ટતા)
Engineer’s hammers ને તેમના weight (વજન) અને shape of the pein (પેઈનનો આકાર) દ્વારા સ્પેસિફાય કરવામાં આવે છે. તેમનું વજન 125 gms થી 1.5 kg સુધીનું હોય છે.
🔍 Types of Pein (પેઈનના પ્રકારો)
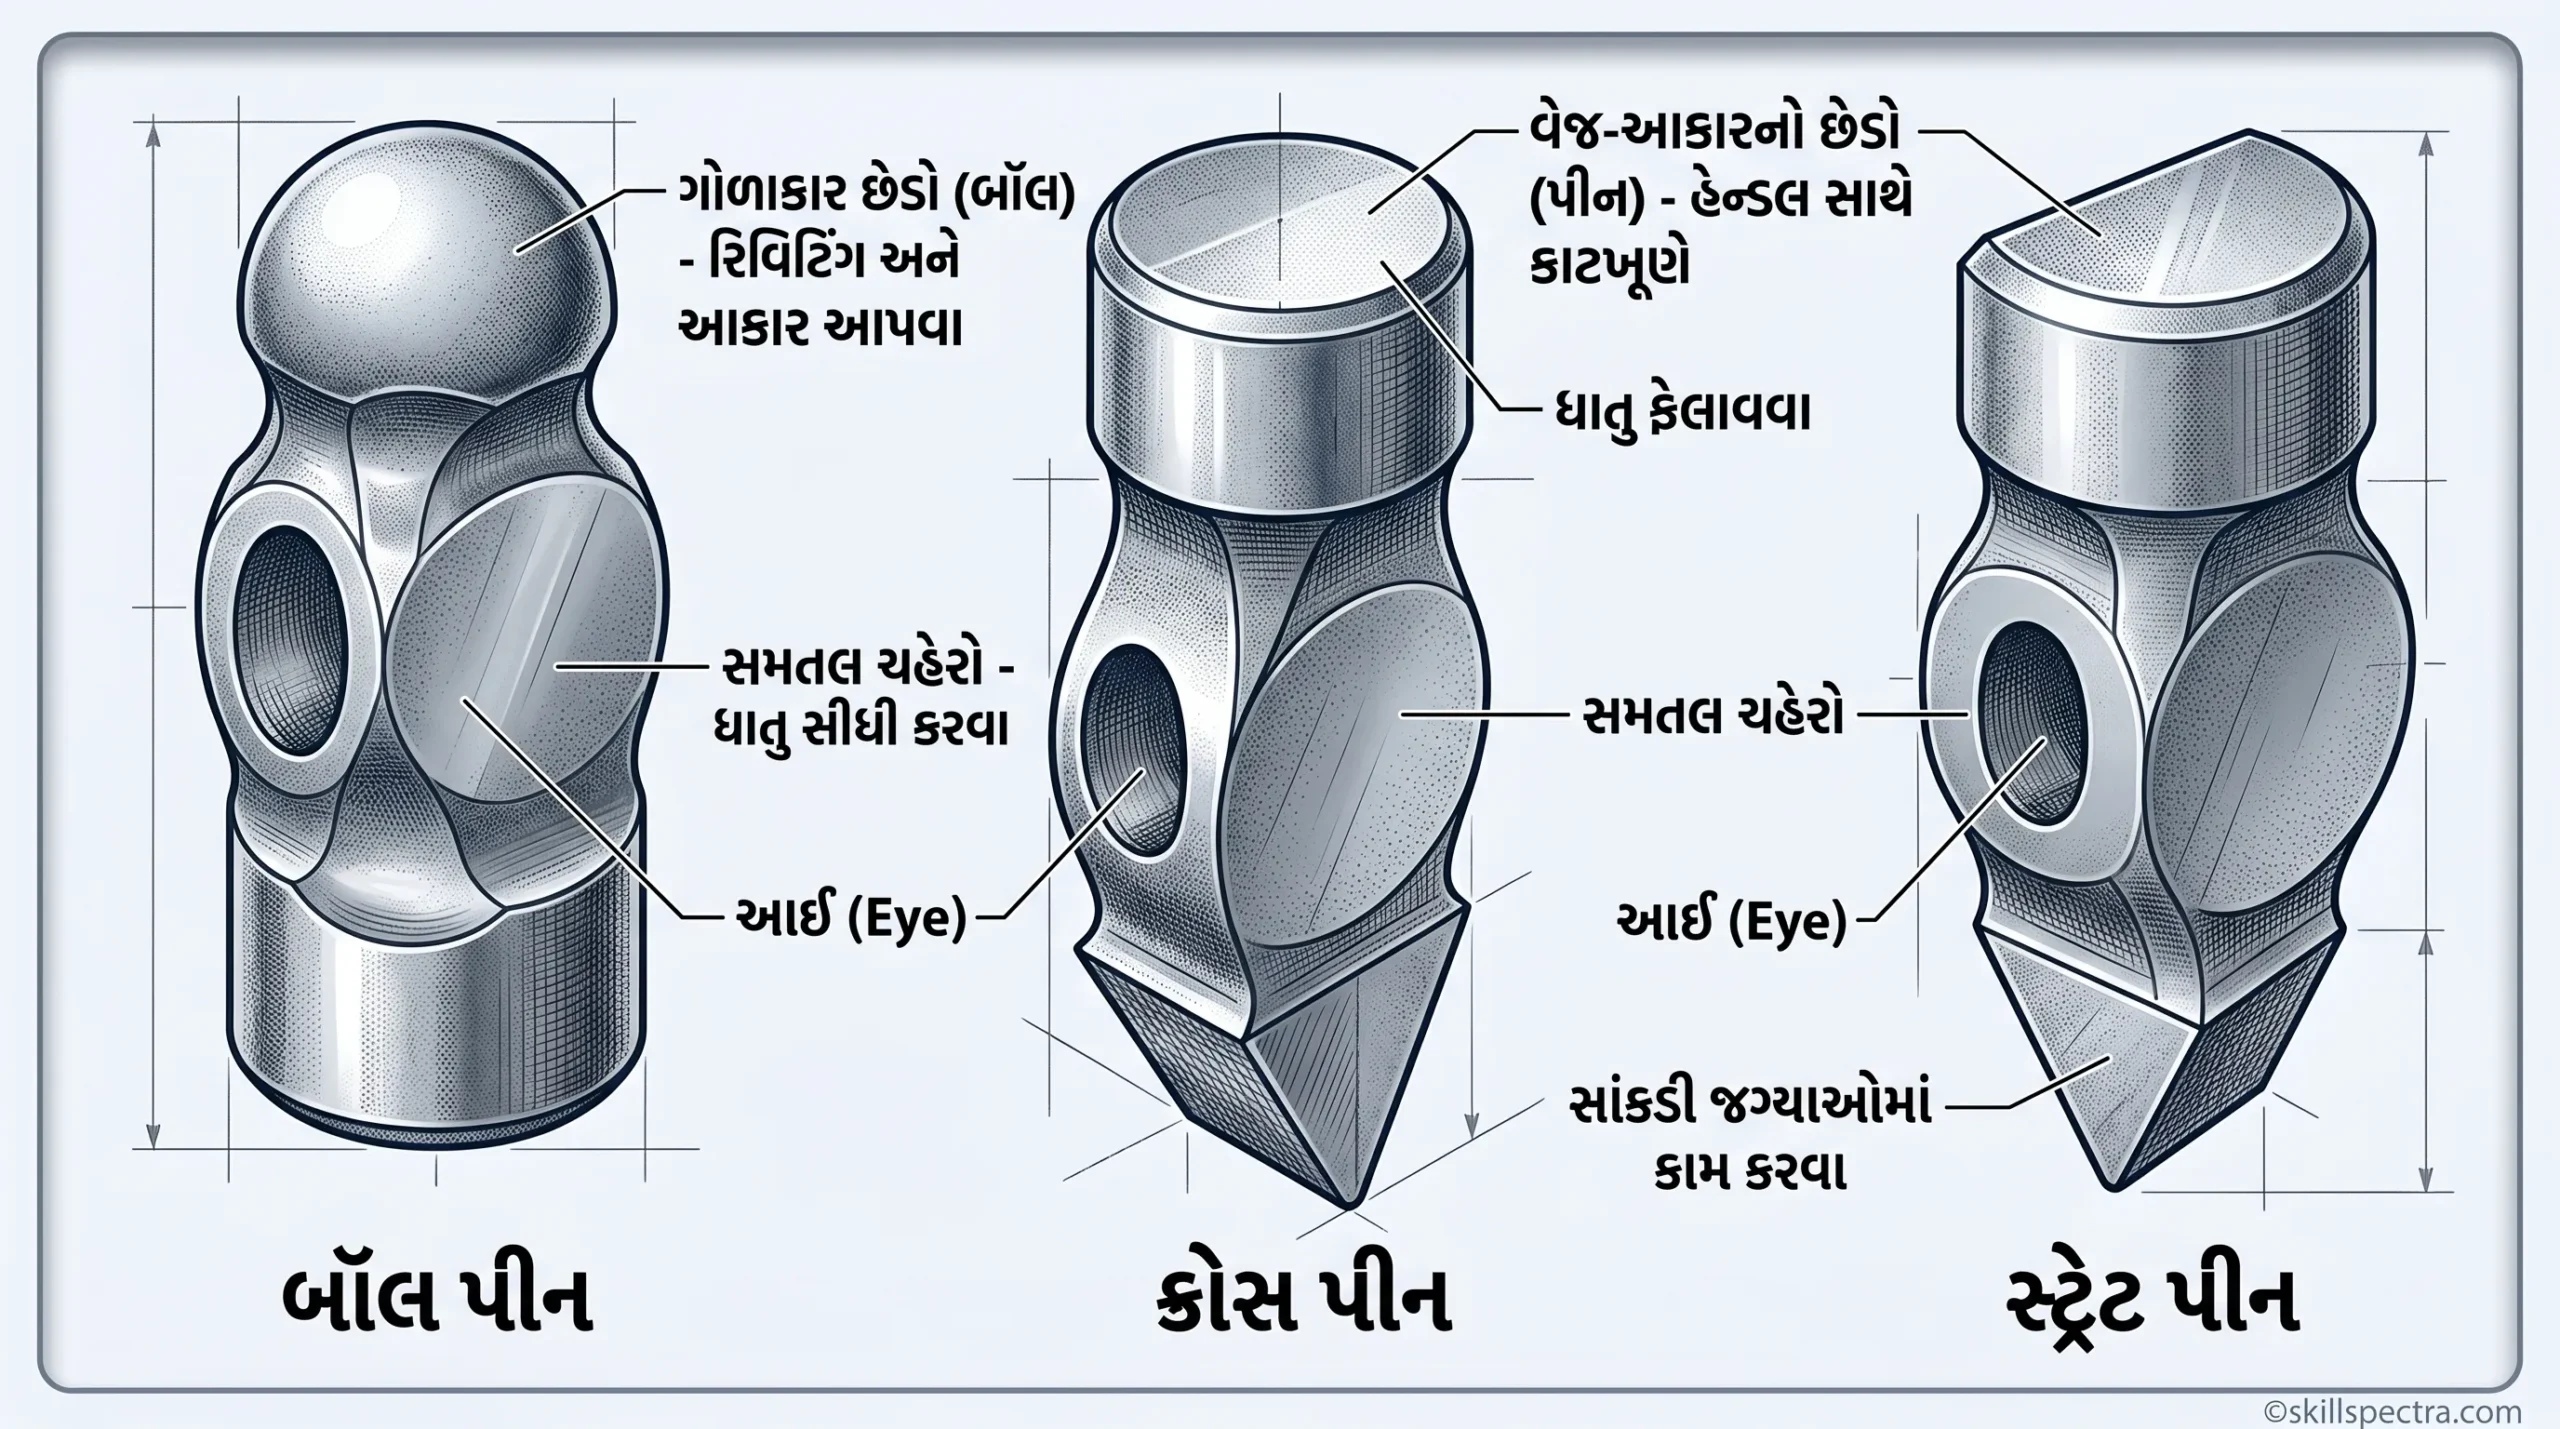
- Ball Pein: તેનો ઉપયોગ સામાન્ય કામો અને riveting માટે થાય છે.
- Cross Pein: આમાં pein હેન્ડલની ધરી (axis) ને કાટખૂણે (right angles) હોય છે.
- Straight Pein: આમાં pein હેન્ડલની ધરીની સમાંતર હોય છે.
⚠️ Safety Precautions: Before using a hammer (હથોડાનો ઉપયોગ કરતા પહેલા)
- ખાતરી કરો કે handle યોગ્ય રીતે ફિટ થયેલું છે (properly fitted).
- કામ મુજબ યોગ્ય વજન (correct weight) વાળો હથોડો પસંદ કરો.
- Head અને handle માં કોઈ cracks (તિરાડો) છે કે નહીં તે તપાસો.
- ખાતરી કરો કે hammer નો face oil અથવા grease થી મુક્ત છે.
🏗️ Detailed Functions of Different Hammers
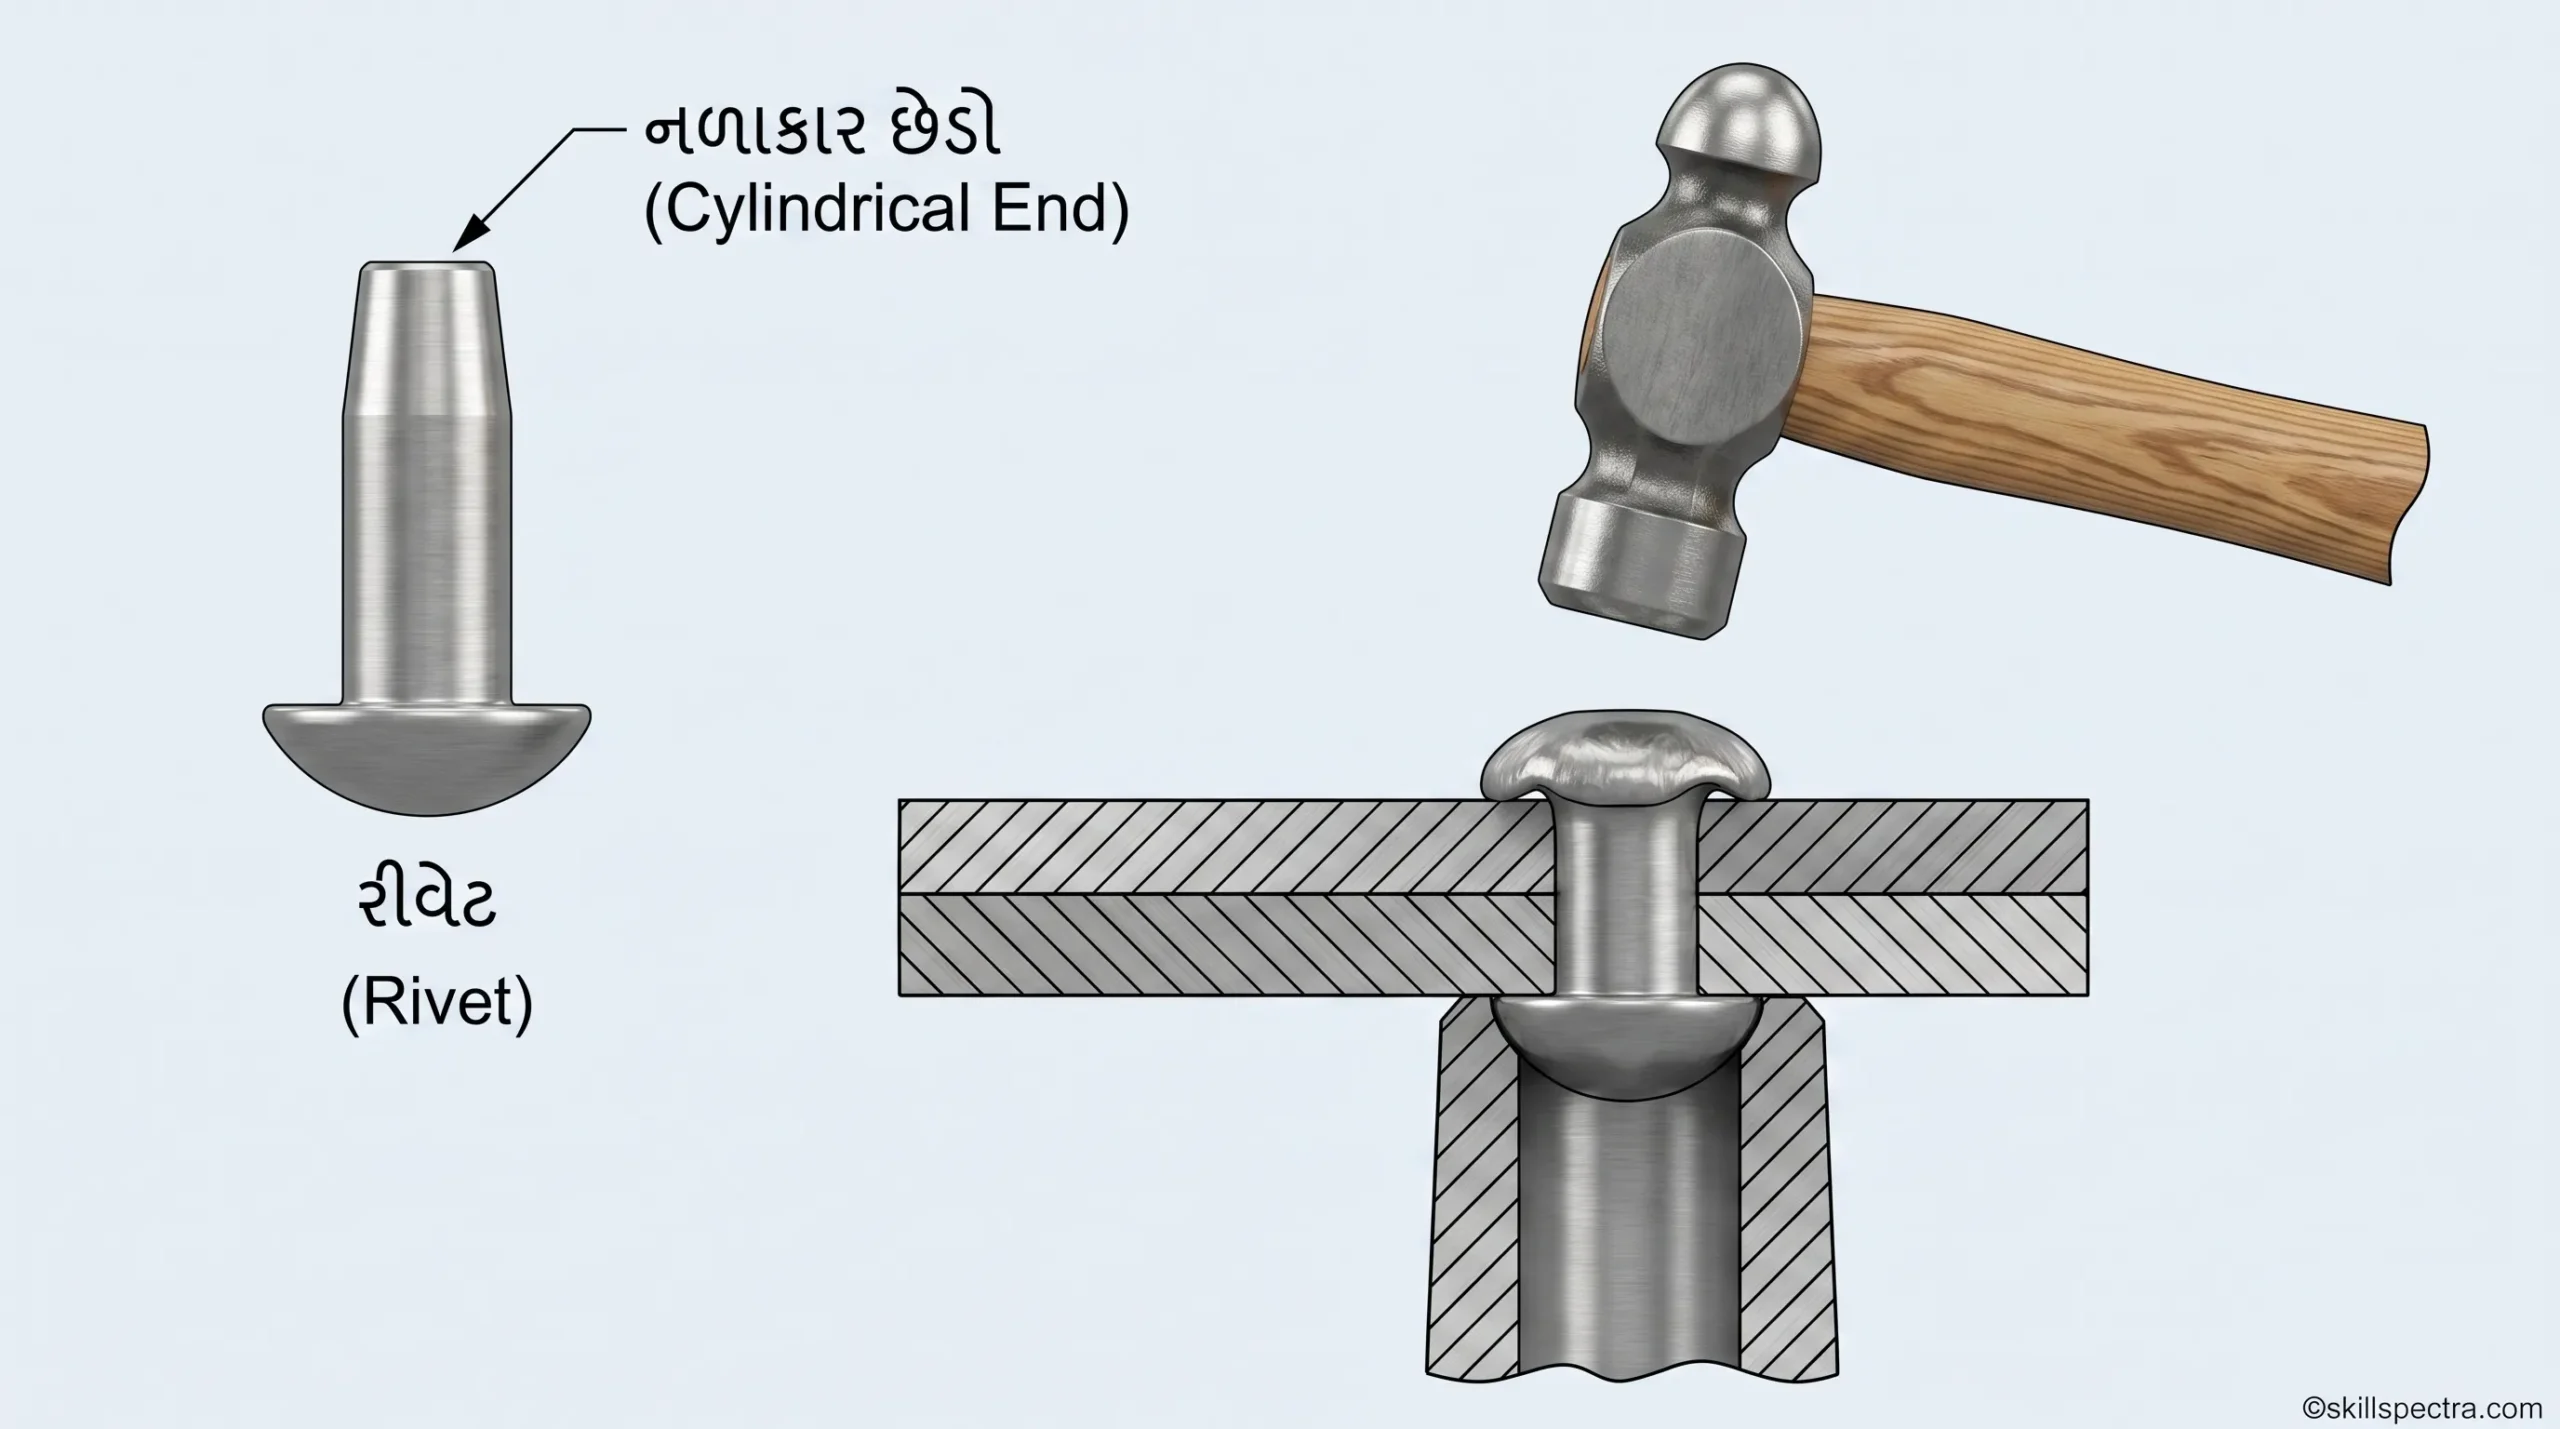
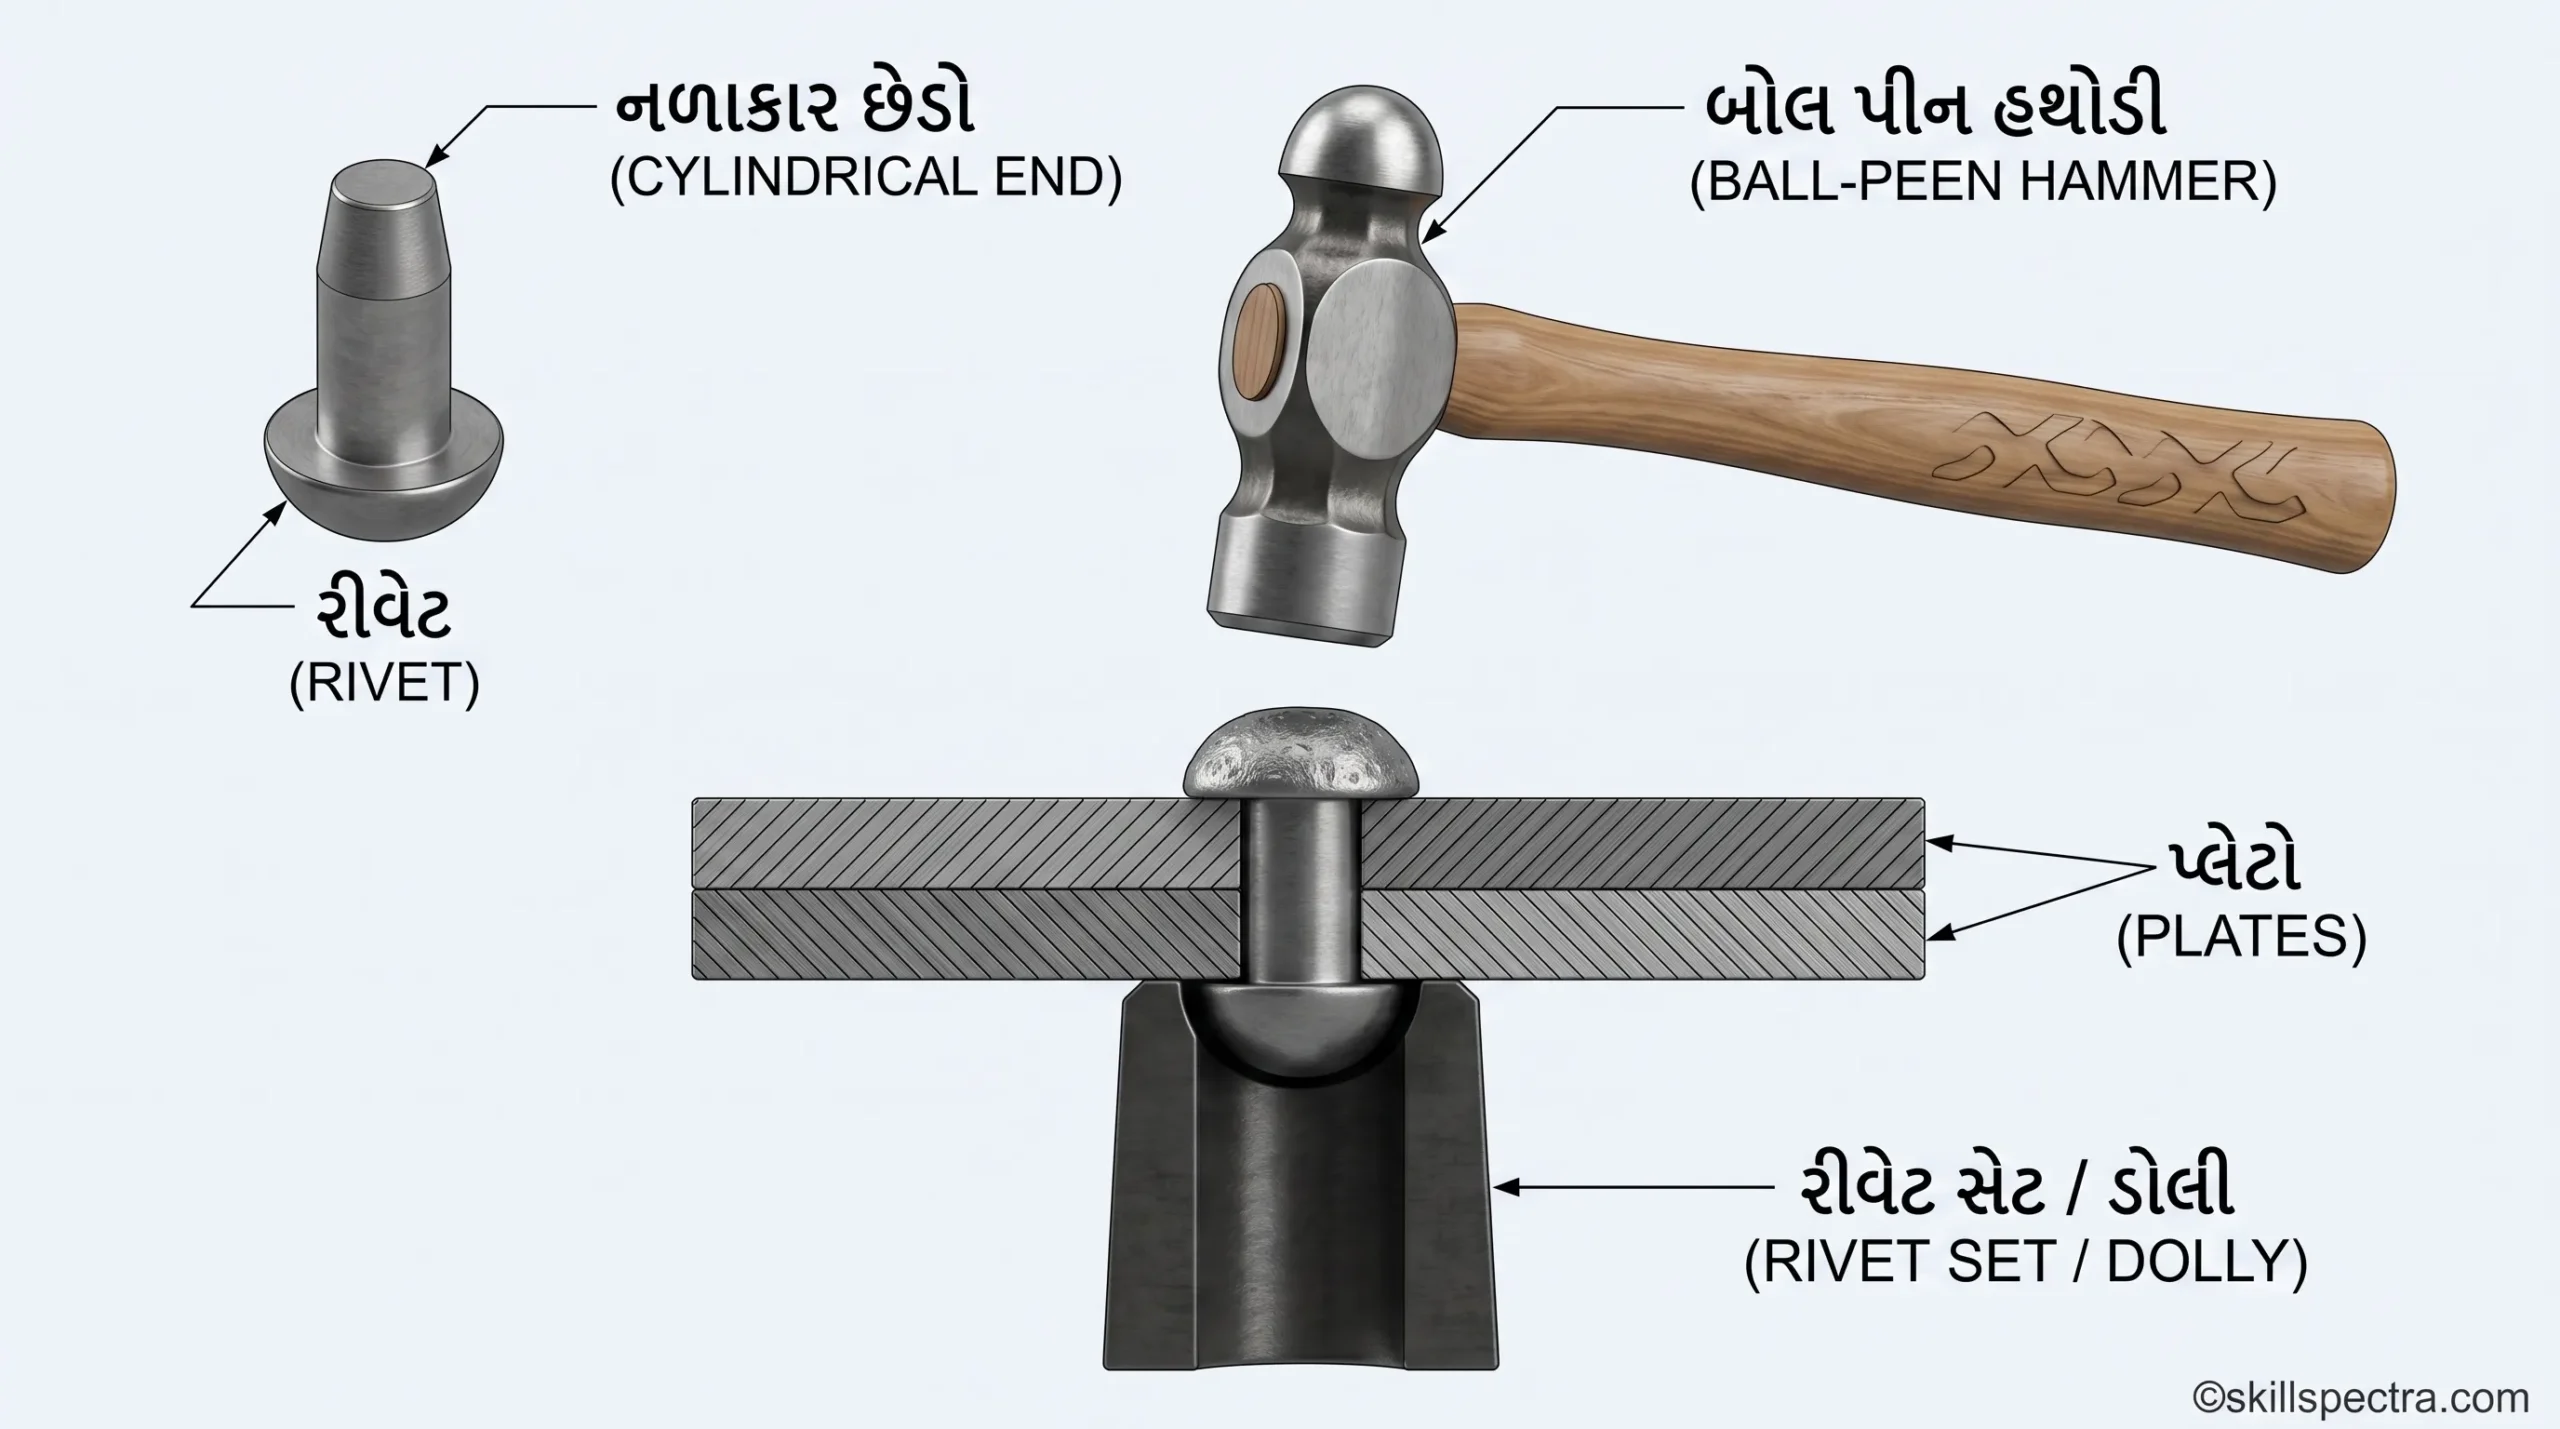
1. Ball Pein Hammer (Fig 8):
- Ball pein head નો ઉપયોગ ધાતુને બધી દિશાઓમાં spread (ફેલાવવા) માટે થાય છે.
- આ hammer માં semi-spherical pein હોય છે જે riveting માટે યોગ્ય છે.
- તેનો ઉપયોગ rivet head બનાવવા માટે metal rivet ના નળાકાર છેડાને આકાર આપવા માટે થાય છે (Fig 9).
2. Cross Pein Hammer (Fig 10):
- Cross pein head નો ઉપયોગ ધાતુને striking line ની એક જ દિશામાં ફેલાવવા માટે થાય છે.
- આમાં blunt wedge-shaped pein હોય છે જે handle ના axis થી right angles (કાટખૂણે) હોય છે.
3. Straight Pein Hammer (સ્ટ્રેટ પીન હેમર) 🔨
- Straight pein hammer નો ઉપયોગ metal ને એક દિશામાં spread (ફેલાવવા) કરવા માટે થાય છે, જે striking line ના right angles (કાટખૂણે) હોય છે (Fig 11).
- આ hammer માં એક blunt wedge-shaped pein હોય છે જે handle ની axis (ધરી) ની સીધી લાઇન માં હોય છે.
4. Lump Hammer or Club Hammer (લમ્પ અથવા ક્લબ હેમર) 🔨
- Lump hammer અથવા club hammer એ એક નાની sledge hammer છે (Fig 12), જેનું વજન સરખામણીમાં ઓછું હોય છે અને તેનું handle ટૂંકું હોય છે જેથી તેને single-handed (એક હાથે) વાપરી શકાય છે. ✋
- તે light demolition work (હલકા તોડફોડના કામ), driving masonry nails (દીવાલની ખીલીઓ ઠોકવા), અને પથ્થર કે ધાતુ કાપતી વખતે steel chisel (છીણી) સાથે વાપરવા માટે ખૂબ ઉપયોગી છે.
- આ છેલ્લા ઉપયોગમાં (chisel સાથે), તેનું વજન chisel ને મટીરિયલની અંદર વધુ ઊંડાઈ સુધી લઈ જાય છે, જે હલકી hammer કરતા વધુ અસરકારક છે. 🏗️
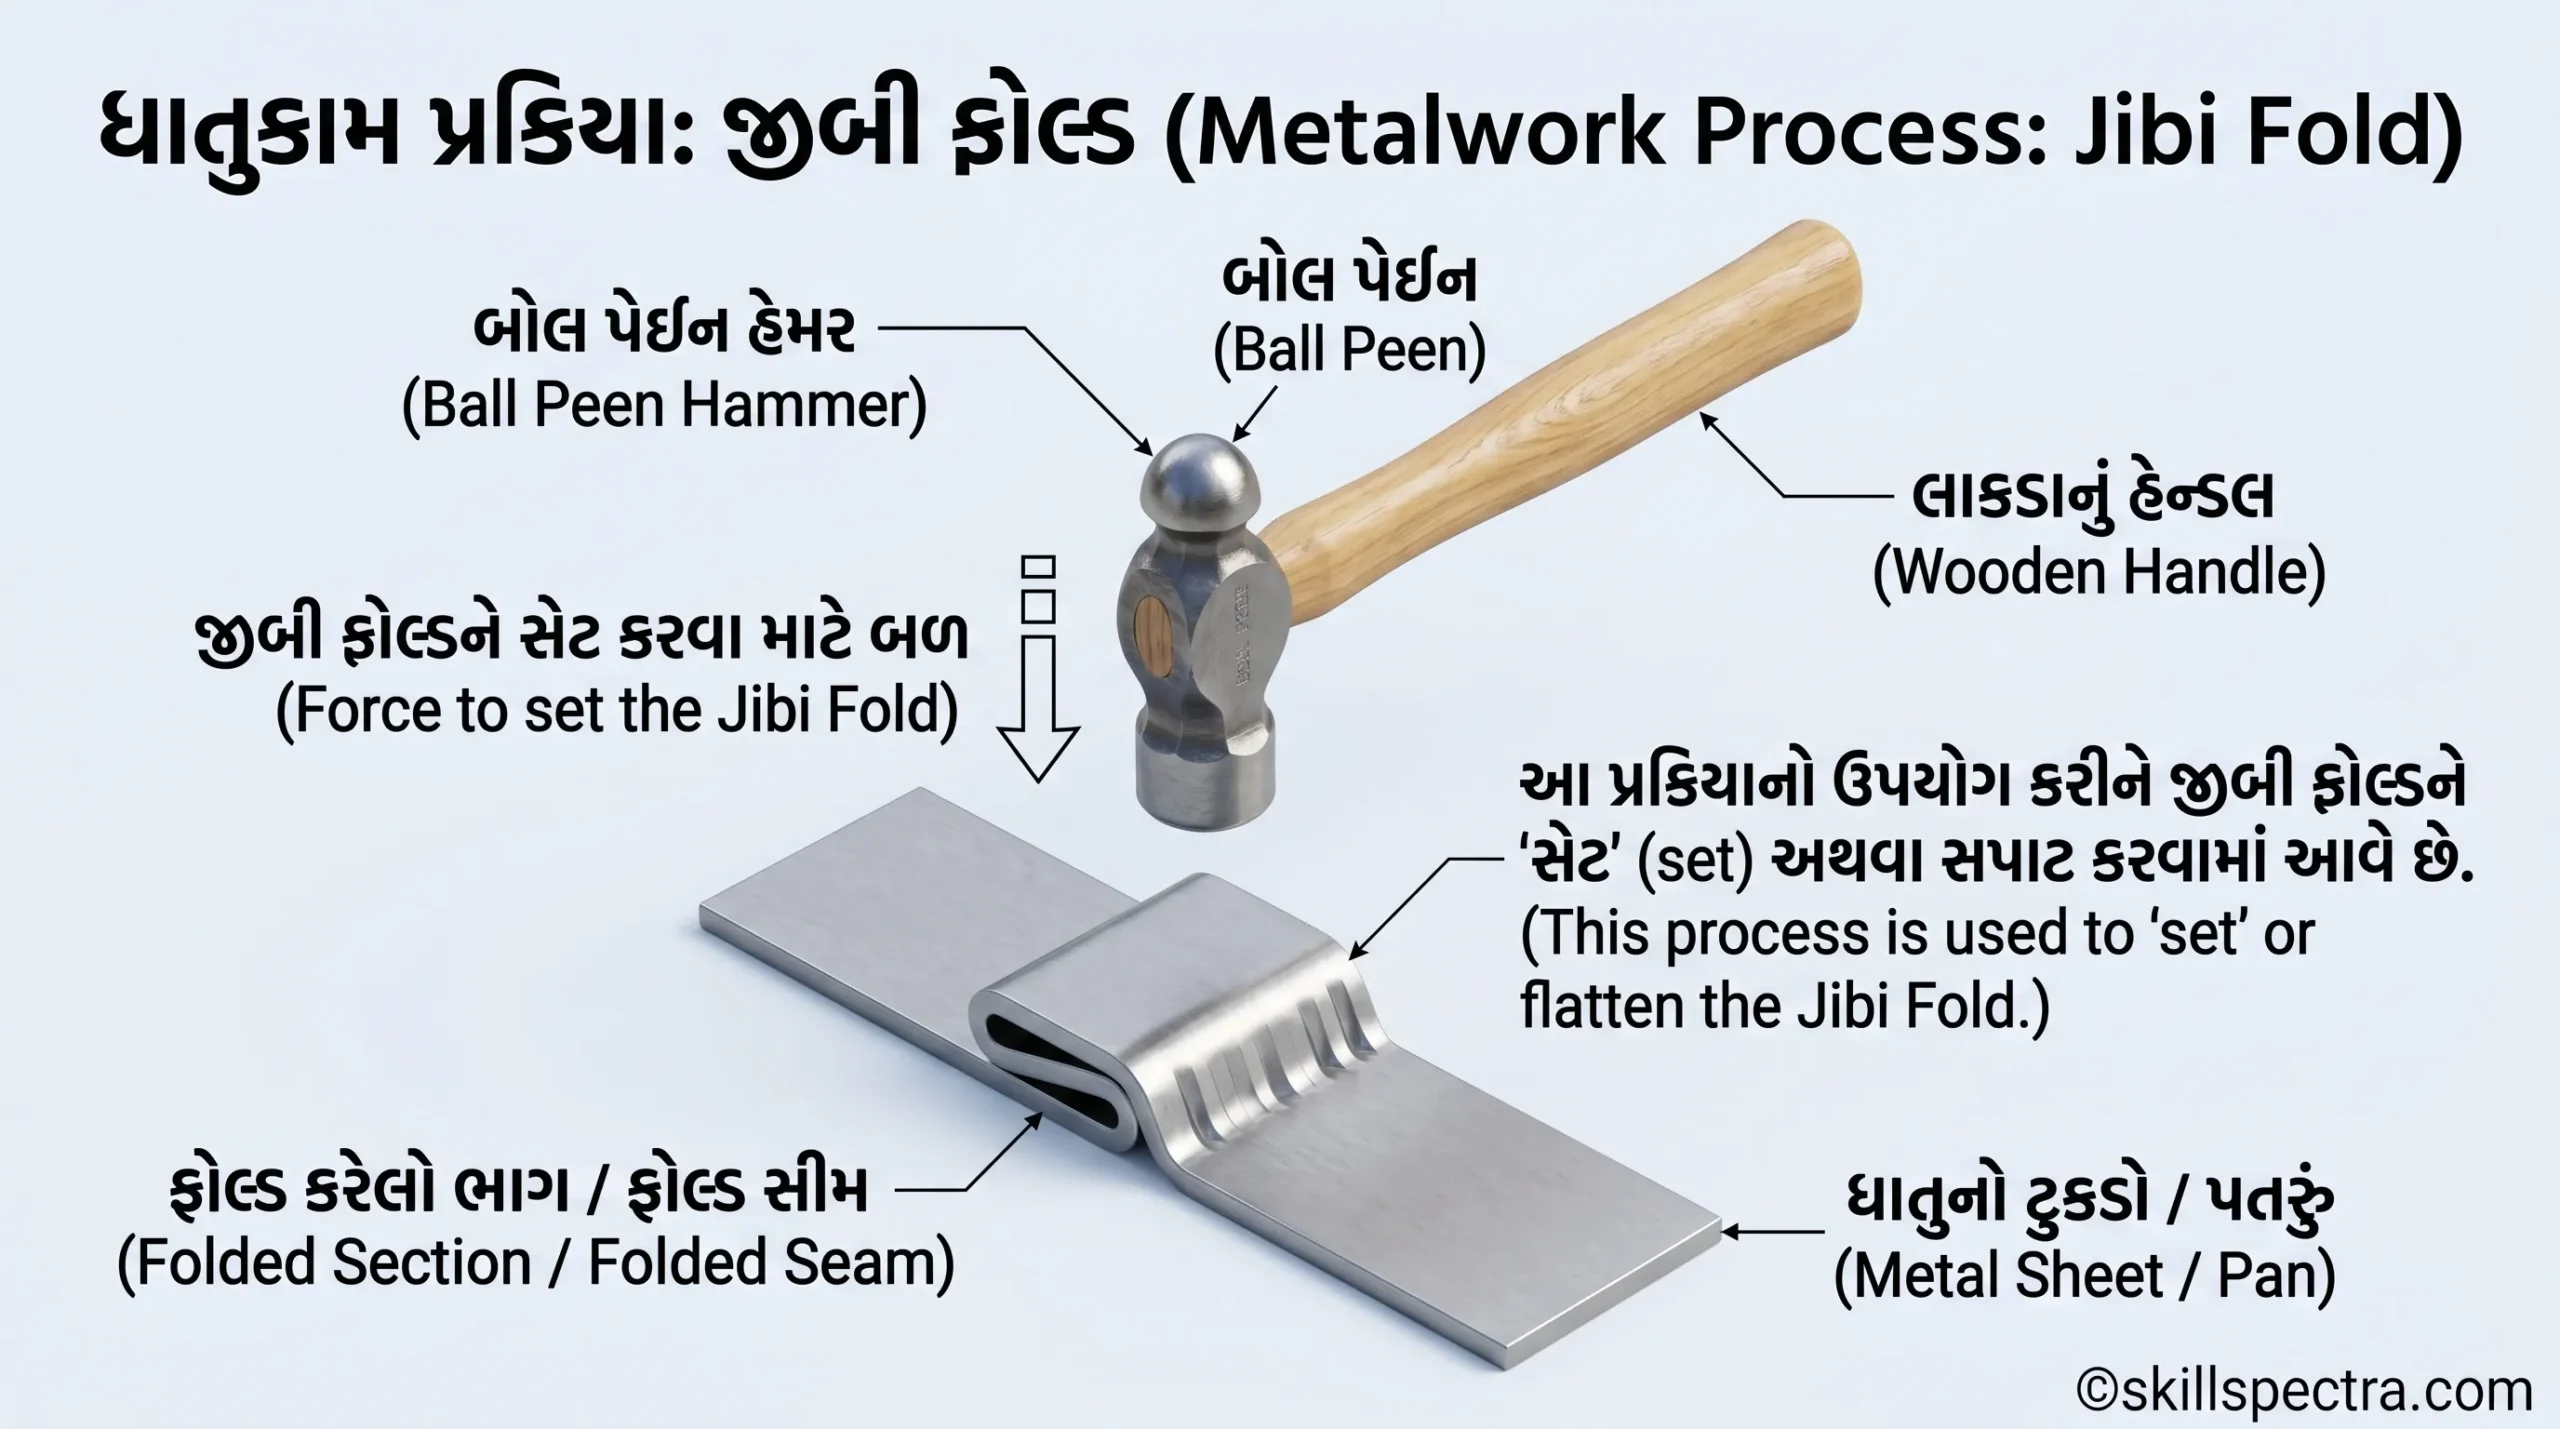
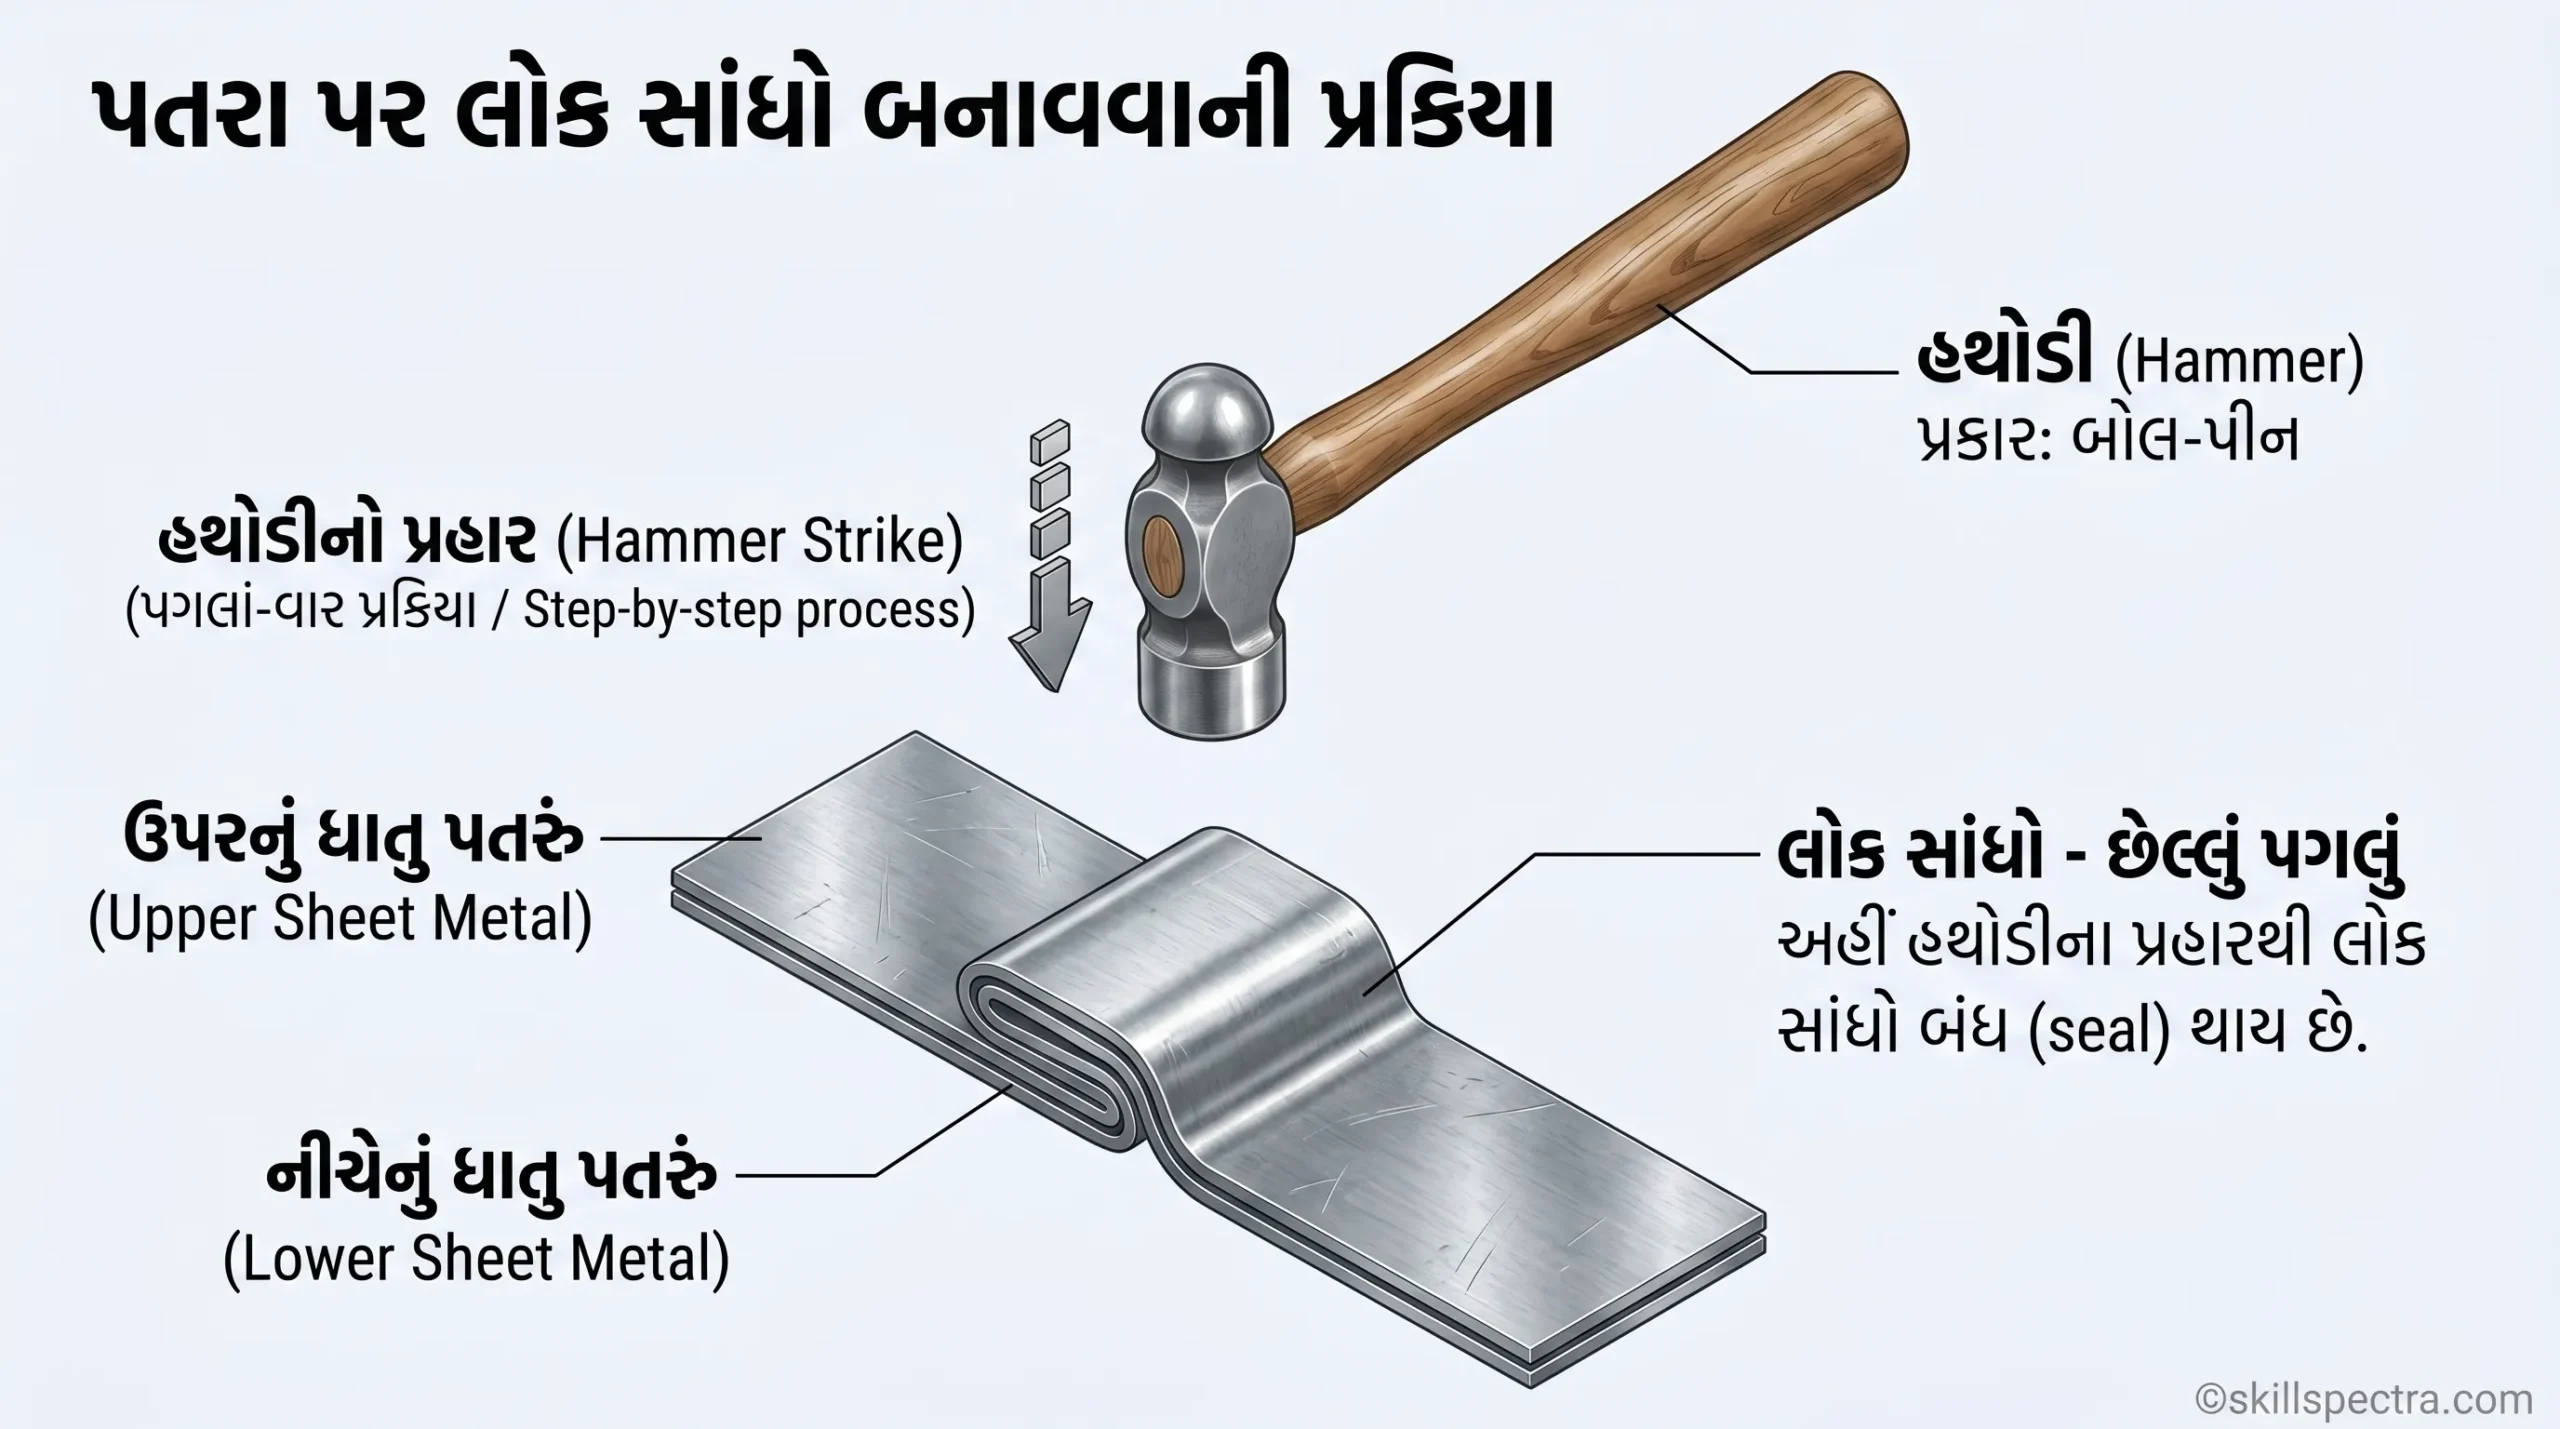
🛠️ Mechanic Diesel: Wooden Mallet (લાકડાની મેલેટ) 🪵
Objectives (ઉદ્દેશ્યો):
આ લેસનના અંતે તમે સમર્થ હશો:
- Mallets ના અલગ-અલગ પ્રકારોના નામ આપવા.
- દરેક પ્રકારના mallets ના ઉપયોગો જણાવવા.
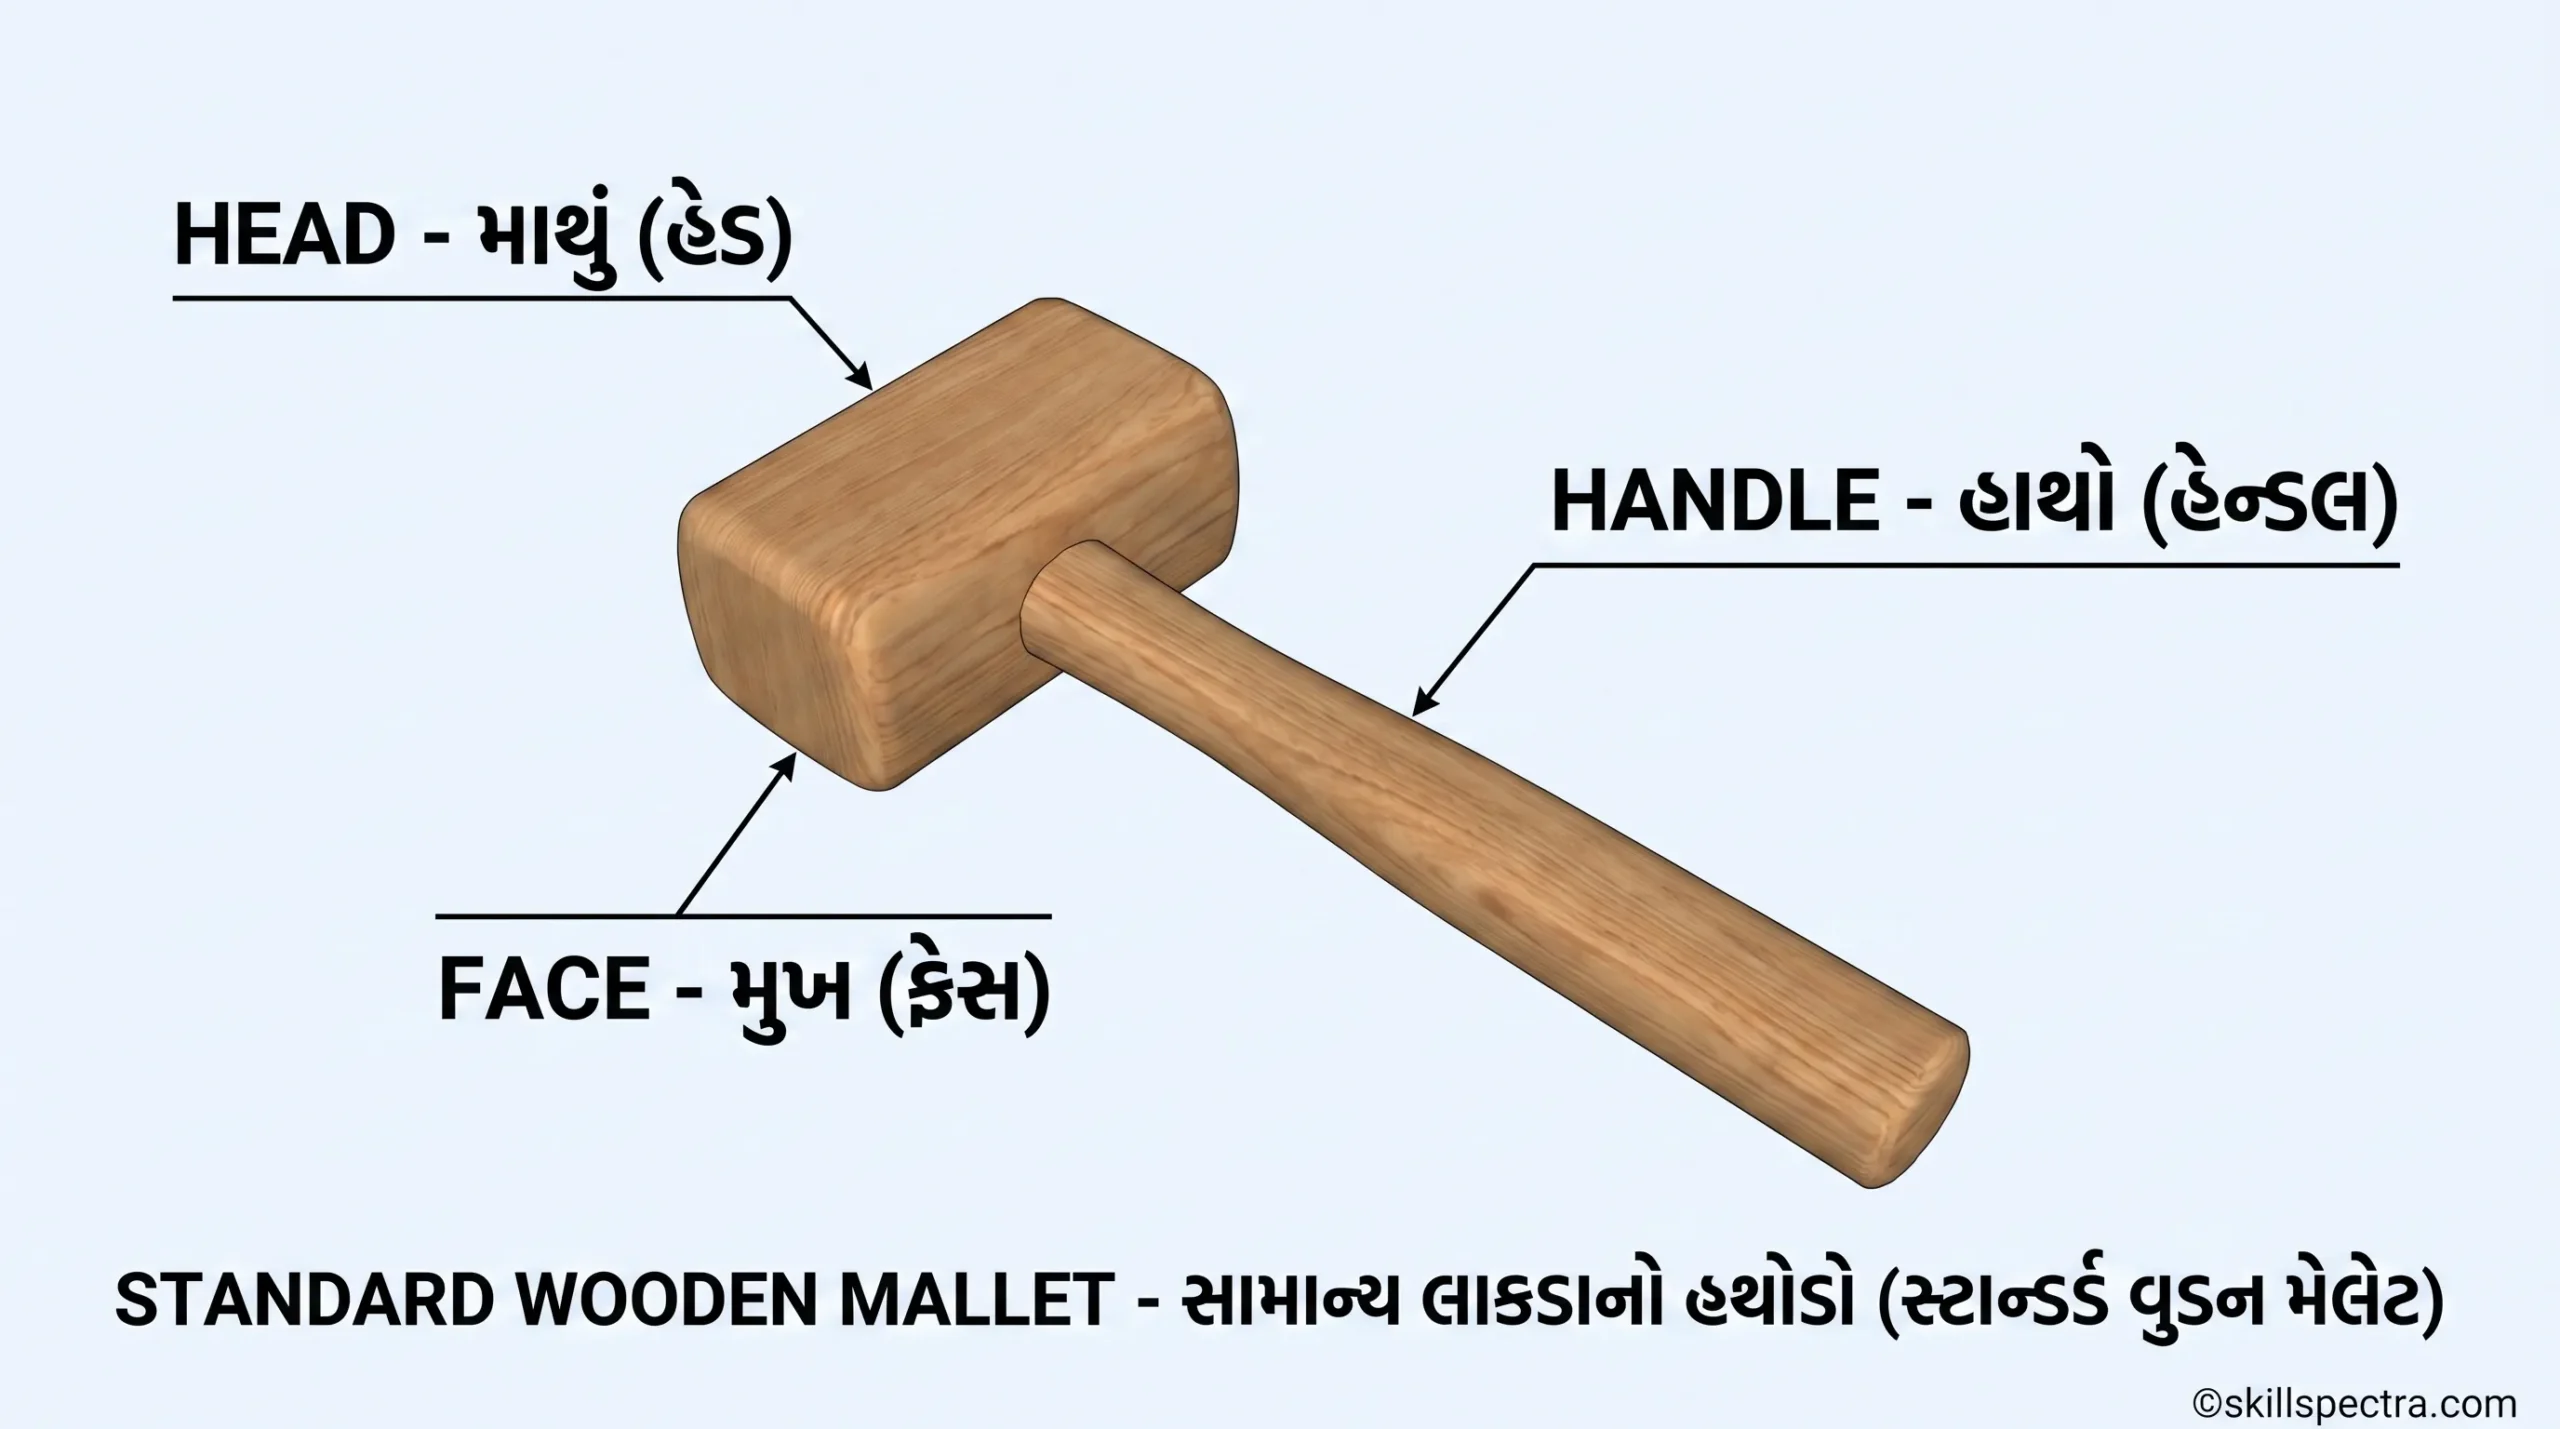
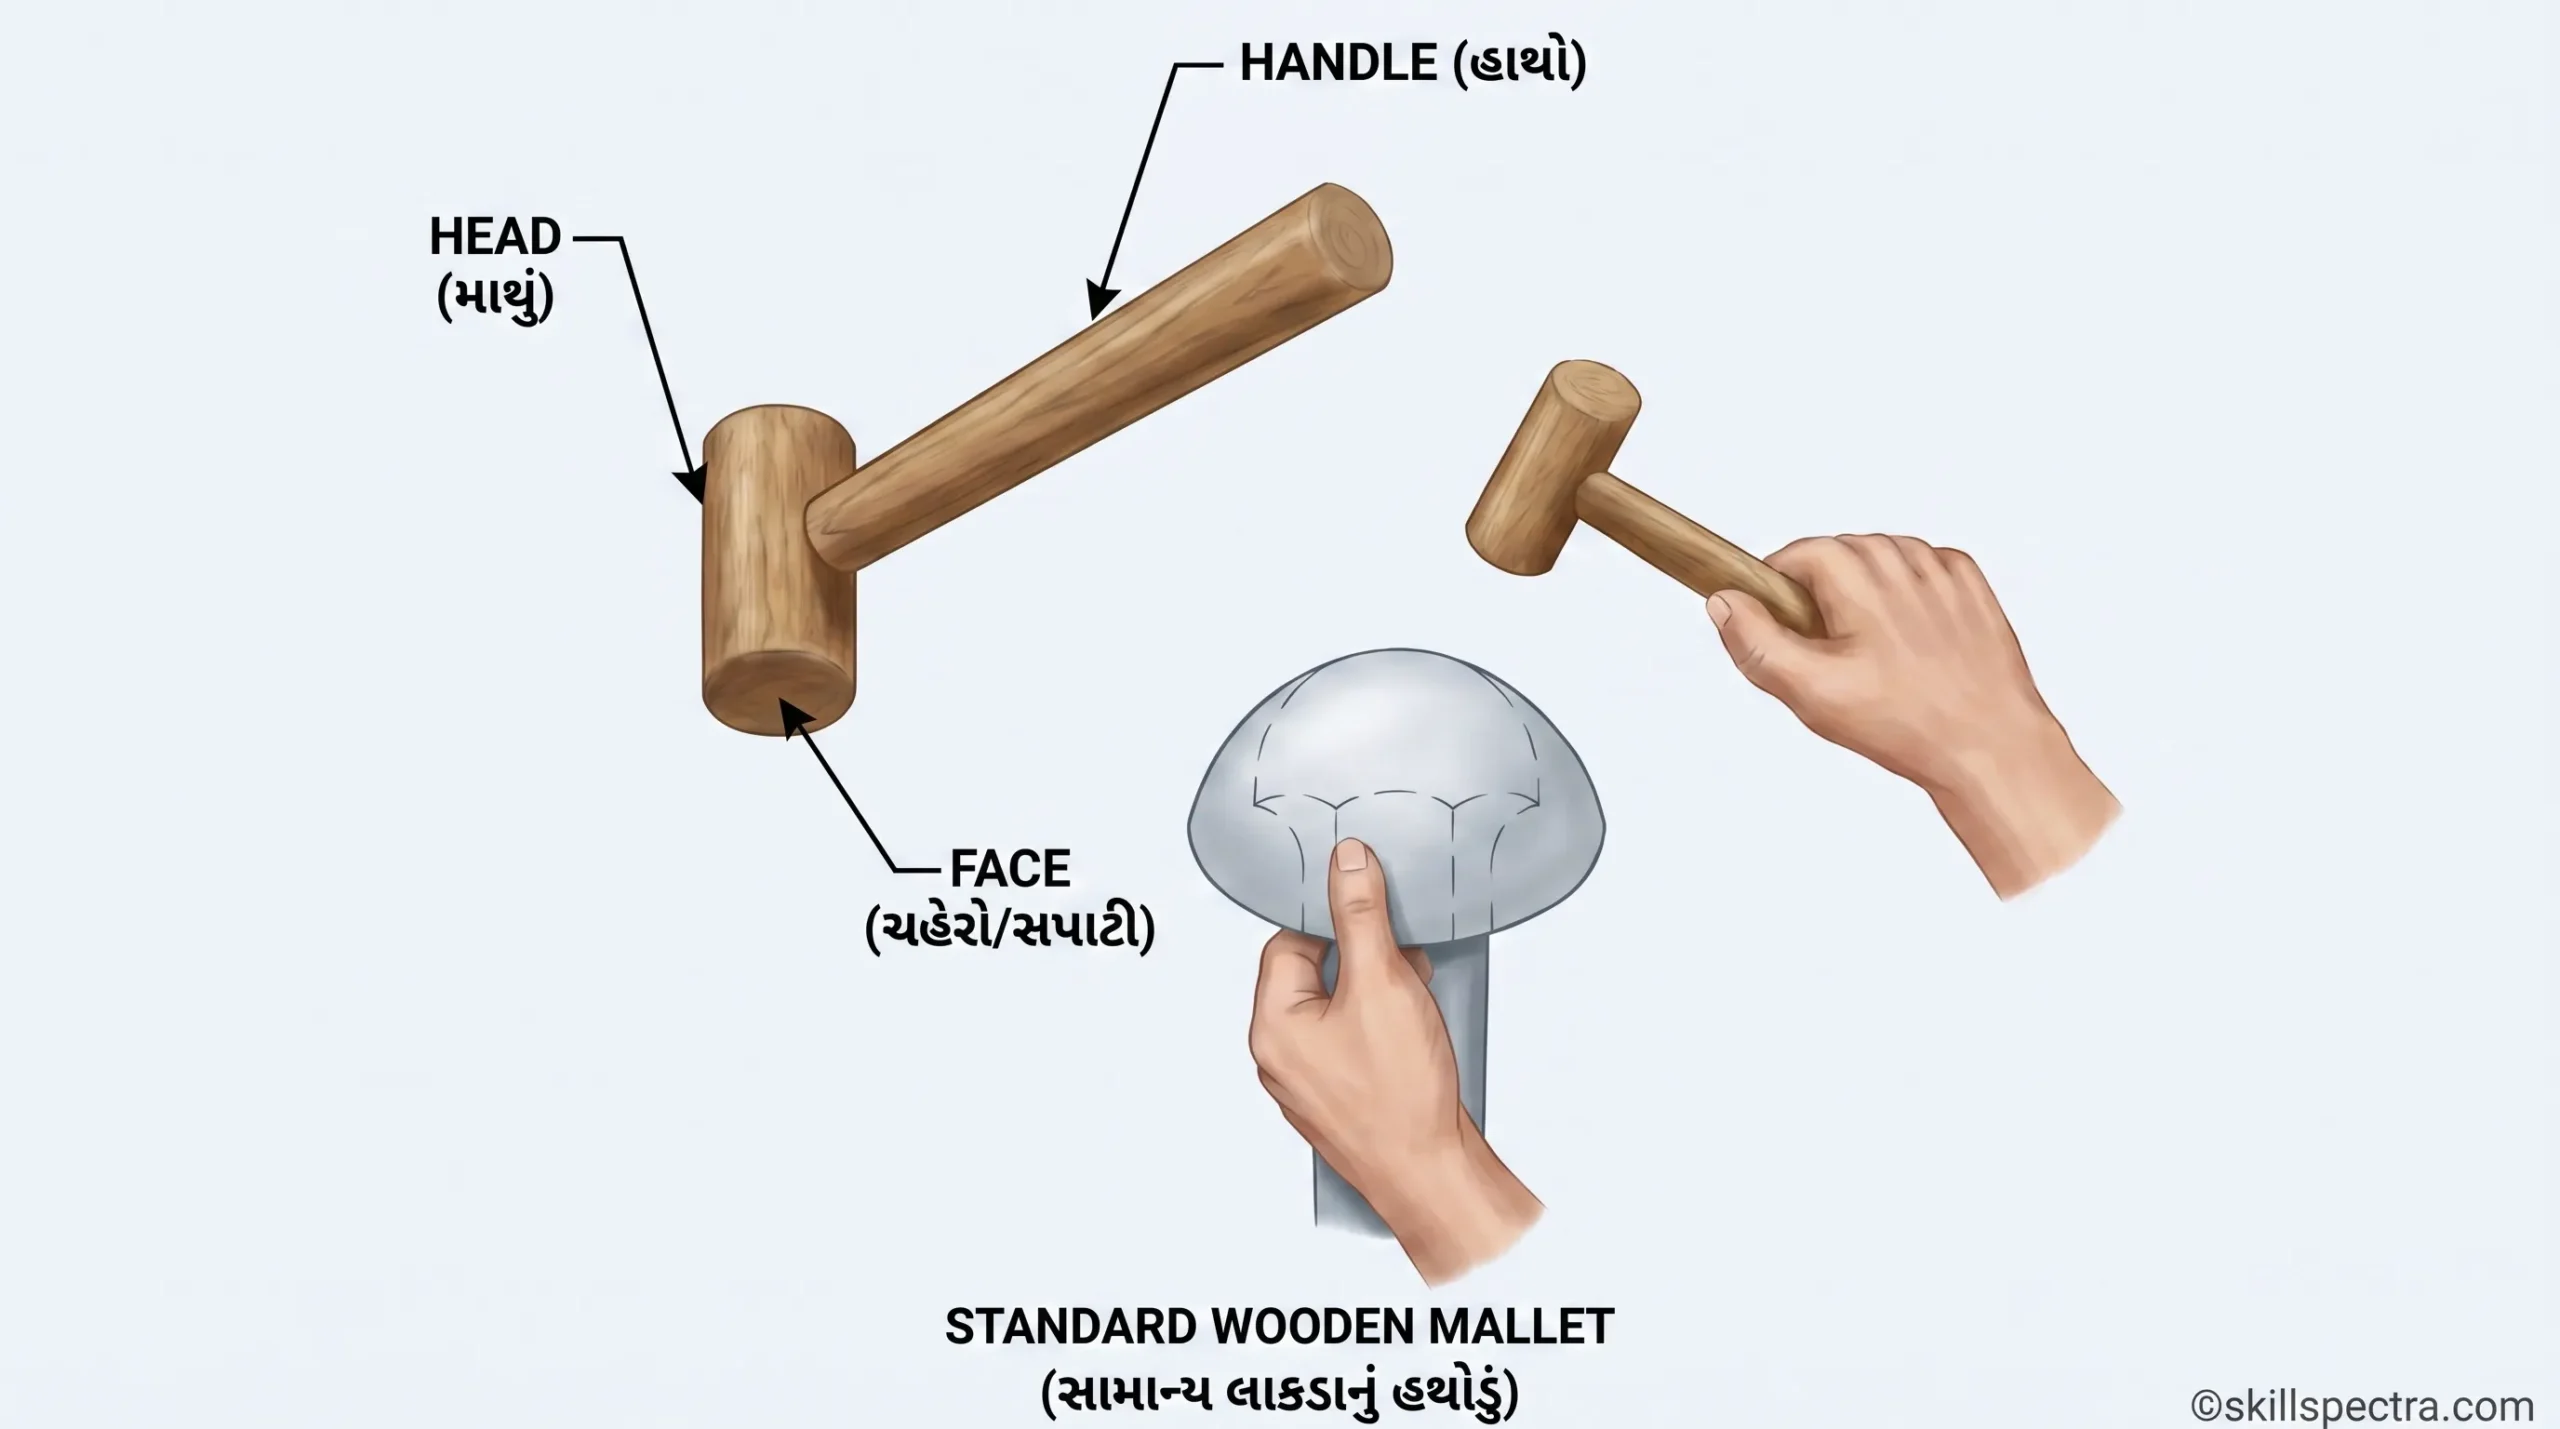
Mallets:
- Mallets એ soft hammers છે અને તે raw hide, hard rubber, copper, brass, lead અથવા wood (લાકડા) માંથી બનેલી હોય છે.
- તેનો ઉપયોગ metal પર soft and light blow (નરમ અને હળવો ફટકો) મારવા માટે થાય છે. ✨
Types and Uses (પ્રકારો અને ઉપયોગો):
- Standard wooden mallets (Fig 1): આનો ઉપયોગ general purpose work (સામાન્ય કામો) જેવા કે flattening (સપાટ કરવું) અને bending (વાળવું) વગેરે માટે થાય છે.
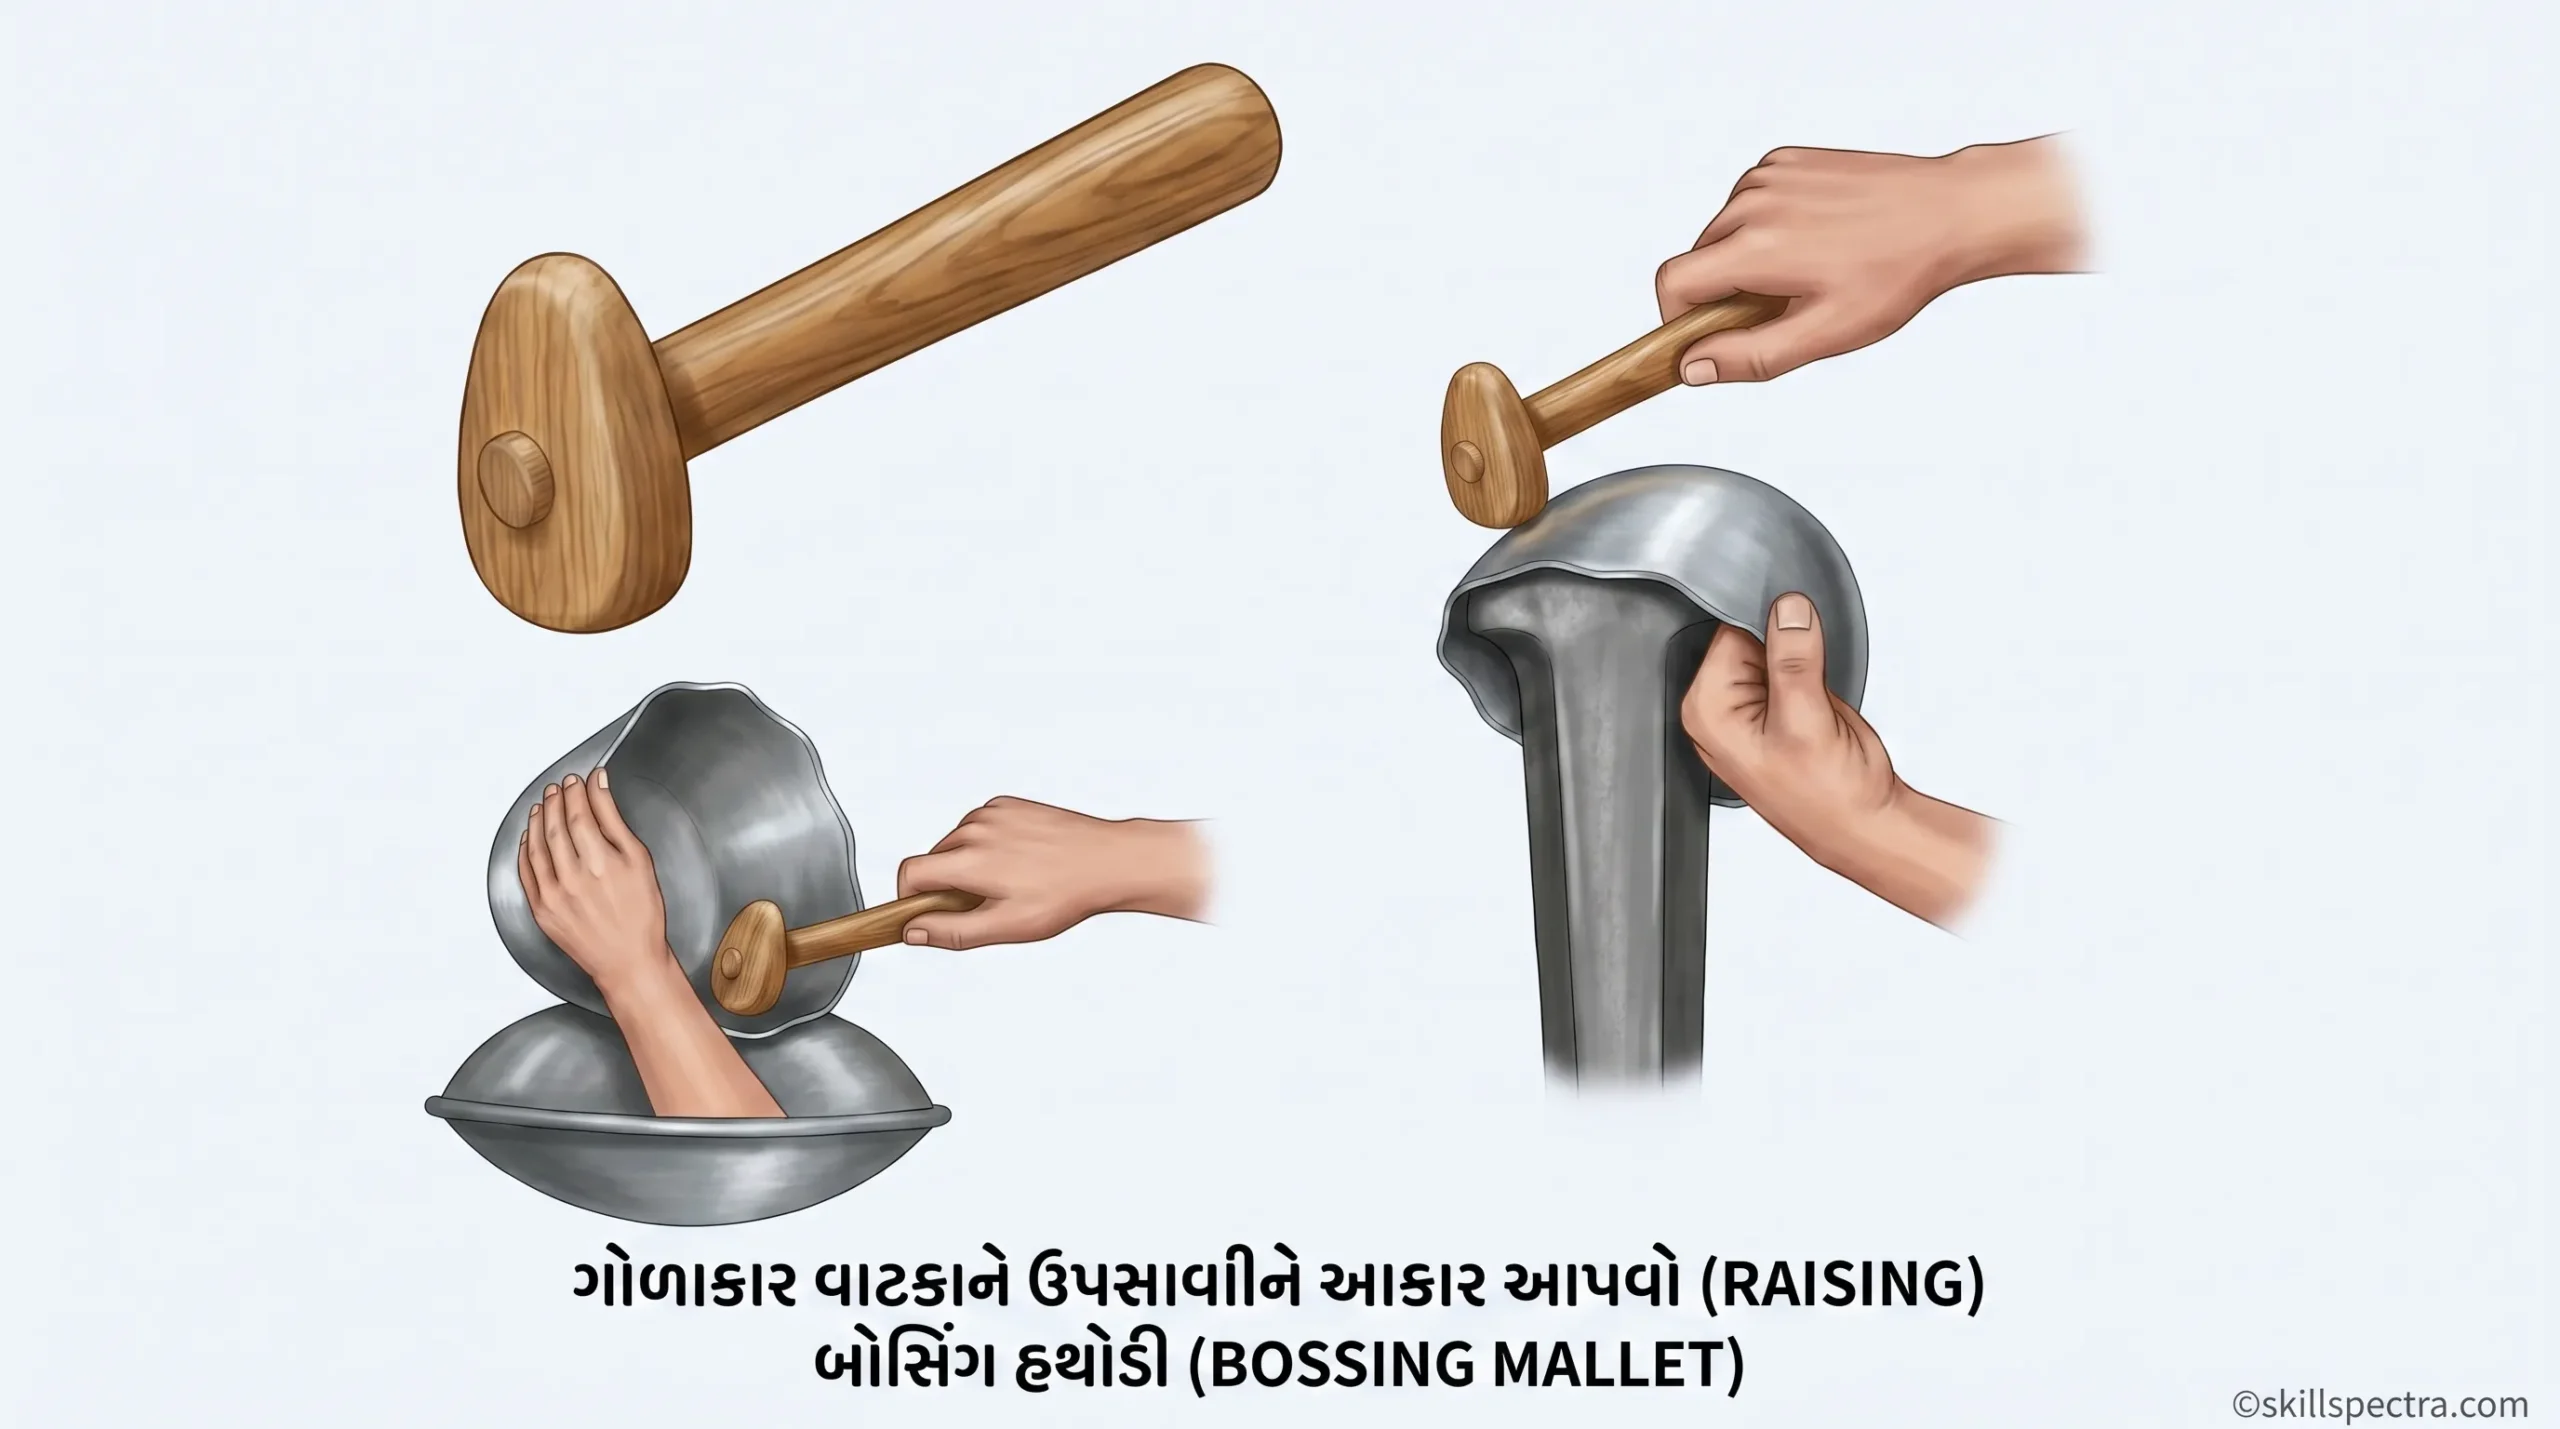
- Bossing mallets (Fig 2): આનો ઉપયોગ hollowing panel beatings (પેનલને પોલાણ આપવા) વગેરે માટે થાય છે. 🥣
- An end-faked mallet (Fig 3): આનો ઉપયોગ stretching (ખેંચવા) અને hammering (ટીપવા) વગેરે માટે થાય છે.
Screwdrivers (સ્ક્રુડ્રાઇવર્સ – ડિસમિસ) 🪛
Objectives (ઉદ્દેશ્યો):
આ લેસનના અંતે તમે સમર્થ હશો:
- Hand-held screwdrivers નું વર્ગીકરણ કરવા.
- Standard screwdrivers ના લક્ષણો (features) જણાવવા.
- Special screwdrivers અને તેના ચોક્કસ ઉપયોગોની યાદી બનાવવી.
- Standard screwdrivers ને specify (સ્પષ્ટ) કરવા.
Screwdrivers:
- Screwdrivers નો ઉપયોગ screws ને tighten (ચુસ્ત કરવા) અથવા loosen (ઢીલા કરવા) માટે થાય છે, જે machine element માં ફિક્સ કરેલા હોય છે.
Classification (વર્ગીકરણ):
- Standard type: જેની tips recessed head screw slots ને અનુરૂપ હોય છે.
- Special type: જેની tips ચોક્કસ પ્રકારના recessed head screws માટે હોય છે.
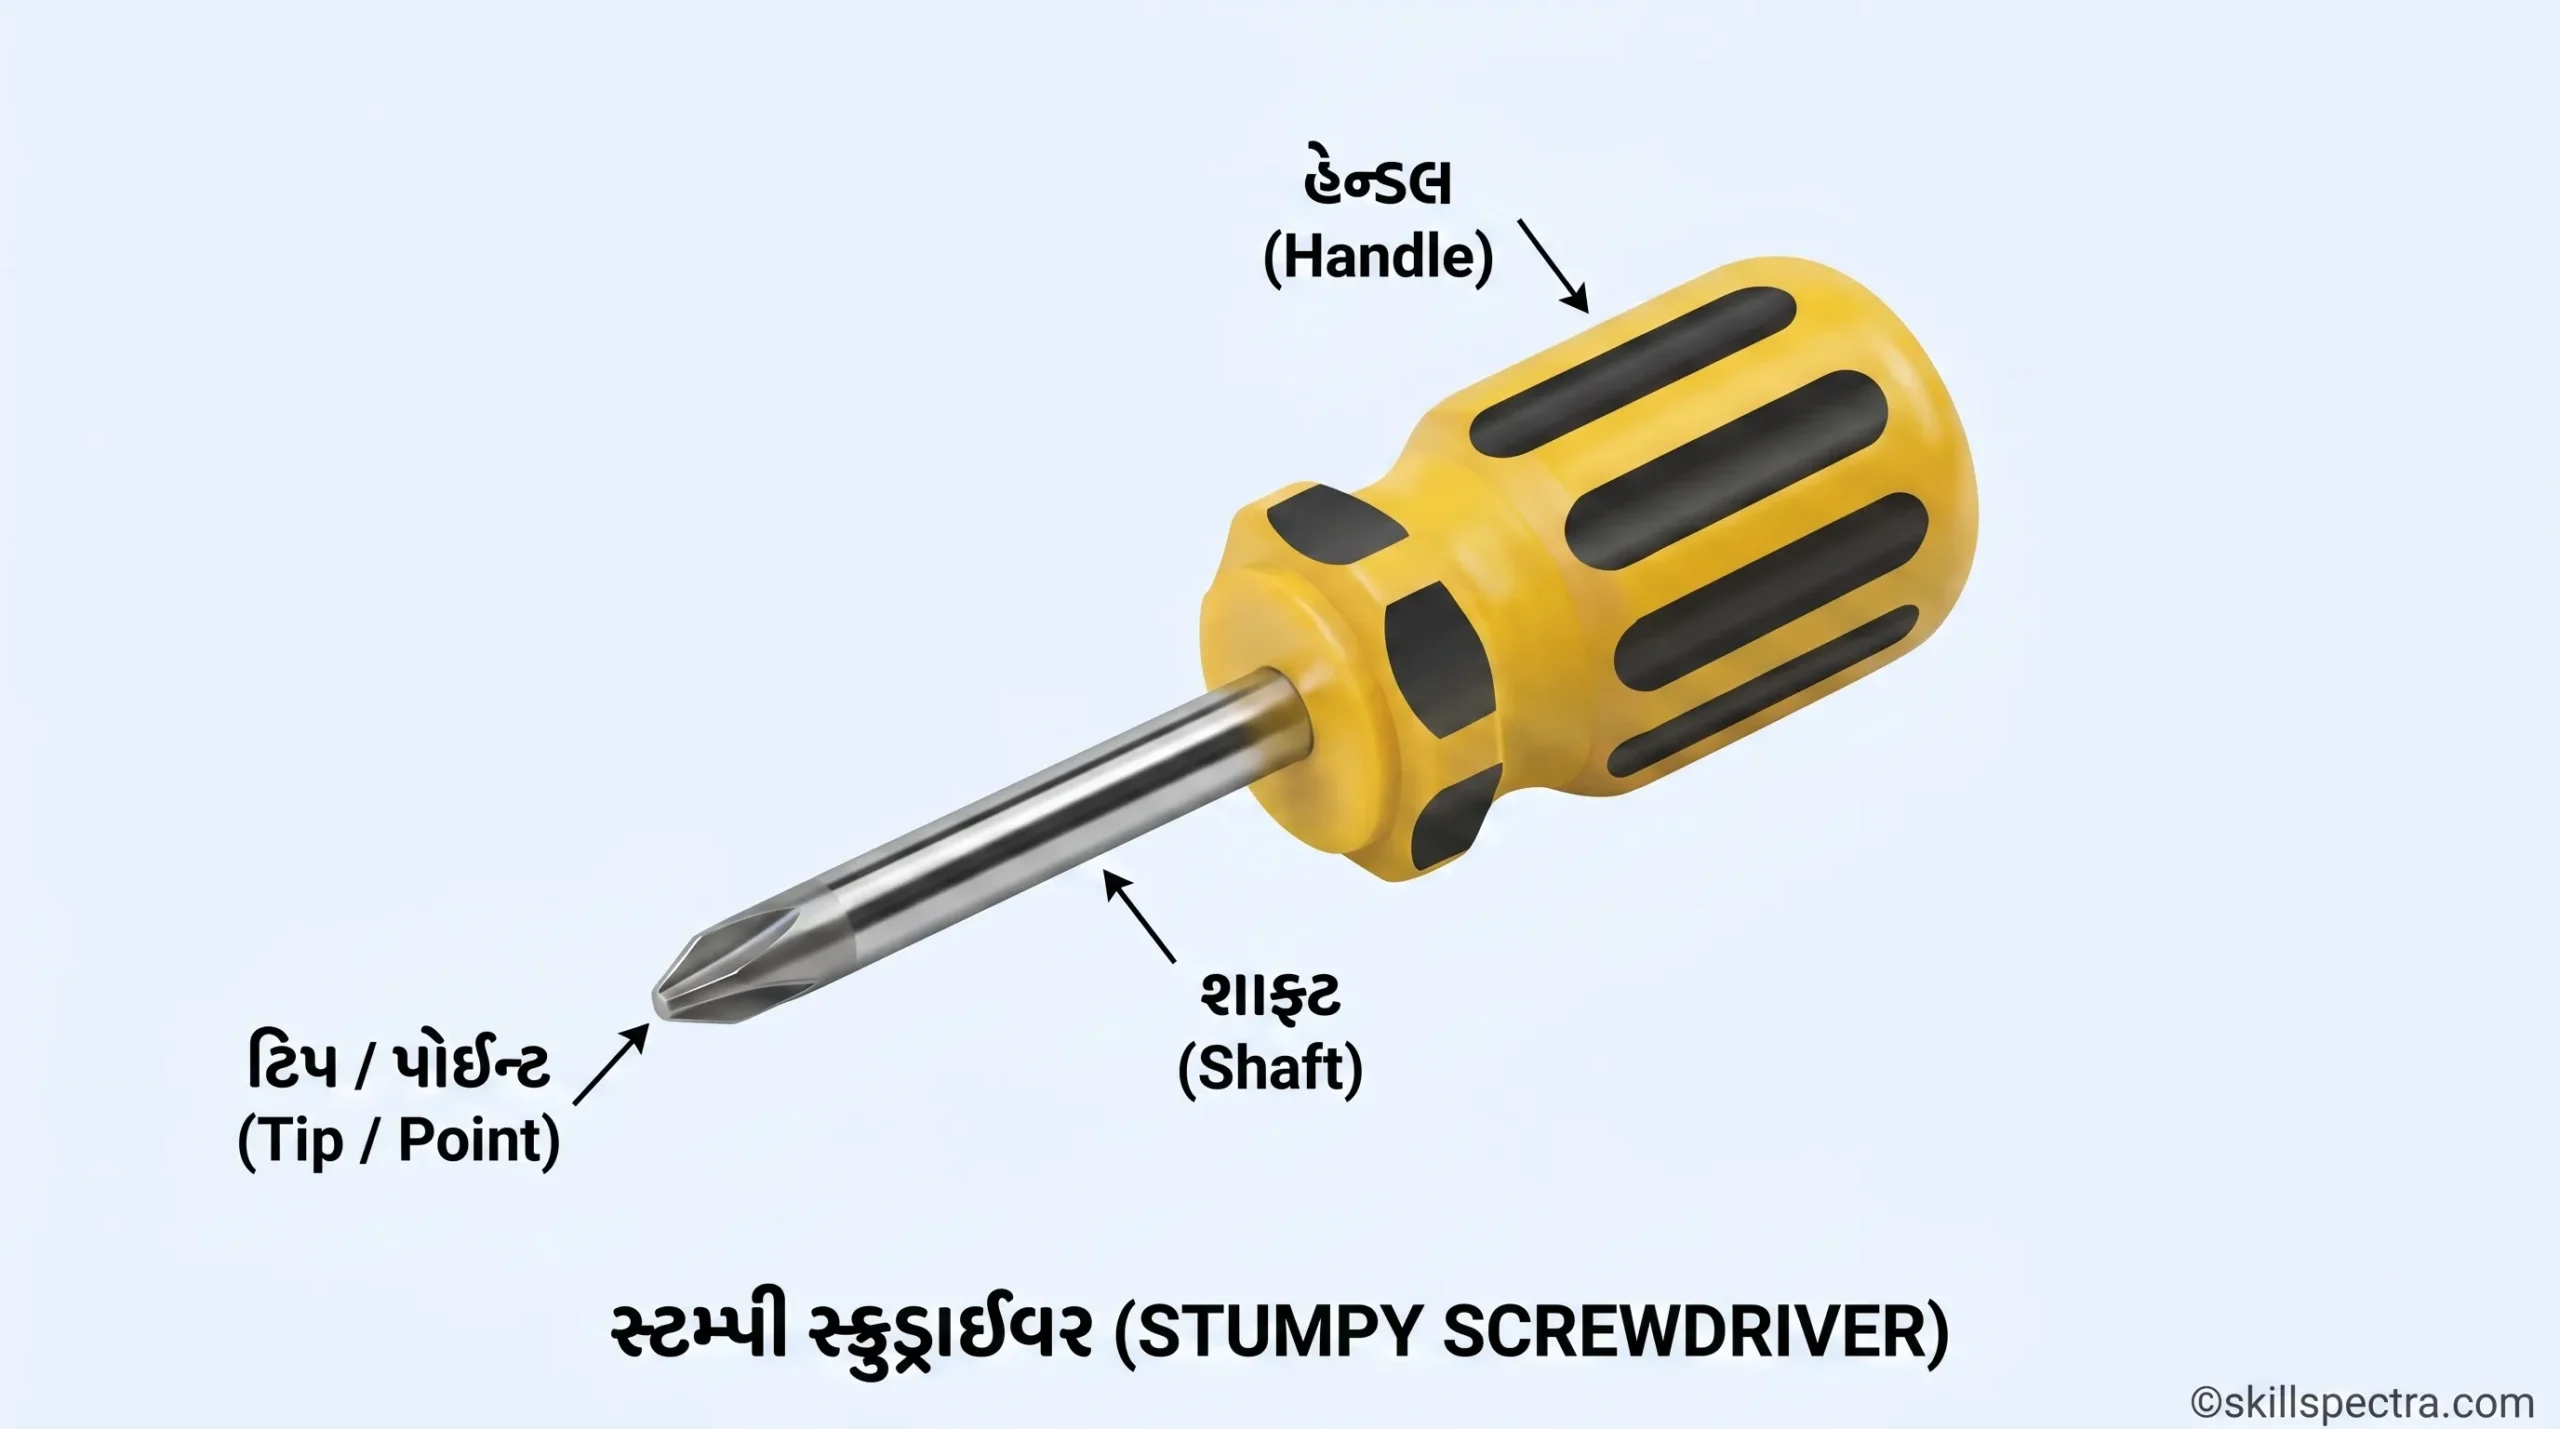
Features of Standard Screwdrivers (Fig 1):
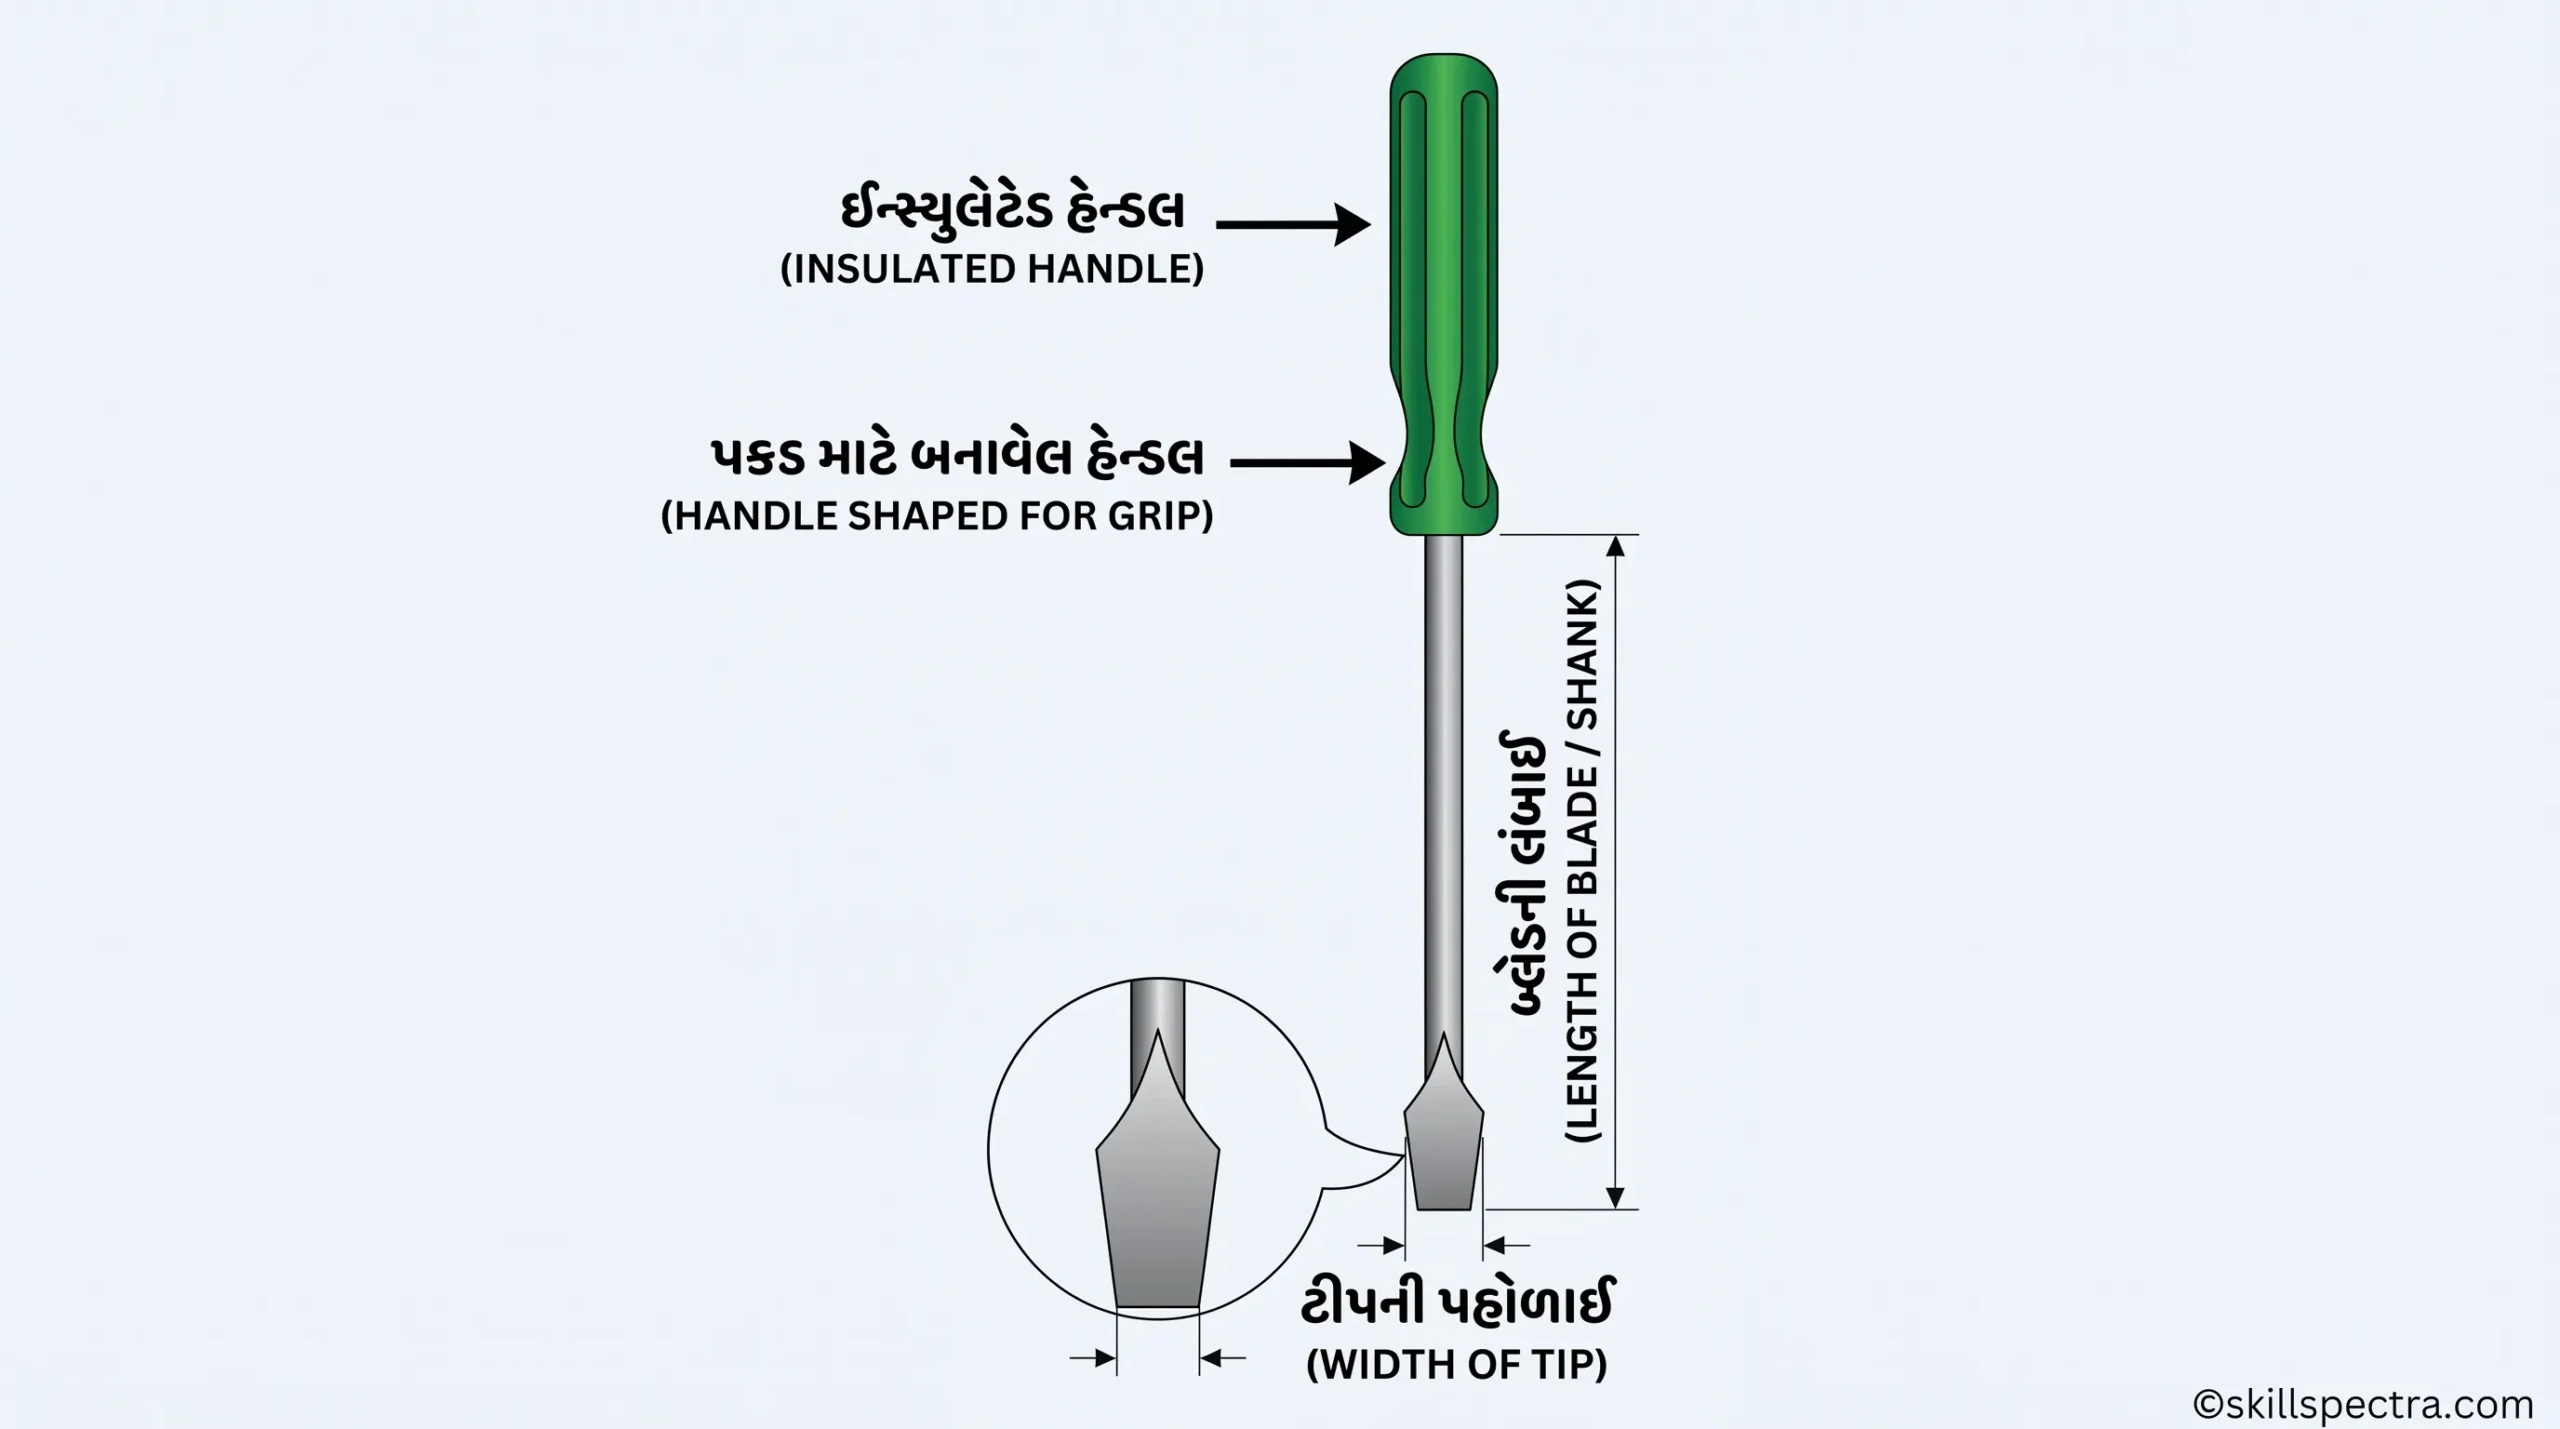
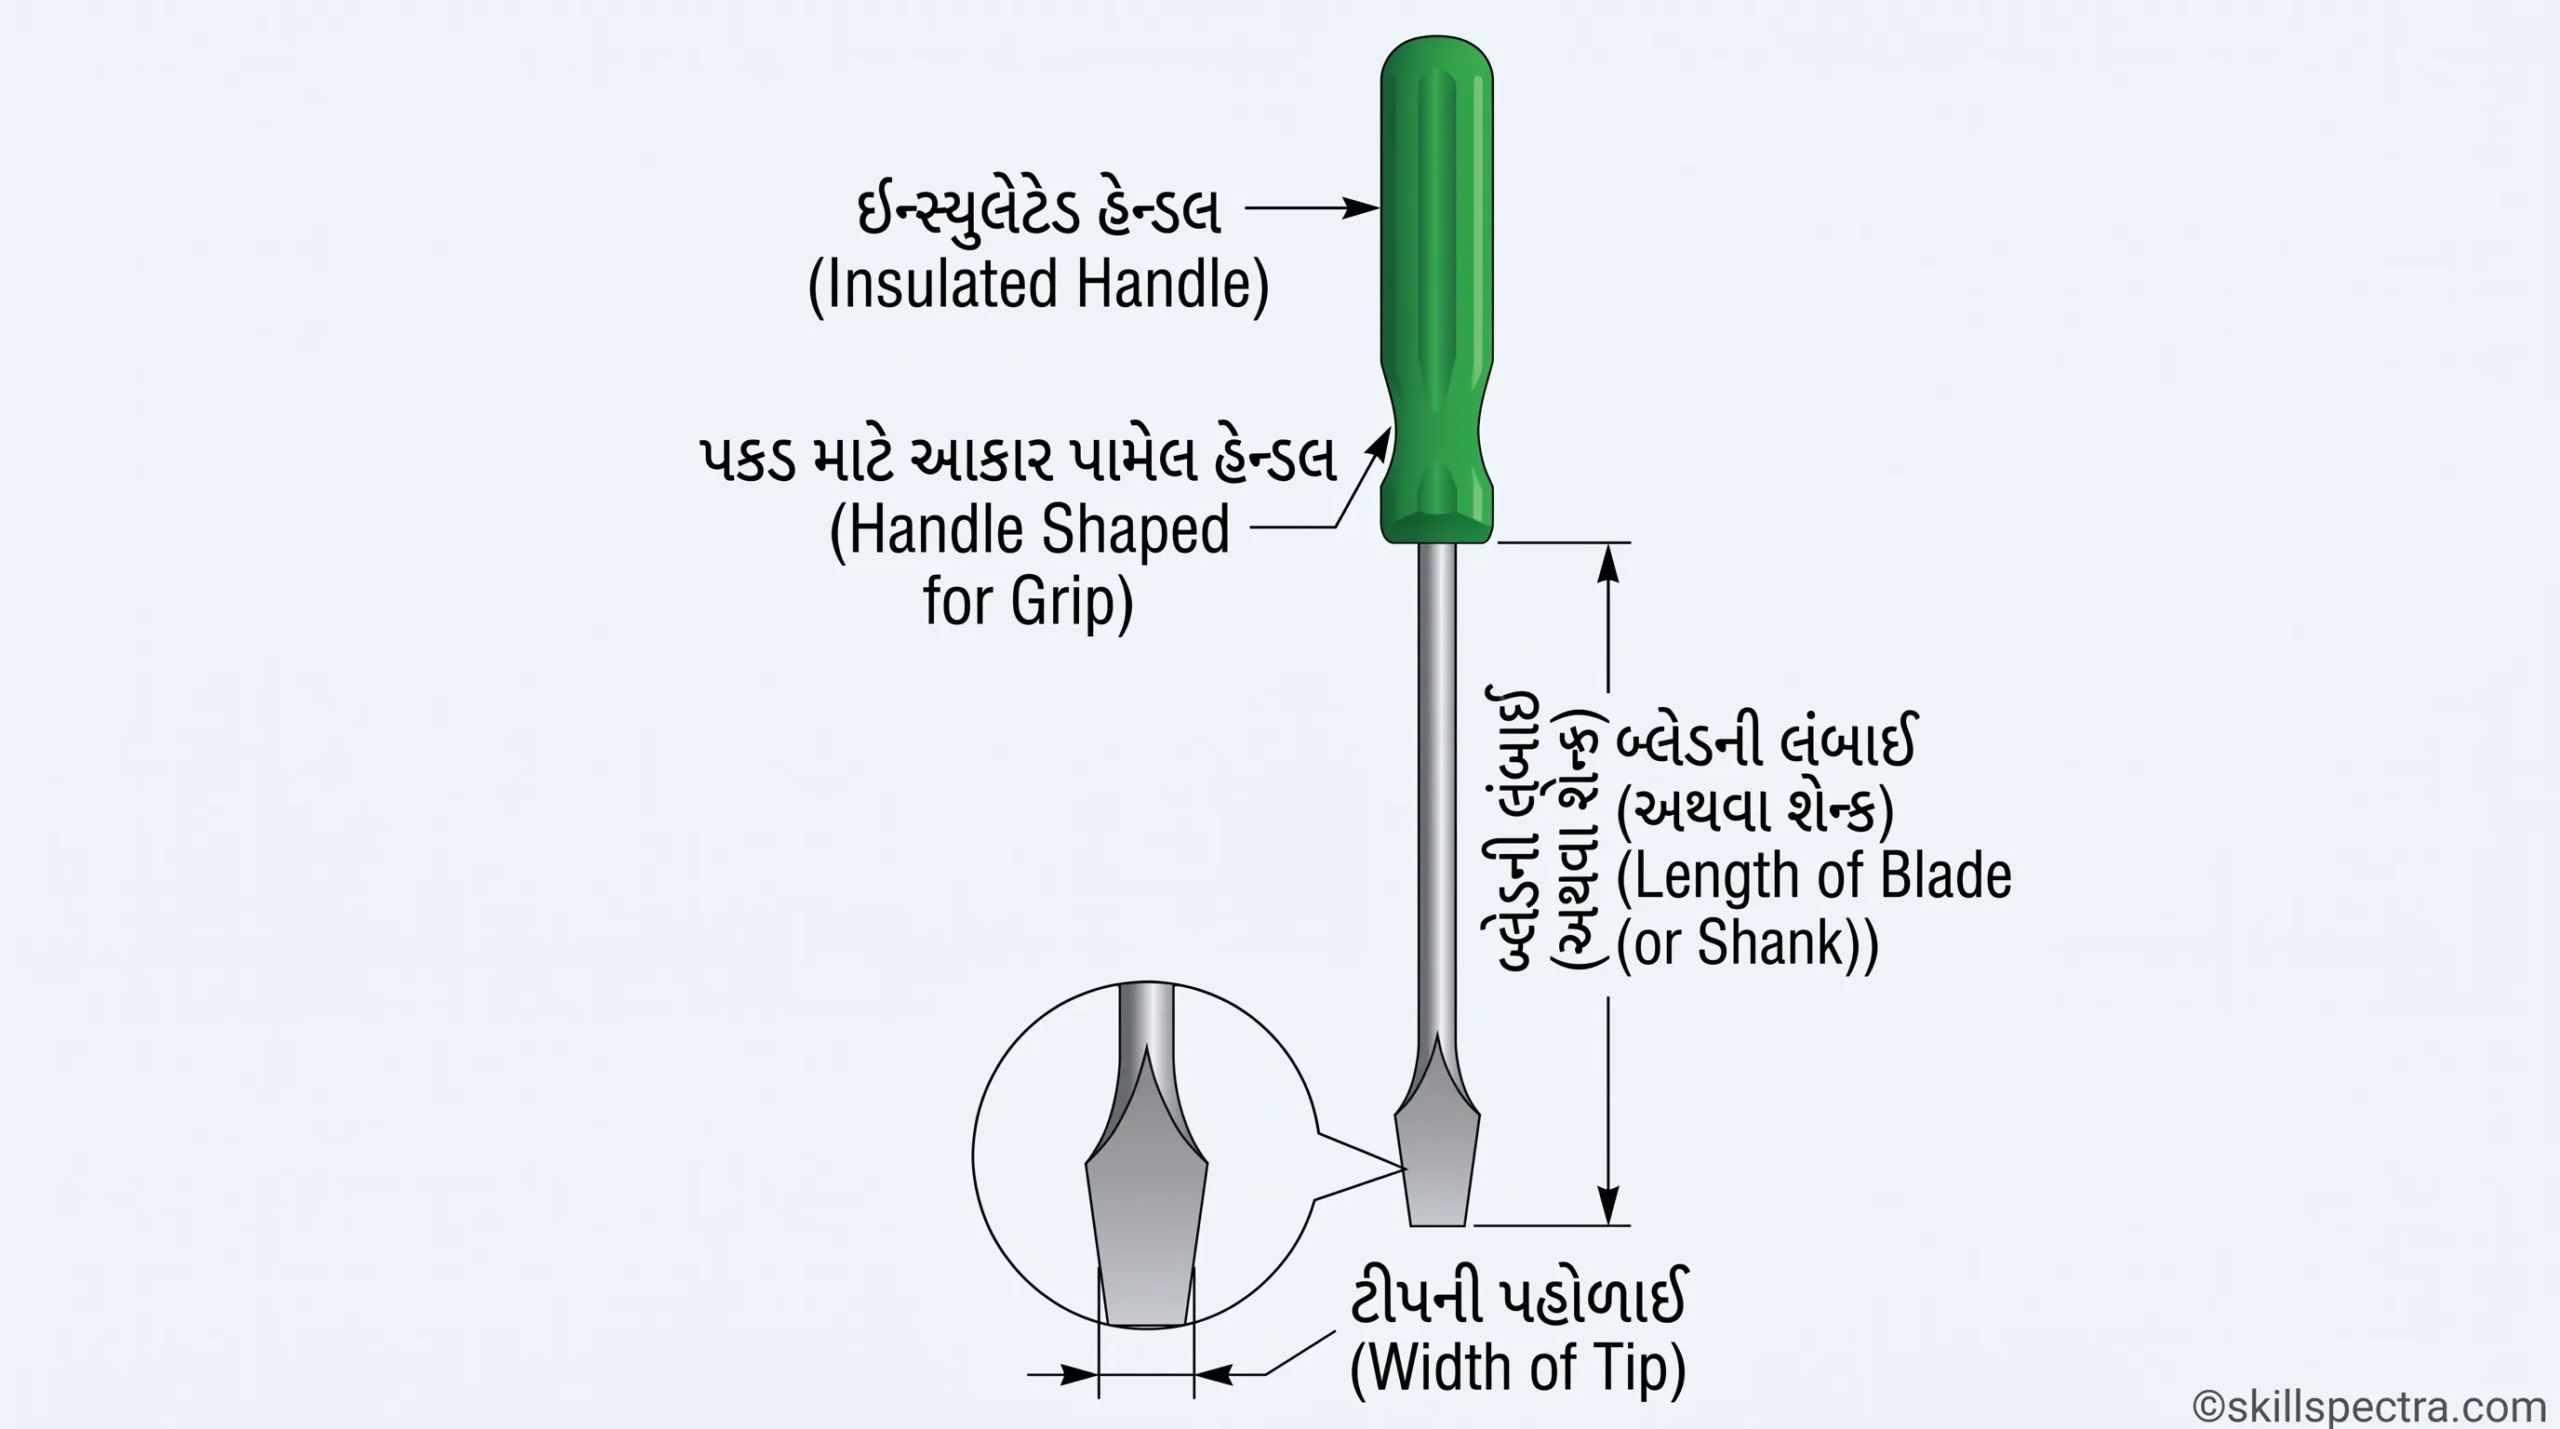
Screwdrivers માં નીચે મુજબના લક્ષણો હોવા જોઈએ:
- Slotted heads વાળા screw ને ફેરવવા માટેની tips (1).
- Handle (2) જે metal, wood અથવા molded insulating material નું બનેલું હોય, અને પકડવા માટે યોગ્ય shape (3) માં હોય.
- Hardened અને tempered carbon steel અથવા alloy steel માંથી બનેલી blades. ⛓️
- Round અથવા Square blade જેની લંબાઈ (4) 40mm થી 350mm સુધીની હોય છે.
- Flared tips જે blade ની લંબાઈ અને જાડાઈ મુજબ બદલાય છે.
Standard Screwdrivers નું વર્ગીકરણ:
Standard screwdrivers ને નીચે મુજબ વર્ગીકૃત કરવામાં આવે છે:
- Heavy duty screwdrivers
- Light duty screwdrivers
- Stumpy screwdrivers
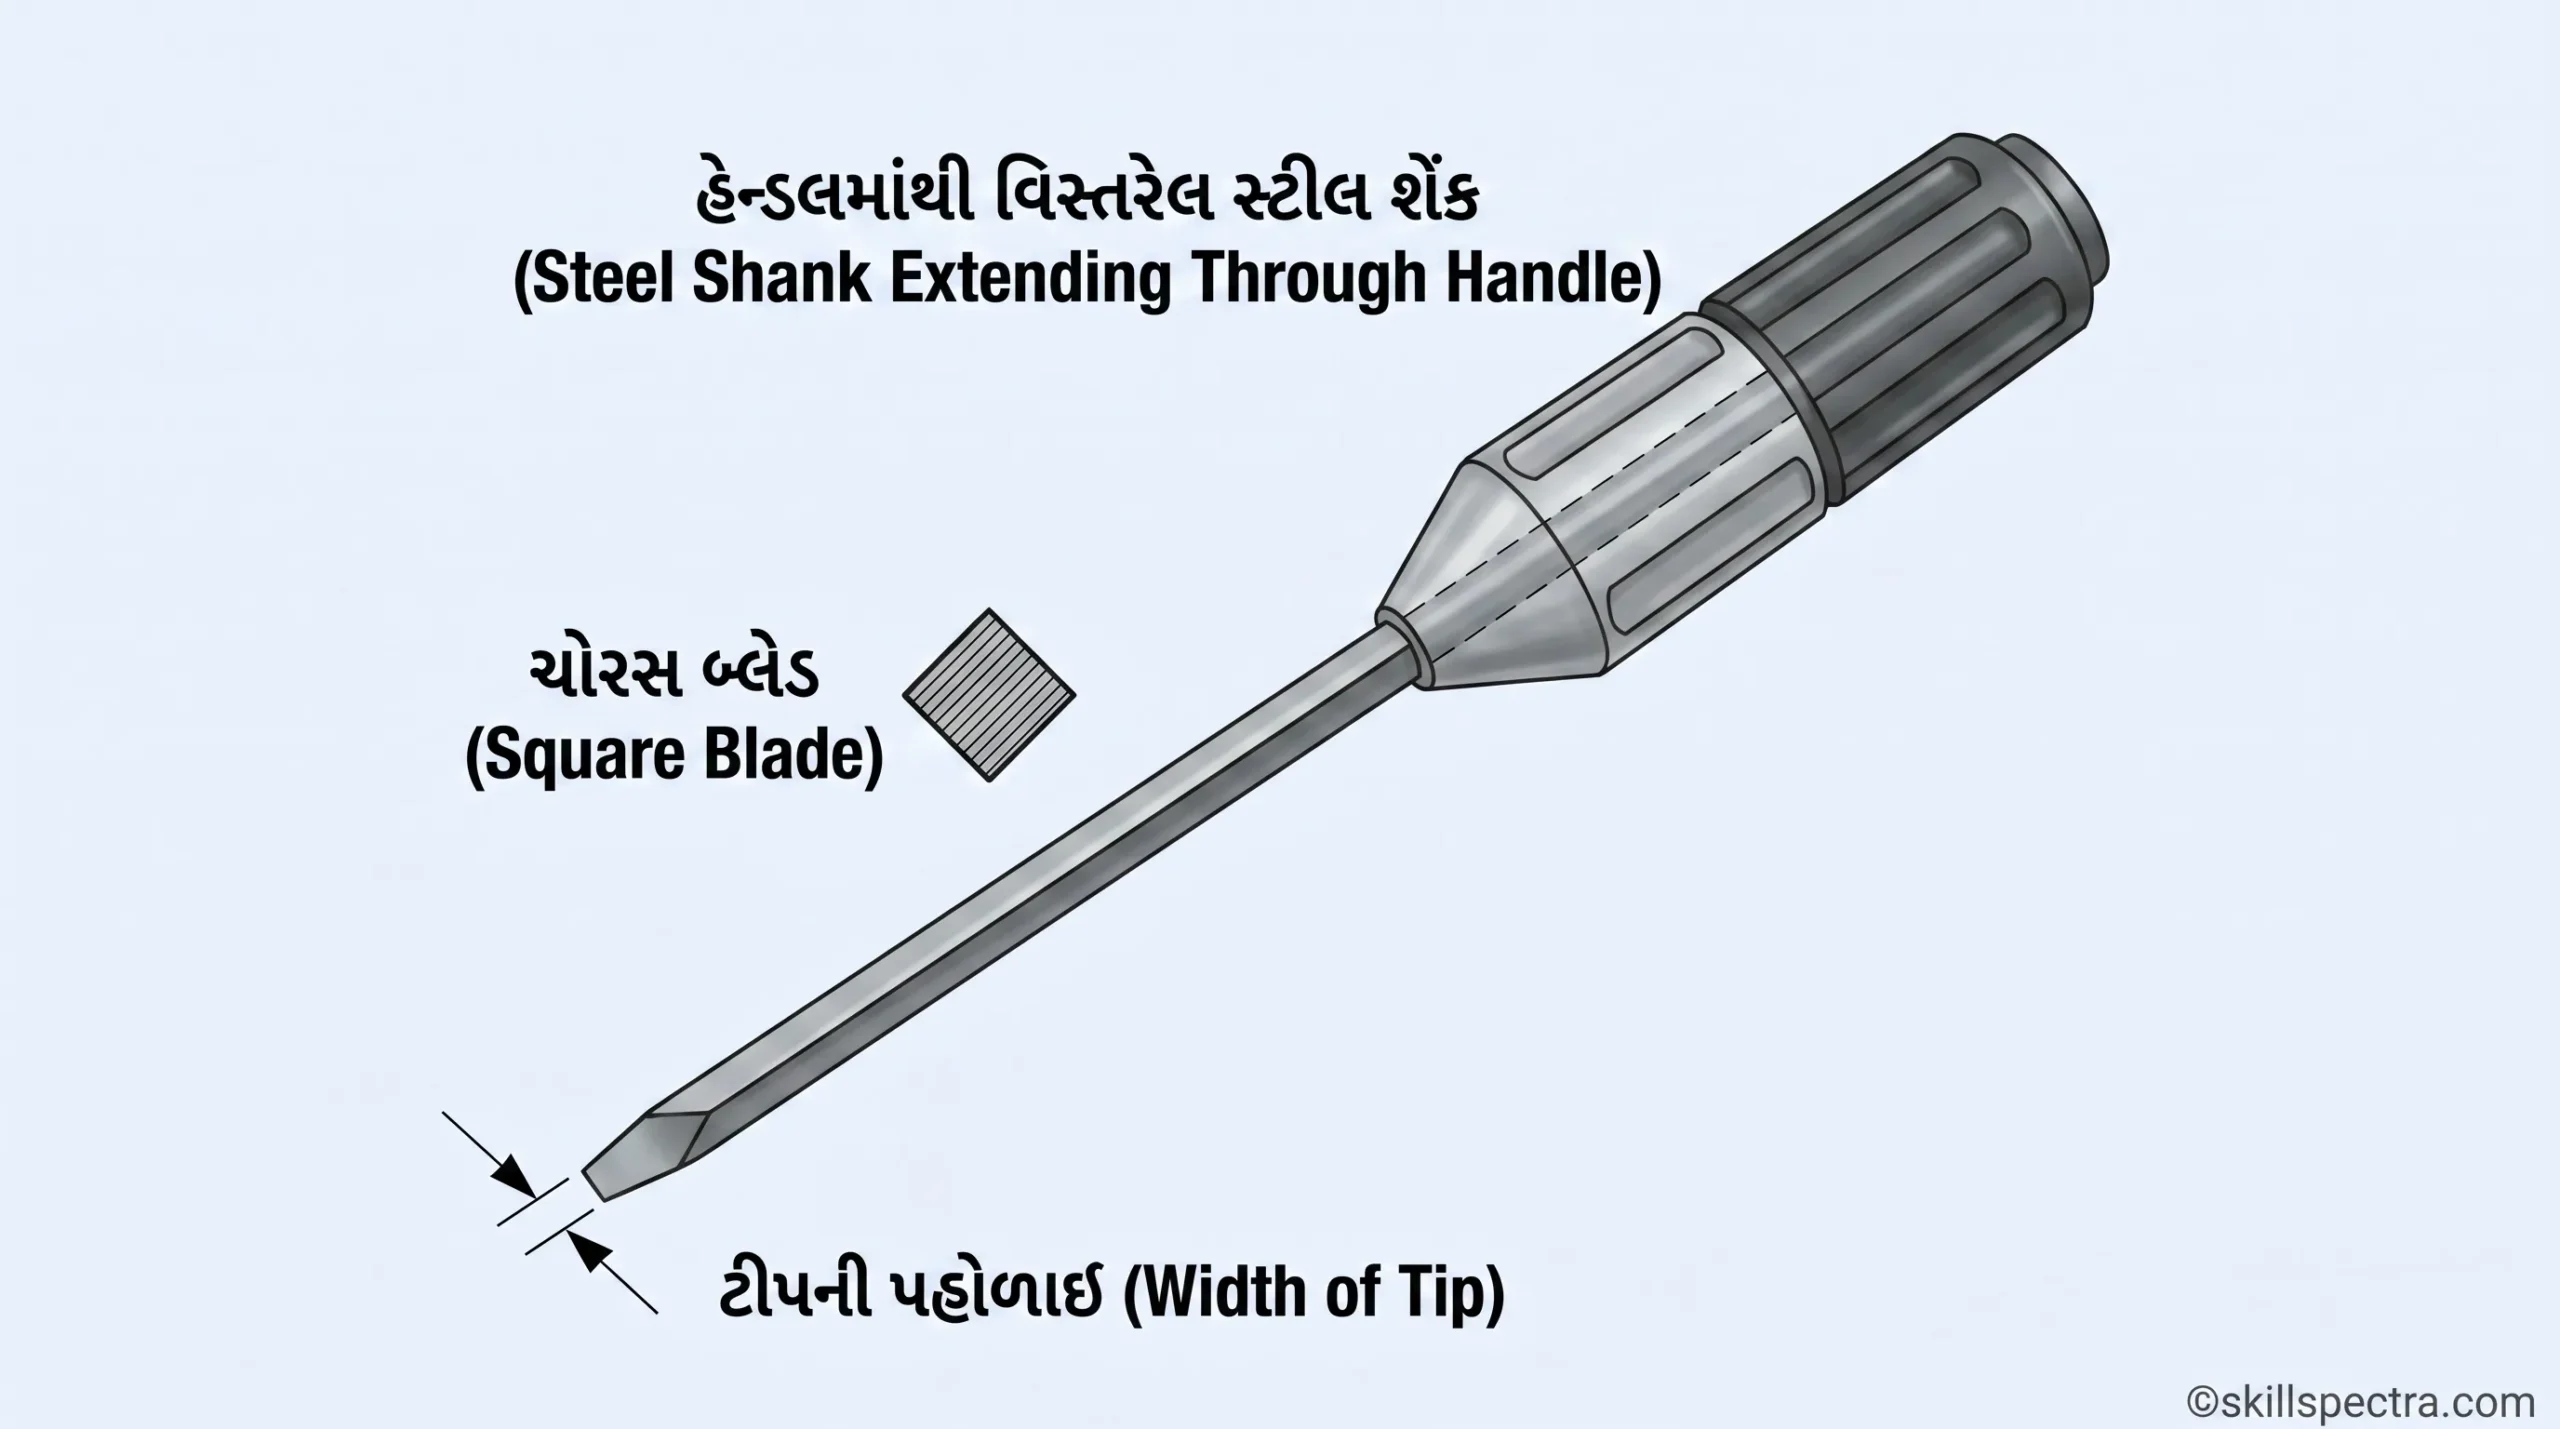
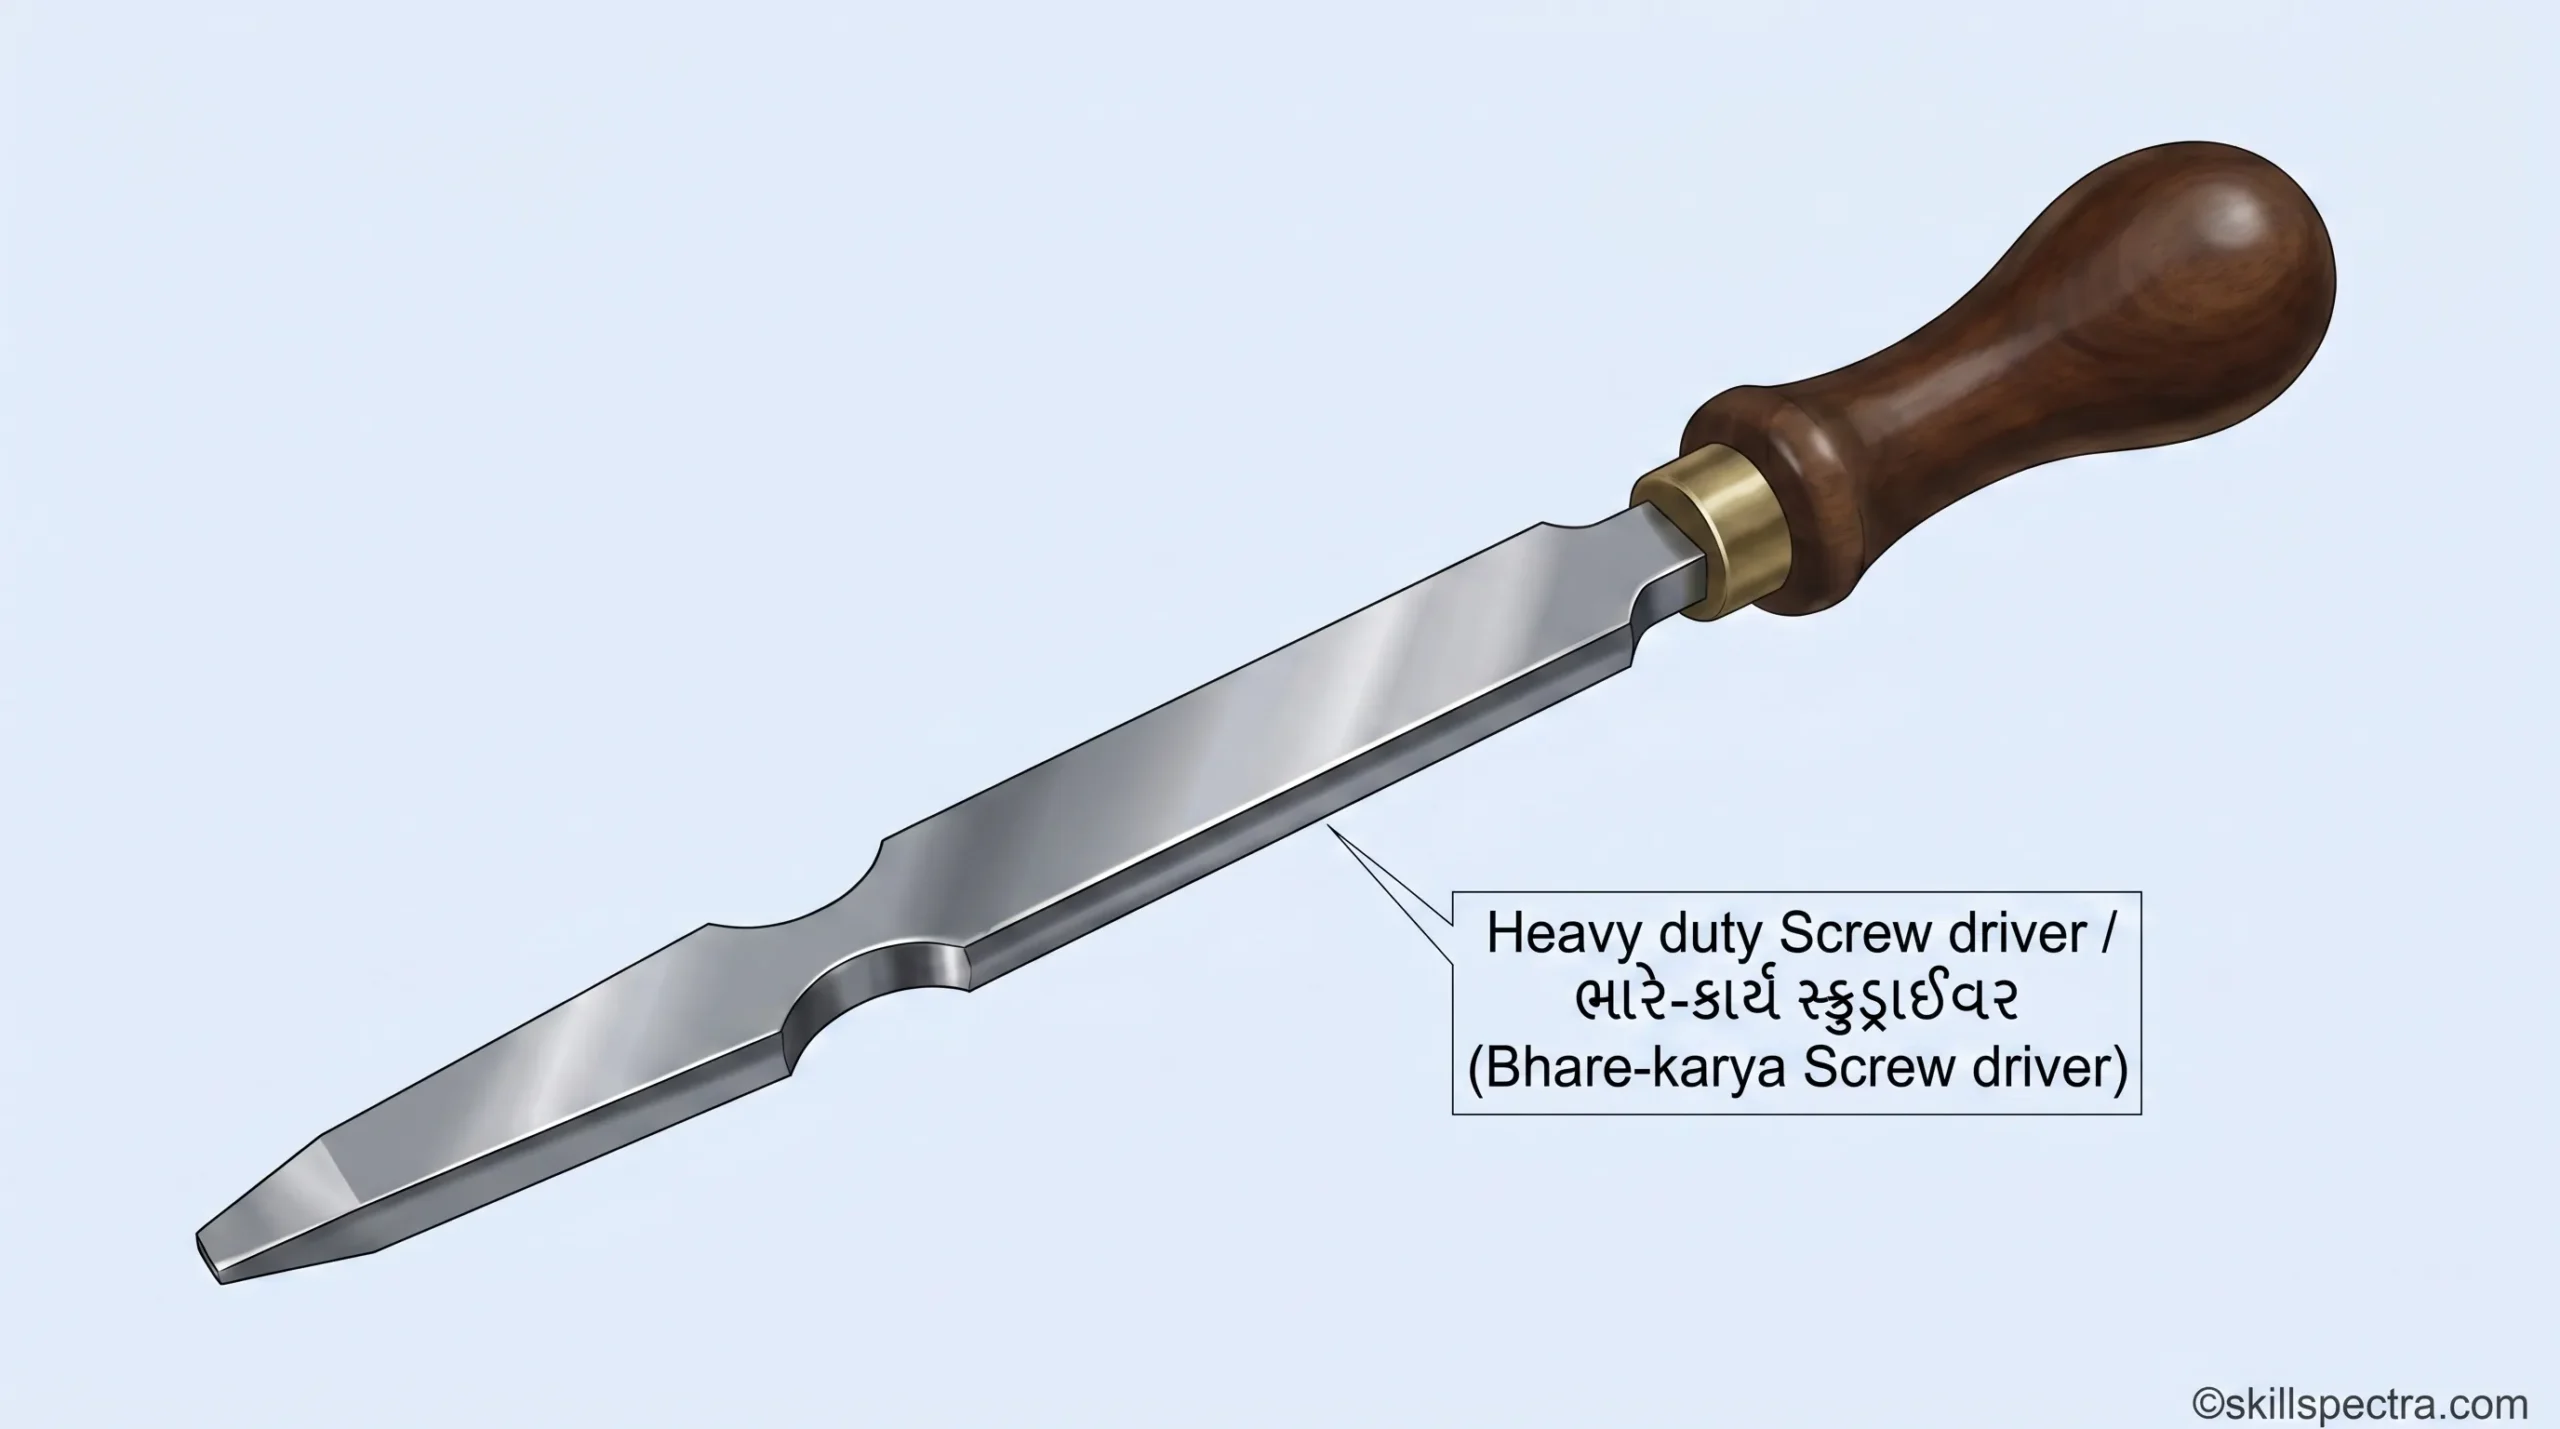
Heavy duty screwdrivers (Fig 2 & 3):
- આ screwdriver માં square blade હોય છે જેથી spanner ના છેડા વડે વધારાનું twisting force (ટોર્ક) લગાવી શકાય. 💪
- Heavy duty screwdrivers of London pattern માં flat blade હોય છે અને તે મોટે ભાગે carpenters (સુથારો) દ્વારા વપરાય છે.
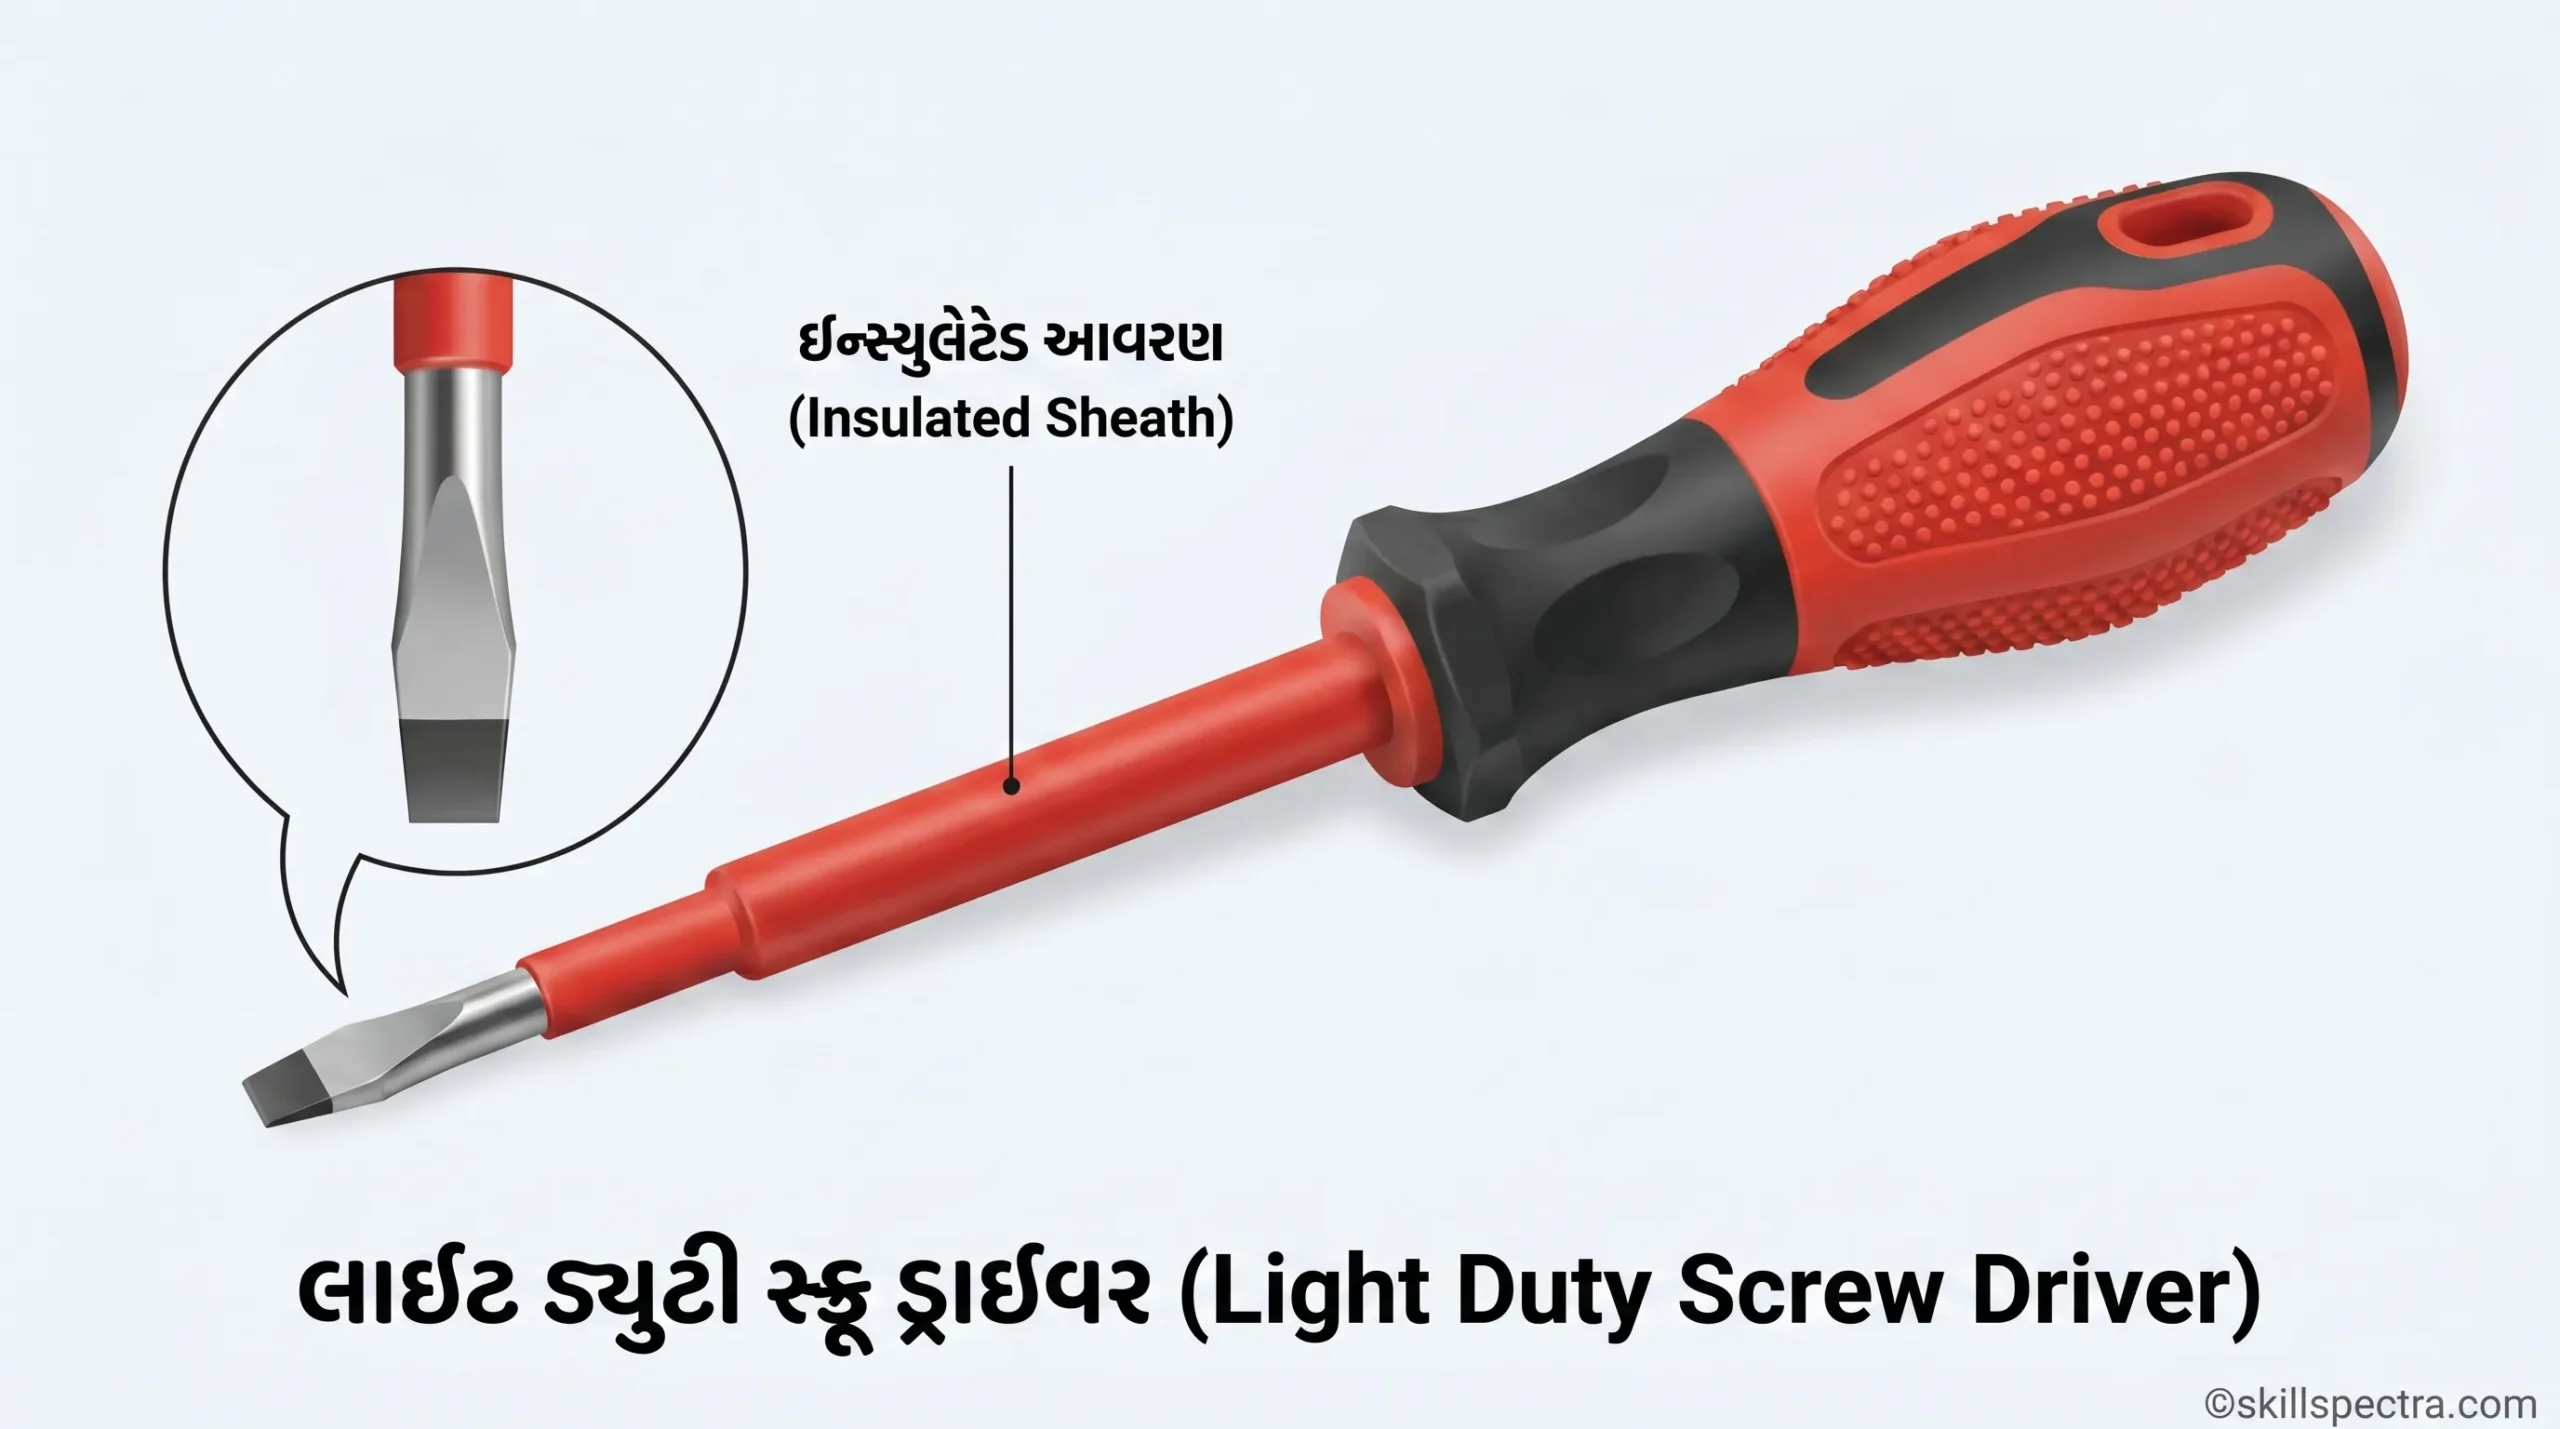
Light duty screwdrivers (Fig 4):
- આ screwdriver માં round blade હોય છે જેની tips parallel હોય છે.
- આ screwdriver નો ઉપયોગ electricians (ઇલેક્ટ્રિશિયન) દ્વારા કરવામાં આવે છે. ⚡
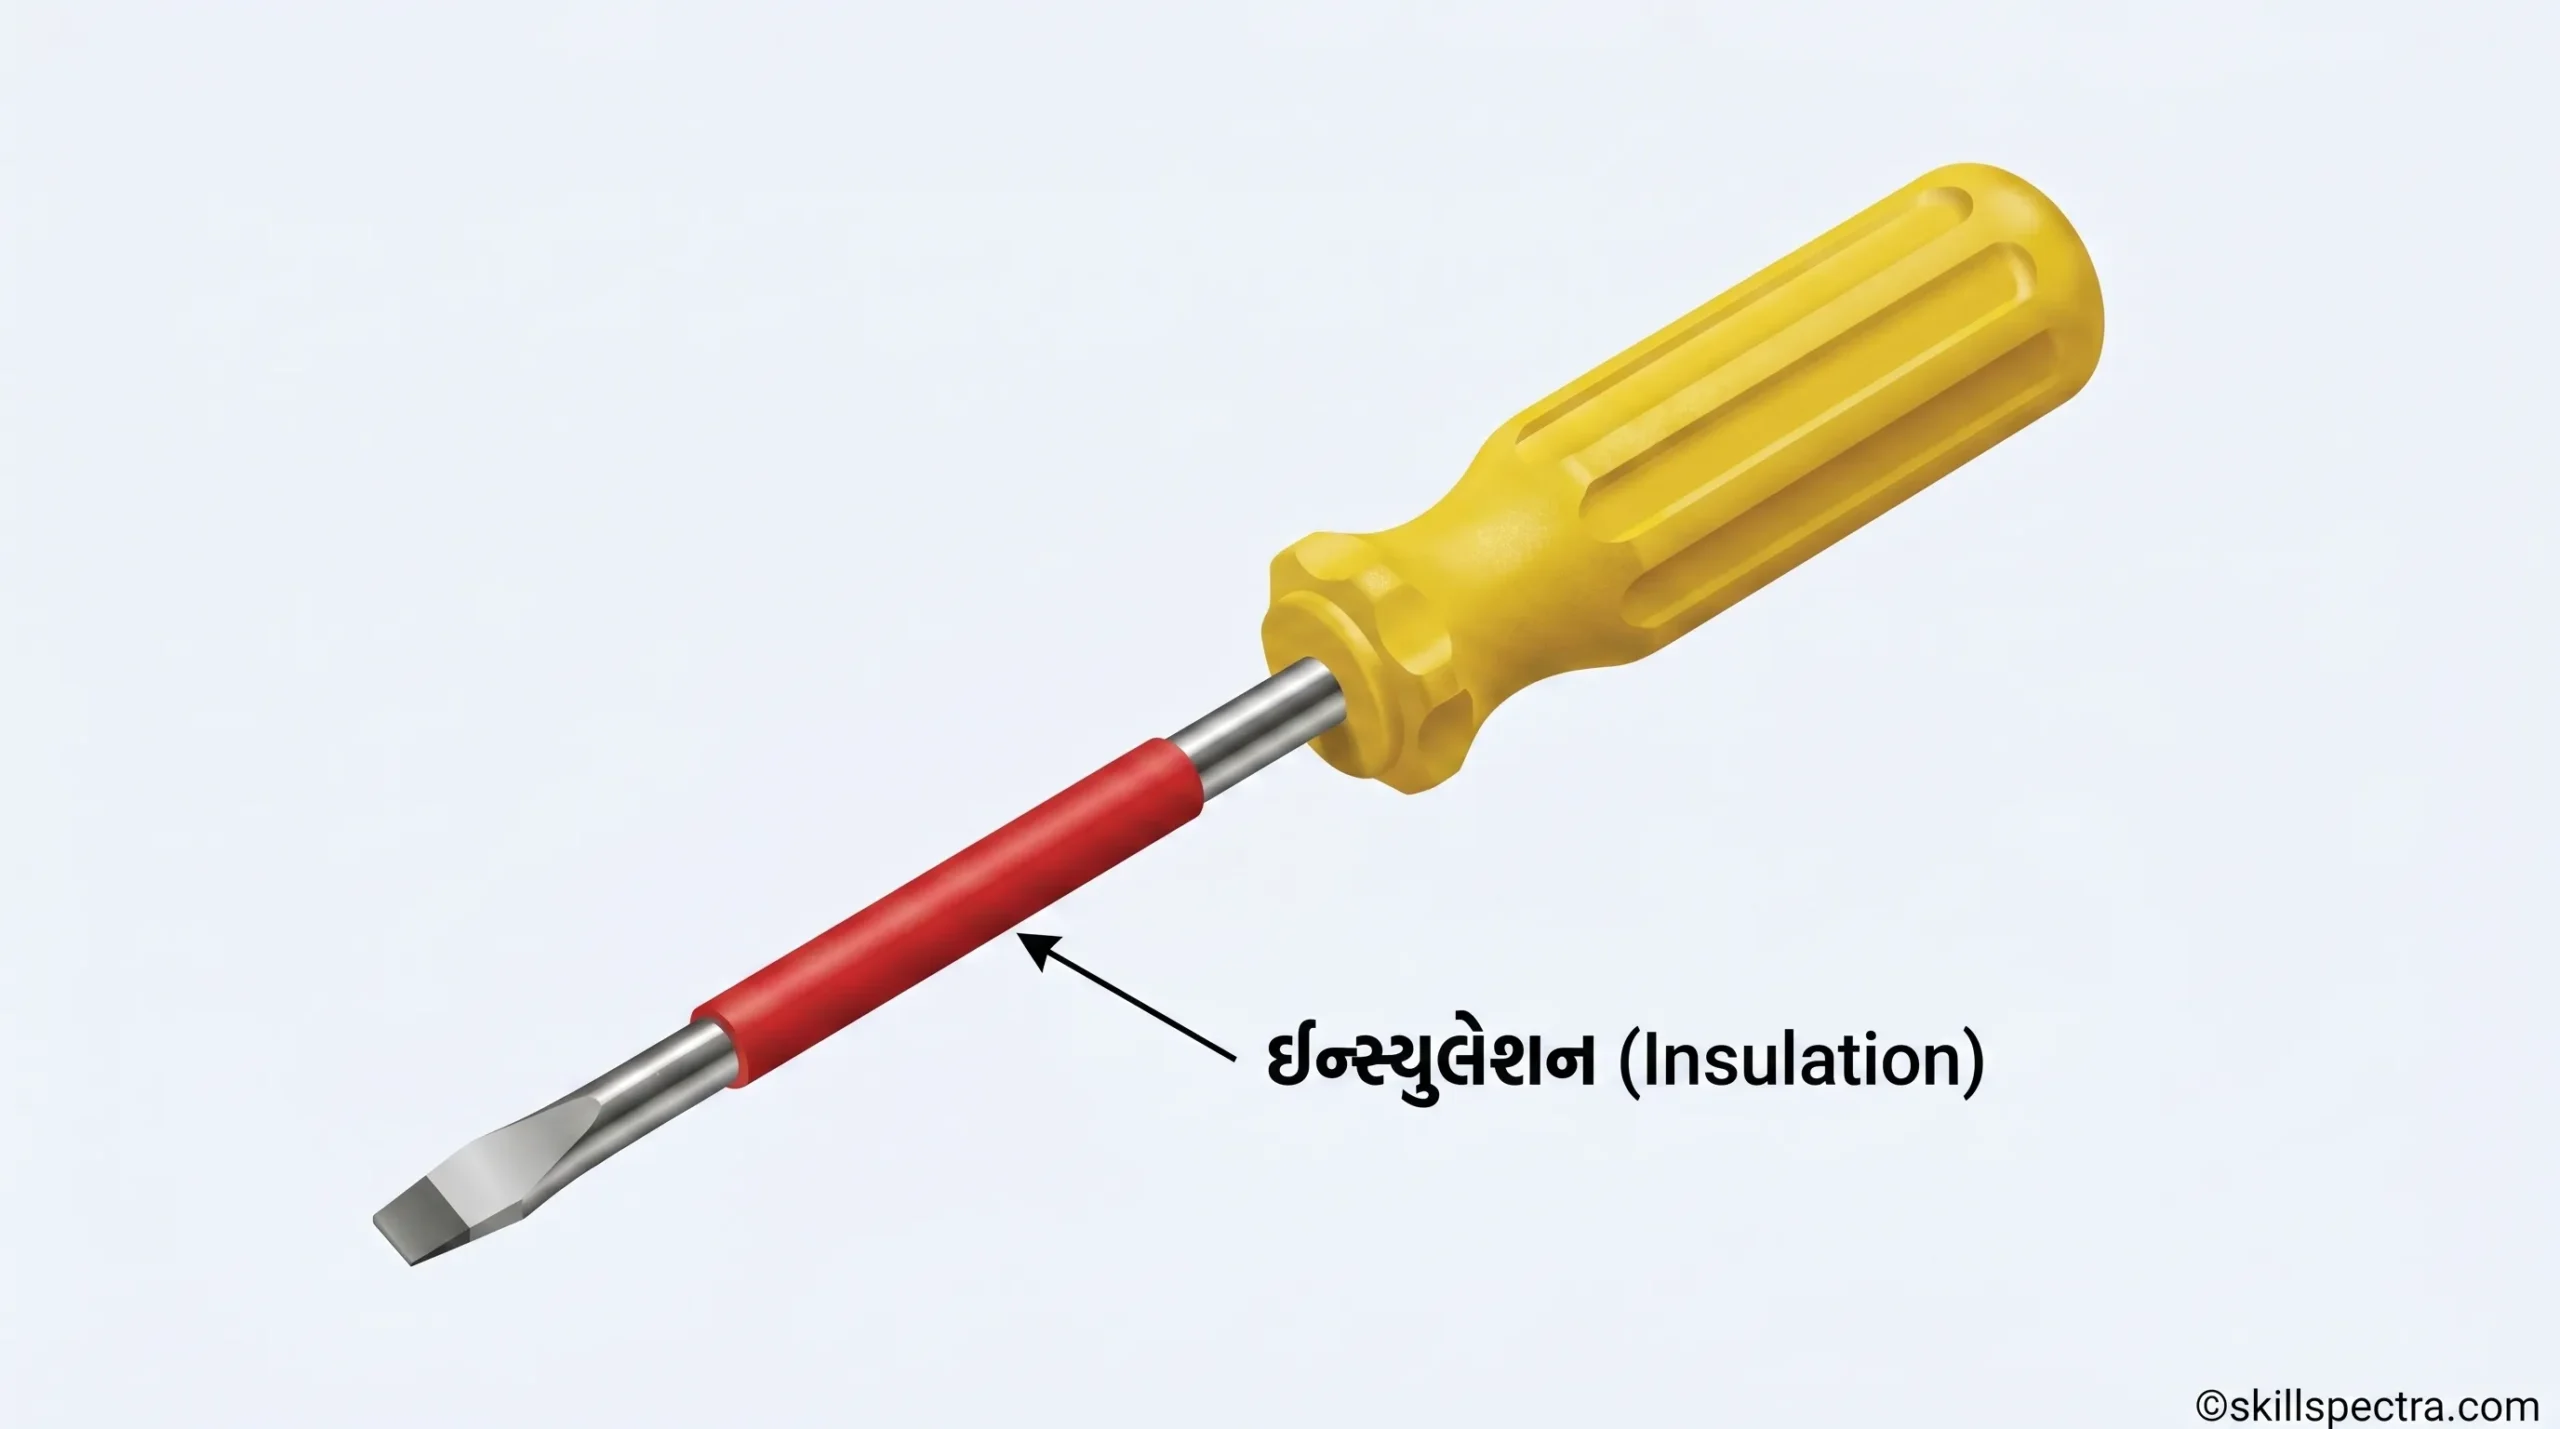
- Live parts સાથે short circuit ટાળવા માટે તેની blades પર insulation નું પડ ચઢાવેલું હોય છે.
Keywords 🌐
- Primary Keywords: Mechanic Diesel Study Material Gujarati, Workshop Tools Guide Gujarati, ITI Diesel Mechanic Lessons.
- Secondary Keywords: Straight Pein Hammer uses, Types of Mallets, Screwdriver Classification Gujarati, Heavy duty vs Light duty screwdrivers, ITI NSQF Level 4 notes.
- Focus Keyphrase: Mechanic Diesel Tools Gujarati English Mix.
- Meta Description: શીખો Mechanic Diesel ના મહત્વના ઓજારો (Hammer, Mallet, Screwdrivers) વિશે ગુજરાતીમાં. ITI વિદ્યાર્થીઓ માટે સંપૂર્ણ માર્ગદર્શિકા.
🌐 Keywords:
Engineer's Hammer Gujarati, Types of Hammers in Hindi/Gujarati, Mechanical Tools Guide Gujarati, Ball Pein Hammer Use, ITI Mechanic Diesel Theory Gujarati, Workshop Hand Tools Gujarati, Hammer Parts and Functions.
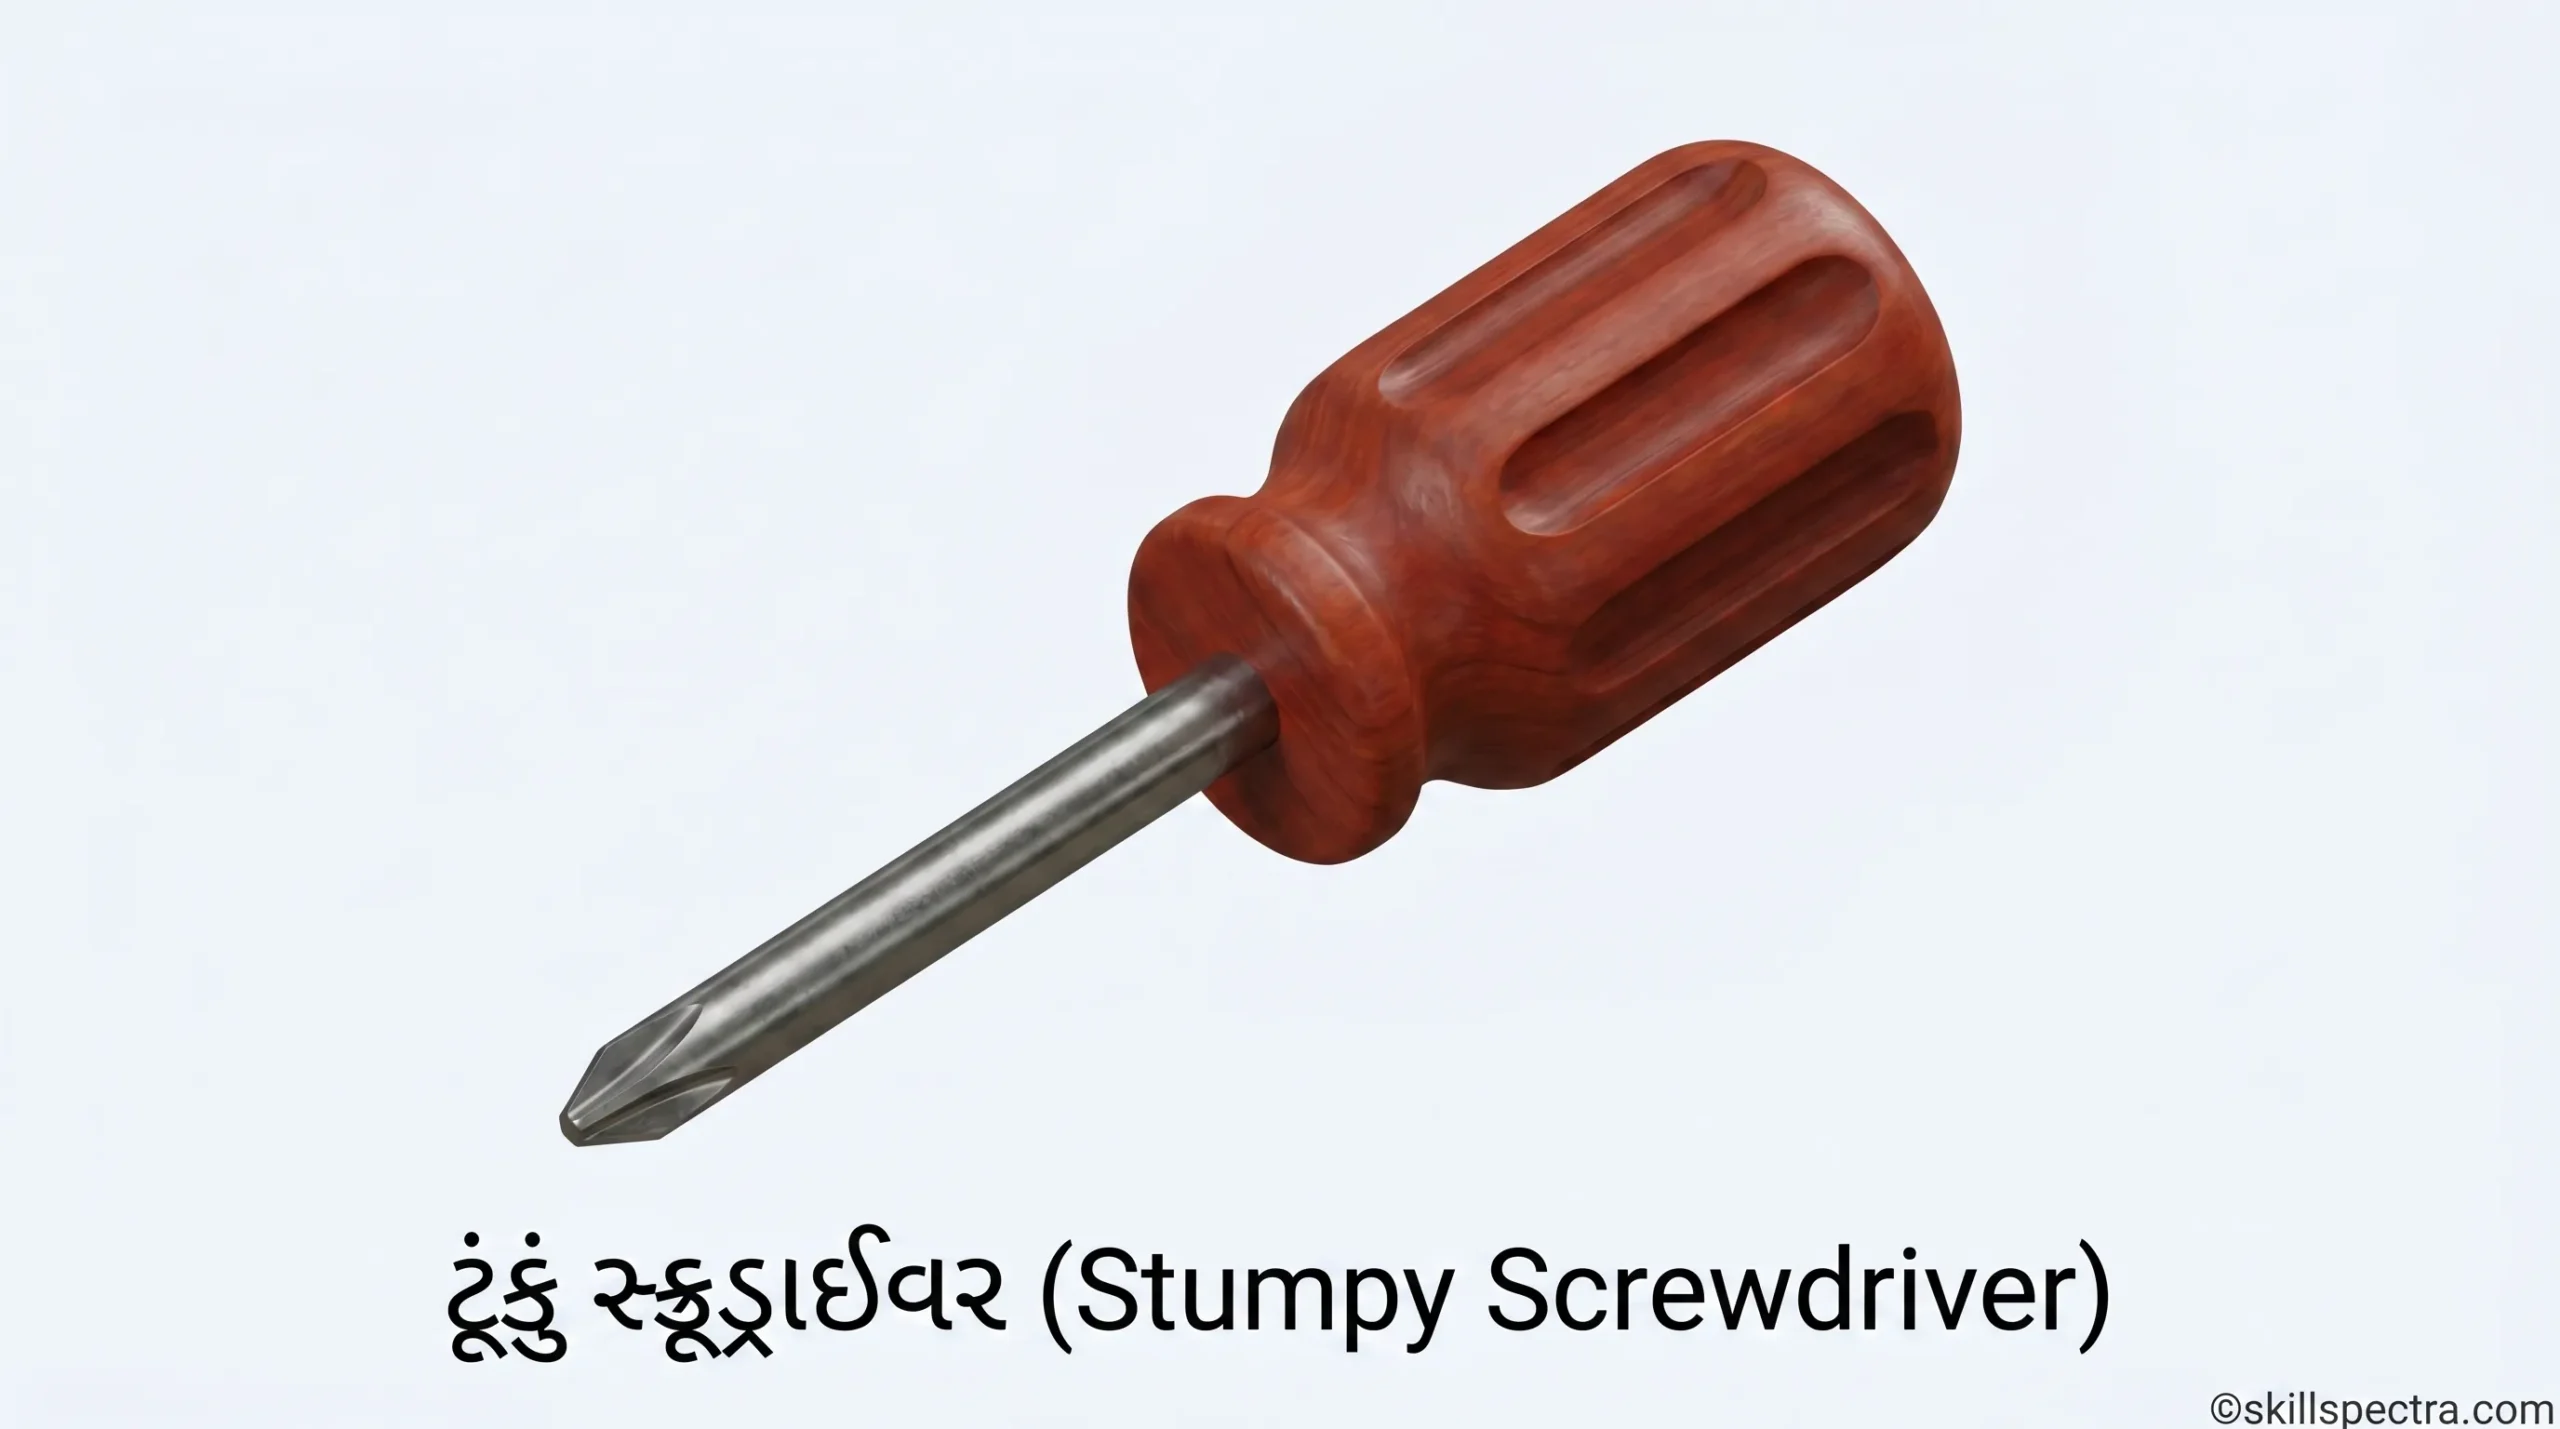
Stumpy Screwdrivers (Fig 5) 🤏
Stumpy screwdrivers એ કદમાં ઘણા નાના હોય છે.
- આ નાના અને મજબૂત (stumpy) સ્ક્રુડ્રાઈવર છે.
- Usage: જ્યારે ઓછી જગ્યા (space limitations) ને કારણે બીજા કોઈ પણ પ્રકારના સ્ક્રુડ્રાઈવરનો ઉપયોગ ન થઈ શકે, ત્યારે આ Stumpy Screwdriver નો ઉપયોગ કરવામાં આવે છે.
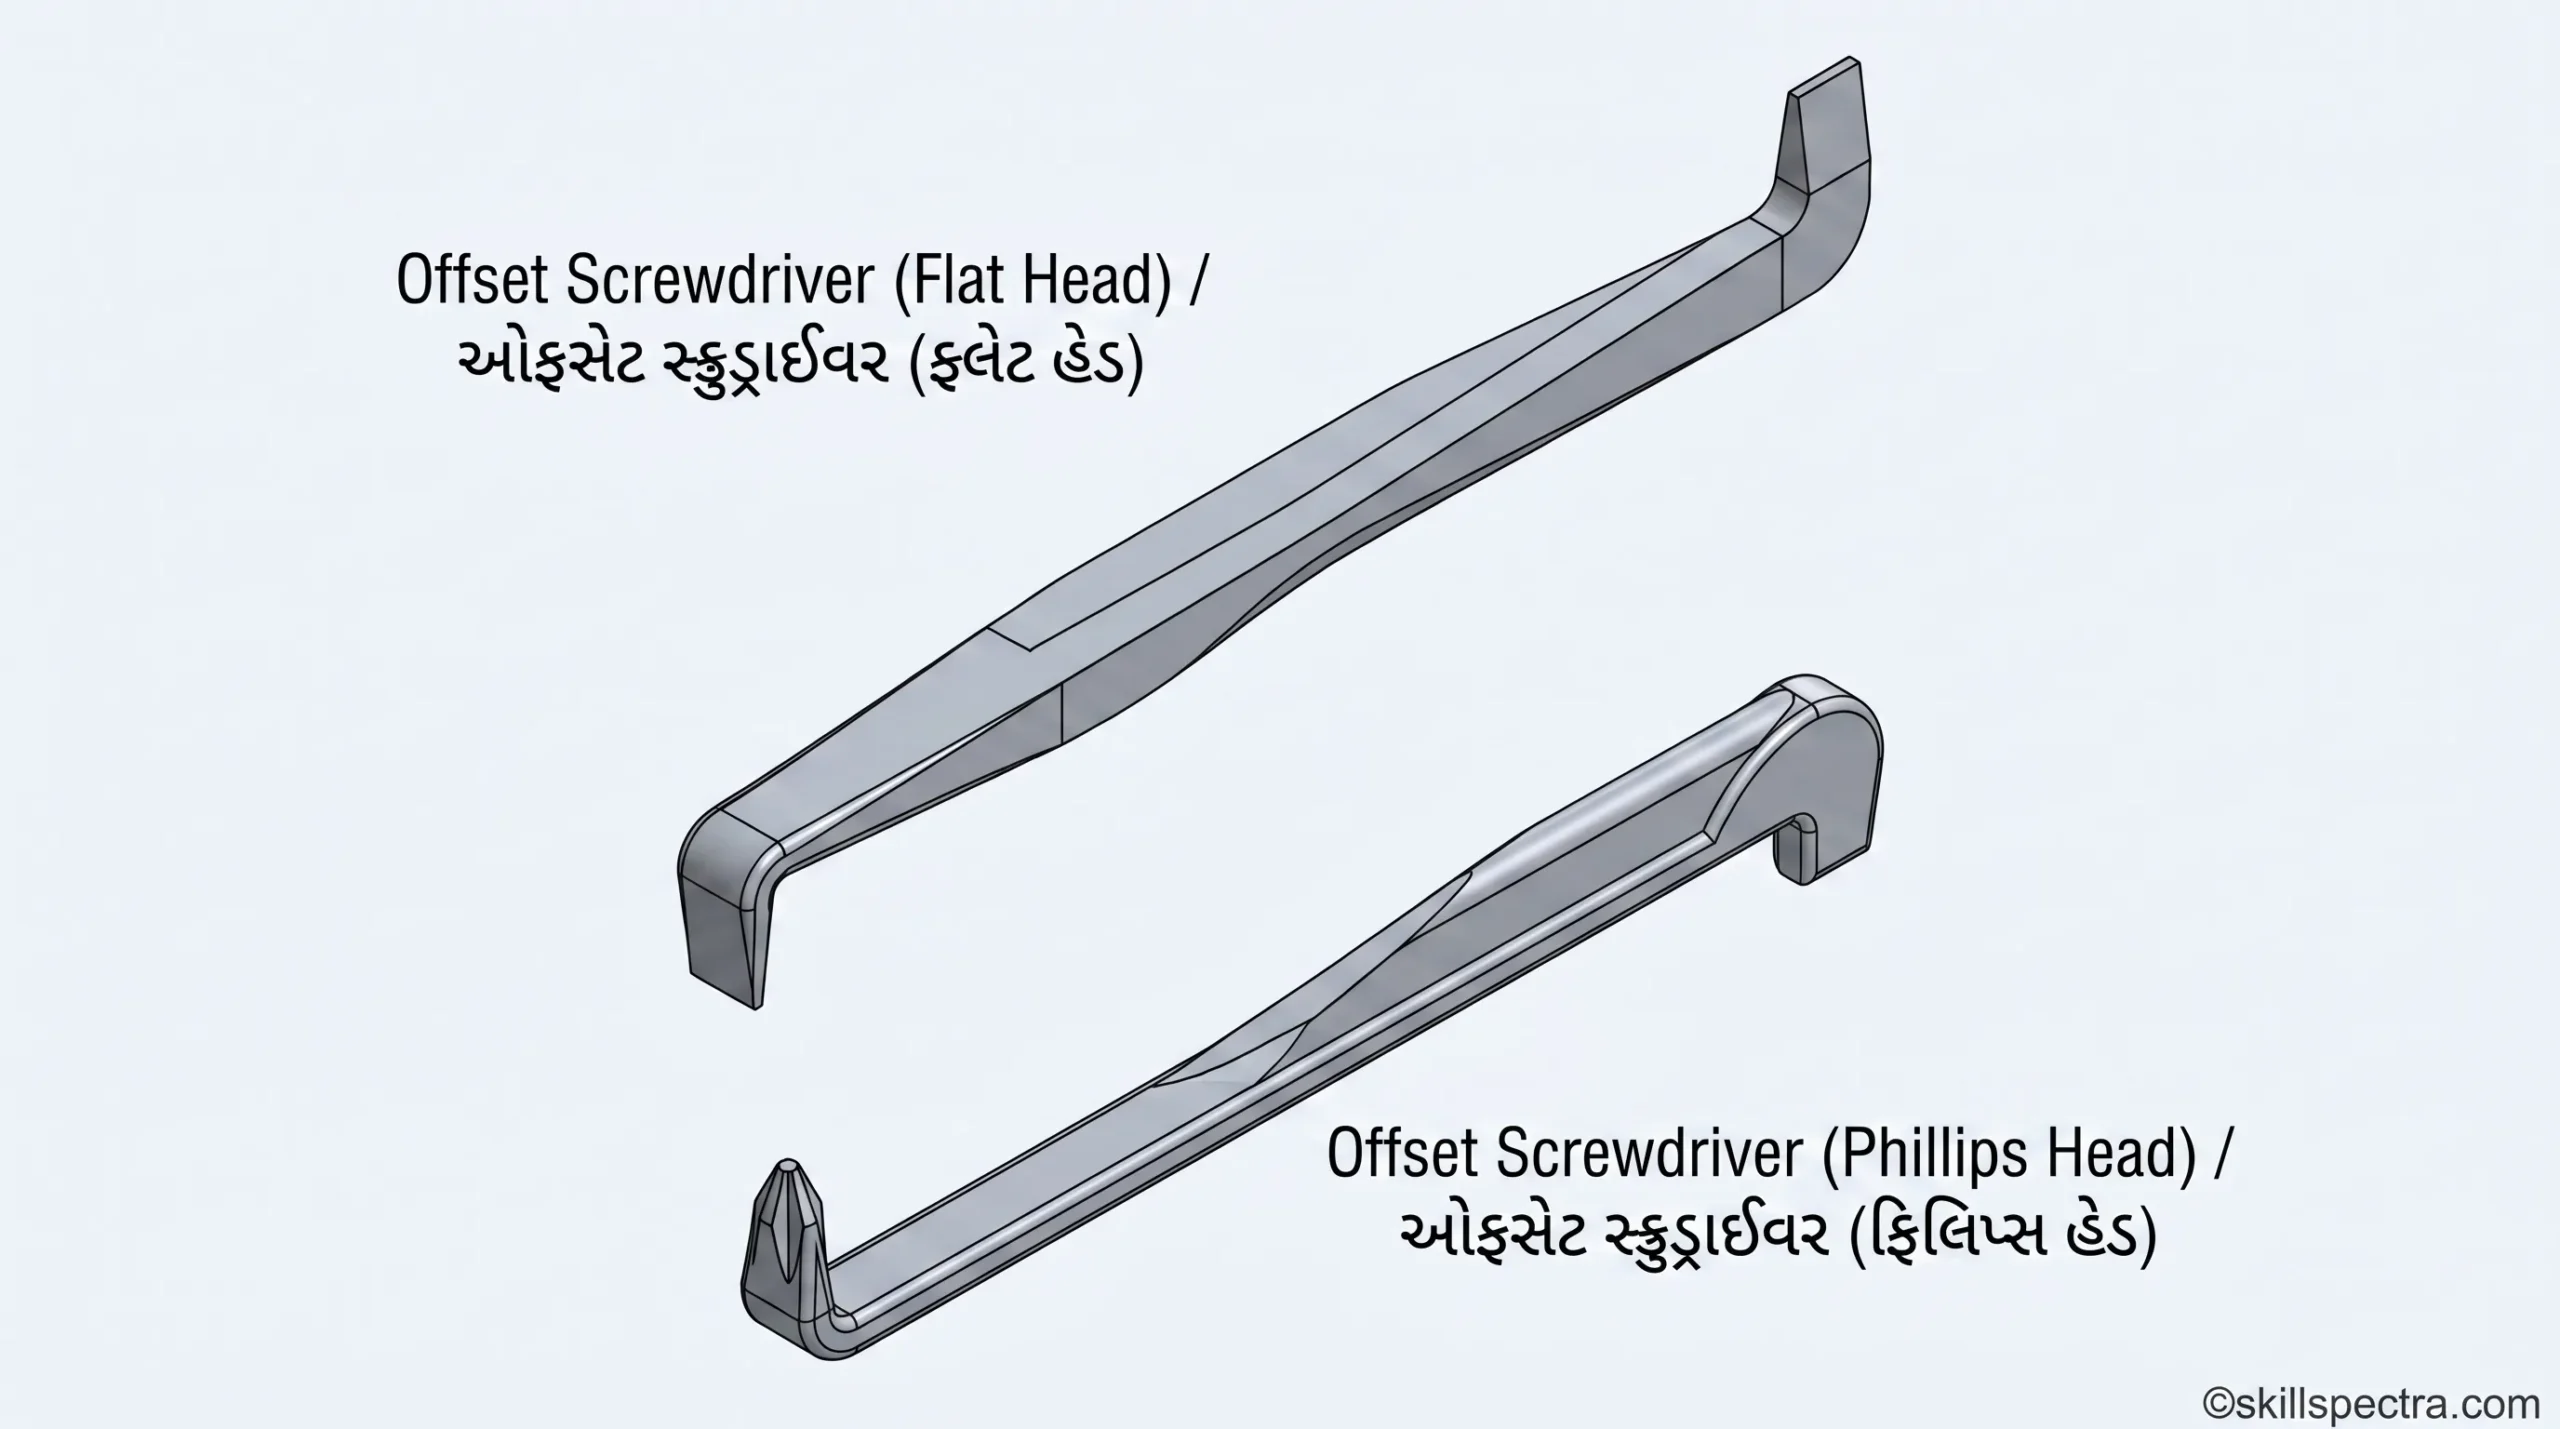
Offset Screwdriver (Fig 6) 📐
Offset screwdrivers નો આકાર અંગ્રેજી ‘Z’ જેવો હોય છે.
- Offset screwdrivers નો ઉપયોગ એવા સ્ક્રુ પર કરવામાં આવે છે જે અંધારી અથવા સાંકડી જગ્યાઓ (blind spaces) માં આવેલા હોય છે, જ્યાં સીધું સ્ક્રુડ્રાઈવર પહોંચી શકતું નથી.
- Design: આ સ્ક્રુડ્રાઈવર ટૂંકી બ્લેડવાળા હોય છે અને તેમની ટીપ્સ (tips) કાટખૂણે (right angle) વળેલી હોય છે.
- Advantage: તેમના ખાસ લીવરેજ (leverage) ને કારણે, આ સ્ક્રુડ્રાઈવર વડે સ્ક્રુ પર વધુ ટર્નિંગ ફોર્સ (greater turning force) લગાવી શકાય છે.
Ratchet Screwdriver ⚙️
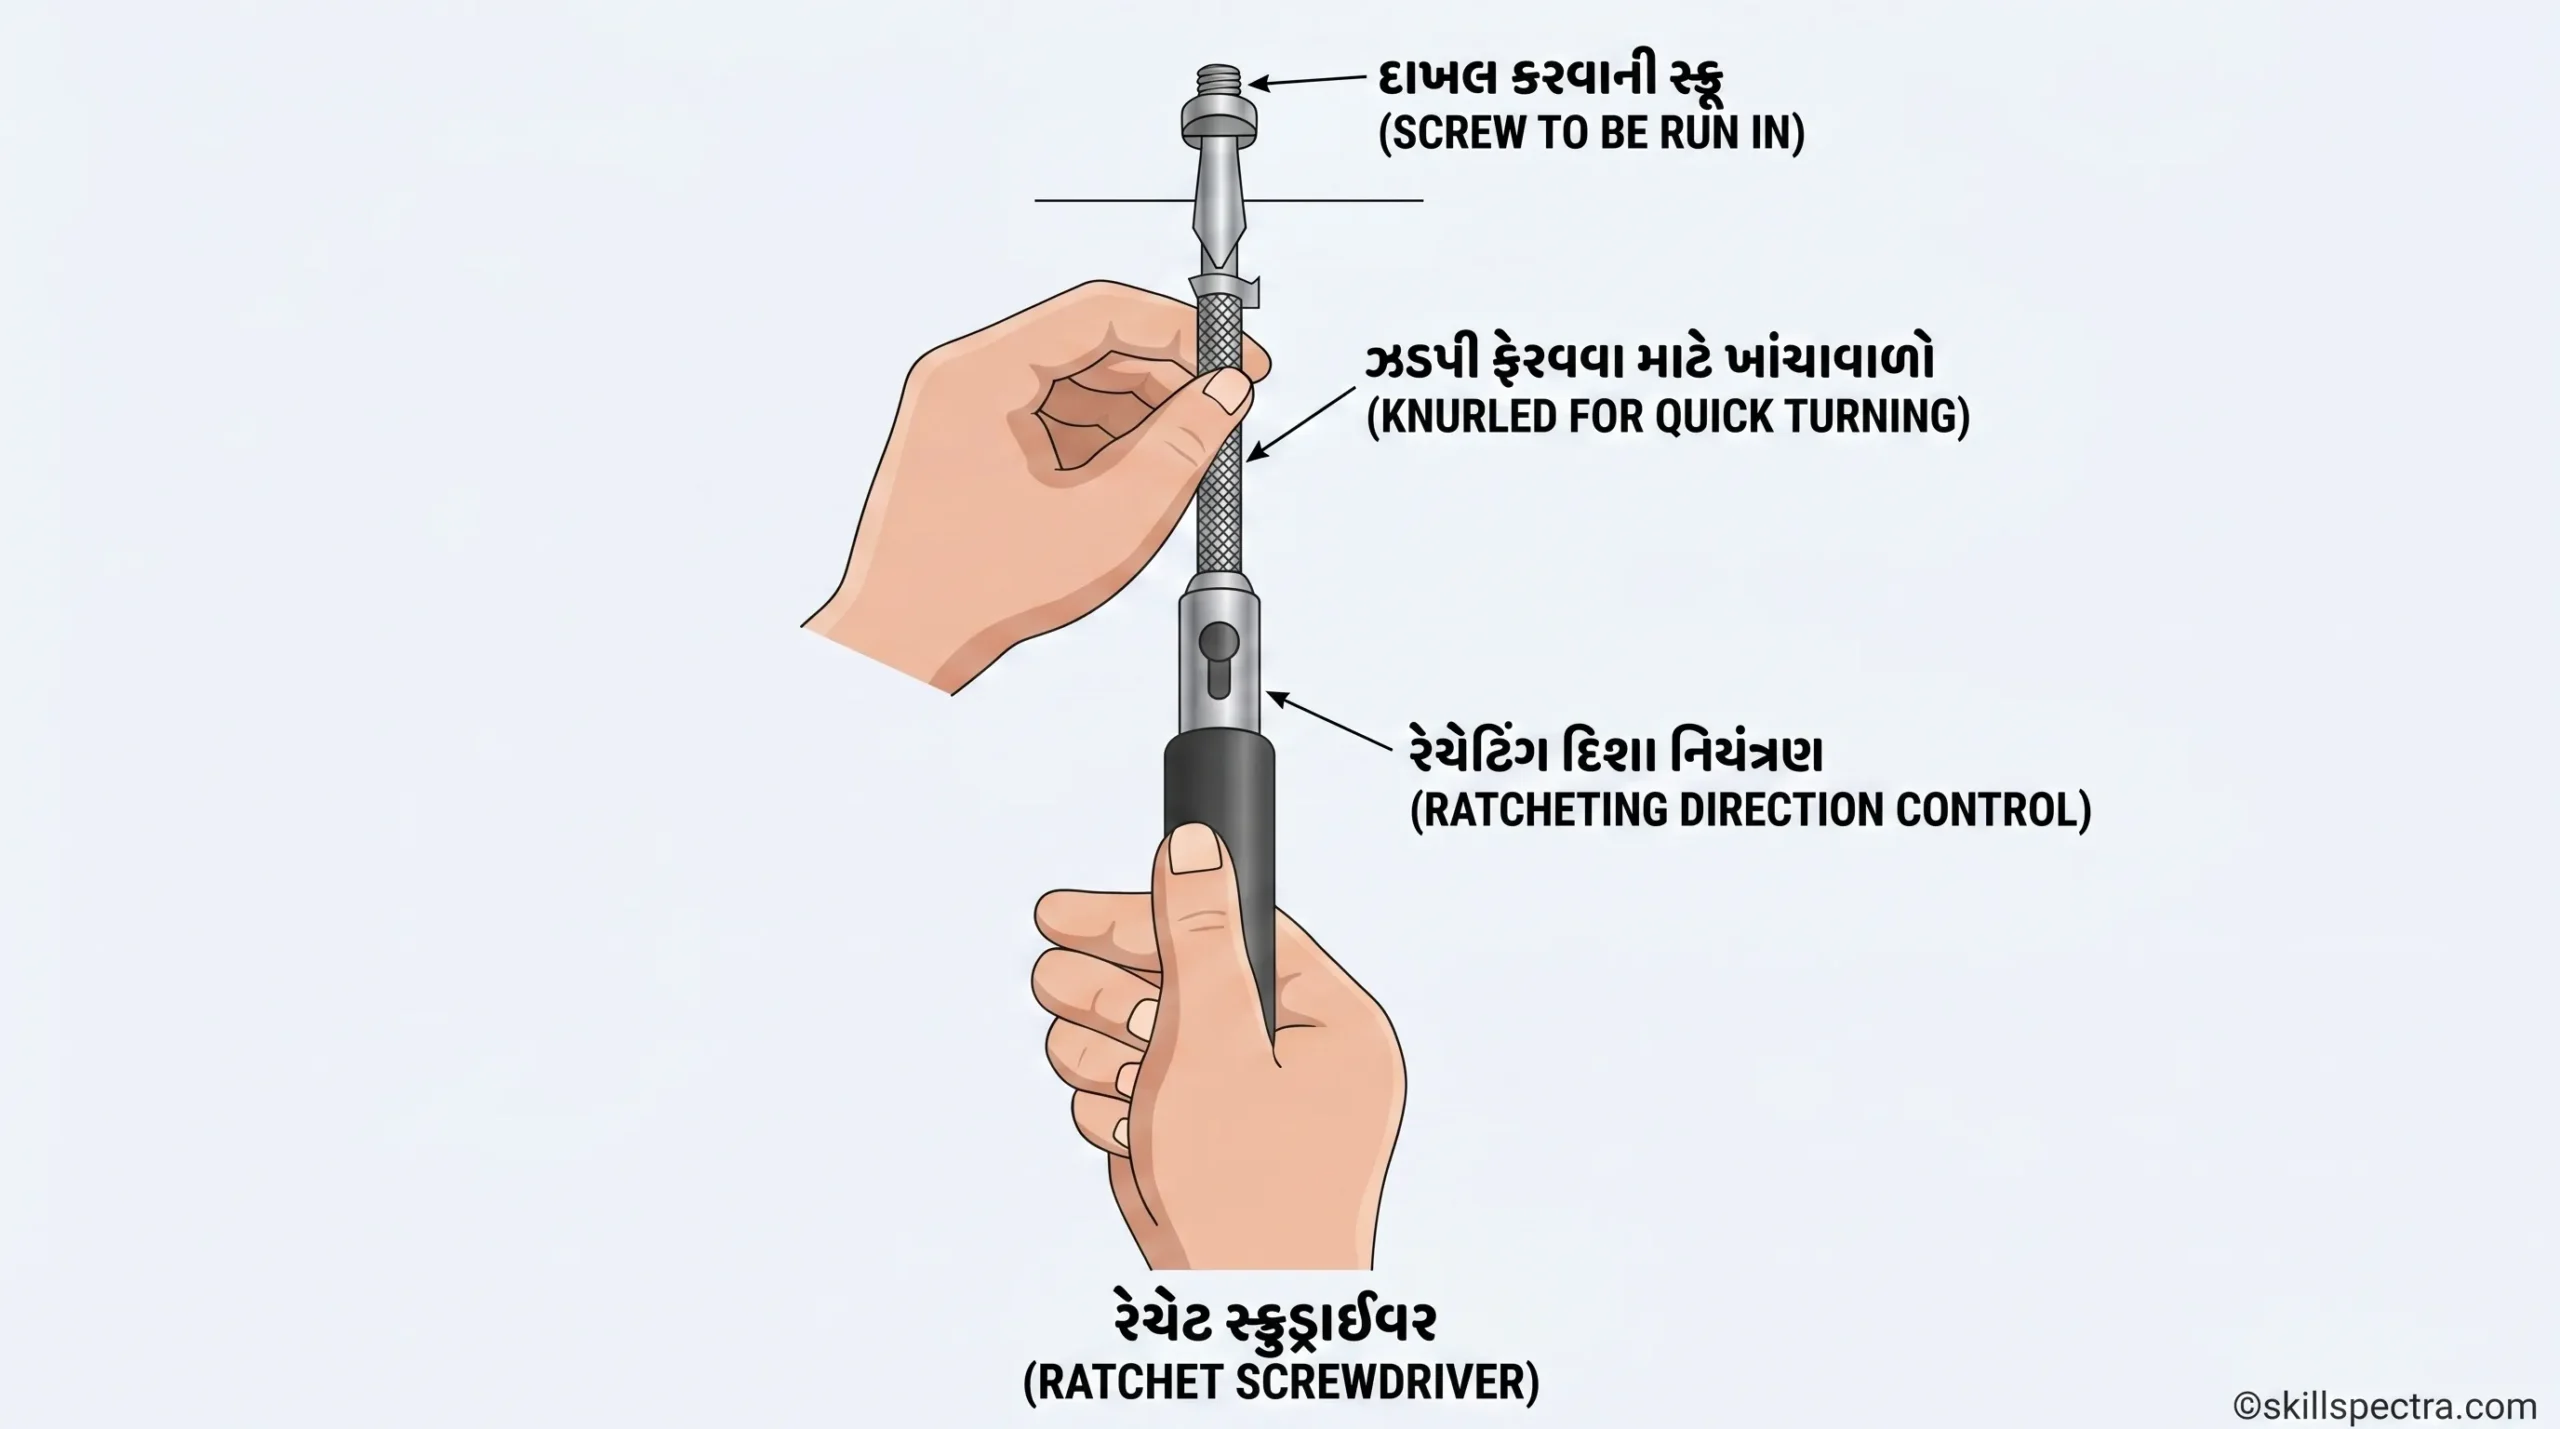
Ratchet screwdriver એ એડવાન્સ ફીચર્સ ધરાવતું ટૂલ છે.
- રેચેટ સ્ક્રુડ્રાઈવરની મુખ્ય વિશેષતાઓ નીચે મુજબ છે:
- Mechanism: આ સ્ક્રુડ્રાઈવરમાં three-position ratchet control હોય છે. જેનો ઉપયોગ સ્ક્રુને ટાઈટ કરવા (screwing), સ્ક્રુને ખોલવા (unscrewing) અને ન્યુટ્રલ પોઝિશન (neutral position) રાખવા માટે થાય છે. આનાથી વારંવાર સ્ક્રુડ્રાઈવરને હાથથી છોડવાની જરૂર પડતી નથી.
🔧 Ratchet Screwdriver નો ઉપયોગ (Uses of Ratchet Screwdriver)
Ratchet Screwdriver (રેચેટ સ્ક્રૂડ્રાઈવર) ના મુખ્ય ઉપયોગો નીચે મુજબ છે:
- તેનો ઉપયોગ confined spaces (સાંકડી અથવા મર્યાદિત જગ્યાઓ) માં સ્ક્રૂ ફેરવવા માટે થાય છે. 📐
- તેને hand grip (હાથની પકડ) બદલ્યા વગર જ ઓપરેટ કરી શકાય છે.
- Medium force (મધ્યમ બળ) સાથે સ્ક્રૂને slackening (ઢીલા કરવા) અથવા tightening (ટાઈટ કરવા) માટે તેનો ઉપયોગ થાય છે. 💪
- તેનો ઉપયોગ mass production (મોટા પાયે ઉત્પાદન) માં કરવામાં આવે છે. 🏭
➕ Phillips (cross-recess) Screwdrivers
- Phillips screwdrivers માં cruciform અથવા cross-shaped tips (વત્તાકાર જેવી ટીપ્સ) હોય છે.
- આ ટીપ્સ એવી રીતે બનાવવામાં આવે છે કે તે Phillips recessed head screws માંથી લપસી જવાની (slip થવાની) શક્યતા બહુ ઓછી રહે છે. 🛠️
- તેના ચાર ફ્લેટ્સનો છેડો (end of the four flats) 53° ના ખૂણા (angle) પર tapered (ઢળતો) હોય છે.
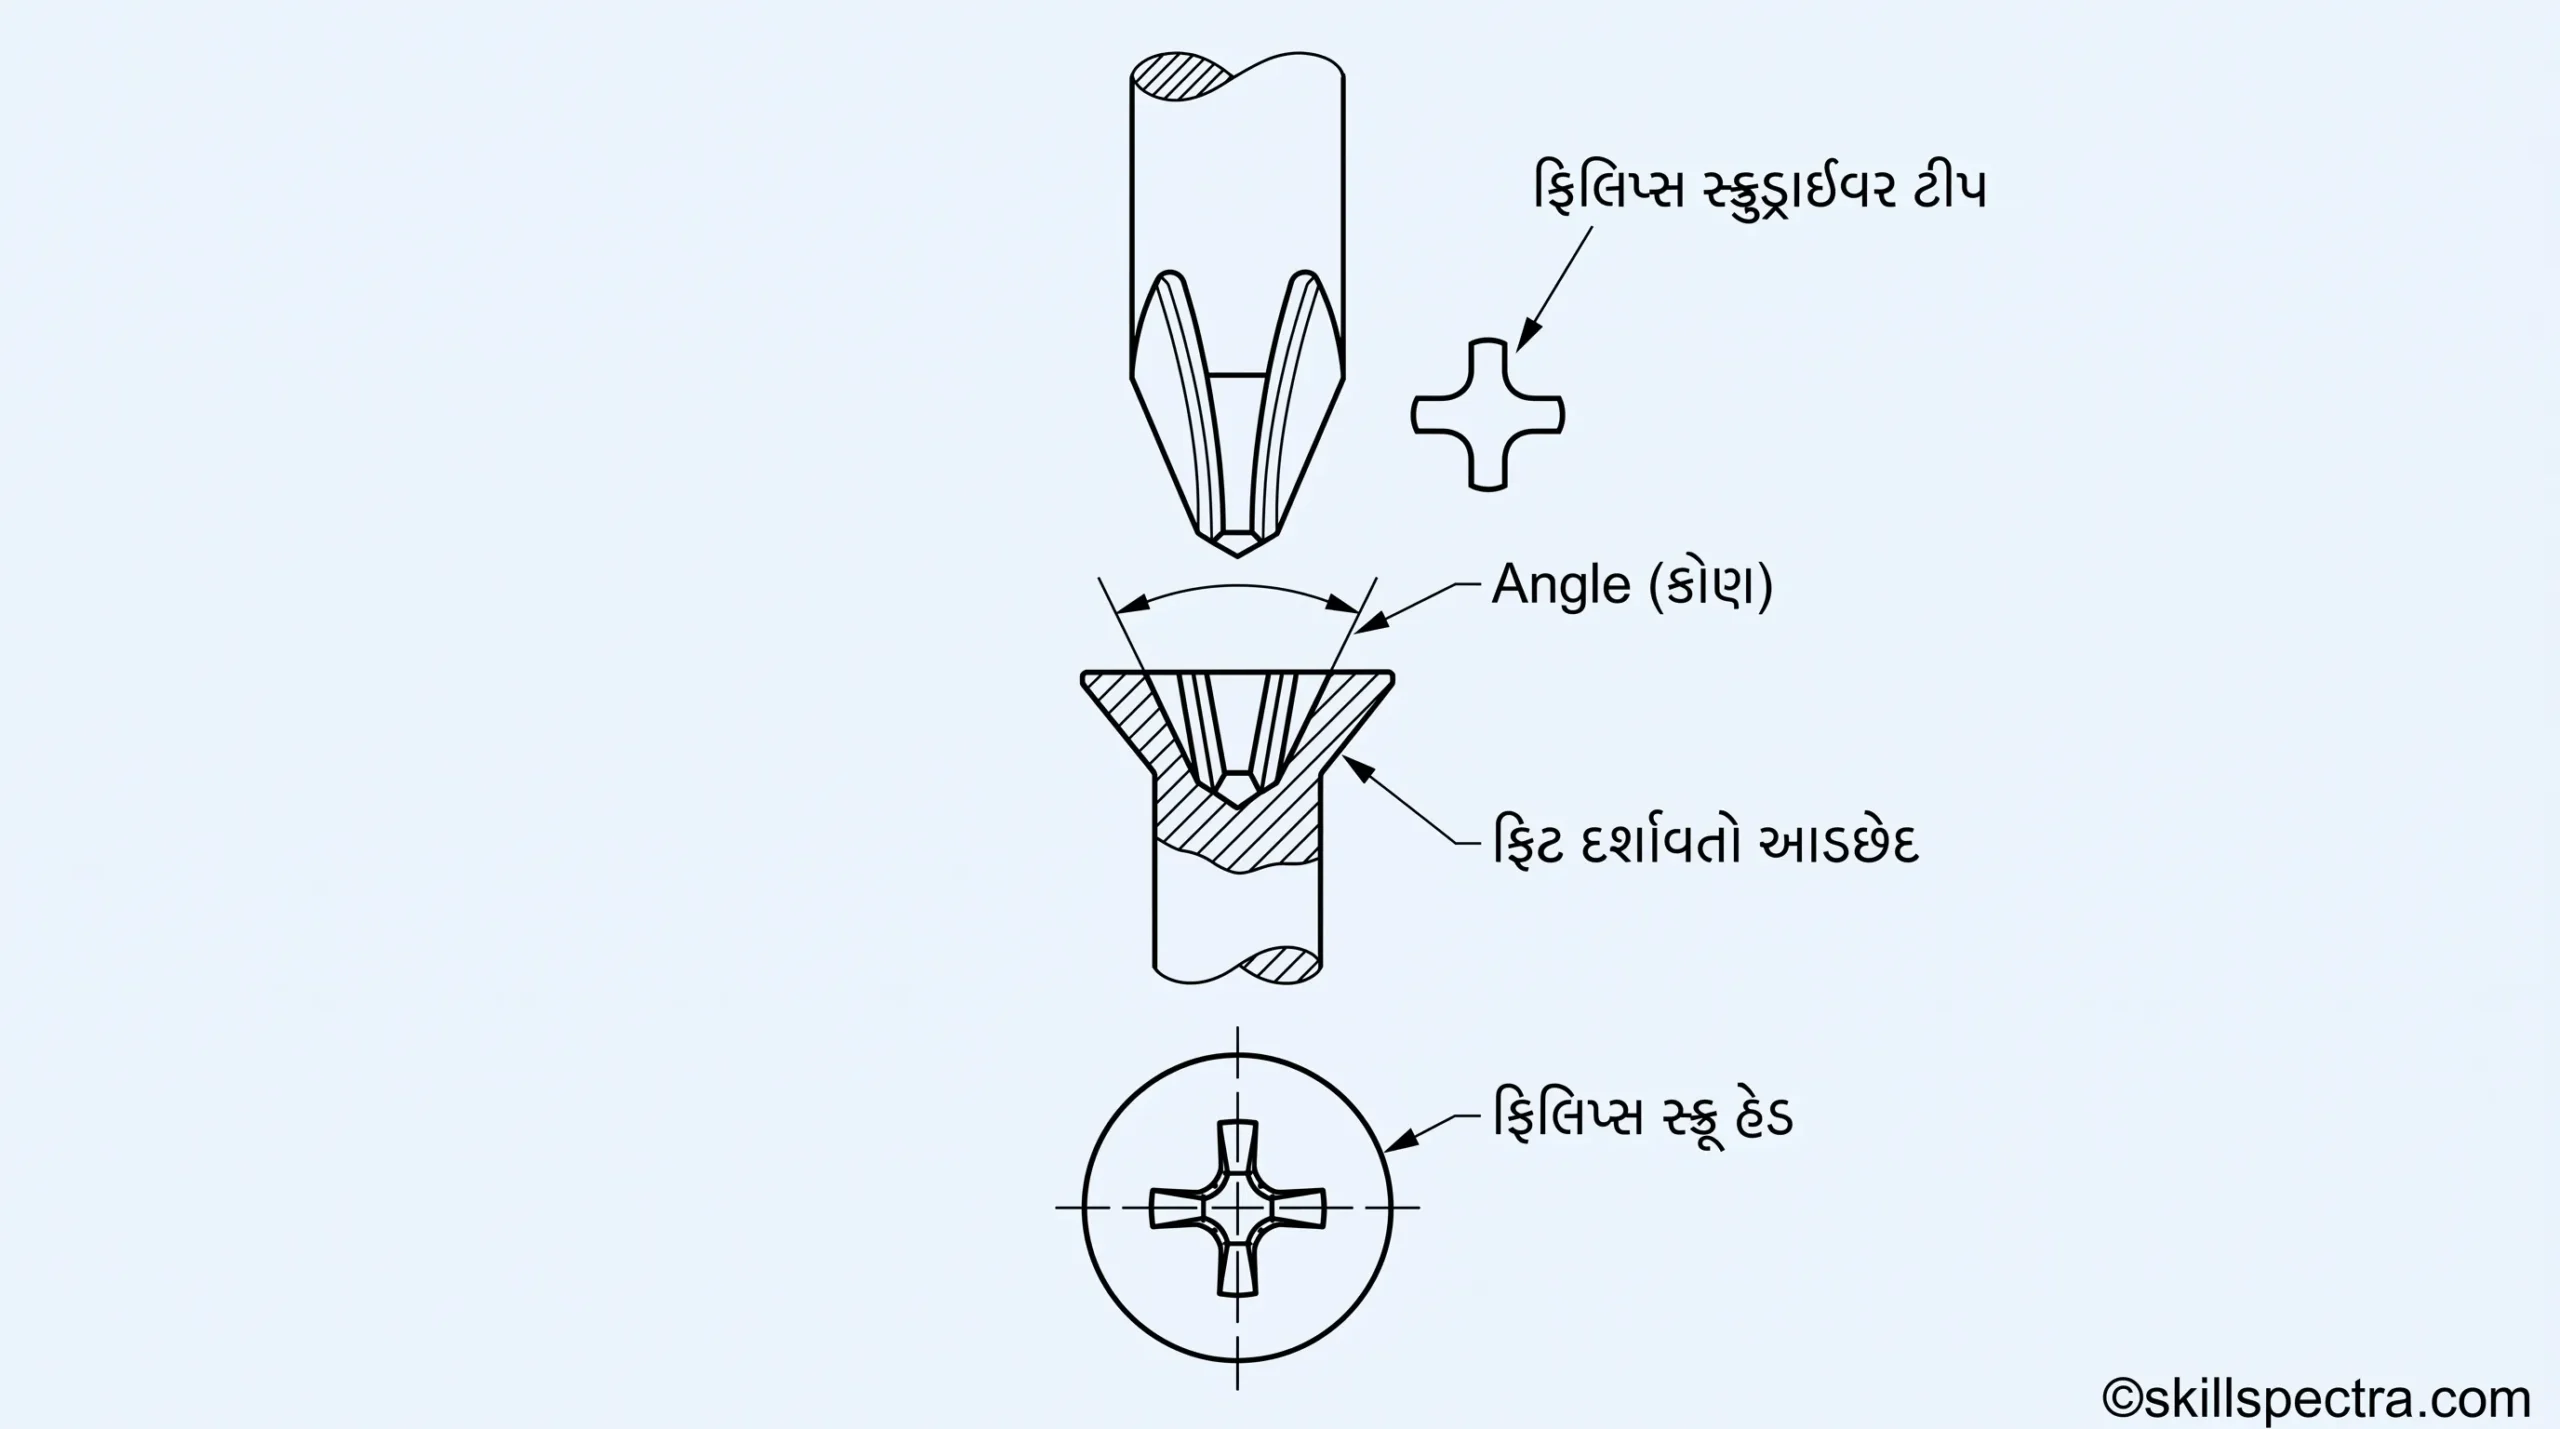
- તેનો છેલ્લો છેડો (extreme end) 110° પર ગ્રાઉન્ડ (ground) કરેલો હોય છે.
- સ્ક્રૂની આખી રેન્જને કવર કરવા માટે ચાર અલગ-અલગ સાઈઝ ઉપલબ્ધ છે. આ સાઈઝ point sizes 1, 2, 3 અને 4 દ્વારા દર્શાવવામાં આવે છે, જે Phillips screw heads ની સાઈઝ સાથે સુસંગત હોય છે. 🔢
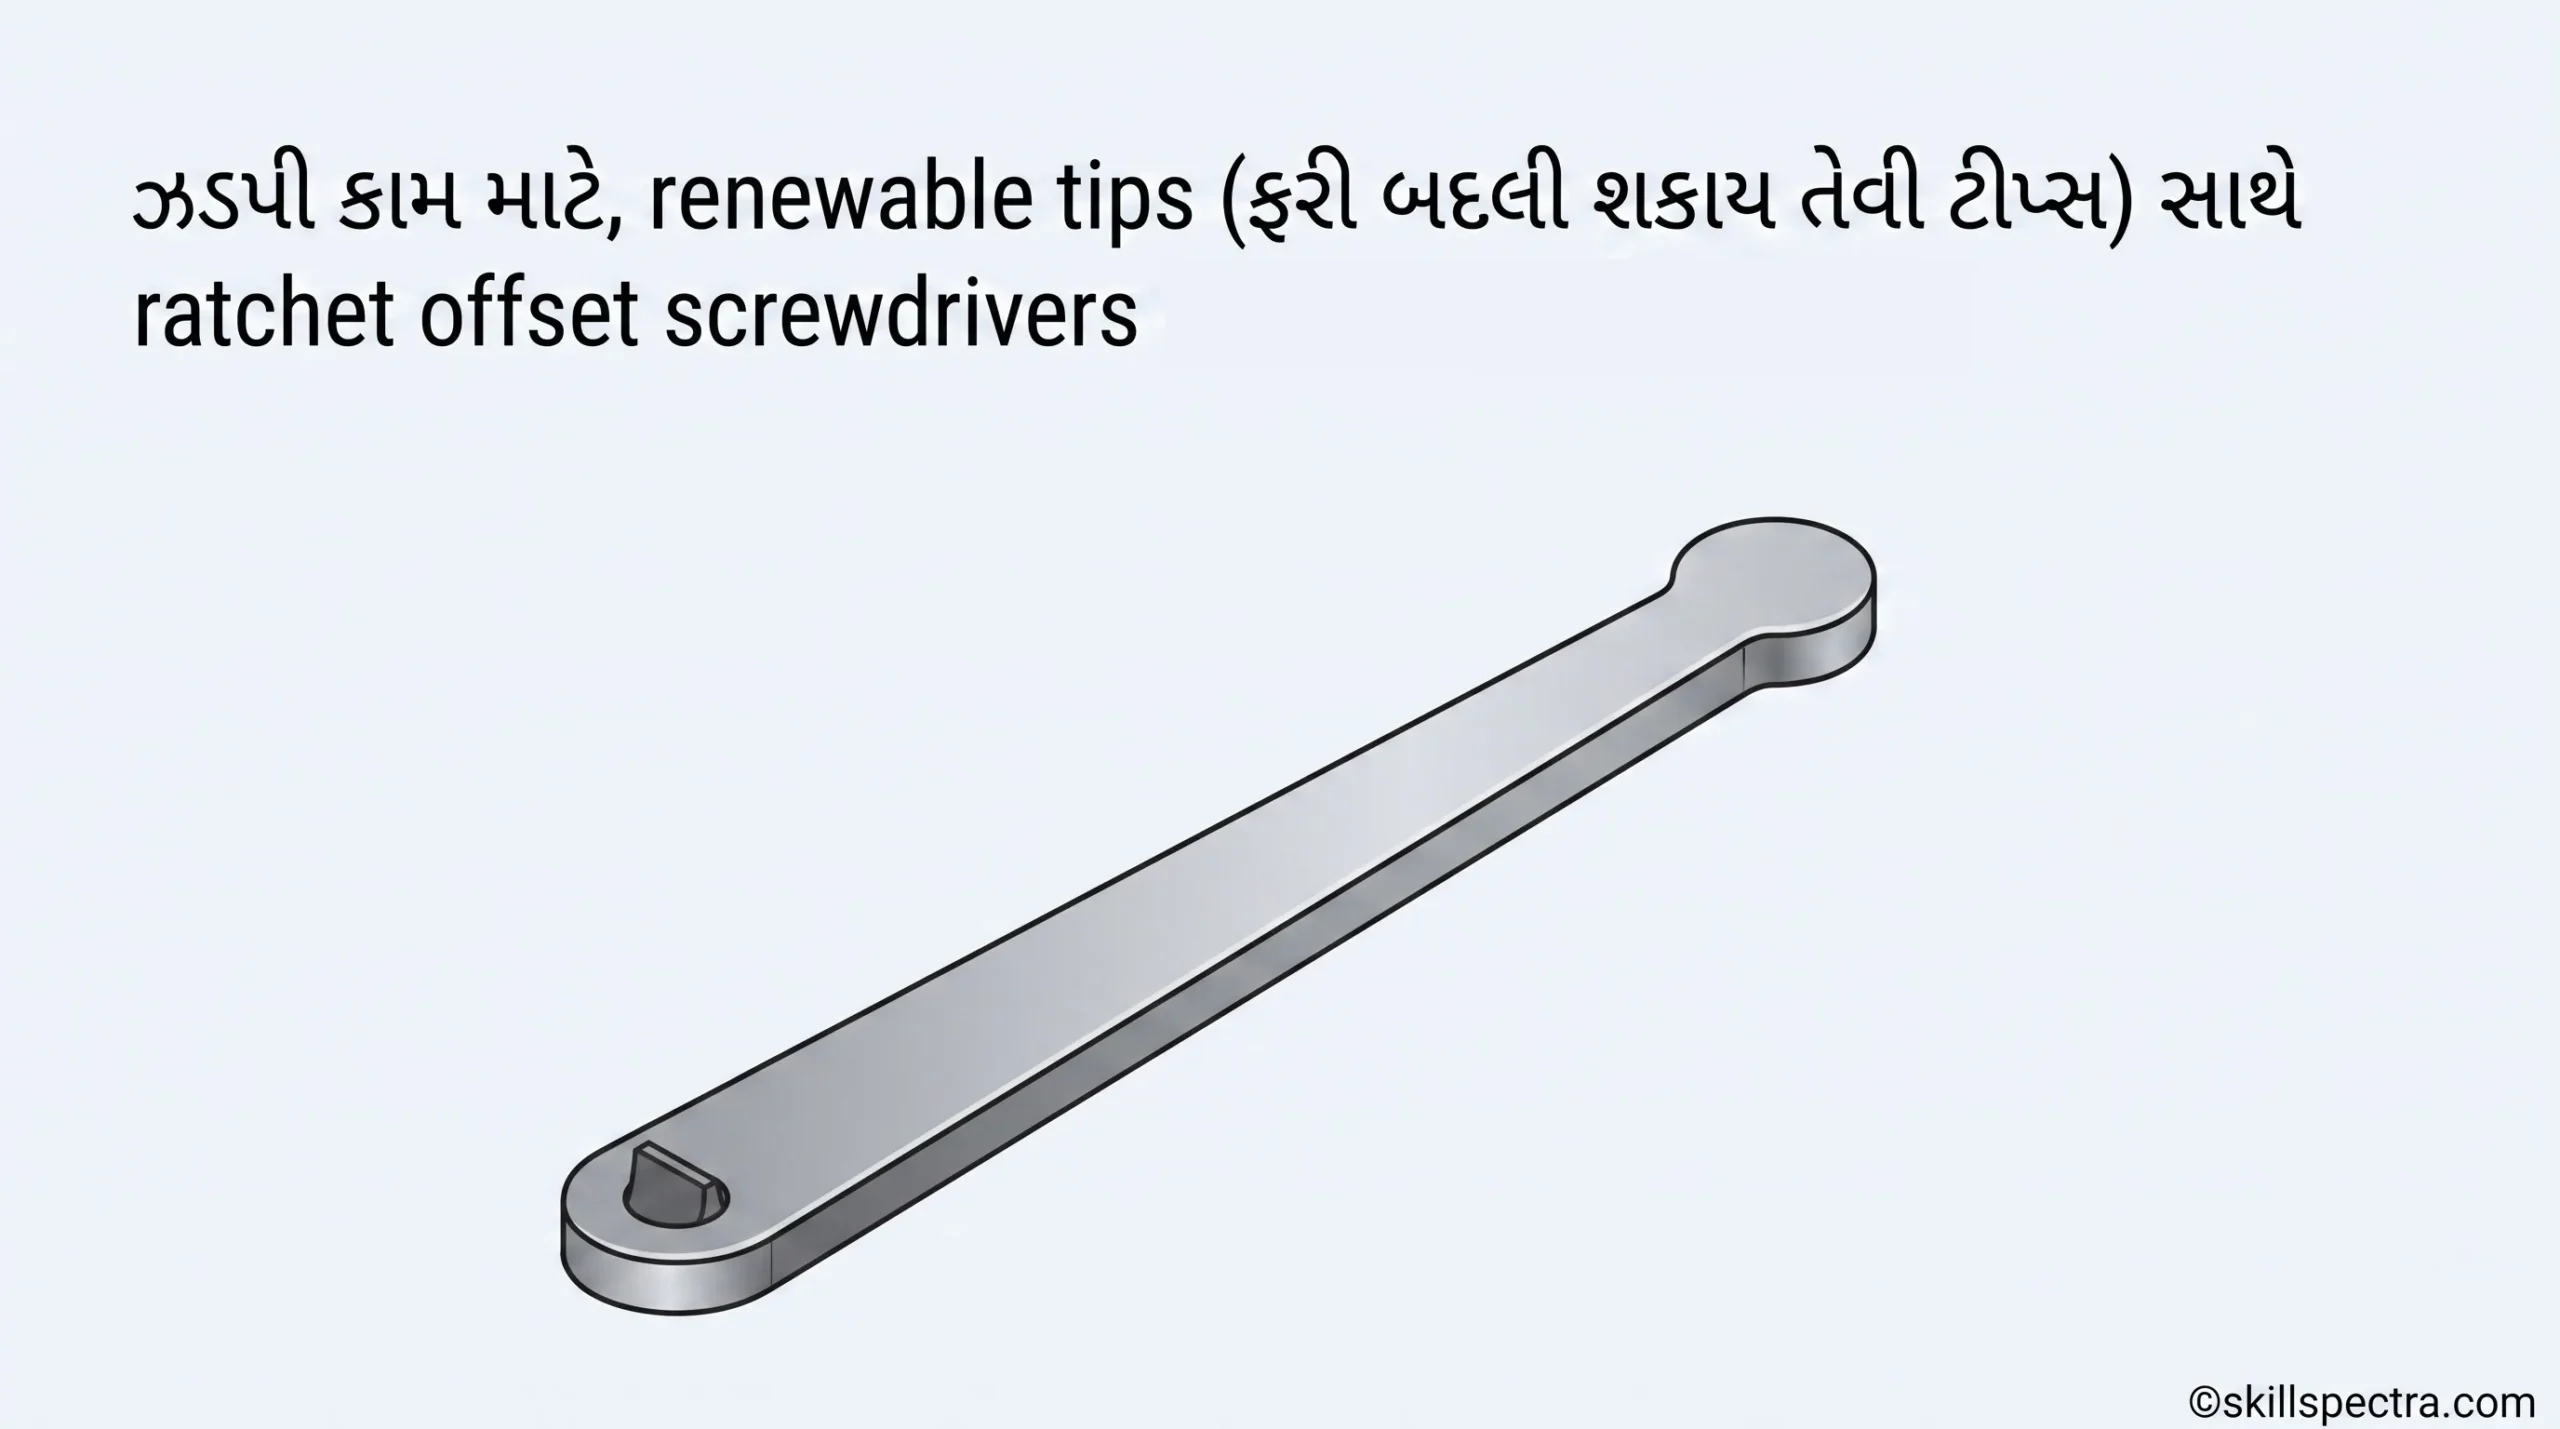
- ઝડપી કામગીરી (quicker application) માટે, renewable tips (બદલી શકાય તેવી ટીપ્સ) સાથેના ratchet offset screwdrivers પણ ઉપલબ્ધ છે. 🔄
📏 Specification of Screwdriver (સ્ક્રૂડ્રાઈવરનું સ્પષ્ટીકરણ)
Screwdrivers ને Figure મુજબ નીચેની બાબતો દ્વારા ઓળખવામાં કે સ્પષ્ટ કરવામાં આવે છે:
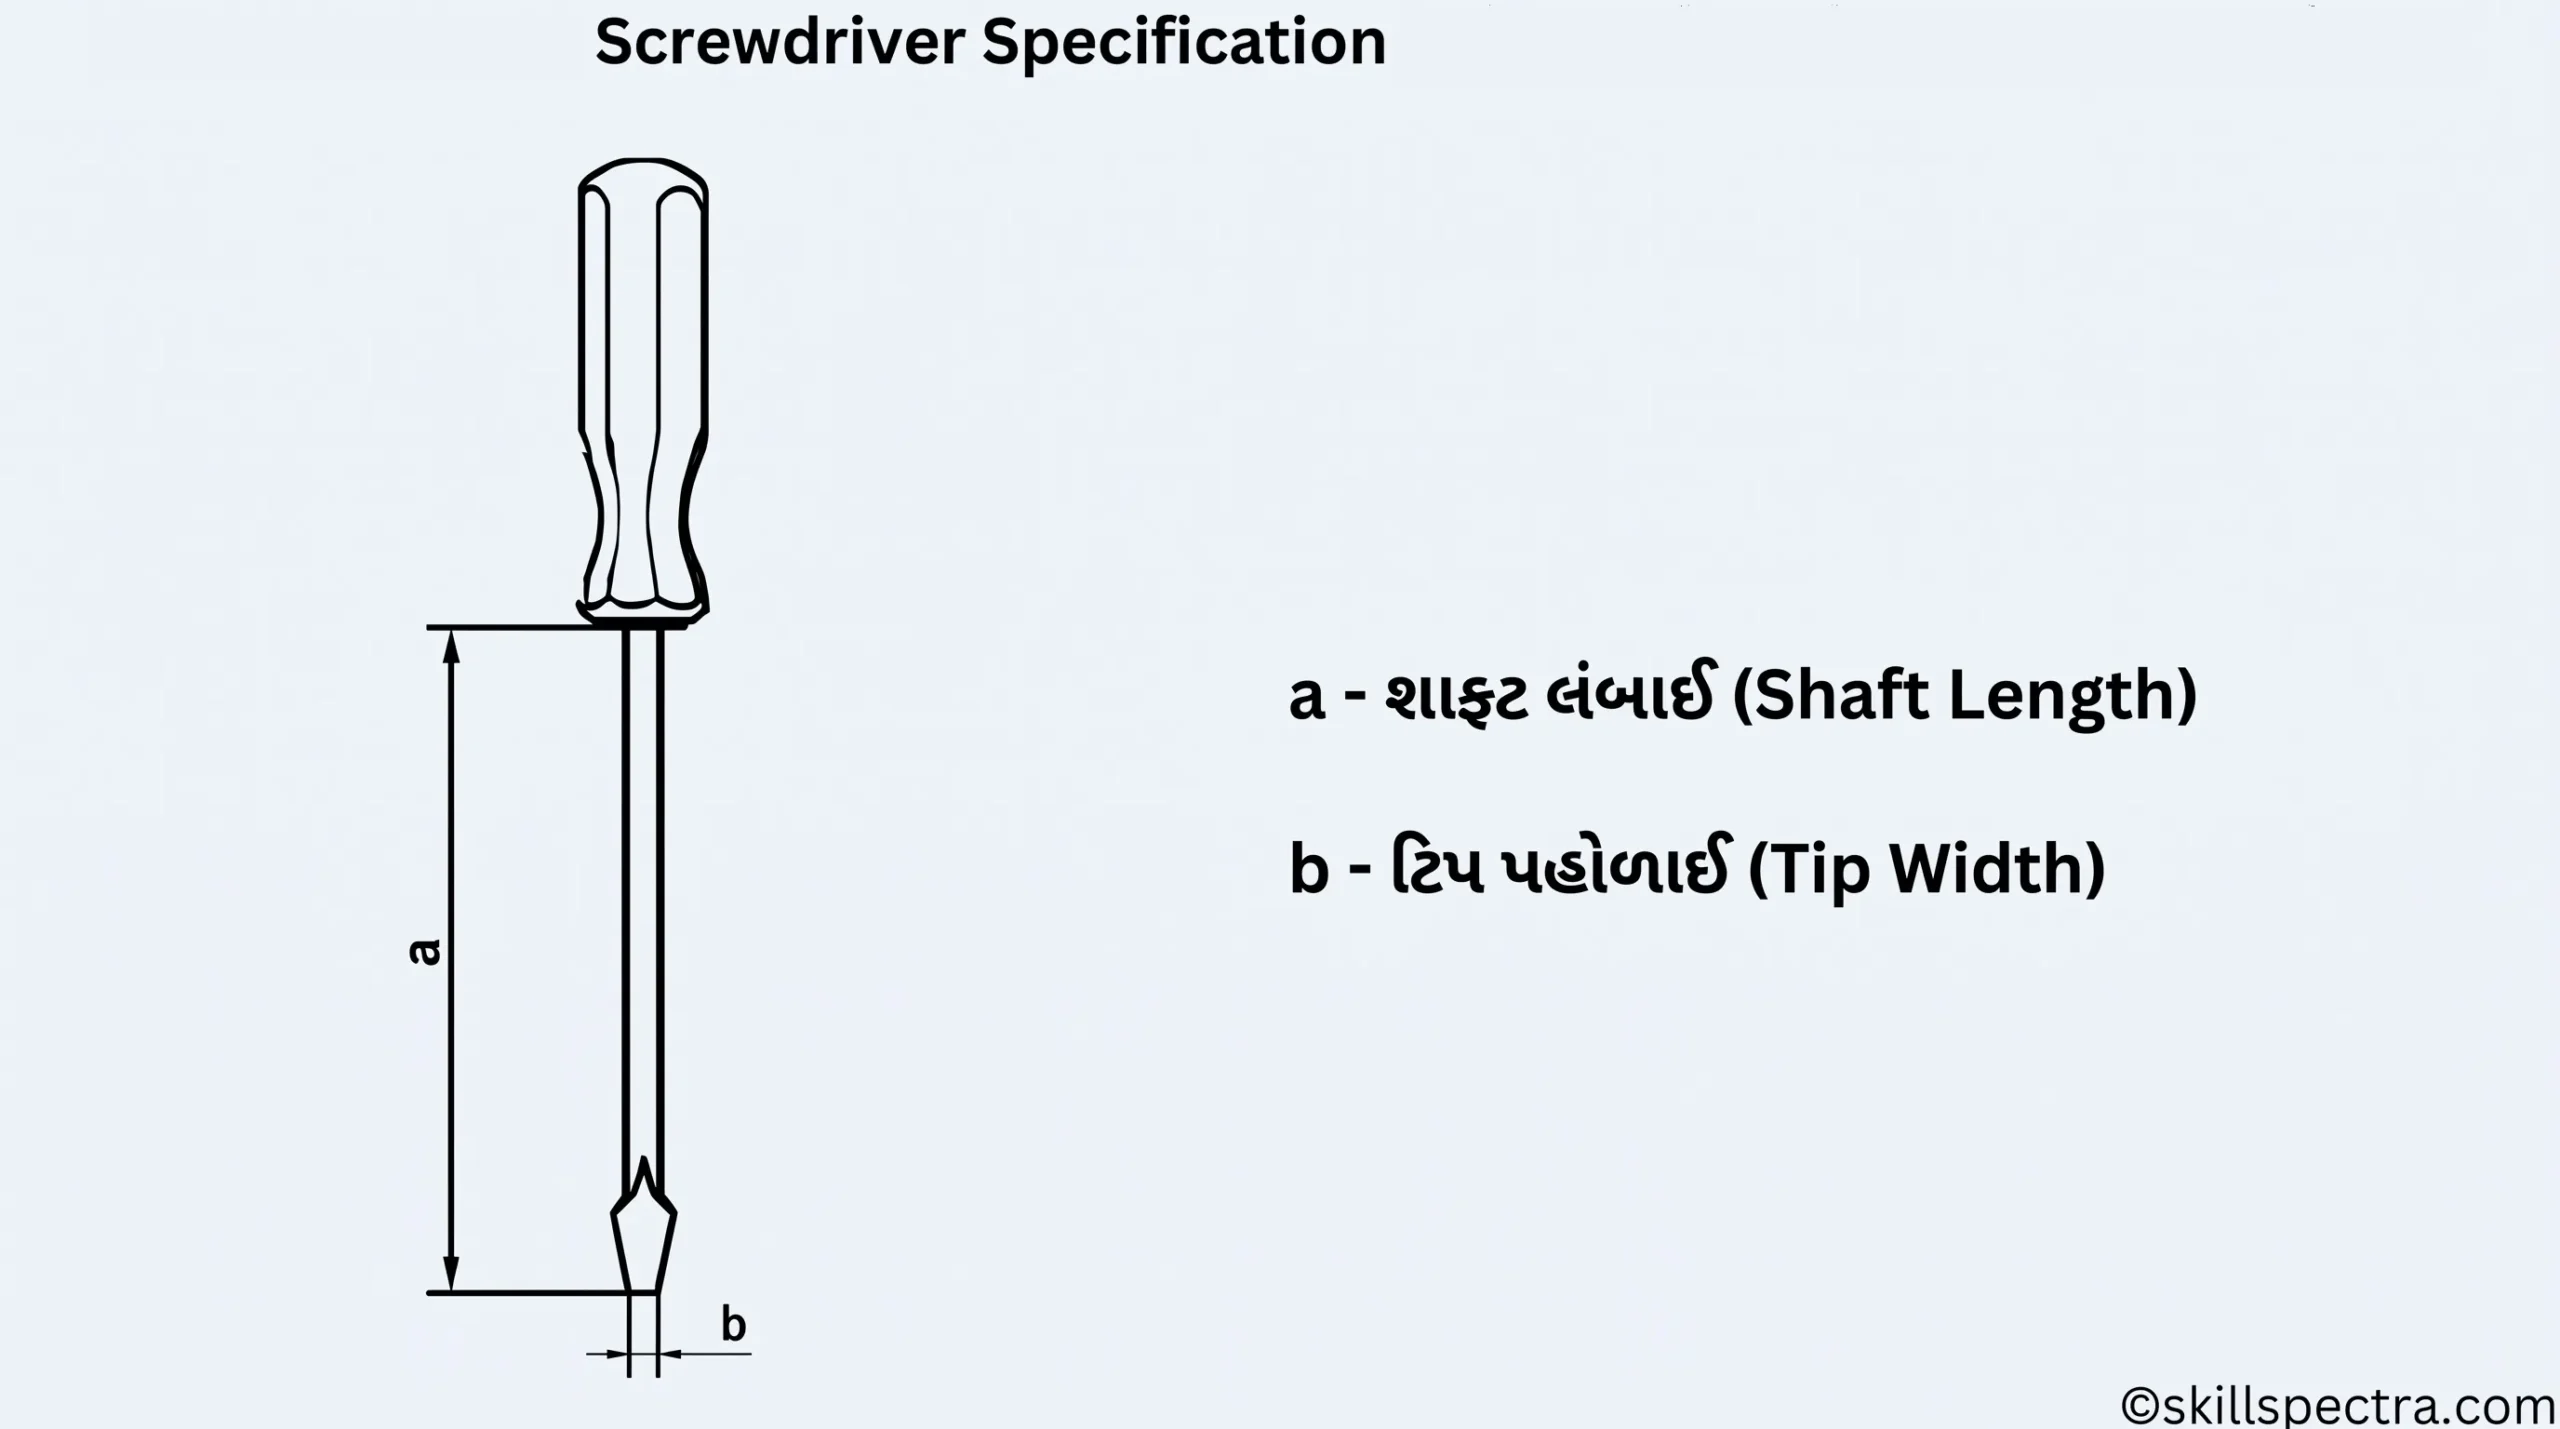
- Length of the blade (a): બ્લેડની લંબાઈ.
- Width of the tip (b): ટીપની પહોળાઈ.
સામાન્ય માપ (Normal Dimensions):
- Normal blade length: 45 mm થી 300 mm સુધી હોય છે.
- Width of blade: 3 mm થી 10 mm સુધી હોય છે. 📏
મટીરીયલ (Material):
- સ્ક્રૂડ્રાઈવરની બ્લેડ carbon steel અથવા alloy steel માંથી બનાવવામાં આવે છે, જેને hardened અને tempered (મજબૂત અને ટકાઉ) કરવામાં આવે છે. 💎
🌟 Screwdrivers for Special Uses (ખાસ ઉપયોગ માટેના સ્ક્રૂડ્રાઈવર)
- Small sturdy screwdrivers: આ નાના અને મજબૂત સ્ક્રૂડ્રાઈવર એવી જગ્યાએ વાપરવા માટે ઉપલબ્ધ છે જ્યાં જગ્યા મર્યાદિત (limited space) હોય. 🤏

- Electrician’s Screwdrivers: ઈલેક્ટ્રિશિયનના ઉપયોગ માટે એવી બ્લેડવાળા સ્ક્રૂડ્રાઈવર ઉપલબ્ધ છે જે insulation (અવાહક પડ) થી ઢંકાયેલી હોય છે. ⚡🔌
Keywords:
- Primary Keywords: Mechanic Diesel Theory, Types of Screwdrivers in Gujarati, Phillips Screwdriver Specifications, Ratchet Screwdriver Uses.
- Secondary Keywords: ITI Mechanic Diesel Lesson, Hand Tools for Automobile, Screwdriver Blade Material, Electrician Screwdriver features, Engineering Hand Tools.
- Tags: #MechanicDiesel #ITI #HandTools #Screwdriver #PhillipsScrewdriver #AutomotiveTools #GujaratiEducation #TechnicalLearning.
Instructor Note: વિદ્યાર્થીઓને આકૃતિ (Fig 7 થી 12) બતાવીને દરેક ભાગ અને તેના પ્રકાર સમજાવવા વિનંતી. આનાથી તેમનું પ્રેક્ટિકલ નોલેજ વધશે. 👨🏫✍️
⚠️ Precautions (સાવચેતીઓ)
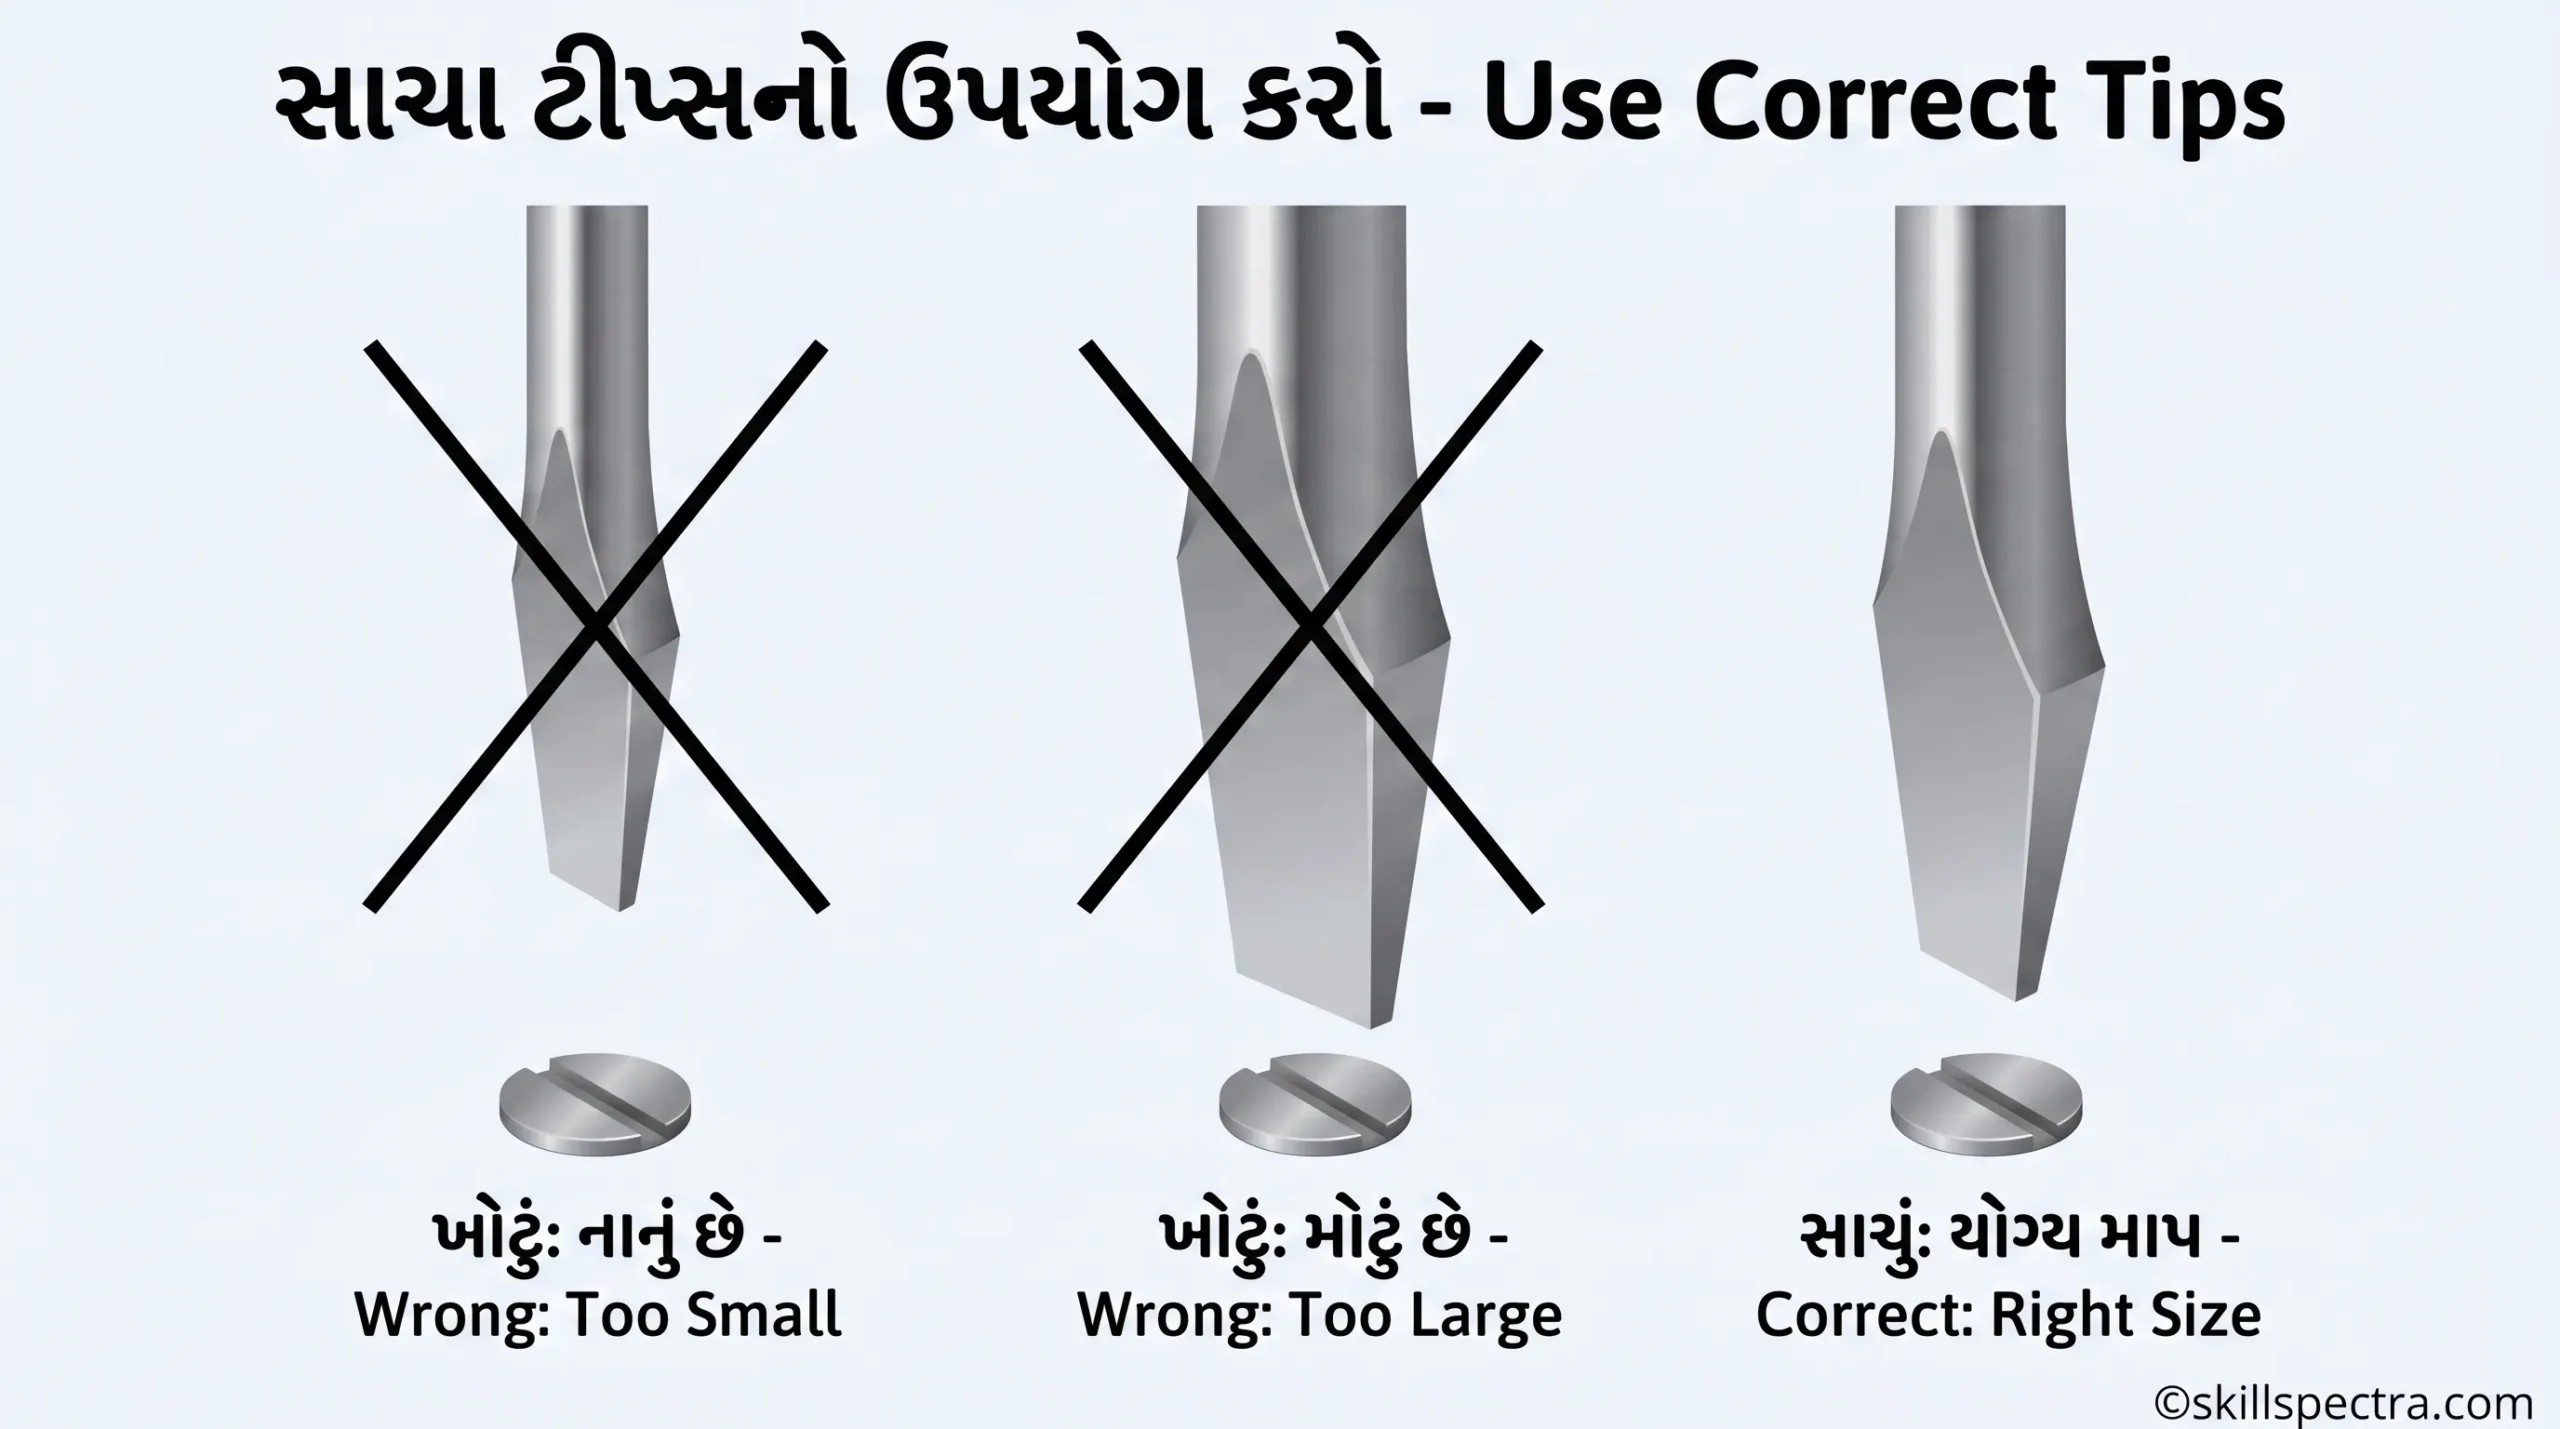
Screwdriver નો ઉપયોગ કરતી વખતે નીચેની બાબતોનું ખાસ ધ્યાન રાખવું જોઈએ:
- Use screwdrivers with tips correctly fitting into the screw slot.
- Screw slot માં બરાબર ફિટ થાય તેવી tips વાળા screwdrivers નો જ ઉપયોગ કરો. (Fig 13 માં દર્શાવ્યા મુજબ) 📏
- Make sure your hand and the handle are dry.
- ખાતરી કરો કે તમારા હાથ અને screwdriver નું handle સૂકા (dry) હોય. 💧🚫
- Hold the screwdrivers axis in line with the axis of the screw.
- Screwdriver ની axis (ધરી) ને screw ની axis સાથે એક જ લાઈનમાં સીધી રાખો. 📏
- While using a Phillips screwdriver apply more downward pressure.
- જ્યારે તમે Phillips screwdriver નો ઉપયોગ કરો છો, ત્યારે નીચેની તરફ વધુ દબાણ (downward pressure) લગાવો. ⬇️💪
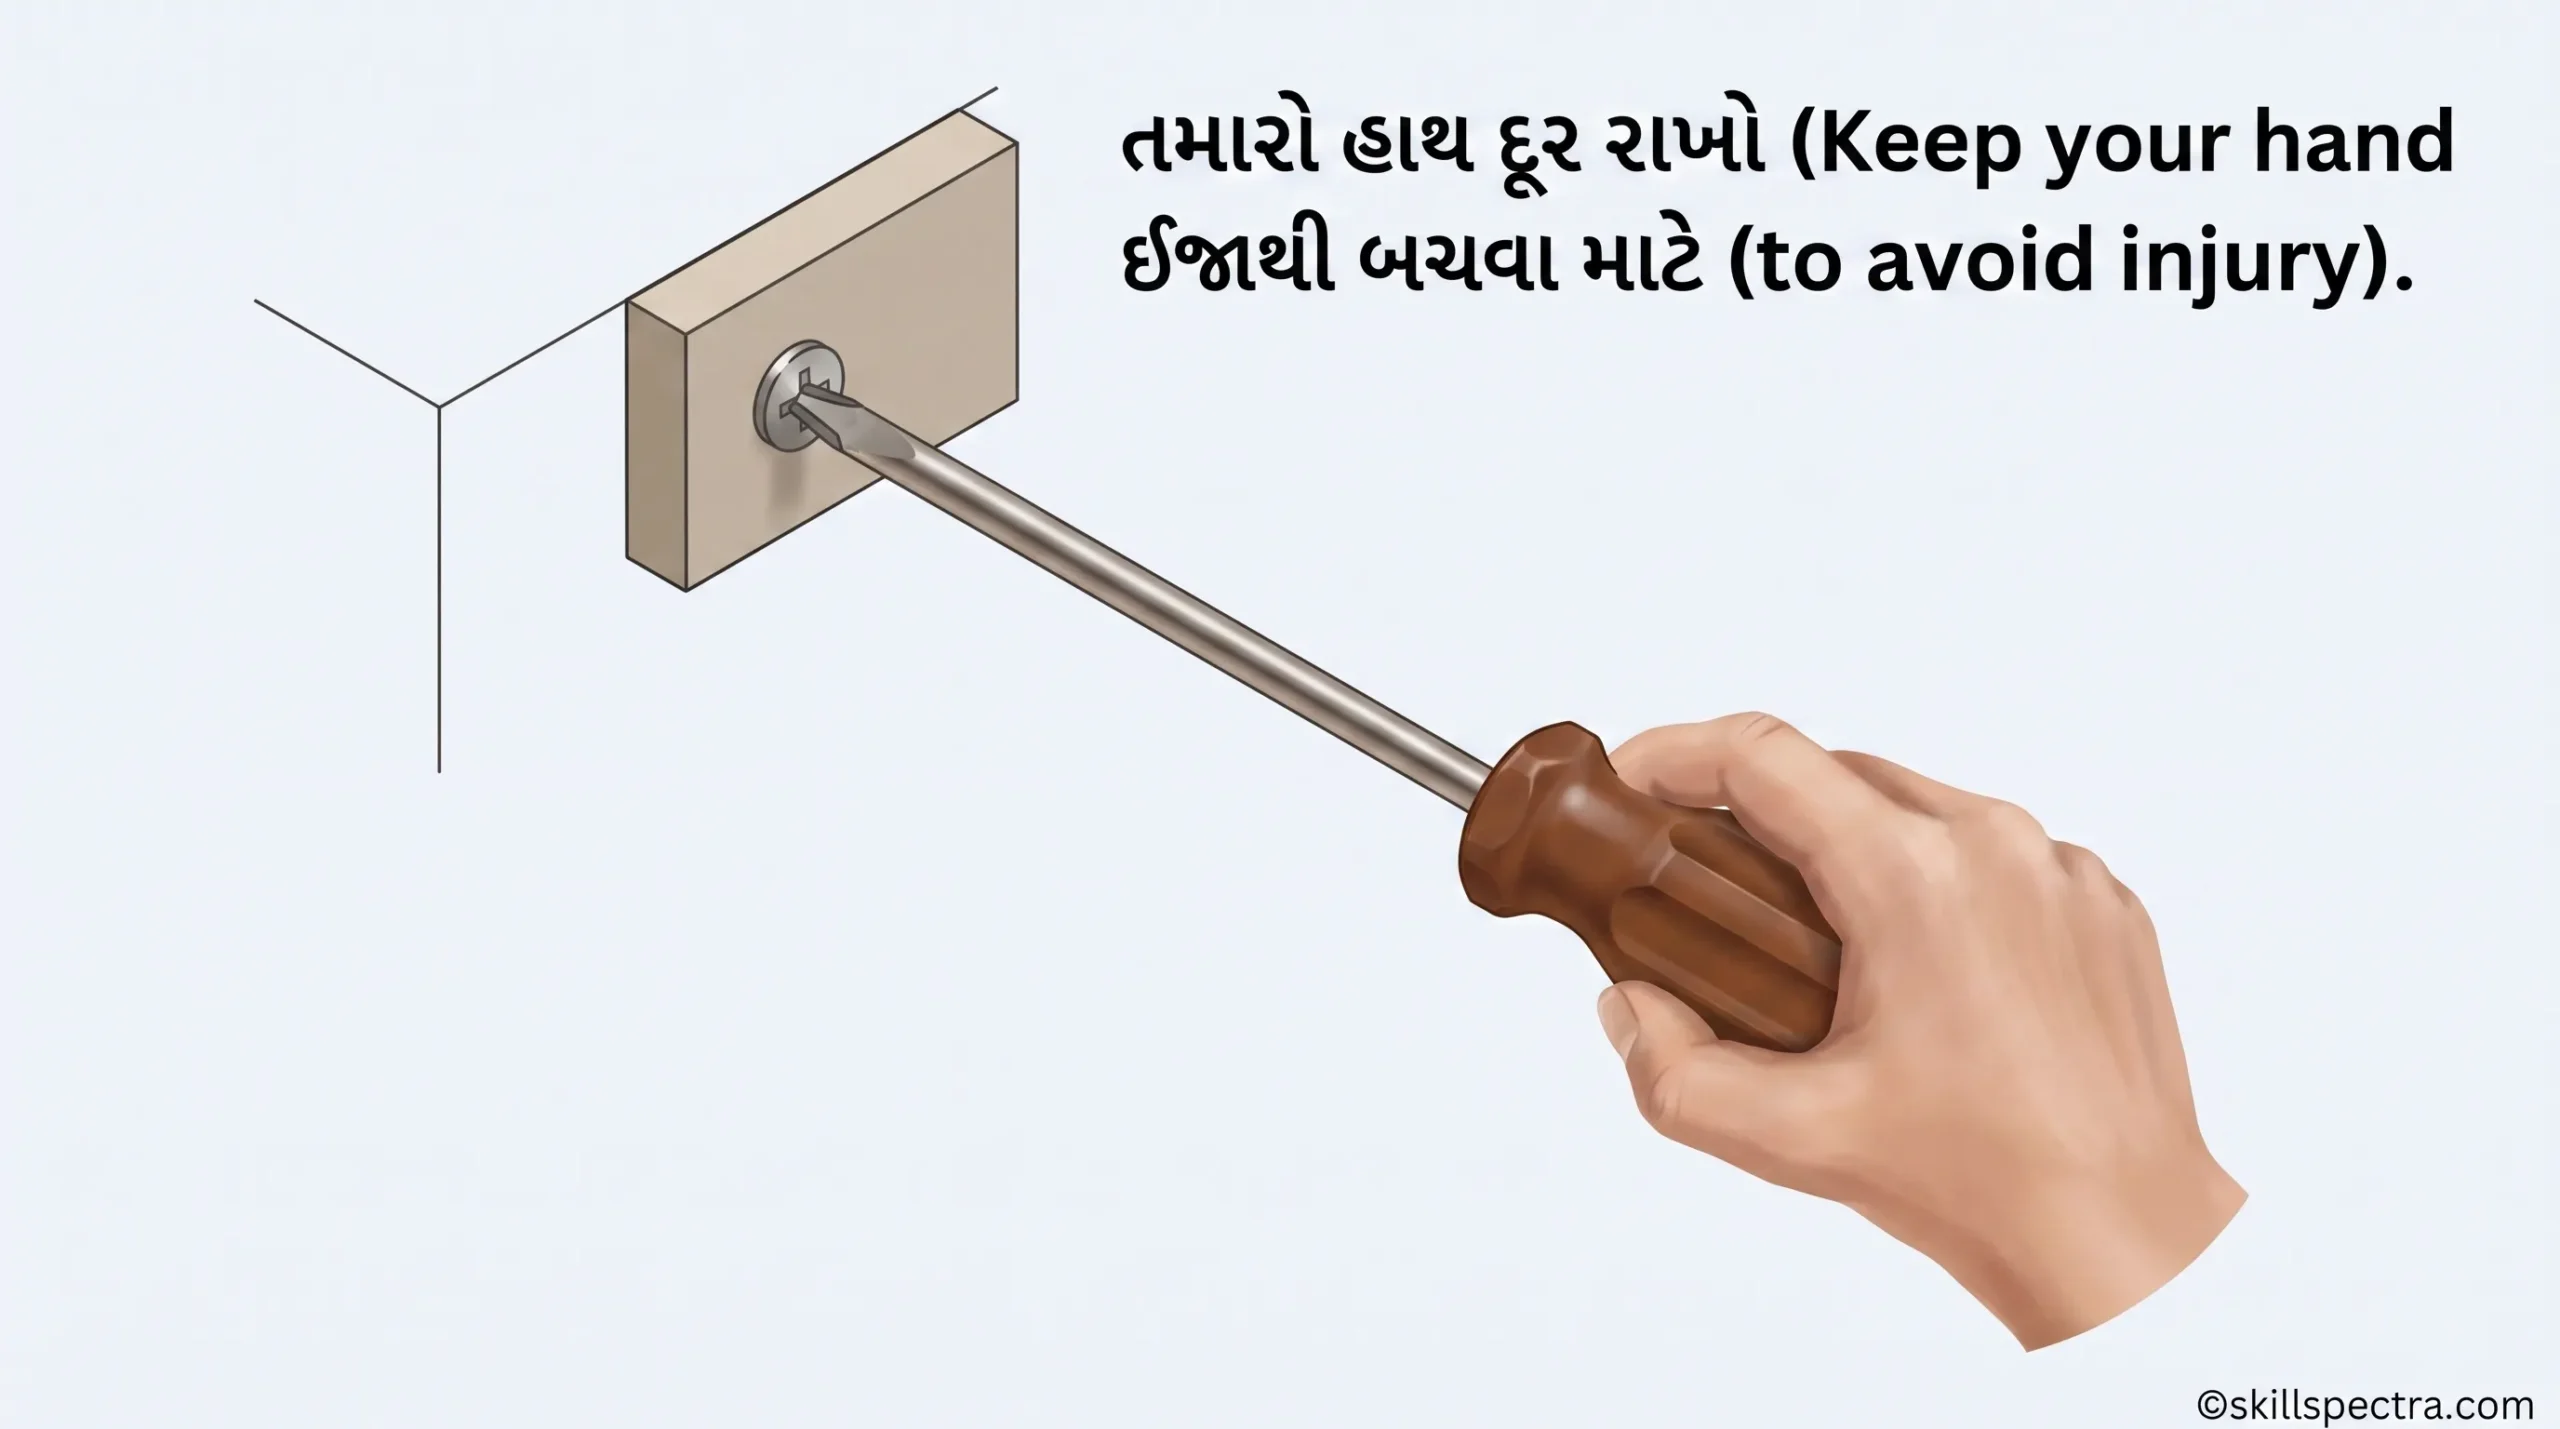
- Keep your hand away to avoid injury due to slipping of the screwdriver.
- Screwdriver લપસી જવાને કારણે થતી ઈજા (injury) થી બચવા માટે તમારા હાથને કામની જગ્યાથી દૂર રાખો. ✋🛑
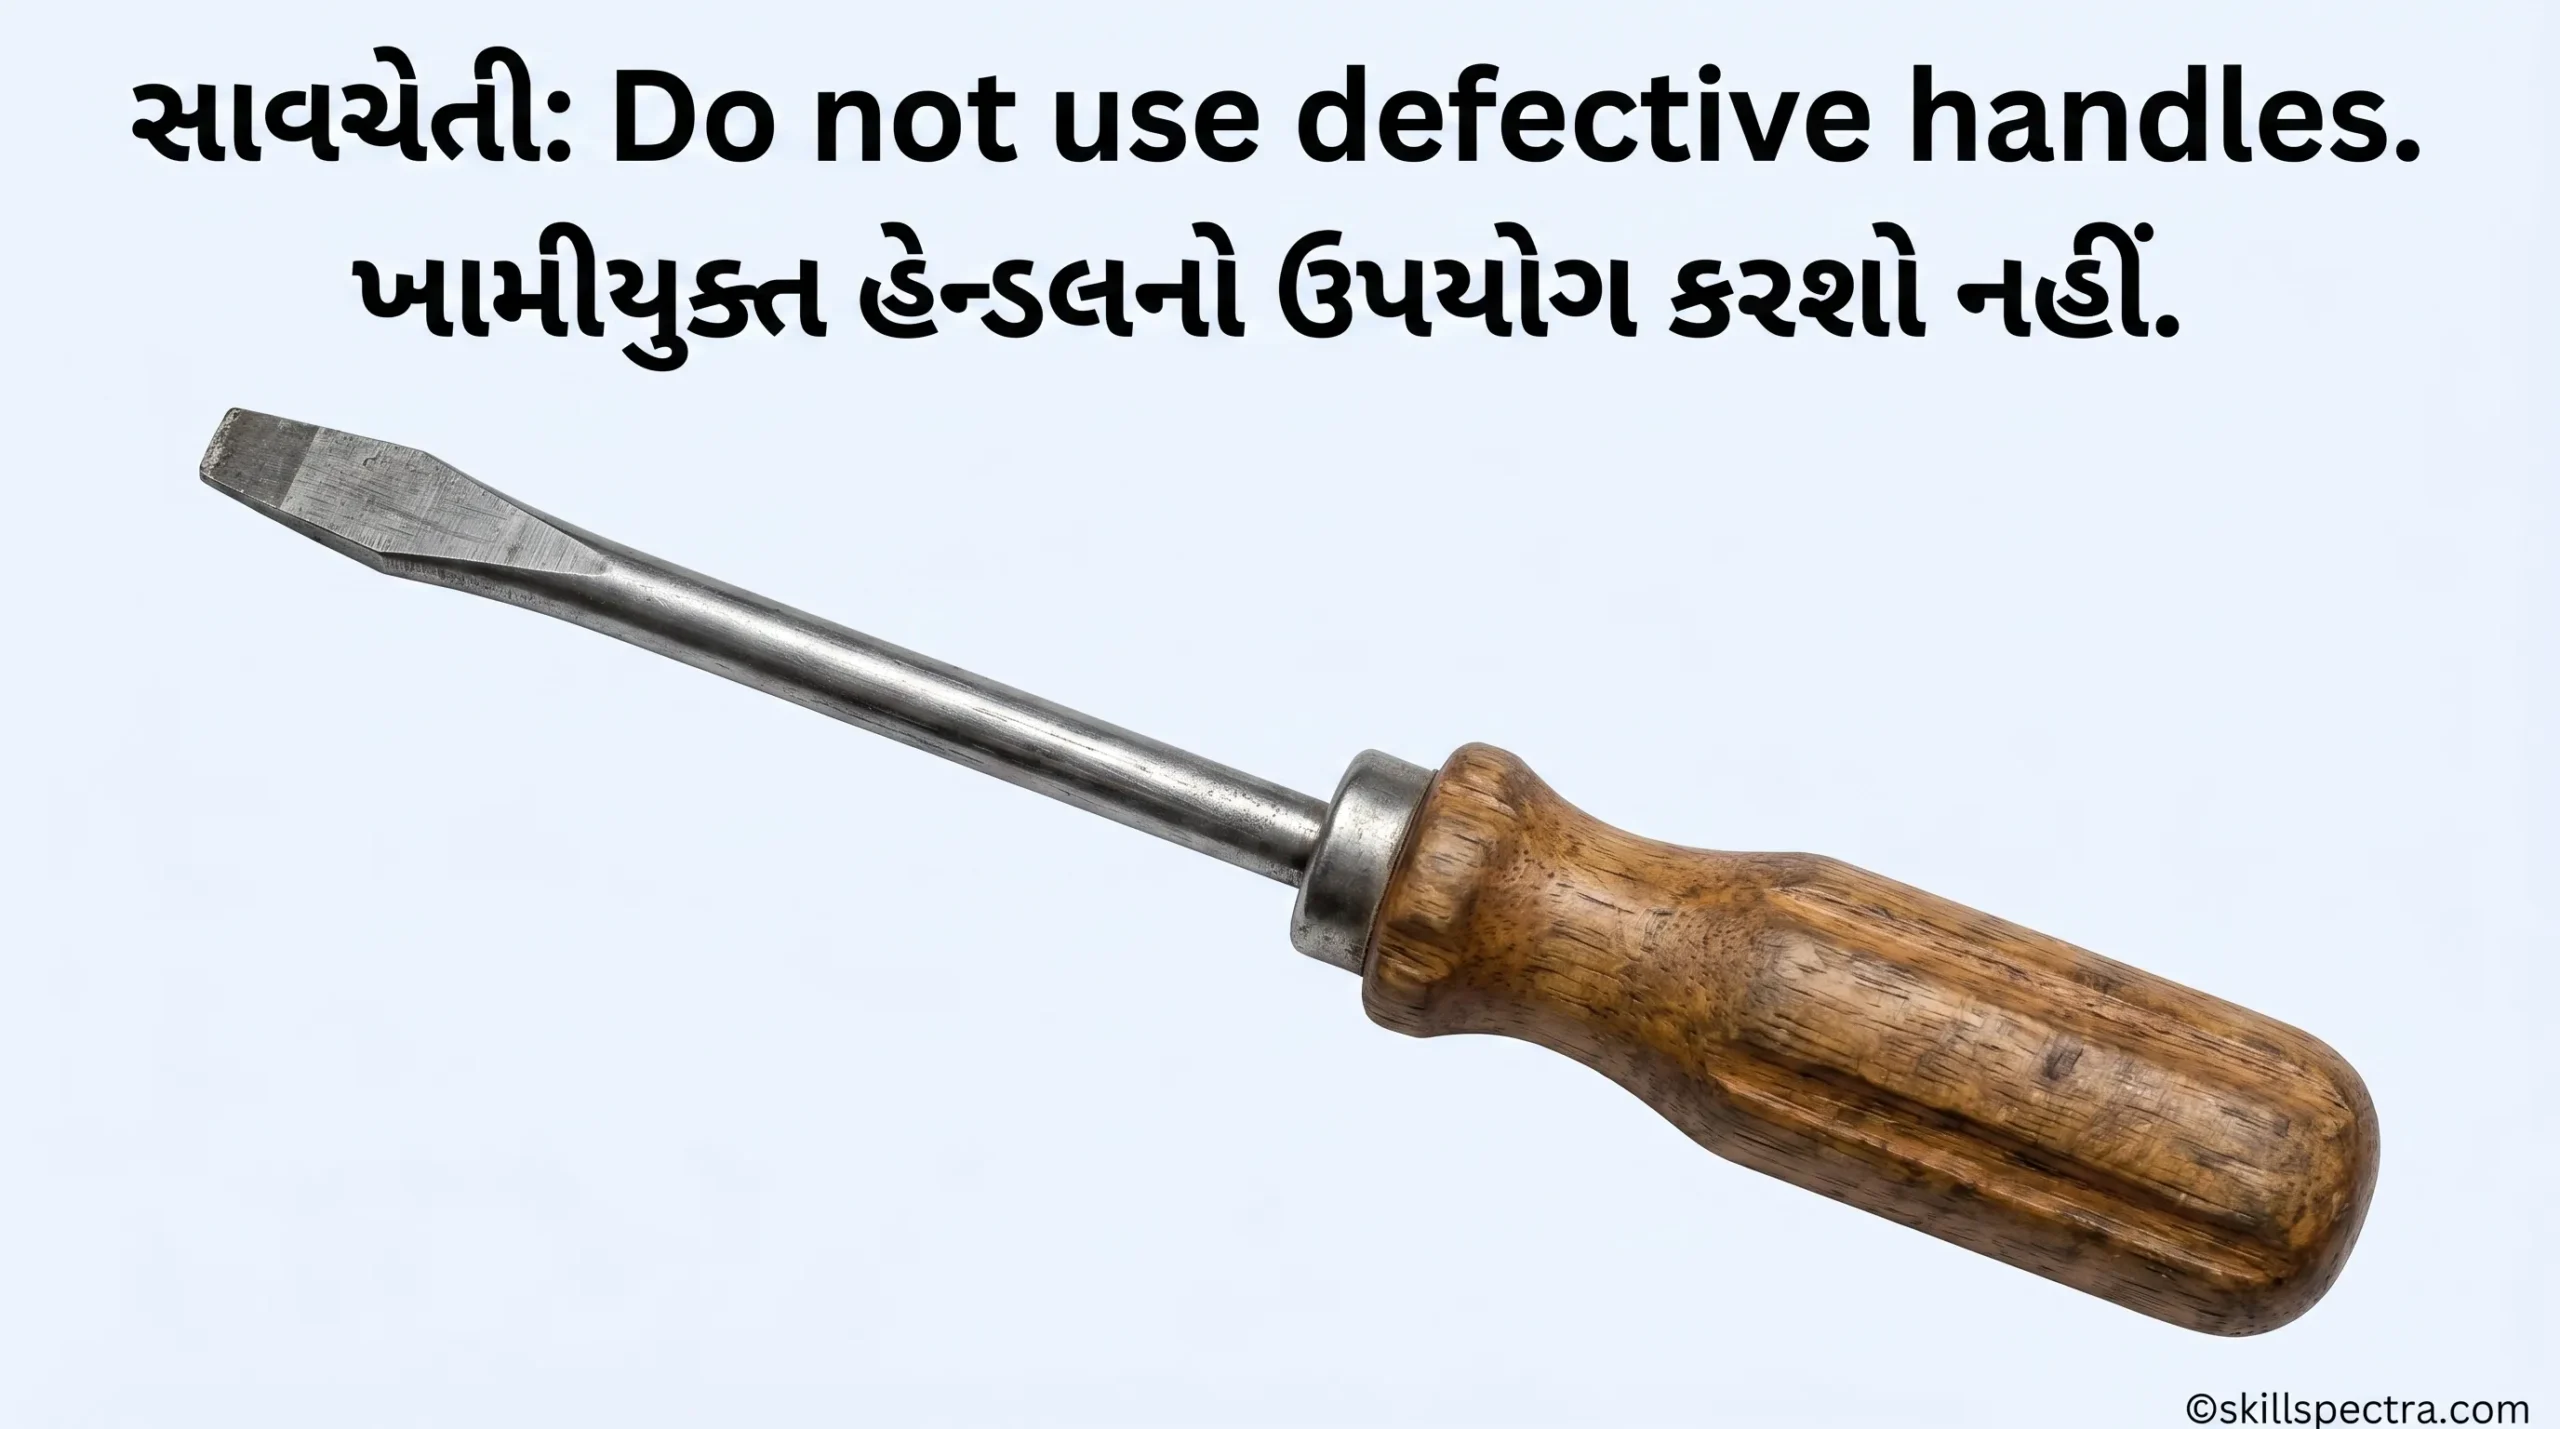
- Do not use screwdrivers with split or defective handles.
- ફાટી ગયેલા (split) અથવા ખામીયુક્ત (defective) handle વાળા screwdriver નો ઉપયોગ ક્યારેય કરશો નહીં. ❌
🔧 Repairing Damaged Screwdrivers
- In the case of damaged screwdrivers, the blades can be ground.
- જો screwdriver ની blade ડેમેજ થઈ ગઈ હોય, તો તેને grinding કરીને ફરીથી ઉપયોગમાં લઈ શકાય છે. ⚙️
- The faces will be parallel with the sides of the screw slot and used.
- Blade ના ફેસ (faces) એવા હોવા જોઈએ જે screw slot ની સાઈડ્સ સાથે સમાંતર (parallel) રહે.
- While grinding ensure the end of the tips is as thick as the slot of the screw.
- Grinding કરતી વખતે ધ્યાન રાખો કે tip નો છેડો screw ના slot જેટલો જ જાડો હોય. 📐
- While using screwdrivers on small jobs, brace the job on the bench or hold them in a vice.
- નાના કામો (small jobs) પર screwdriver વાપરતી વખતે, તે જોબને બેન્ચ પર ટેકો આપો અથવા તેને Vice માં મજબૂત રીતે પકડી રાખો. 🛠️
📝 Specification of a Screwdriver (સ્પષ્ટીકરણ)
Screwdrivers ને નીચેની બાબતો મુજબ સ્પષ્ટ (specify) કરવામાં આવે છે:
- Length of the blade: Blade ની લંબાઈ. 📏
- Width of the tip: Tip ની પહોળાઈ. 📐
- The normal blade length varies from 45mm to 300mm and the width of the blade varies from 3mm to 10mm.
- સામાન્ય રીતે blade ની લંબાઈ 45mm થી 300mm અને તેની પહોળાઈ 3mm થી 10mm વચ્ચે હોય છે. 📏
🔀 Types of Screwdriver (Screwdriver ના પ્રકારો)
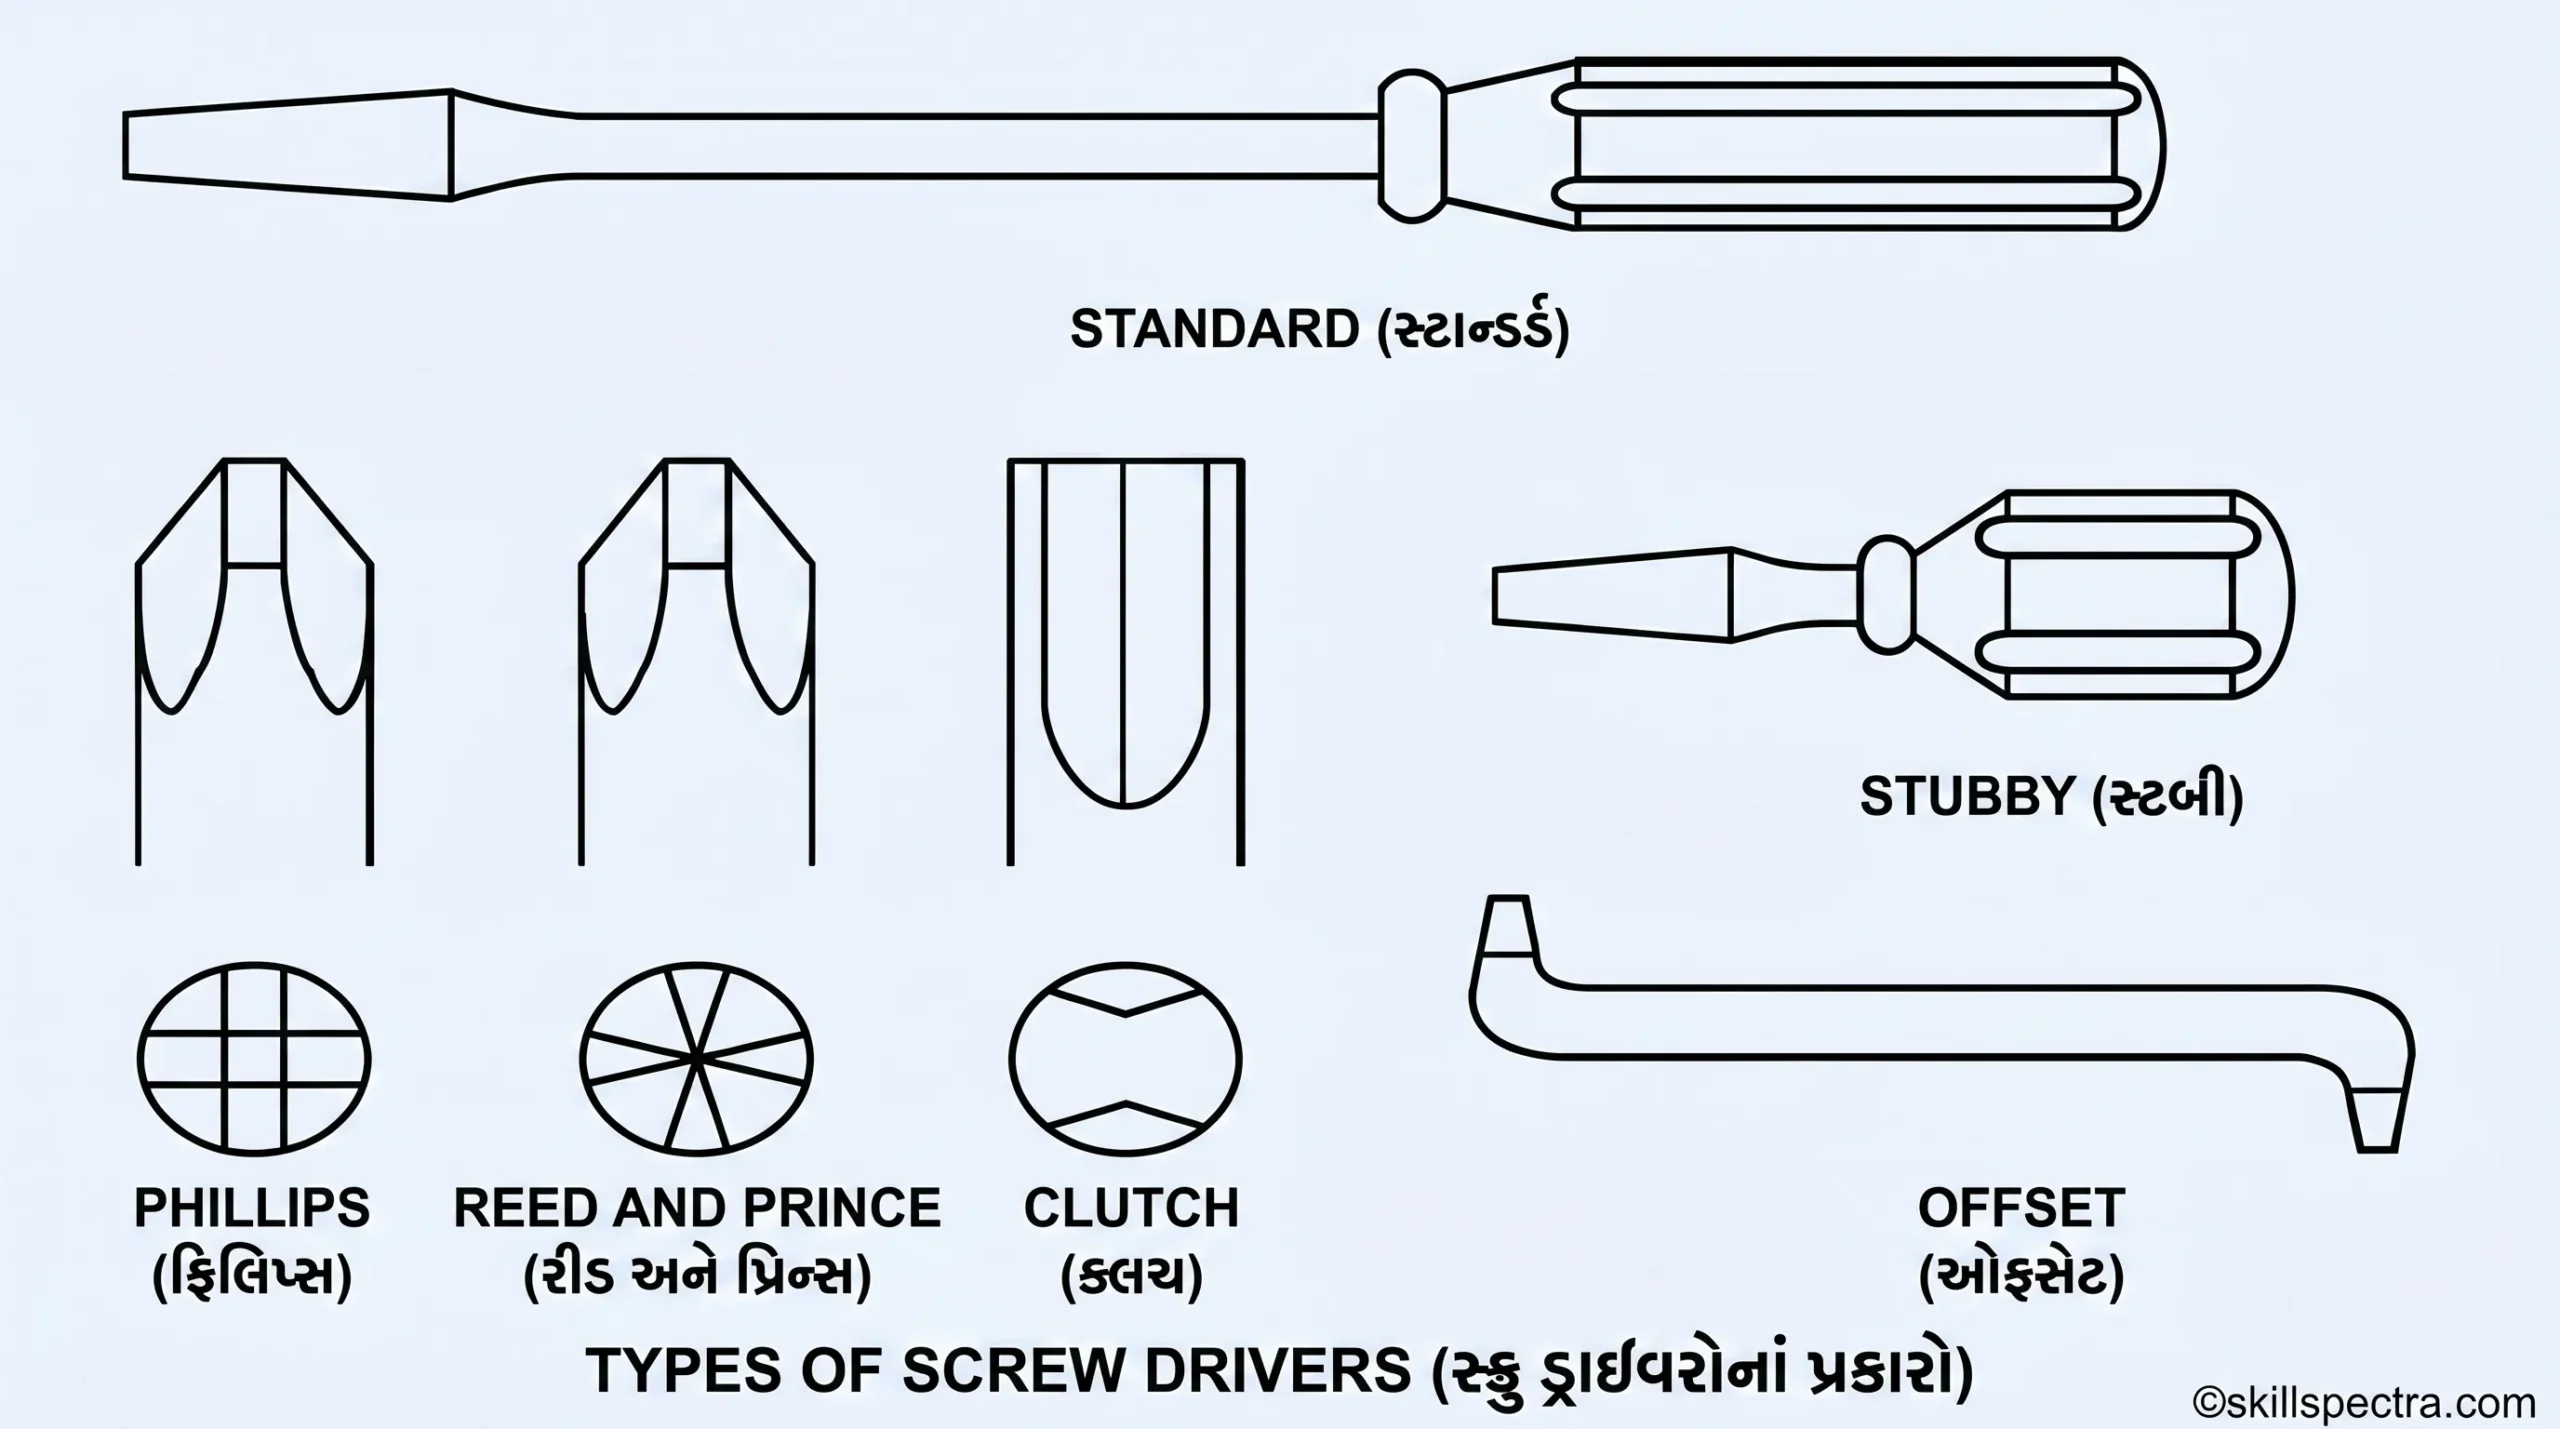
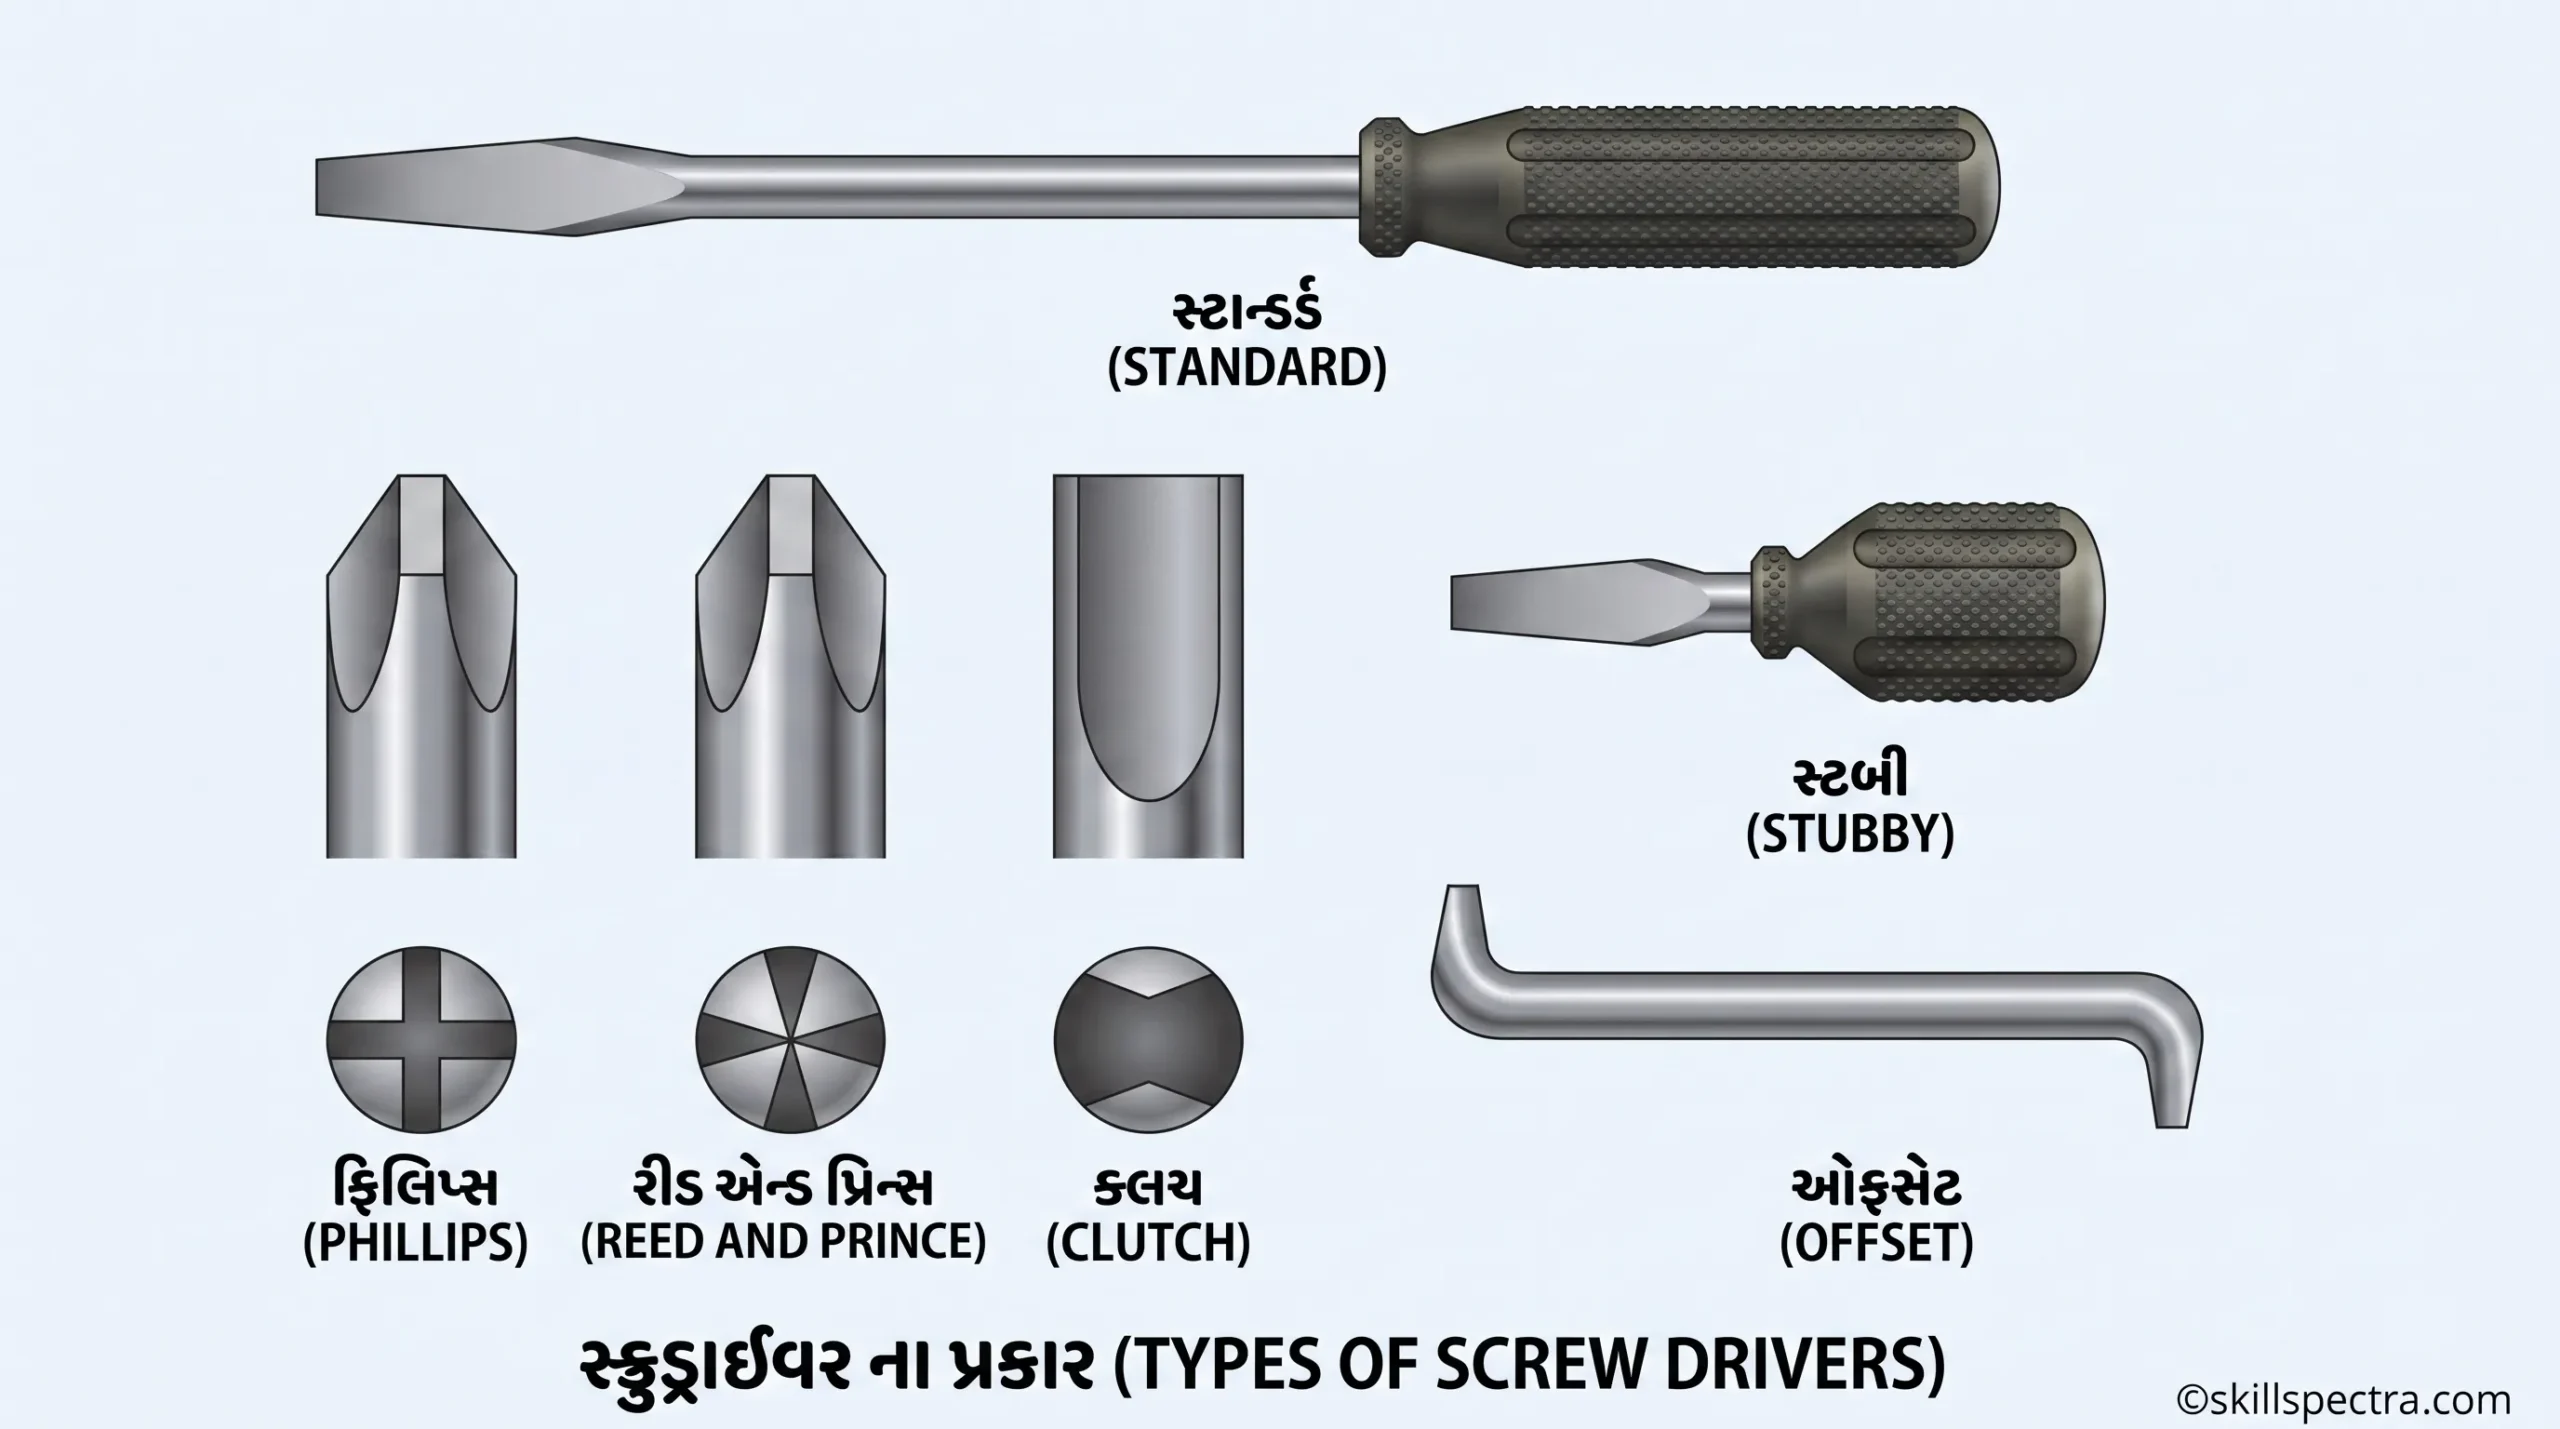
- Screw driver: There are several different size of screw drivers of the standard, reed & prince & Philips types.
- Standard, Reed & Prince અને Phillips પ્રકારના વિવિધ સાઈઝના screw drivers ઉપલબ્ધ હોય છે. 🔩
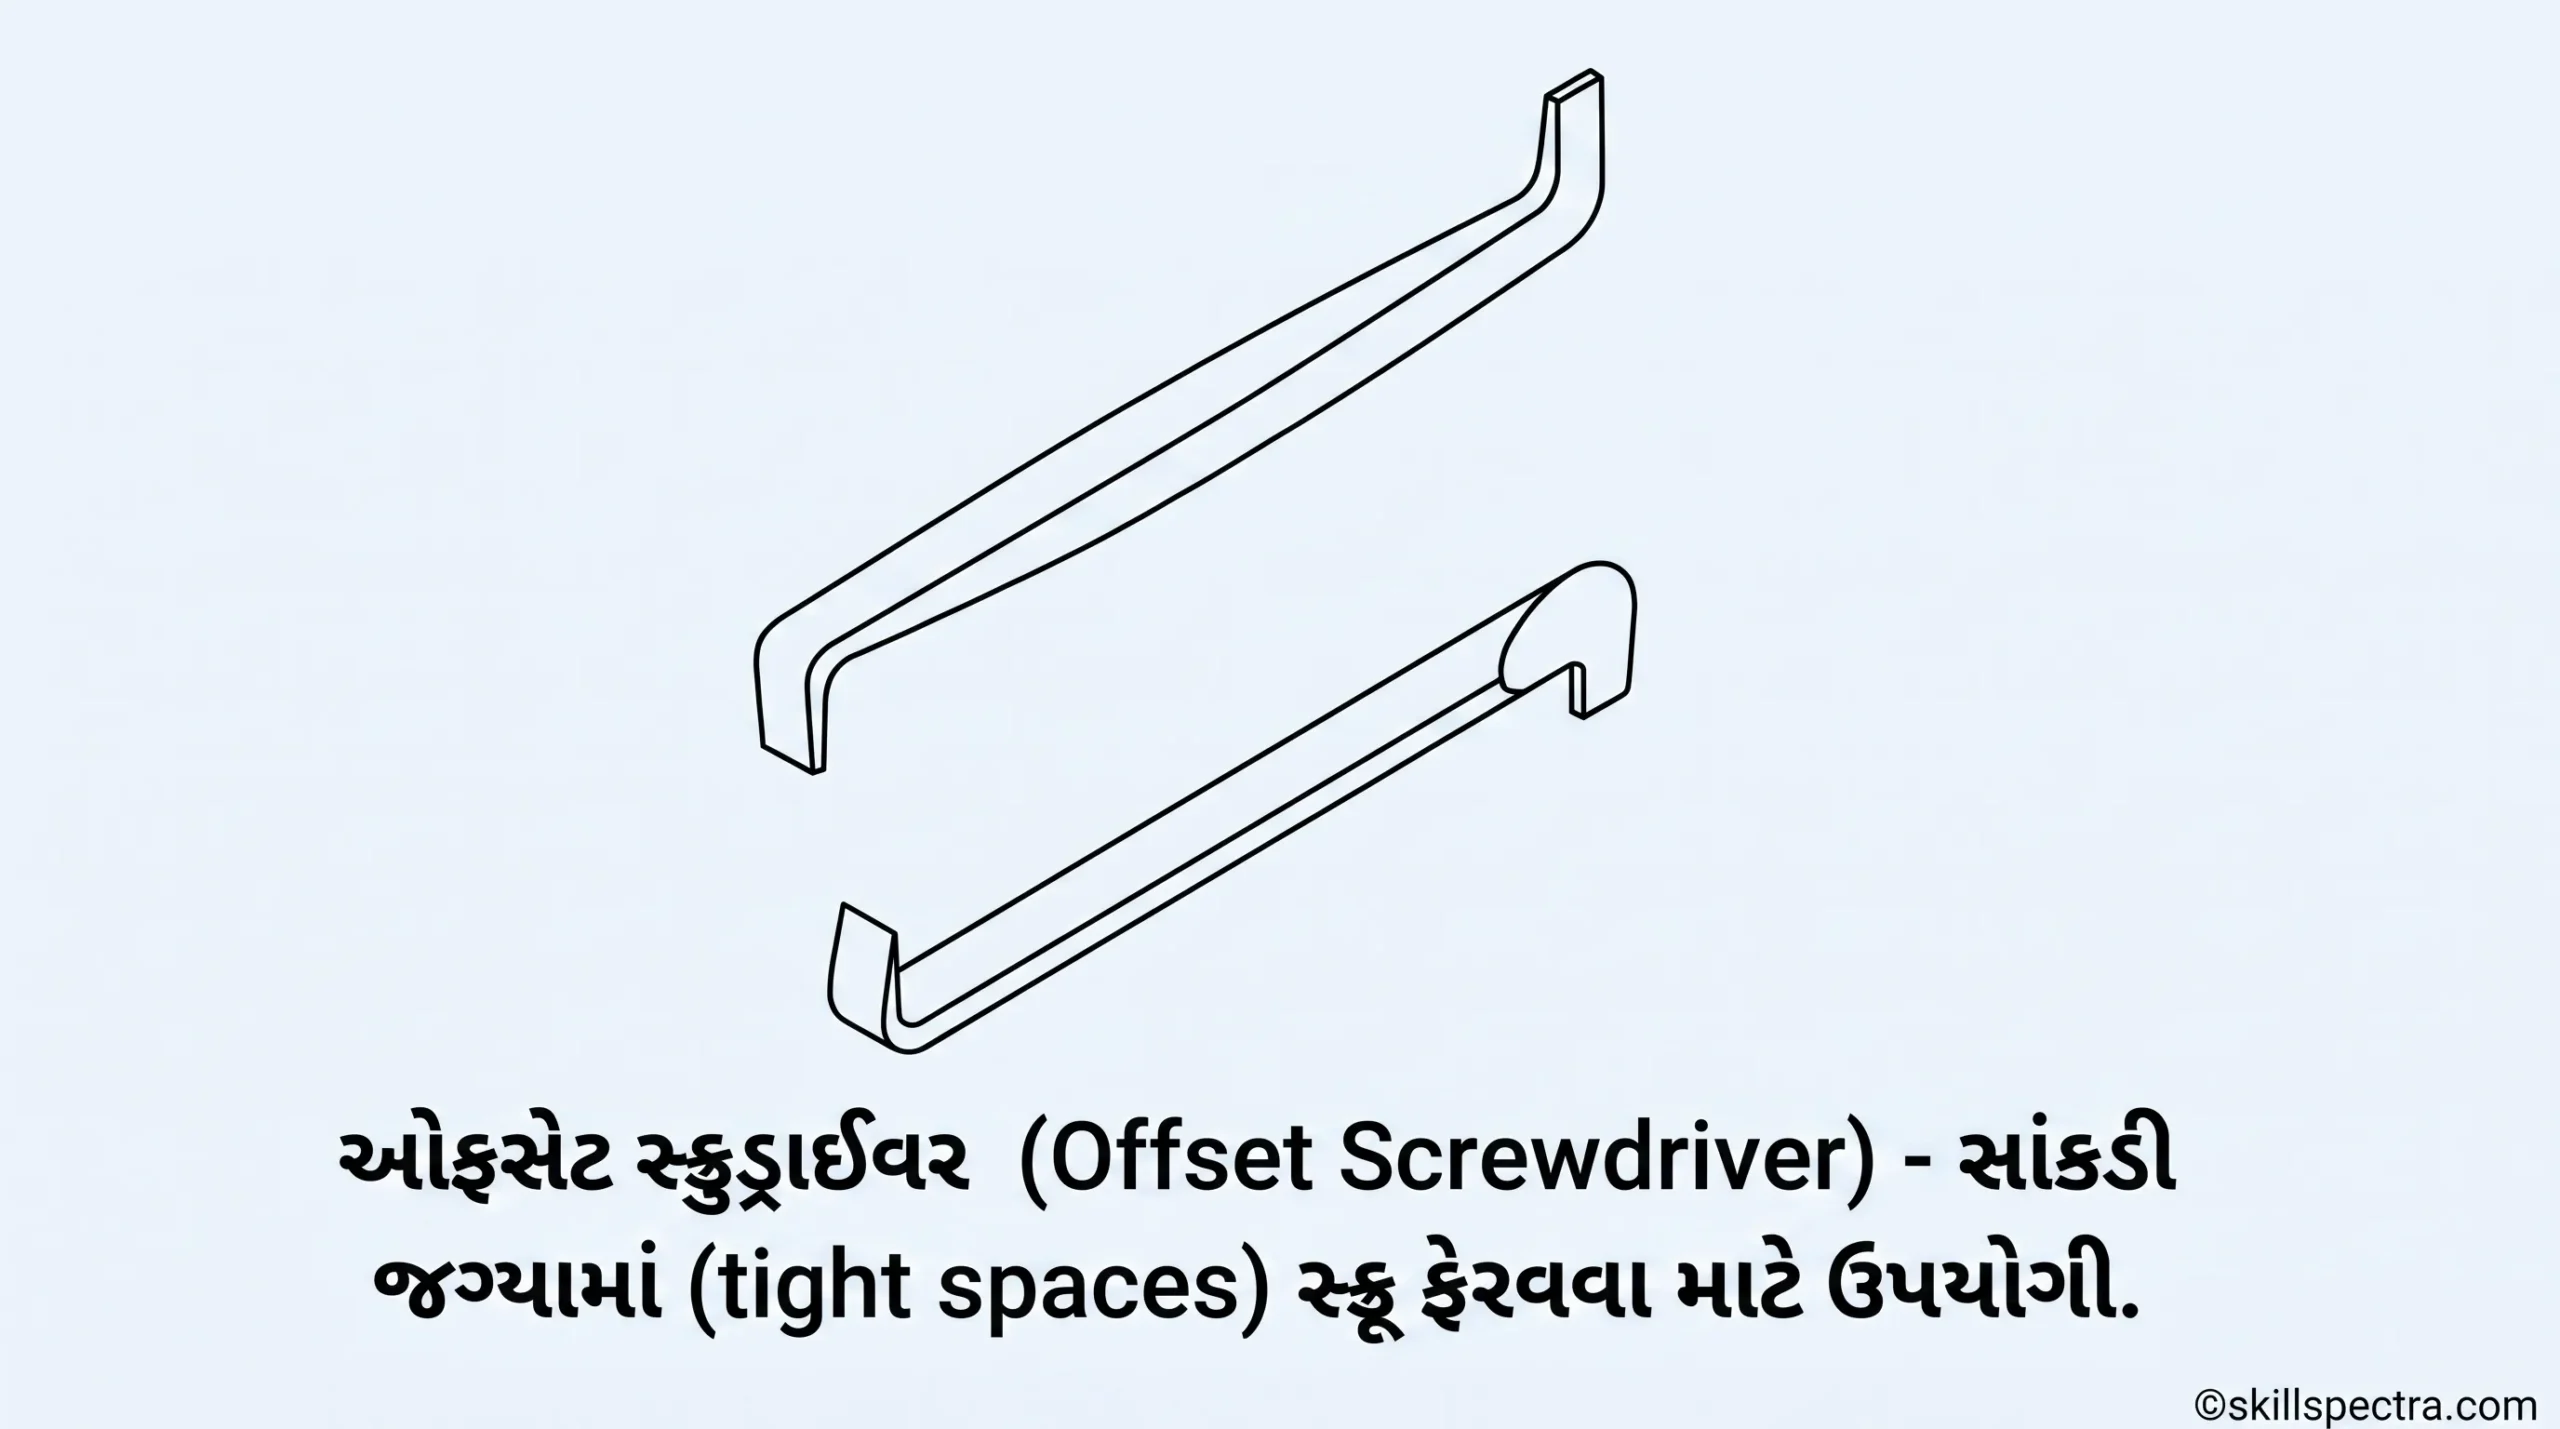
- The offset screw driver is useful in tight quarters where even a “Stubby” cannot be used.
- Offset screwdriver એવી સાંકડી જગ્યાઓ (tight quarters) માં ઉપયોગી છે જ્યાં “Stubby” screwdriver પણ પહોંચી શકતું નથી. 🔄
Types listed in Figure:
- Standard (સામાન્ય)
- Stubby (ટૂંકું અને જાડું)
- Phillips (પ્લસ (+) આકારની ટીપ)
- Reed and Prince
- Clutch
- Offset (ખૂણા પર કામ કરવા માટે)
🛡️ Safety (સલામતી)
- Always use correct type and size screw drivers.
- હંમેશા યોગ્ય પ્રકાર (type) અને સાઈઝના screwdriver નો જ ઉપયોગ કરો. ✅
- Don’t do repair work by holding the job on the hand with the help of screw driver, if may slips it pierce the hand.
- કોઈપણ જોબ (કામ) ને હાથમાં પકડીને screwdriver થી રિપેર કરવાનો પ્રયાસ ન કરો. જો screwdriver લપસી જશે, તો તે તમારા હાથમાં ખૂંપી શકે છે અને ગંભીર ઈજા કરી શકે છે. ⚠️🩹
🔑 Keywords:
- Mechanic Diesel Screwdriver Lesson
- Types of Screwdrivers in Gujarati
- Screwdriver Safety Precautions Gujarati
- NSQF Level 4 Mechanic Diesel Tools
- Phillips vs Offset Screwdriver
- Automotive Tools Tutorial Gujarati
- Screwdriver specification and uses
- ITI Mechanic Diesel Related Theory
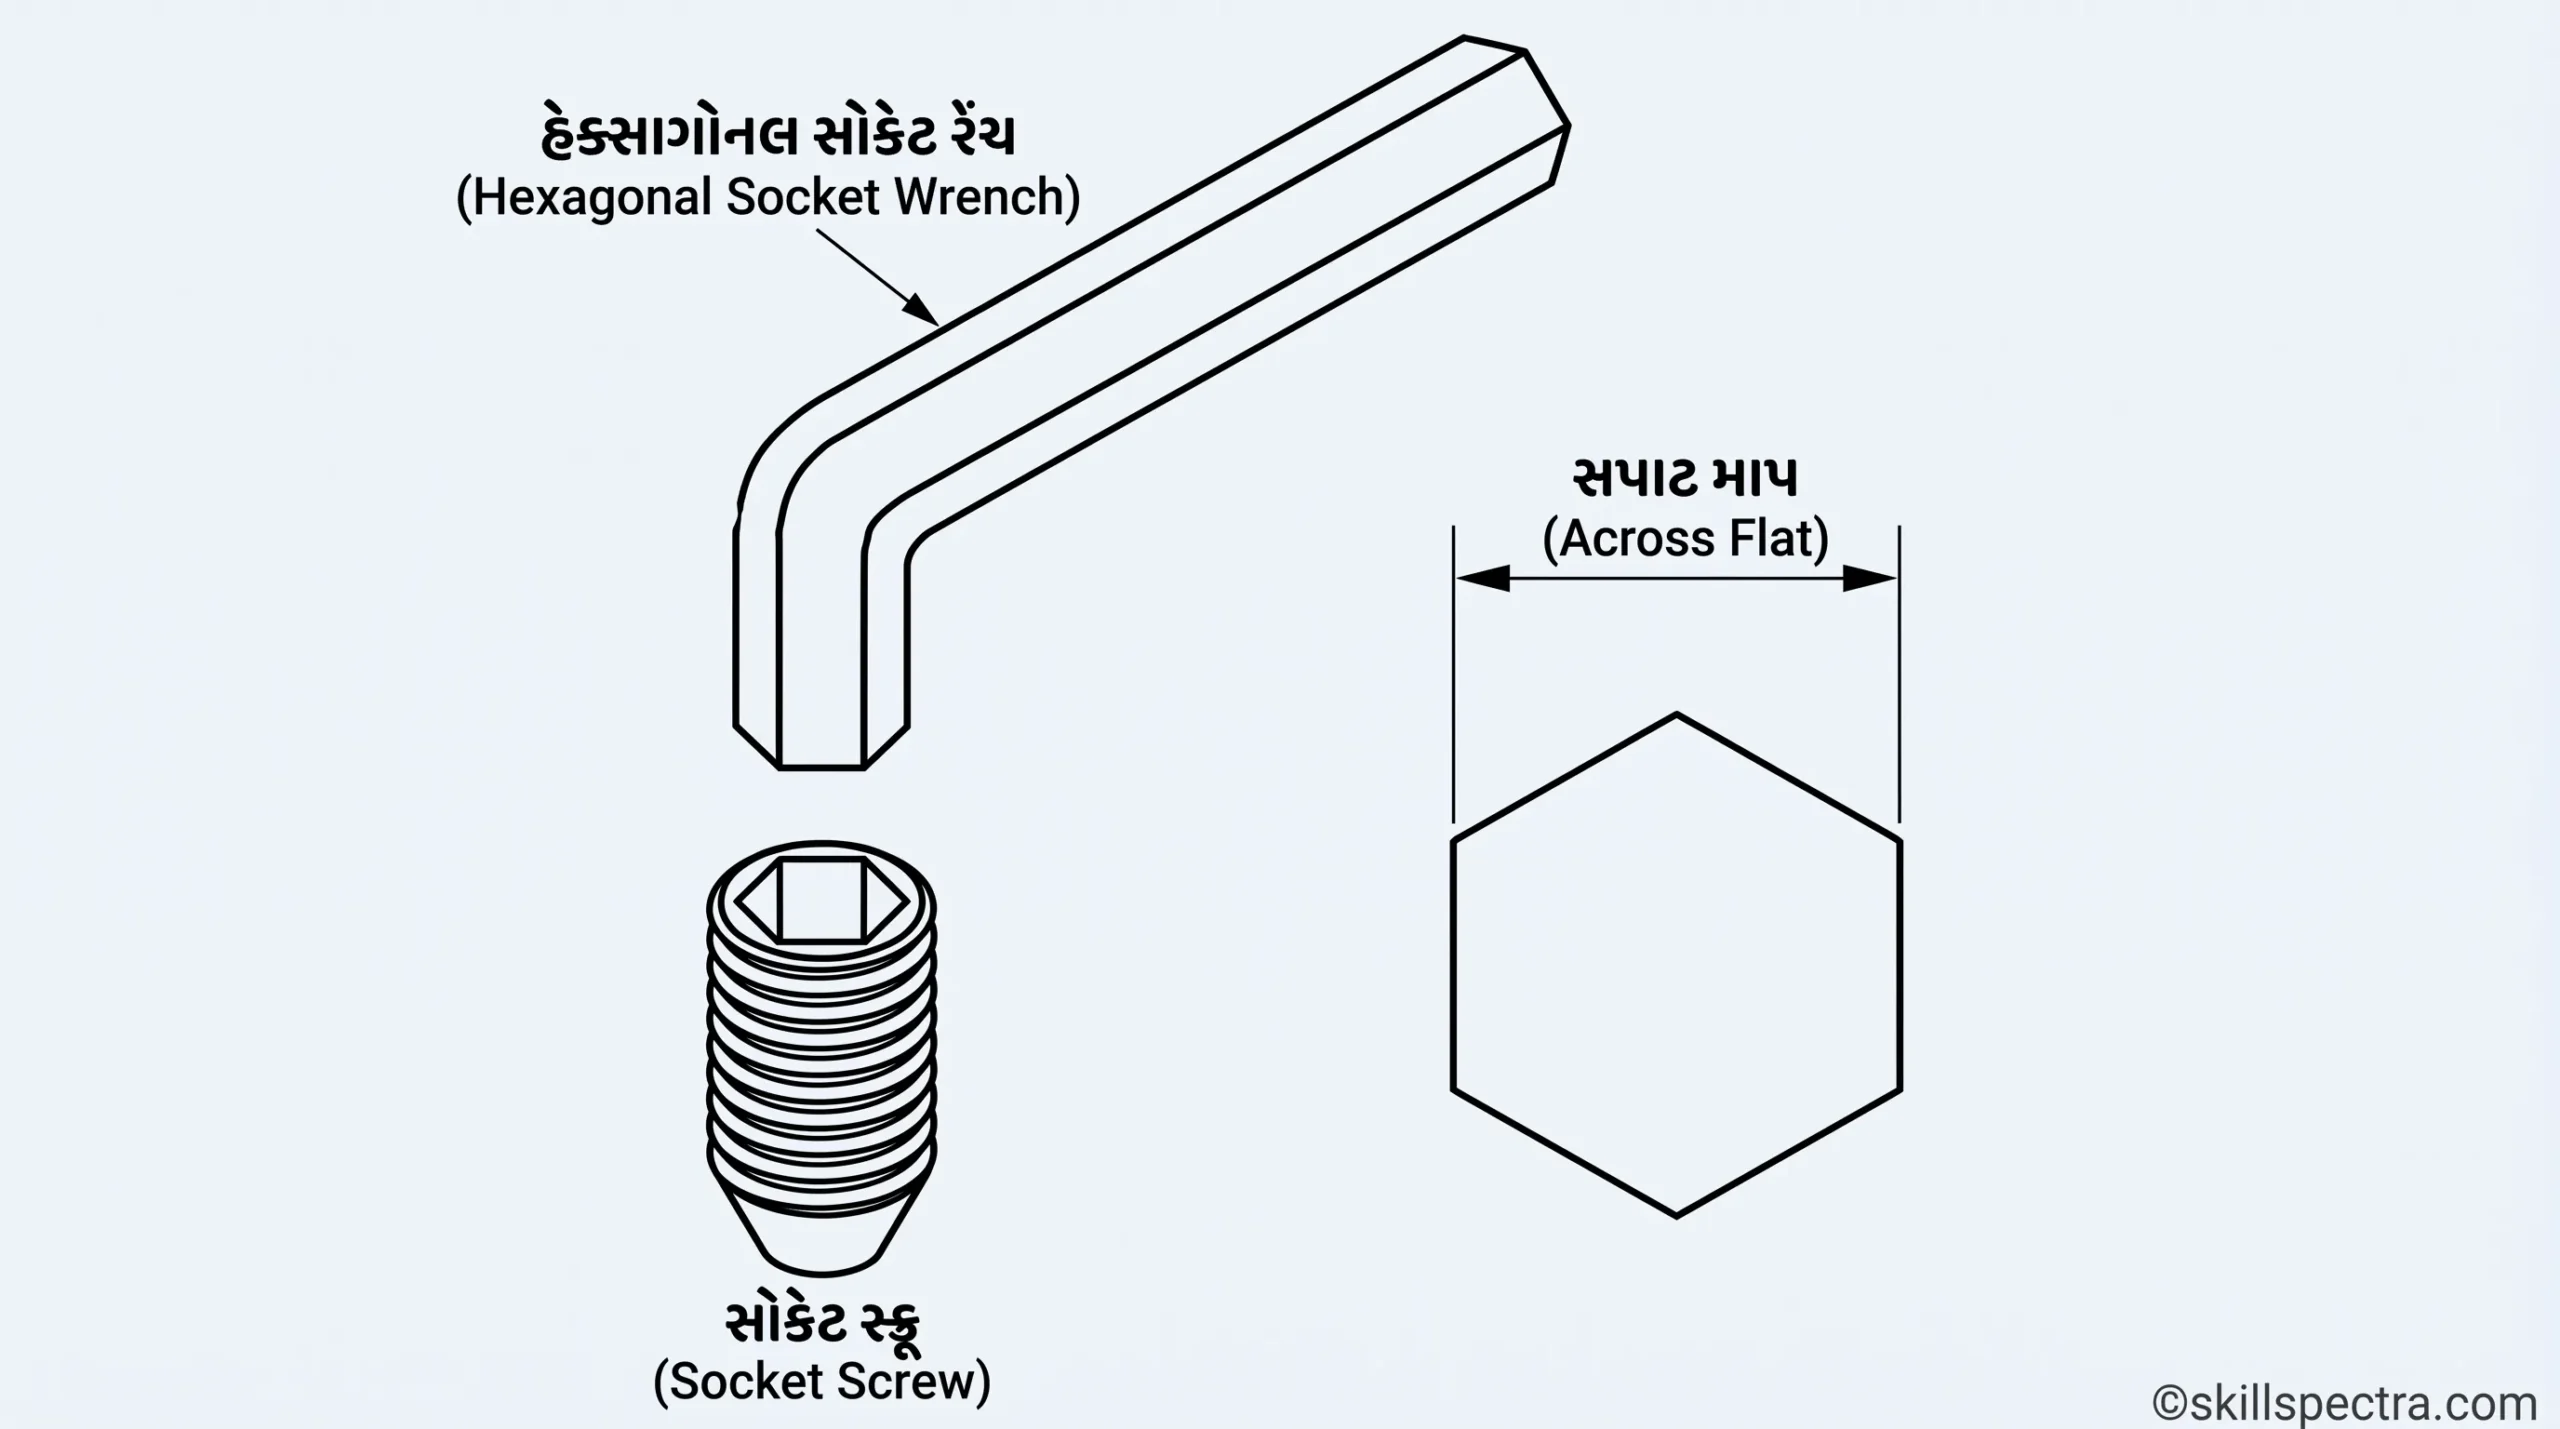
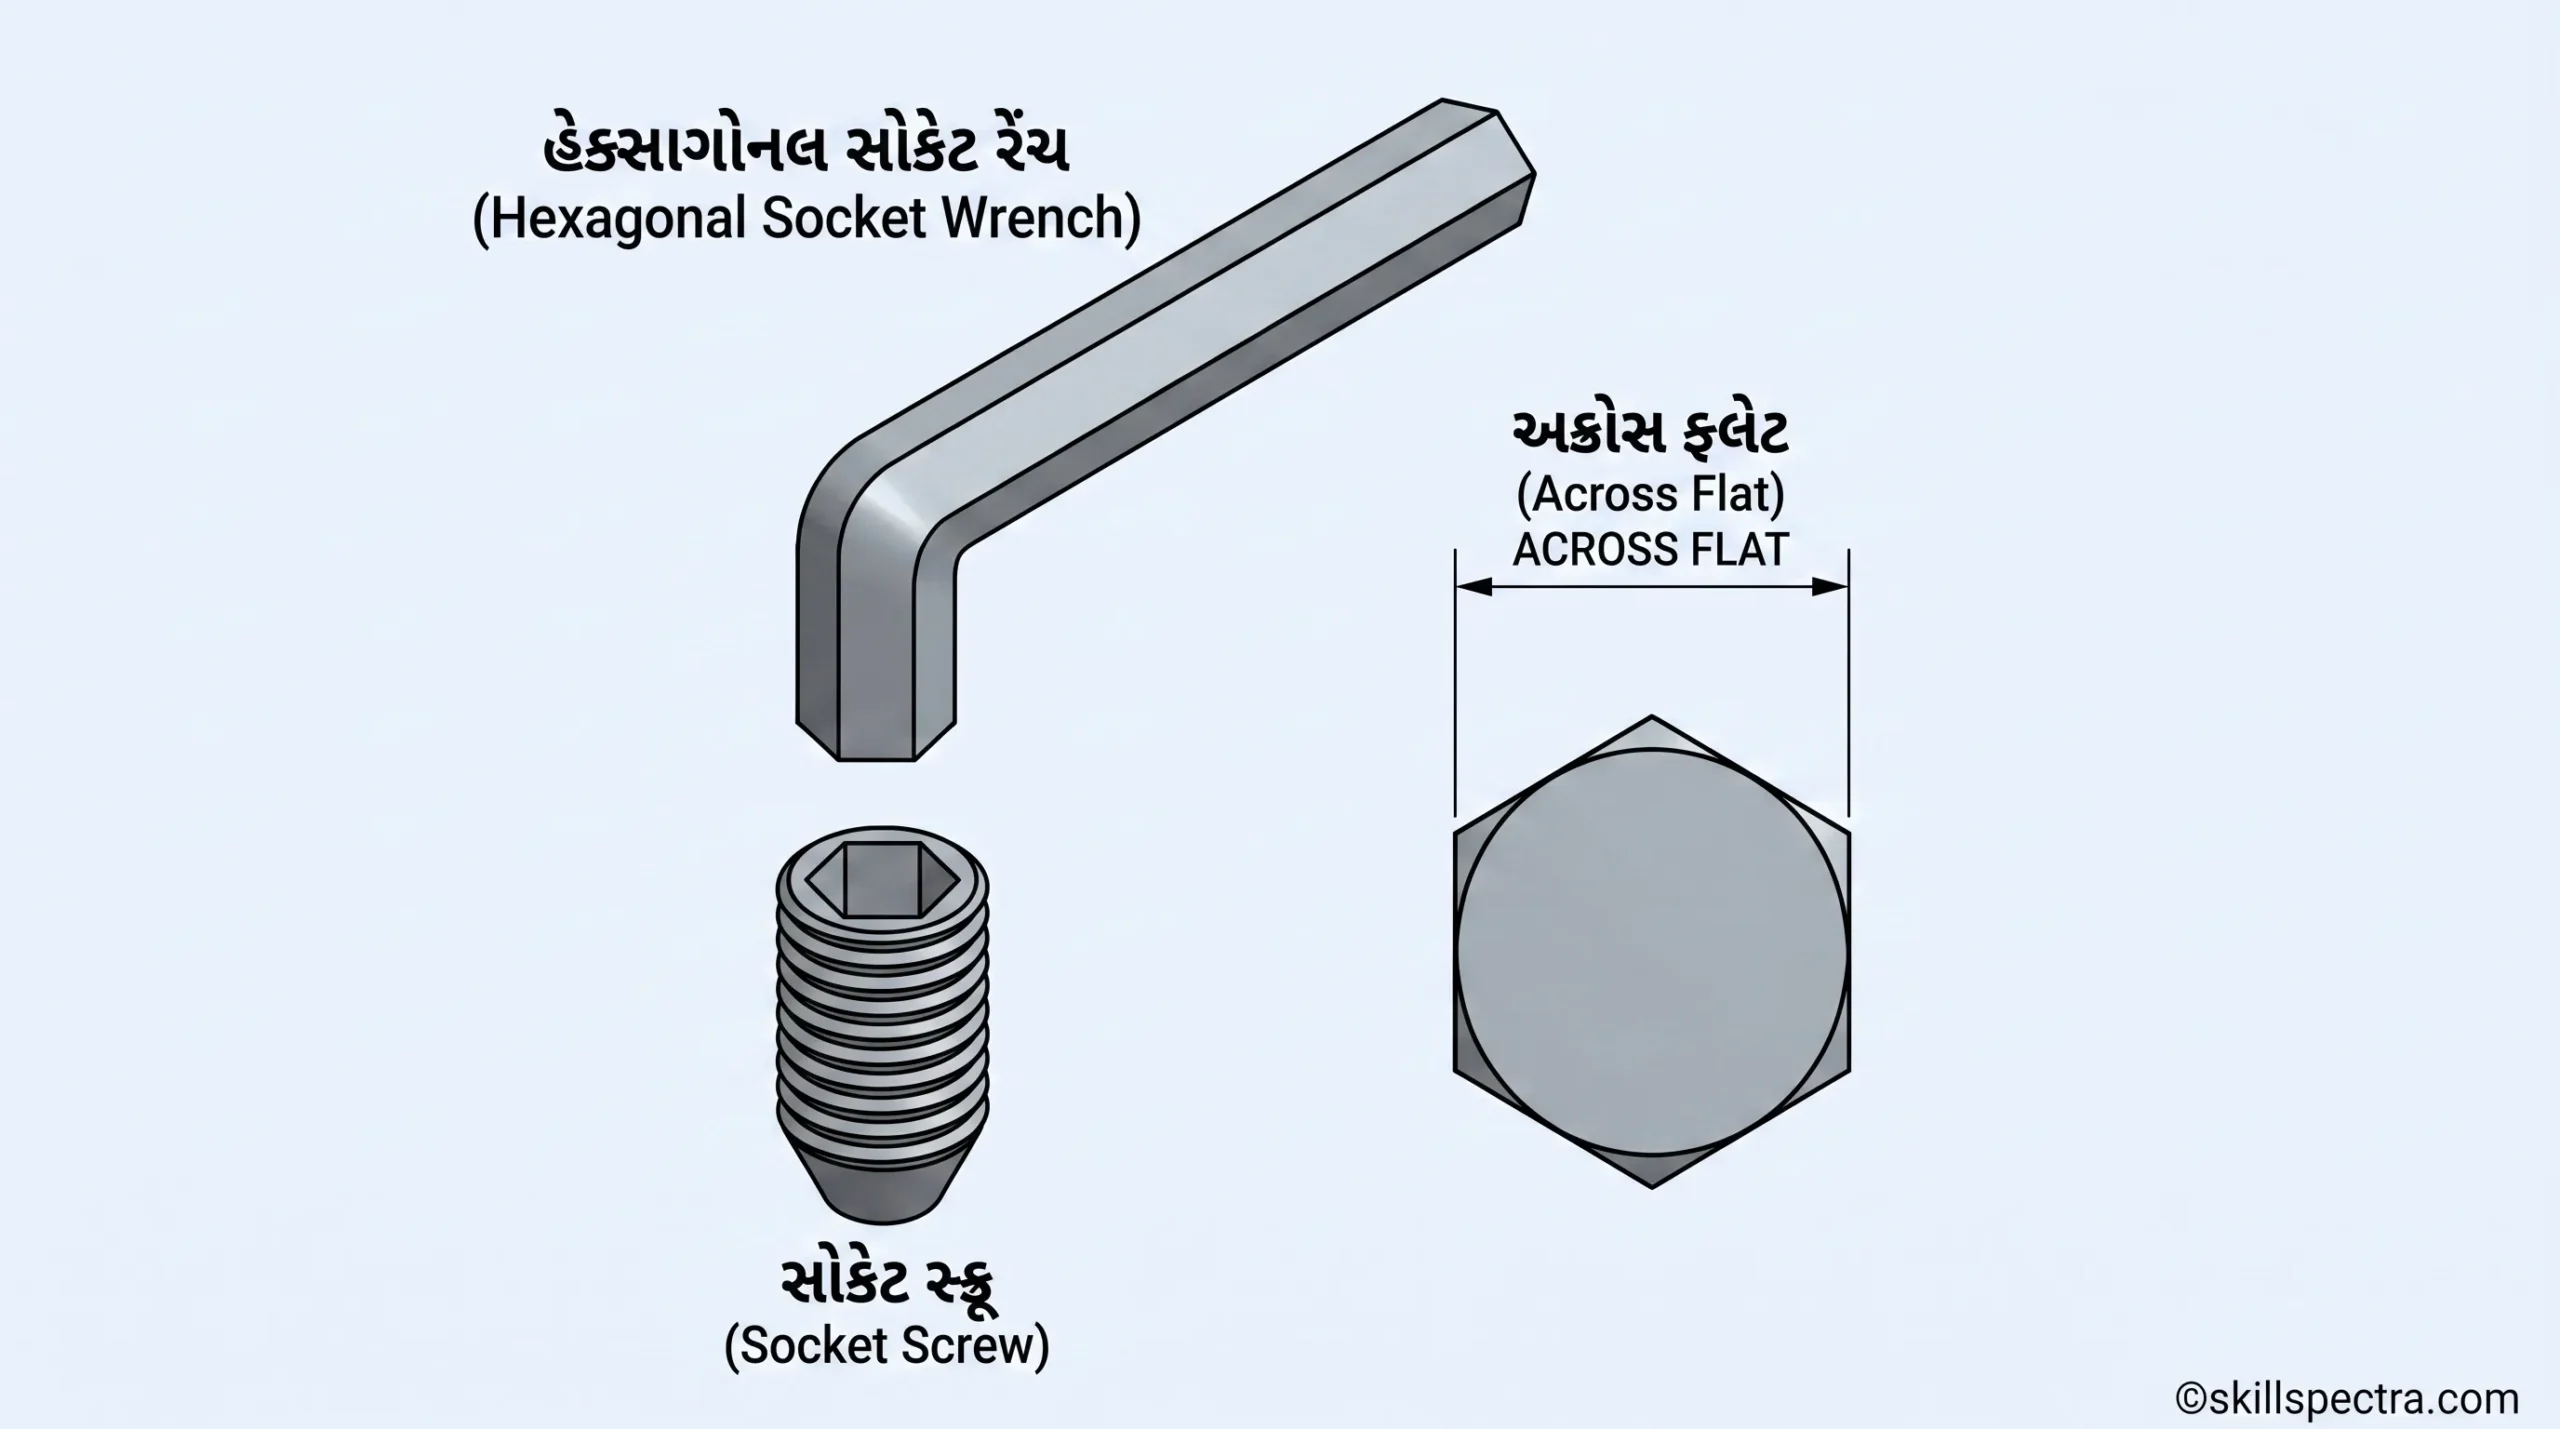
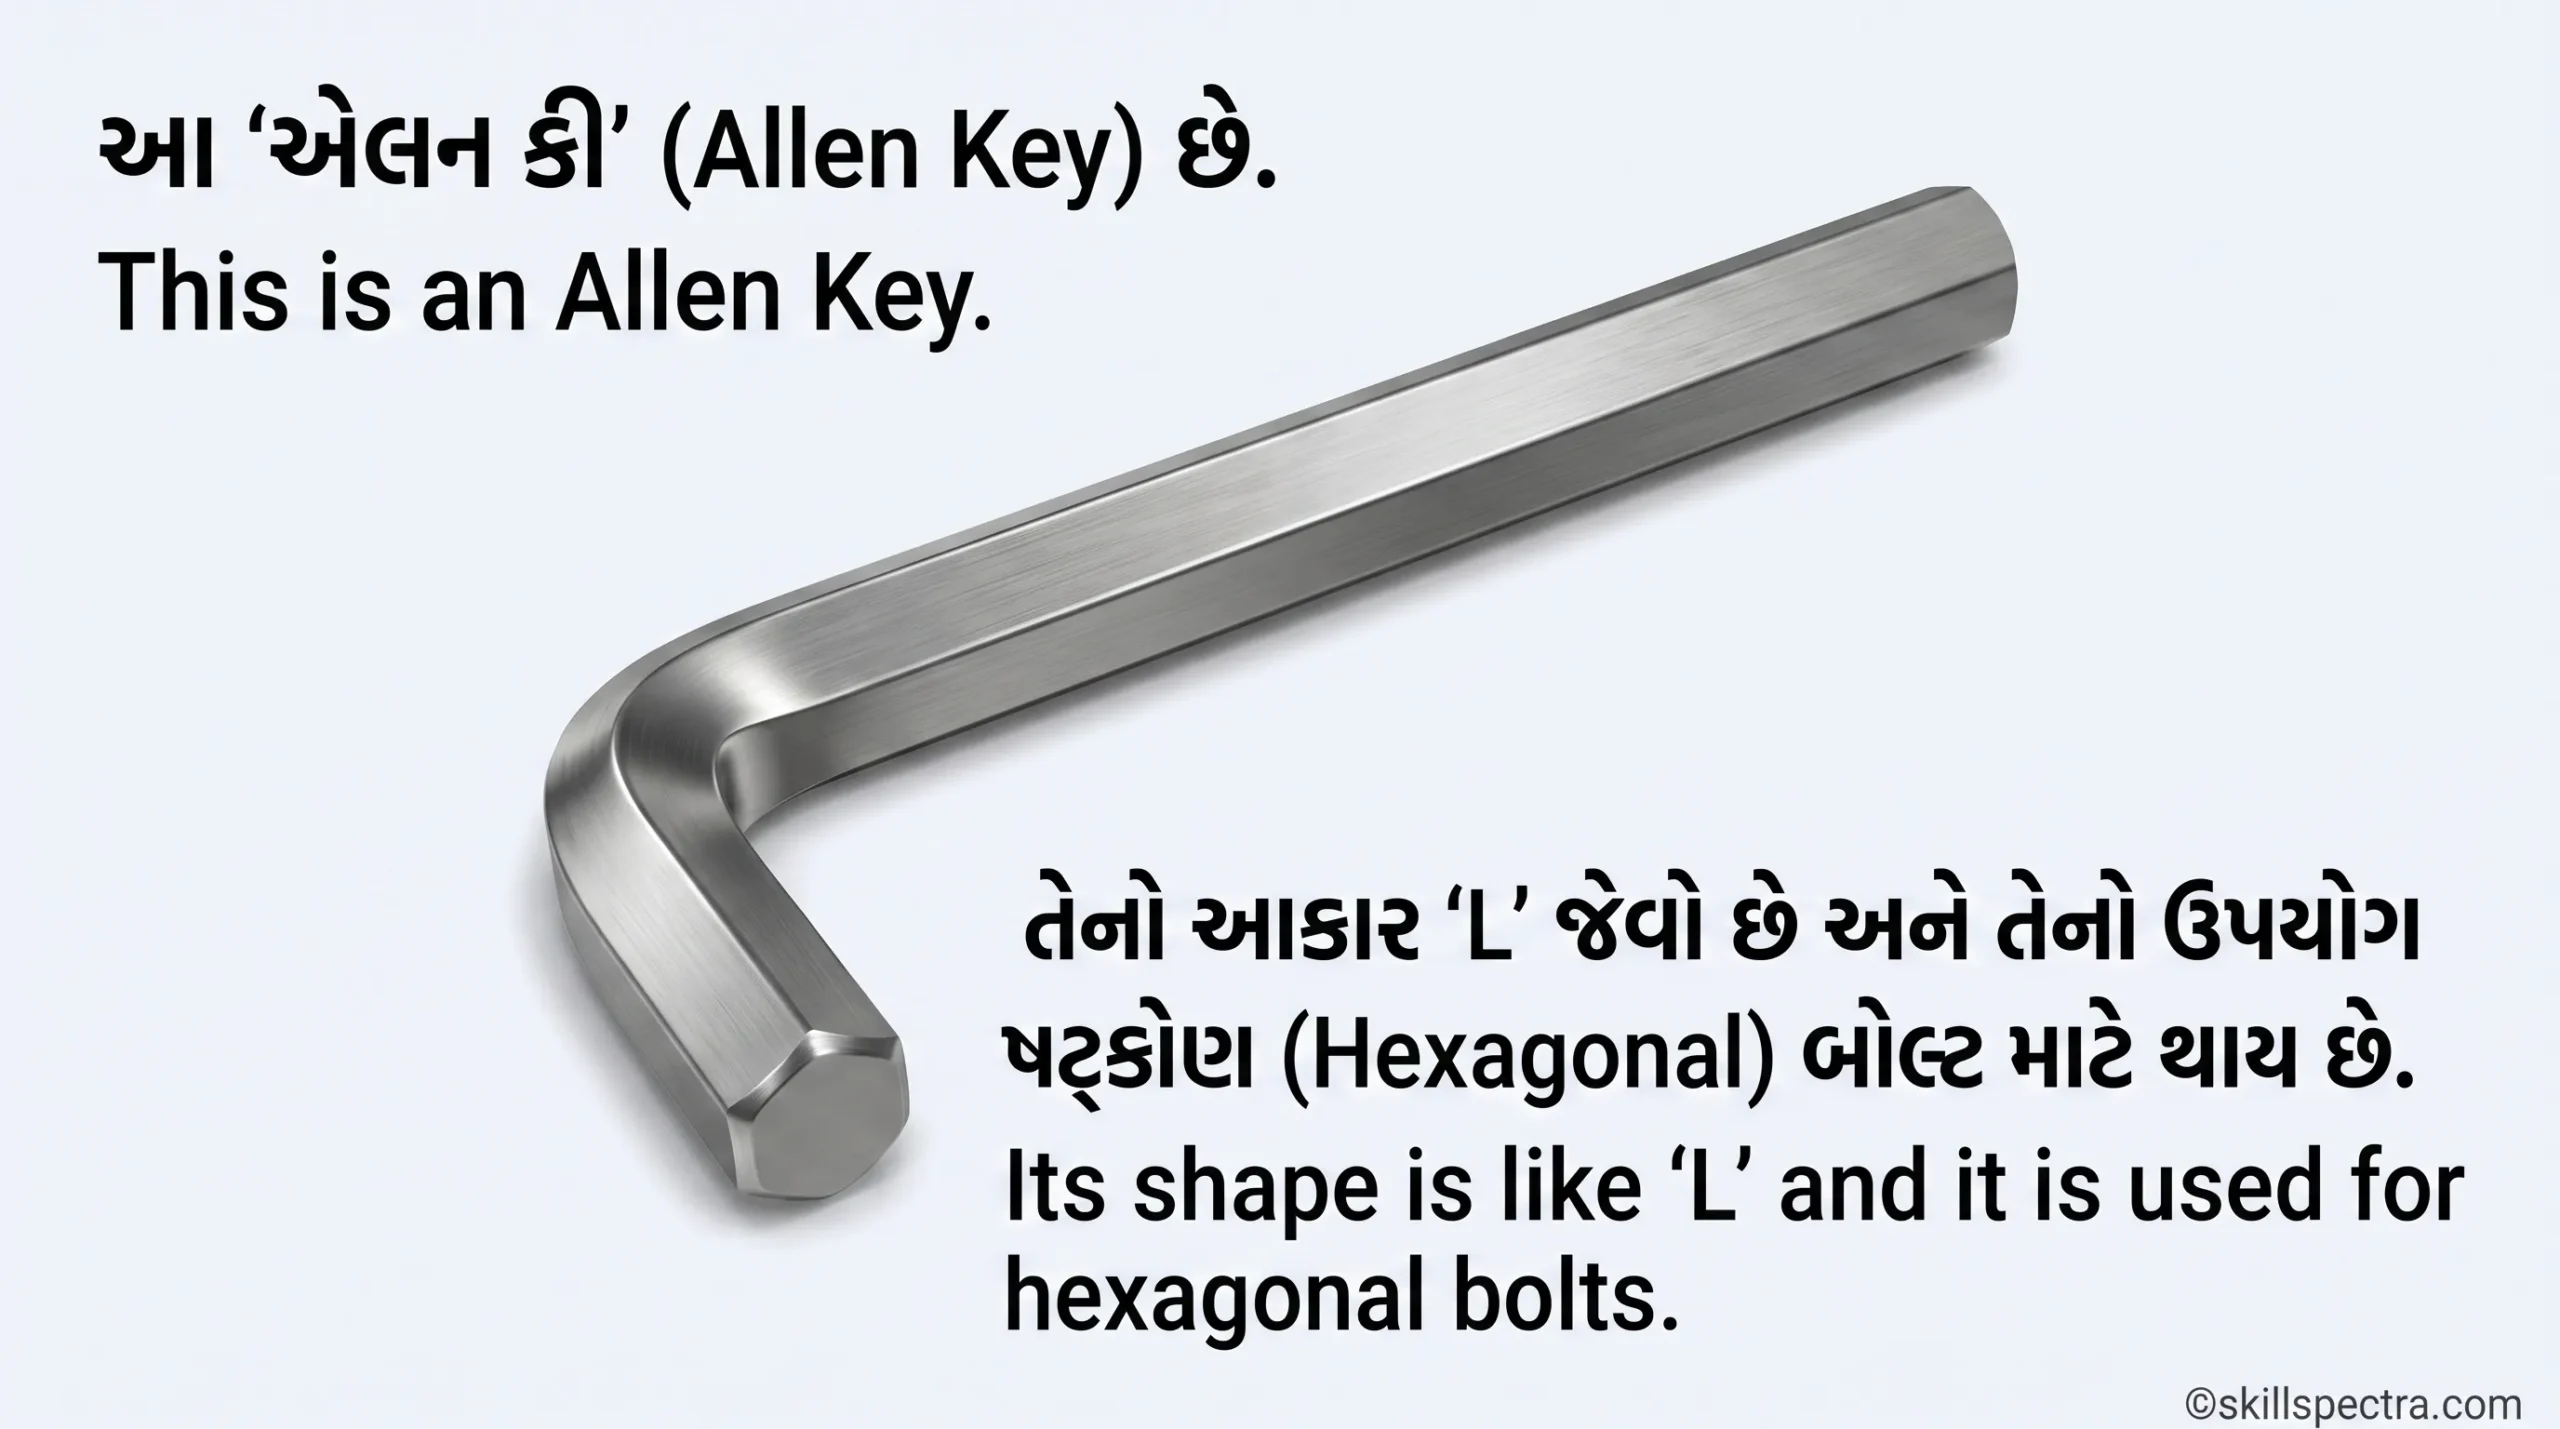
🛠️ Allen keys (એલન કીઝ)
Objectives: આ lesson ના અંતે તમે સક્ષમ હશો:
- Hexagon socket screw keys ના features અને uses જણાવવા.
- Hexagon socket screw keys ને specify (ઓળખવા) કરવા.
Hexagon socket screw keys/Allen keys એ chrome vanadium steel ના hexagonal section bars માંથી બનાવવામાં આવે છે. 🔩 આ keys hardened અને tempered હોય છે. તેઓ ‘L’ shape માં વળેલા (bent) હોય છે. Allen key ની size, hexagon ના across the flat ના માપ દ્વારા ઓળખાય છે.
Uses (ઉપયોગો):
તેનો ઉપયોગ internal hexagon sockets ધરાવતા screws ને tighten (ખેંચવા) અથવા loosen (ઢીલા) કરવા માટે થાય છે (Fig 1).
Allen keys, અલગ-અલગ sets માં plastic wallets માં ઉપલબ્ધ હોય છે, જેમ કે set of 8 (2 to 10mm):
- 2, 3, 4, 5, 6, 7, 8 અને 10mm.
Sizes of Allen keys (Fig 1): વ્યક્તિગત (Individual) પીસ નીચે મુજબ ઉપલબ્ધ છે: 1, 1.5, 2, 2.5, 3, 4, 5, 6, 8, 10, 12, 14, 17, 19, 22, 24, 27, 32 અને 36.
Designation of Allen keys (Fig 2): 8 mm across flat ધરાવતી hexagonal socket screw key ને Key 8 IS:3082 તરીકે ઓળખવામાં આવશે.
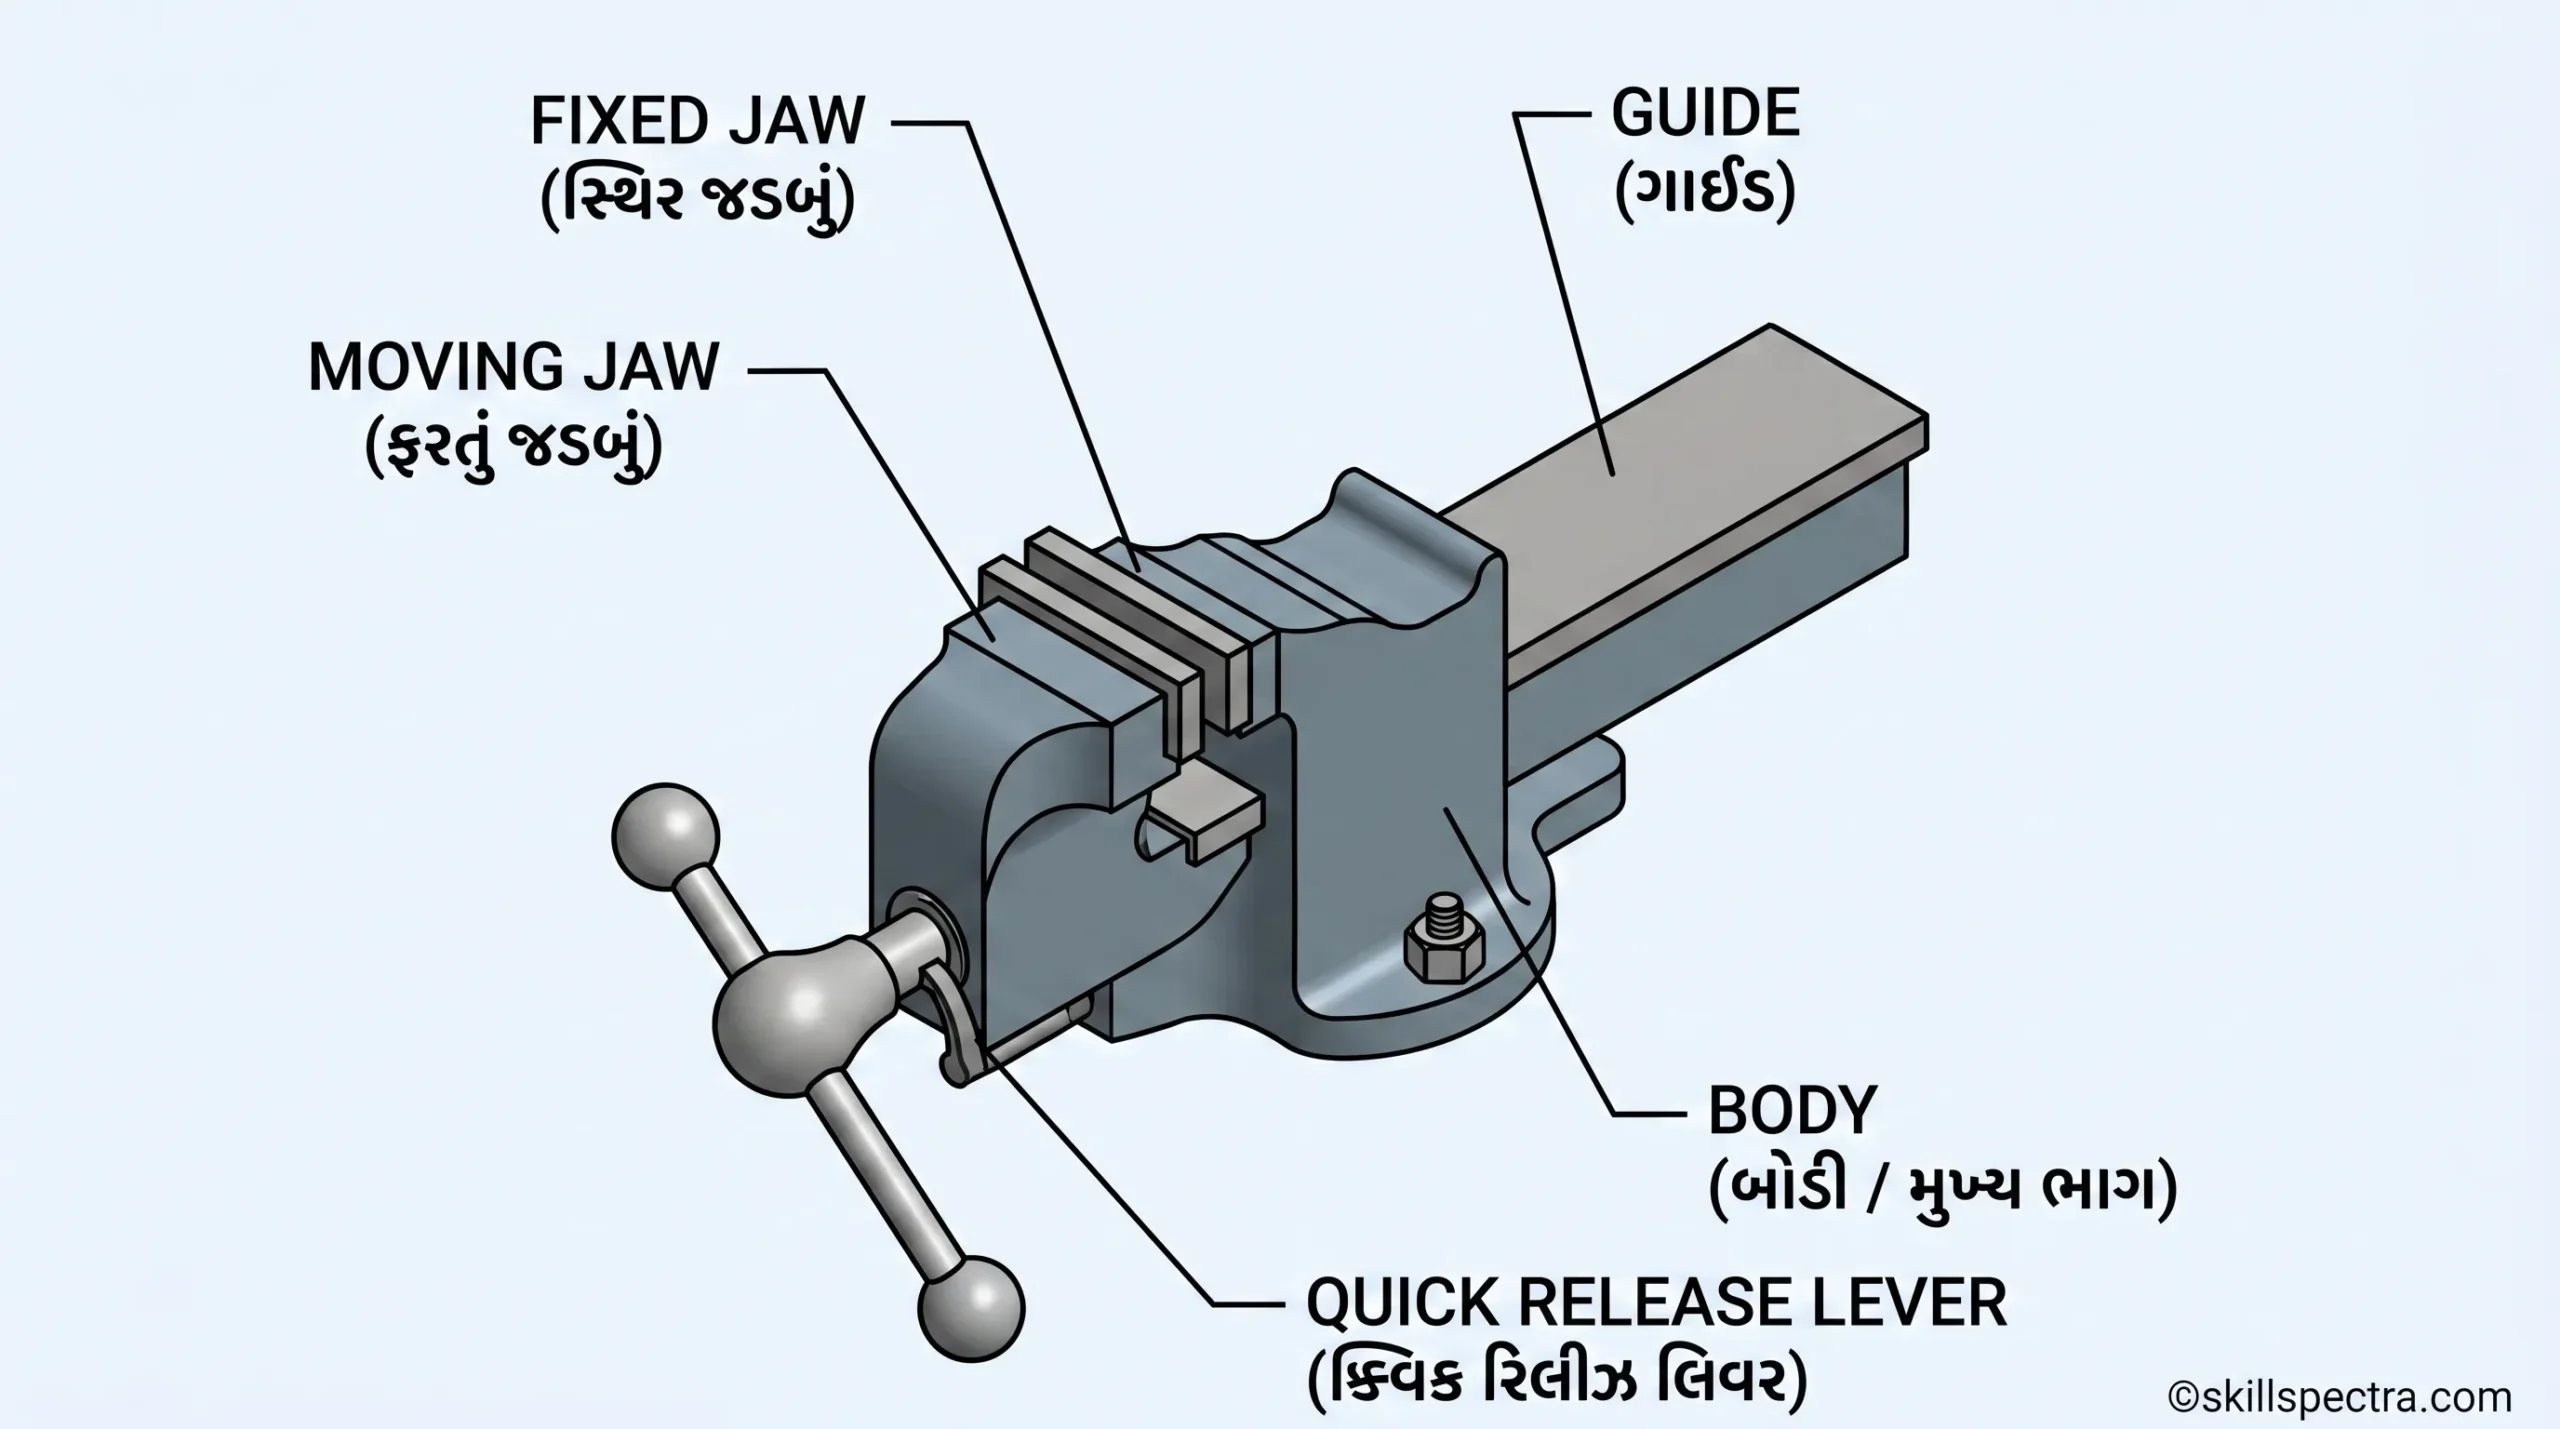
🗜️ Bench vice (બેન્ચ વાઈસ)
Objectives: આ lesson ના અંતે તમે સક્ષમ હશો:
- Bench vice ના parts અને uses ના નામ જણાવવા.
- Bench vice ની size specify કરવા.
- Vice clamps ના ઉપયોગો જણાવવા.
Vices નો ઉપયોગ workpieces ને મજબૂત રીતે પકડવા (holding) માટે થાય છે. Bench work માટે વપરાતી vice ને bench vice અથવા Engineer’s vice કહેવામાં આવે છે.
Bench vice એ cast iron અથવા cast steel માંથી બનેલી હોય છે અને તેનો ઉપયોગ filing, sawing, threading અને અન્ય hand operations કરવા માટે workpiece ને પકડી રાખવા માટે થાય છે. 🔨
Vice ની size, તેના jaws ની width (પહોળાઈ) દ્વારા દર્શાવવામાં આવે છે.
Parts of a bench vice (Fig 1):
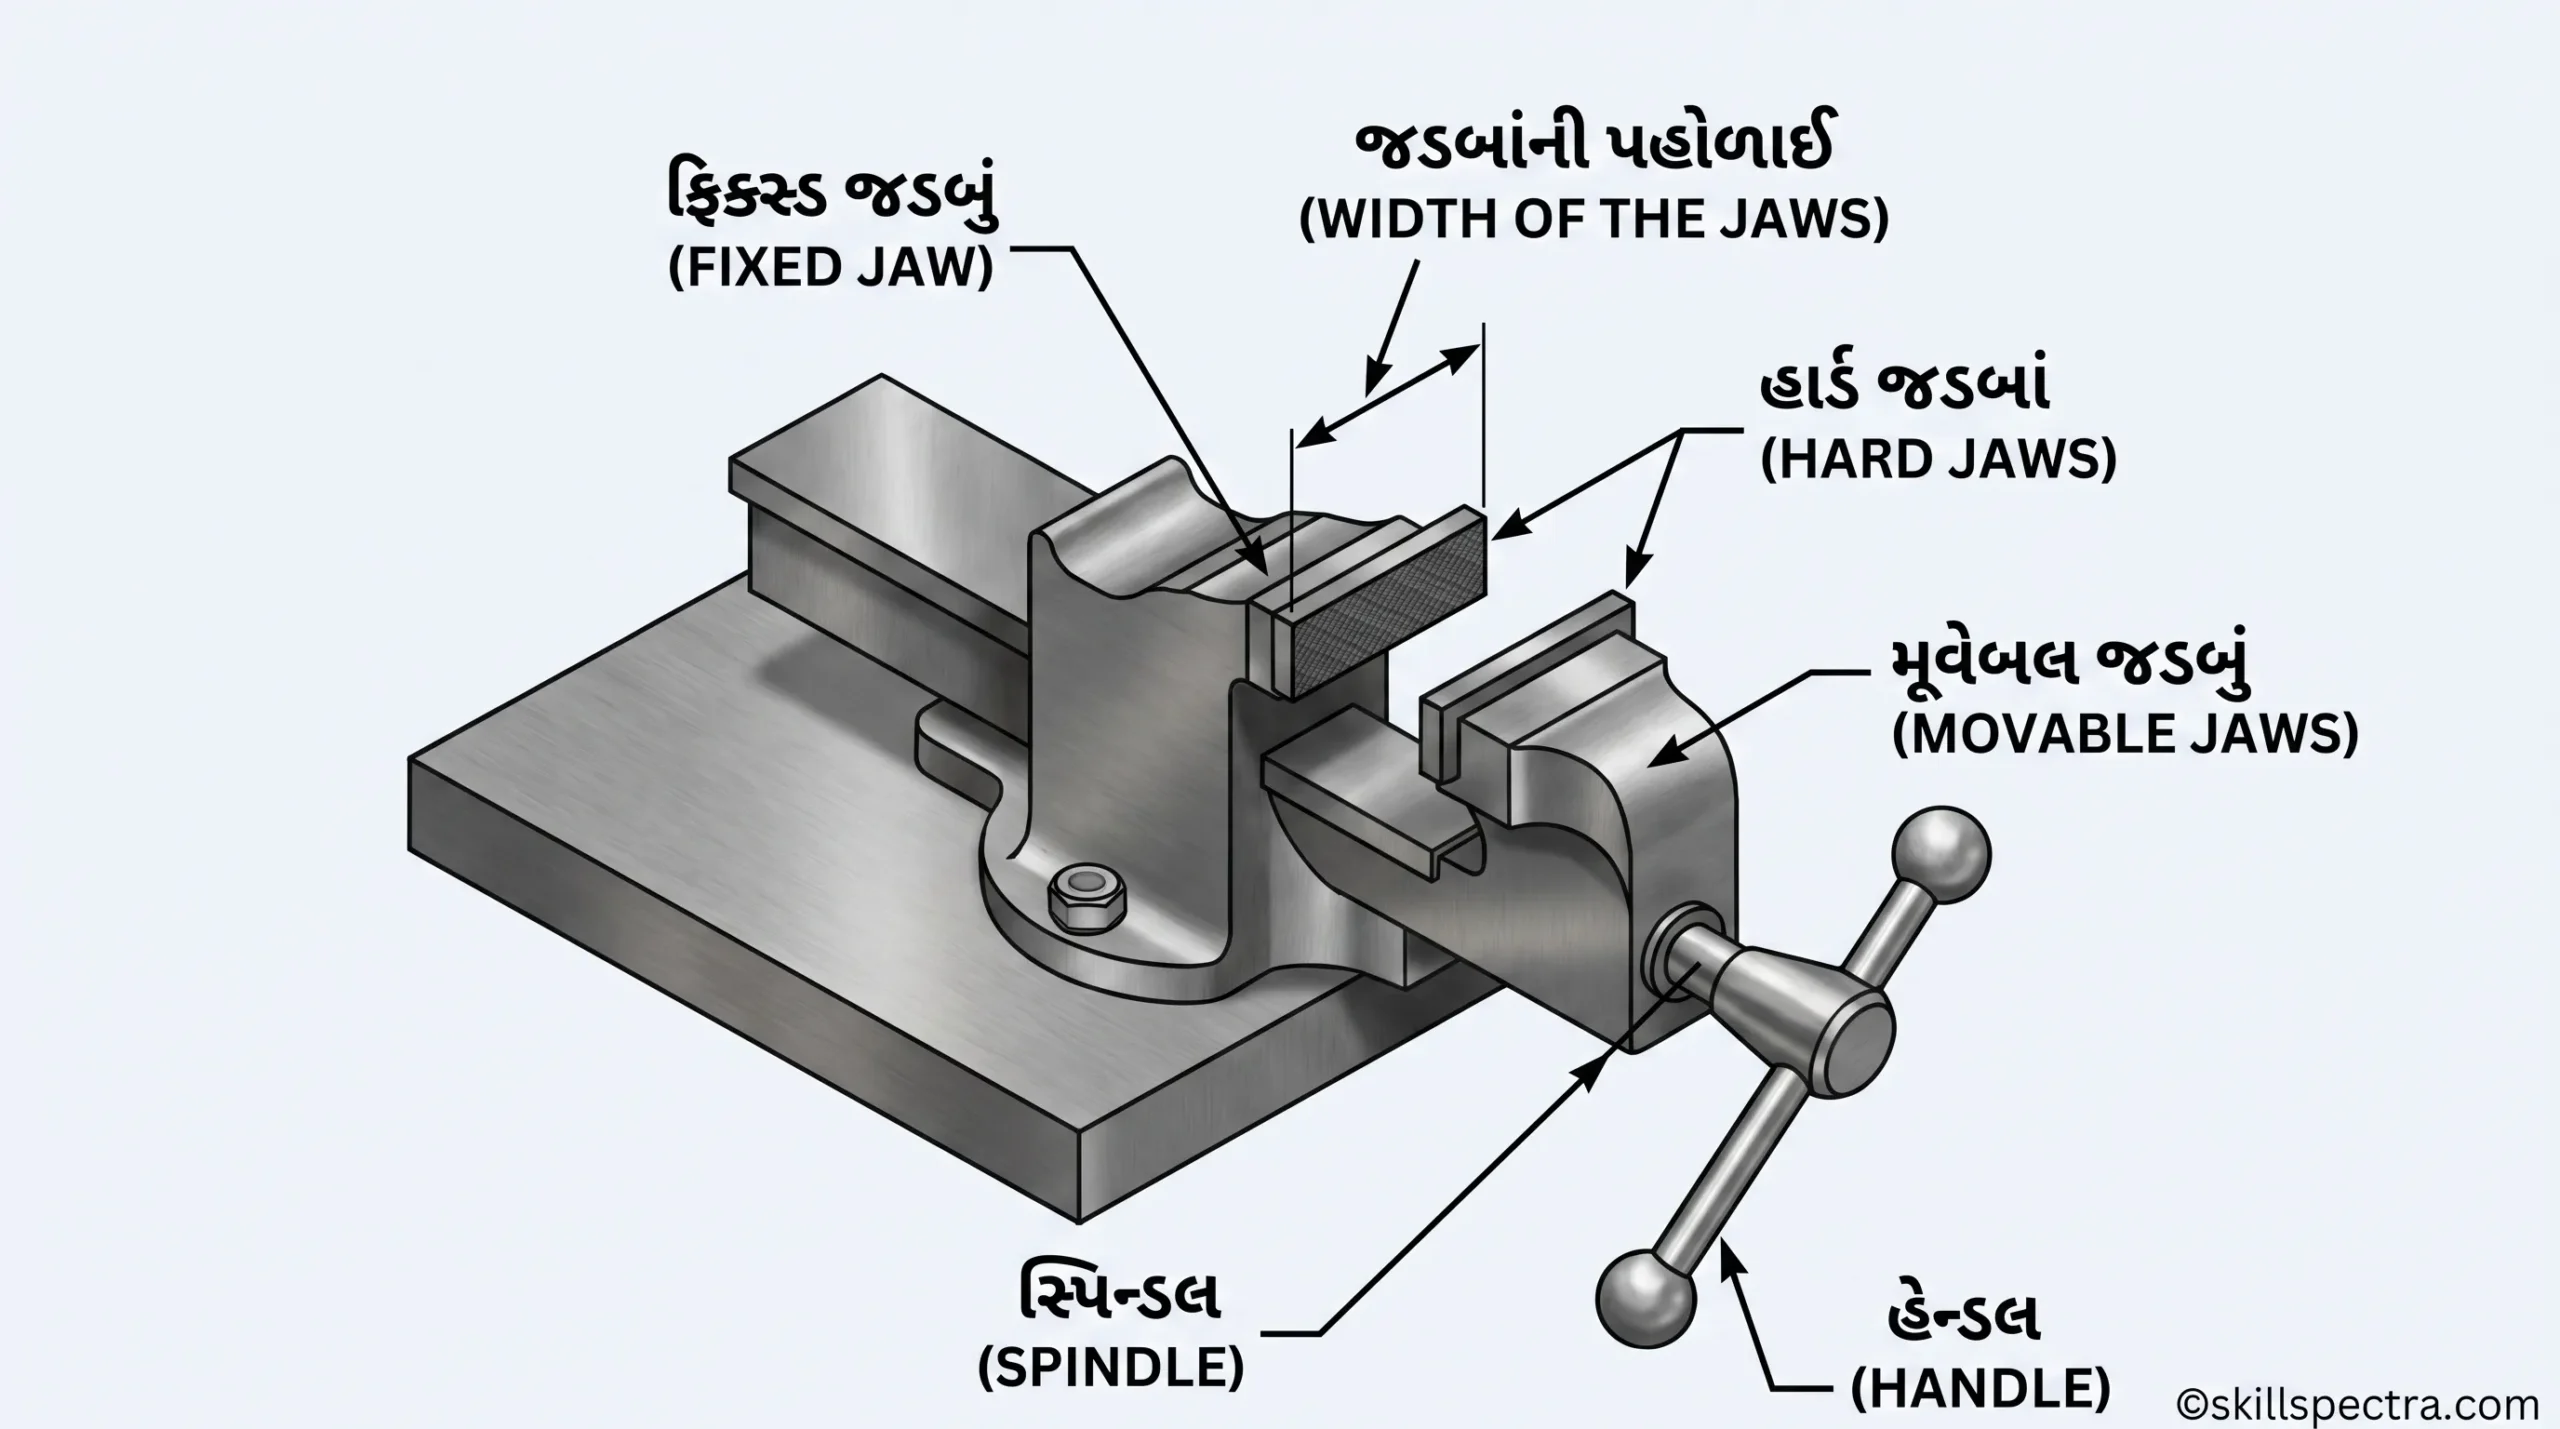
નીચે મુજબ vice ના મુખ્ય ભાગો છે:
- Fixed jaw (સ્થિર જડબું)
- Movable jaw (ચલિત જડબું)
- Hard jaws (મજબૂત જડબાં)
- Spindle (સ્પિન્ડલ)
- Handle (હેન્ડલ)
- Box-nut (બોક્સ-નટ)
- Spring (સ્પ્રિંગ)
Box-nut અને spring એ અંદરના ભાગો (internal parts) છે.
⚠️ ખાસ સૂચના: Vice ને ક્યારેય over-tighten ન કરો, કારણ કે તેનાથી spindle ને નુકસાન થઈ શકે છે.
Vice clamps or soft jaws (Fig 2):
Finished work (જેની સપાટી તૈયાર થઈ ગઈ હોય) ને પકડવા માટે aluminium ના બનેલા soft jaws (vice clamps) નો ઉપયોગ regular jaws ની ઉપર કરવામાં આવે છે. આનાથી work surface ને નુકસાન થતું અટકાવી શકાય છે. ✅
Keywords:
- Keywords: Allen keys uses in Gujarati, Bench vice parts name Gujarati, Workshop tools tutorial Gujarati, ITI Mechanic Diesel Theory Gujarati, Bench vice size specification, Types of Allen keys, Soft jaws vs Hard jaws.
- EO Title: Allen Keys and Bench Vice Guide in Gujarati & English | ITI Workshop Theory.
- Meta Description: Learn all about Allen keys and Bench Vice in Gujarati. Explore their parts, uses, sizes, and maintenance tips for workshop practice.
🛠️ Types of Vice: Vice ના વિવિધ પ્રકારો અને તેનો ઉપયોગ
નમસ્કાર વિદ્યાર્થીમિત્રો! આજના lesson માં આપણે workshop માં વપરાતા સૌથી મહત્વના tool, એટલે કે Vice વિશે શીખીશું. Vice નો ઉપયોગ કોઈપણ workpiece ને મજબૂત રીતે પકડવા (holding) માટે થાય છે.
🎯 Objectives (હેતુઓ):
આ lesson ના અંતે તમે નીચેની બાબતો શીખી શકશો:
- Quick releasing vice ની બનાવટ (construction) અને તેના ફાયદા (advantages) સમજાવવા.
- Pipe vice, Toolmakers vice, Hand vice અને Pin vice ના ઉપયોગો વિશે જણાવવું.
📝 Introduction (પરિચય)
Workpieces ને પકડવા માટે અલગ-અલગ પ્રકારના vice વપરાય છે. મુખ્ય પ્રકારોમાં Quick releasing vice, Pipe vice, Hand vice, Pin vice અને Toolmaker’s vice નો સમાવેશ થાય છે. 🔩
⚡ 1. Quick releasing vice (Fig 1)
Quick releasing vice સામાન્ય bench vice જેવું જ હોય છે, પણ તેમાં એક ખાસિયત છે. આમાં movable jaw ને ઝડપથી ખોલવા માટે એક trigger (lever) નો ઉપયોગ થાય છે.
- જો movable jaw ની આગળ રહેલું trigger દબાવવામાં આવે, તો તે screw ને disengage (છૂટો) કરી દે છે.
- આનાથી movable jaw ને કોઈપણ જગ્યાએ ખૂબ જ ઝડપથી set કરી શકાય છે. આ તેનો સૌથી મોટો ફાયદો છે.
🚰 2. Pipe vice (Fig 2)
Pipe vice નો ઉપયોગ ખાસ કરીને metal ના round sections (ગોળ ટુકડાઓ) અને pipes ને પકડવા માટે થાય છે.
- આ vice માં screw vertical (ઉભો) હોય છે અને jaws પણ vertically કામ કરે છે.
- Pipe vice પદાર્થને (work) તેની સપાટી પર 4 points થી પકડે છે, જેથી પાઇપ સરકી ન જાય. Fig 2 માં તેના ભાગો દર્શાવેલ છે.
✋ 3. Hand vice (Fig 3)
Hand vice નો ઉપયોગ એવી નાની વસ્તુઓને પકડવા માટે થાય છે જેને bench vice માં પકડવી અનુકૂળ નથી હોતી.
- જેમ કે: screws, rivets, keys, નાના drills વગેરે.
- આની length 125 થી 150 mm હોય છે અને jaw width 40 થી 44 mm હોય છે.
- તેમાં રહેલા wing nut ને ફેરવીને jaws ને ખોલી કે બંધ કરી શકાય છે. તે અલગ-અલગ આકાર અને સાઈઝ માં ઉપલબ્ધ હોય છે.
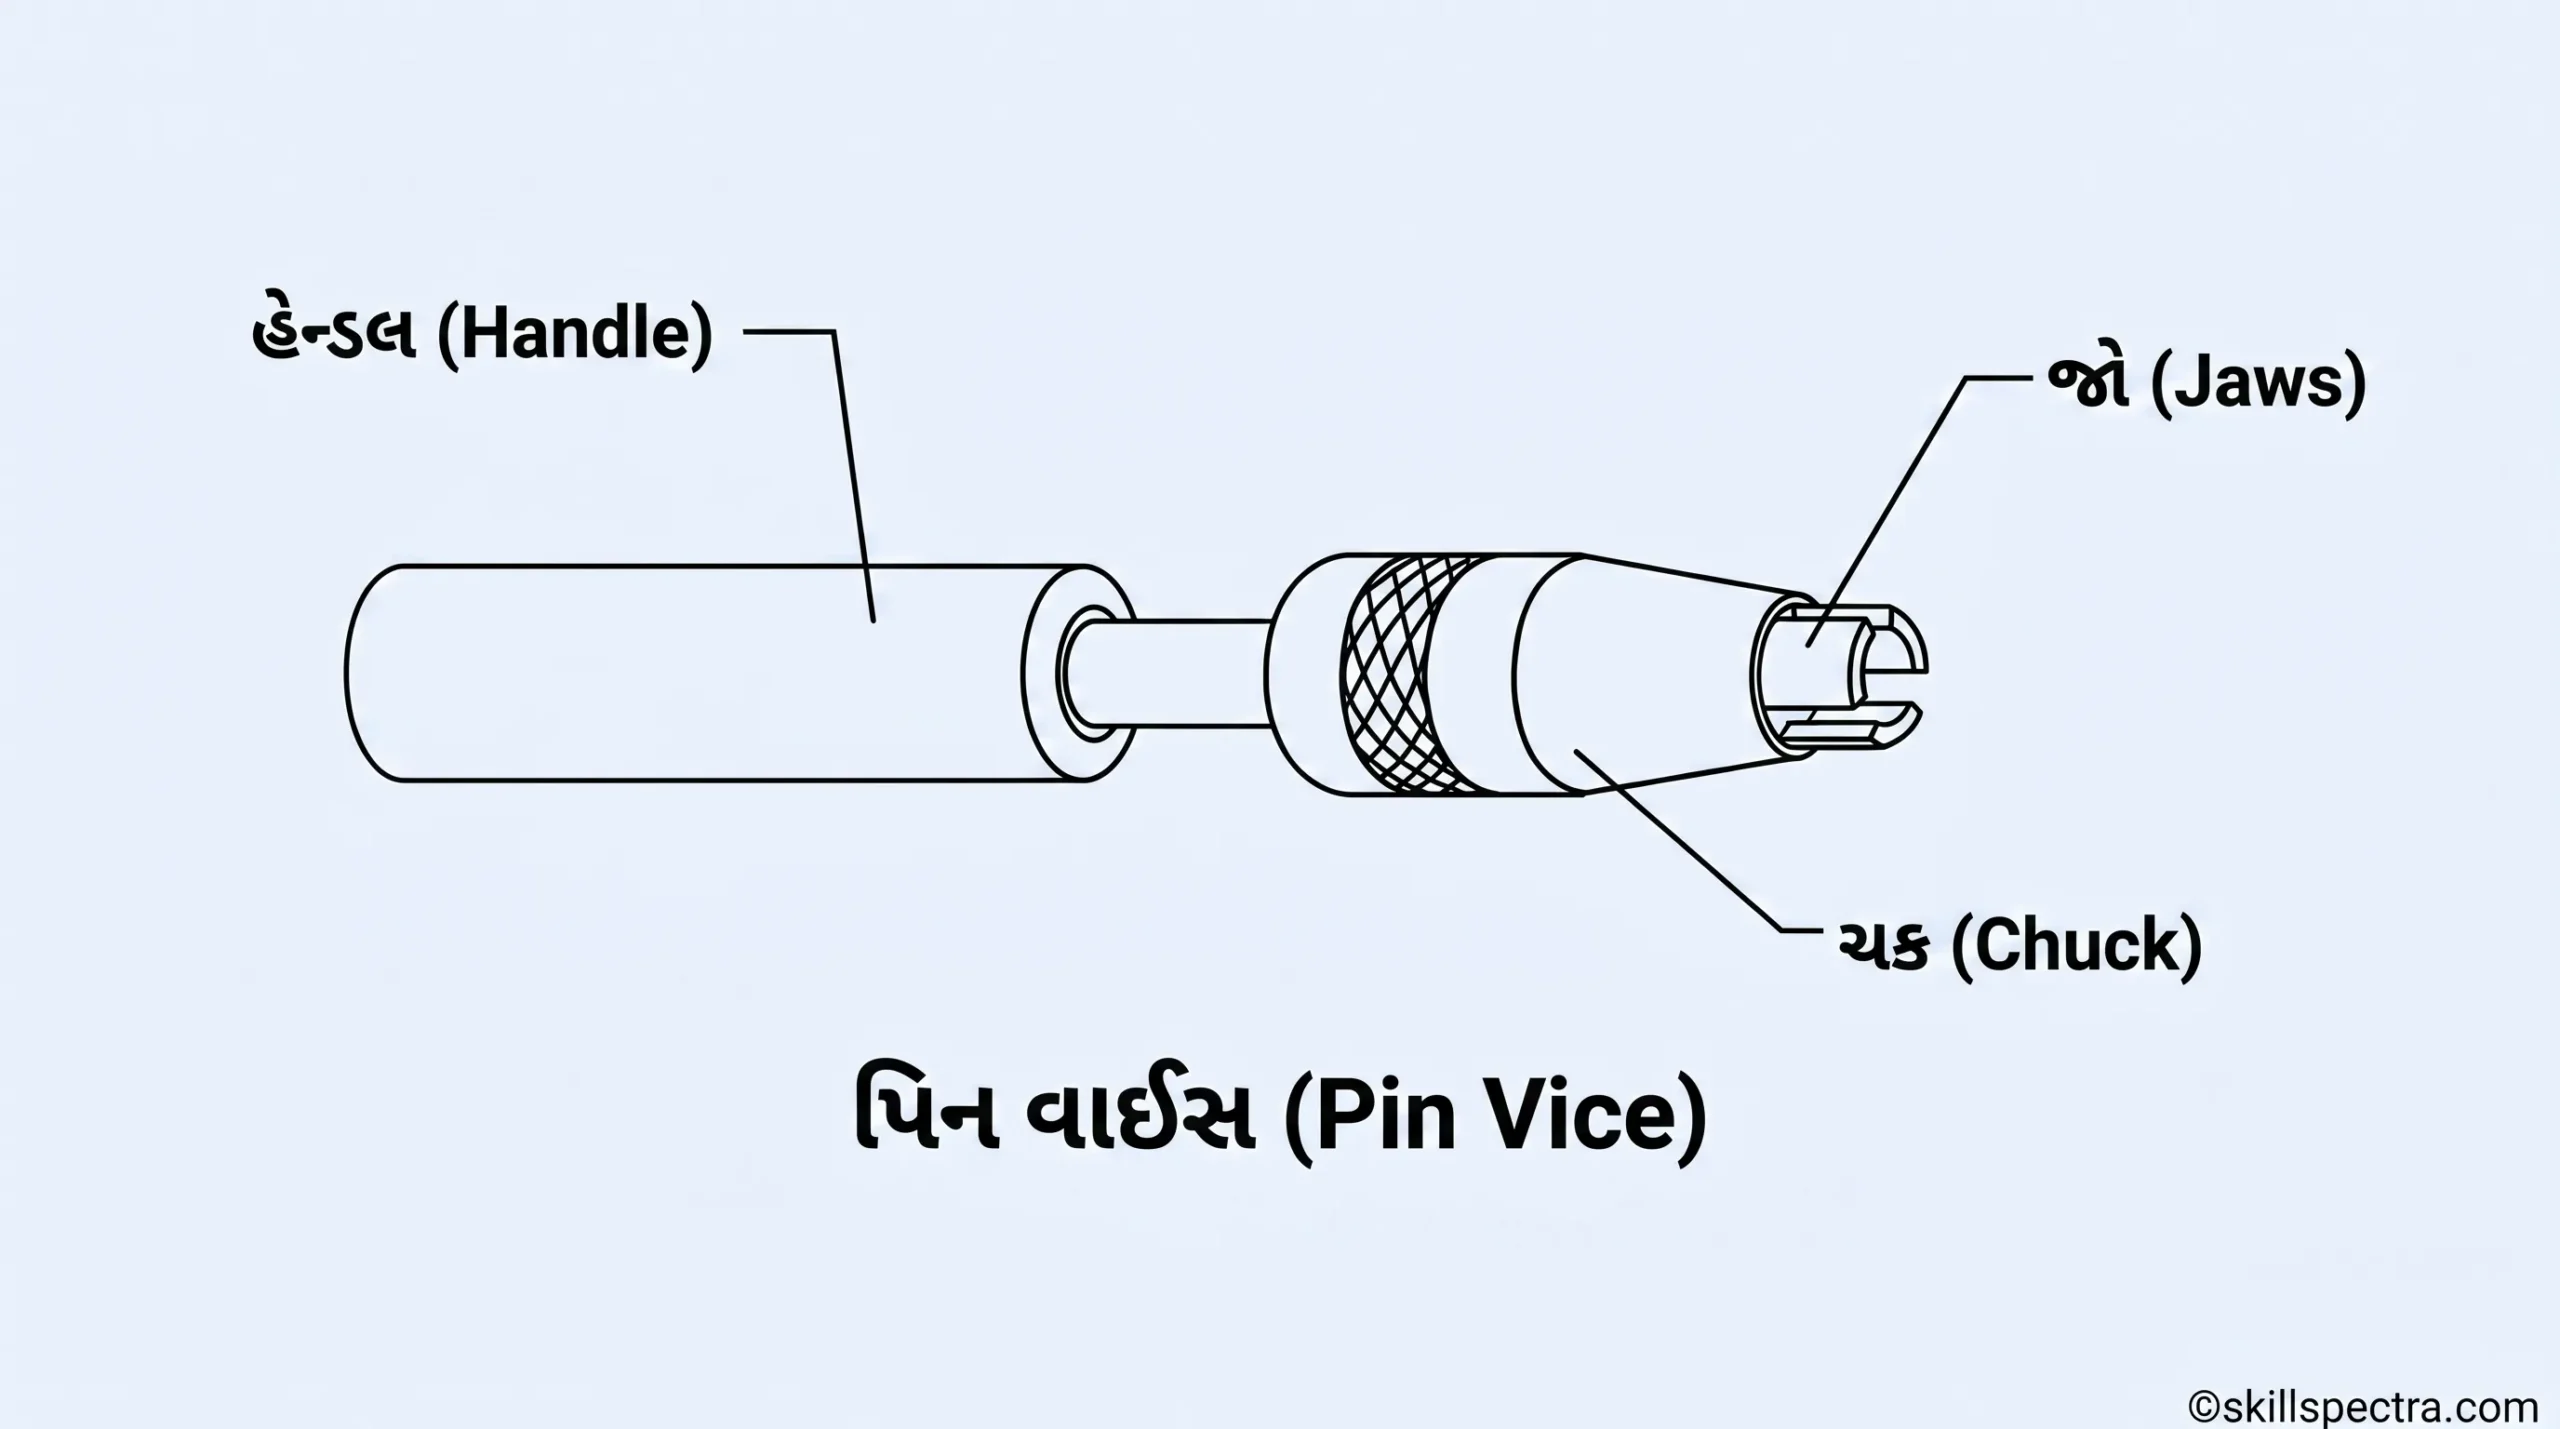
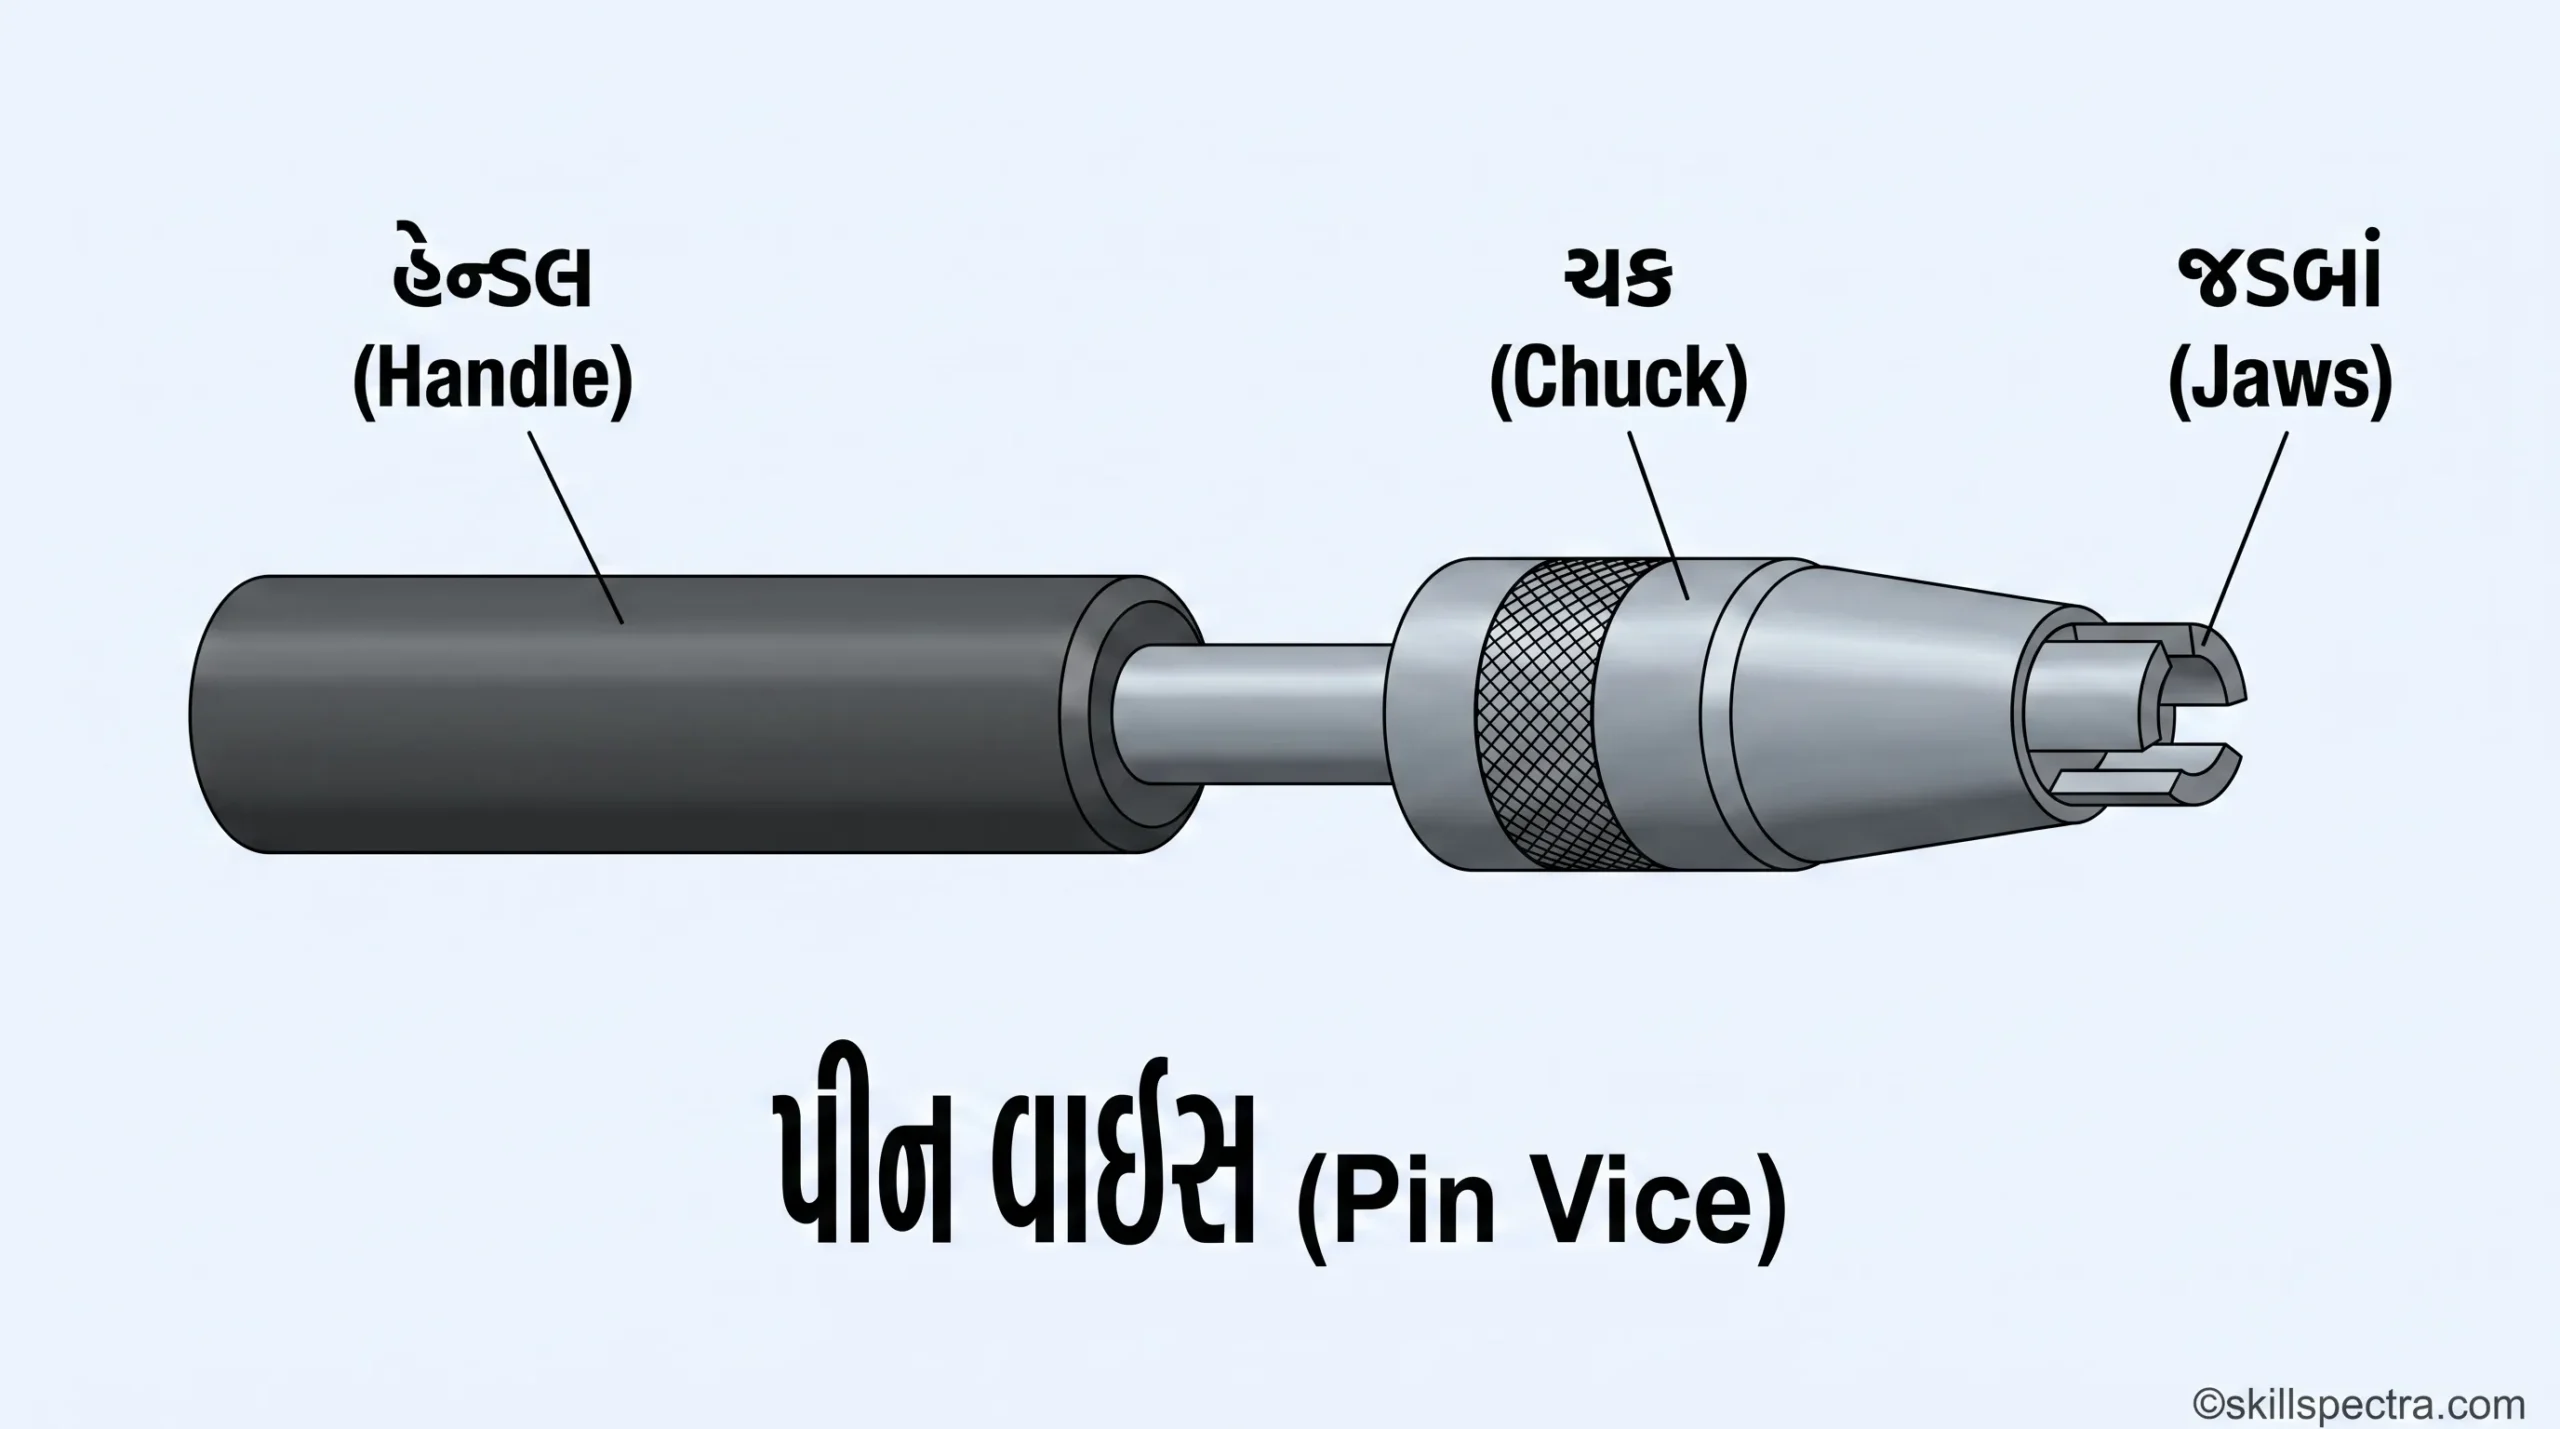
📍 4. Pin vice (Fig 4)
Pin vice નો ઉપયોગ ખૂબ જ નાના વ્યાસ વાળા (small diameter) કામો માટે થાય છે.
- તેના એક છેડે નાનું collet chuck હોય છે.
- Handle ને ફેરવવાથી chuck માં રહેલા jaws કાર્ય કરે છે અને ઝીણી પિન કે વાયરને પકડી રાખે છે.
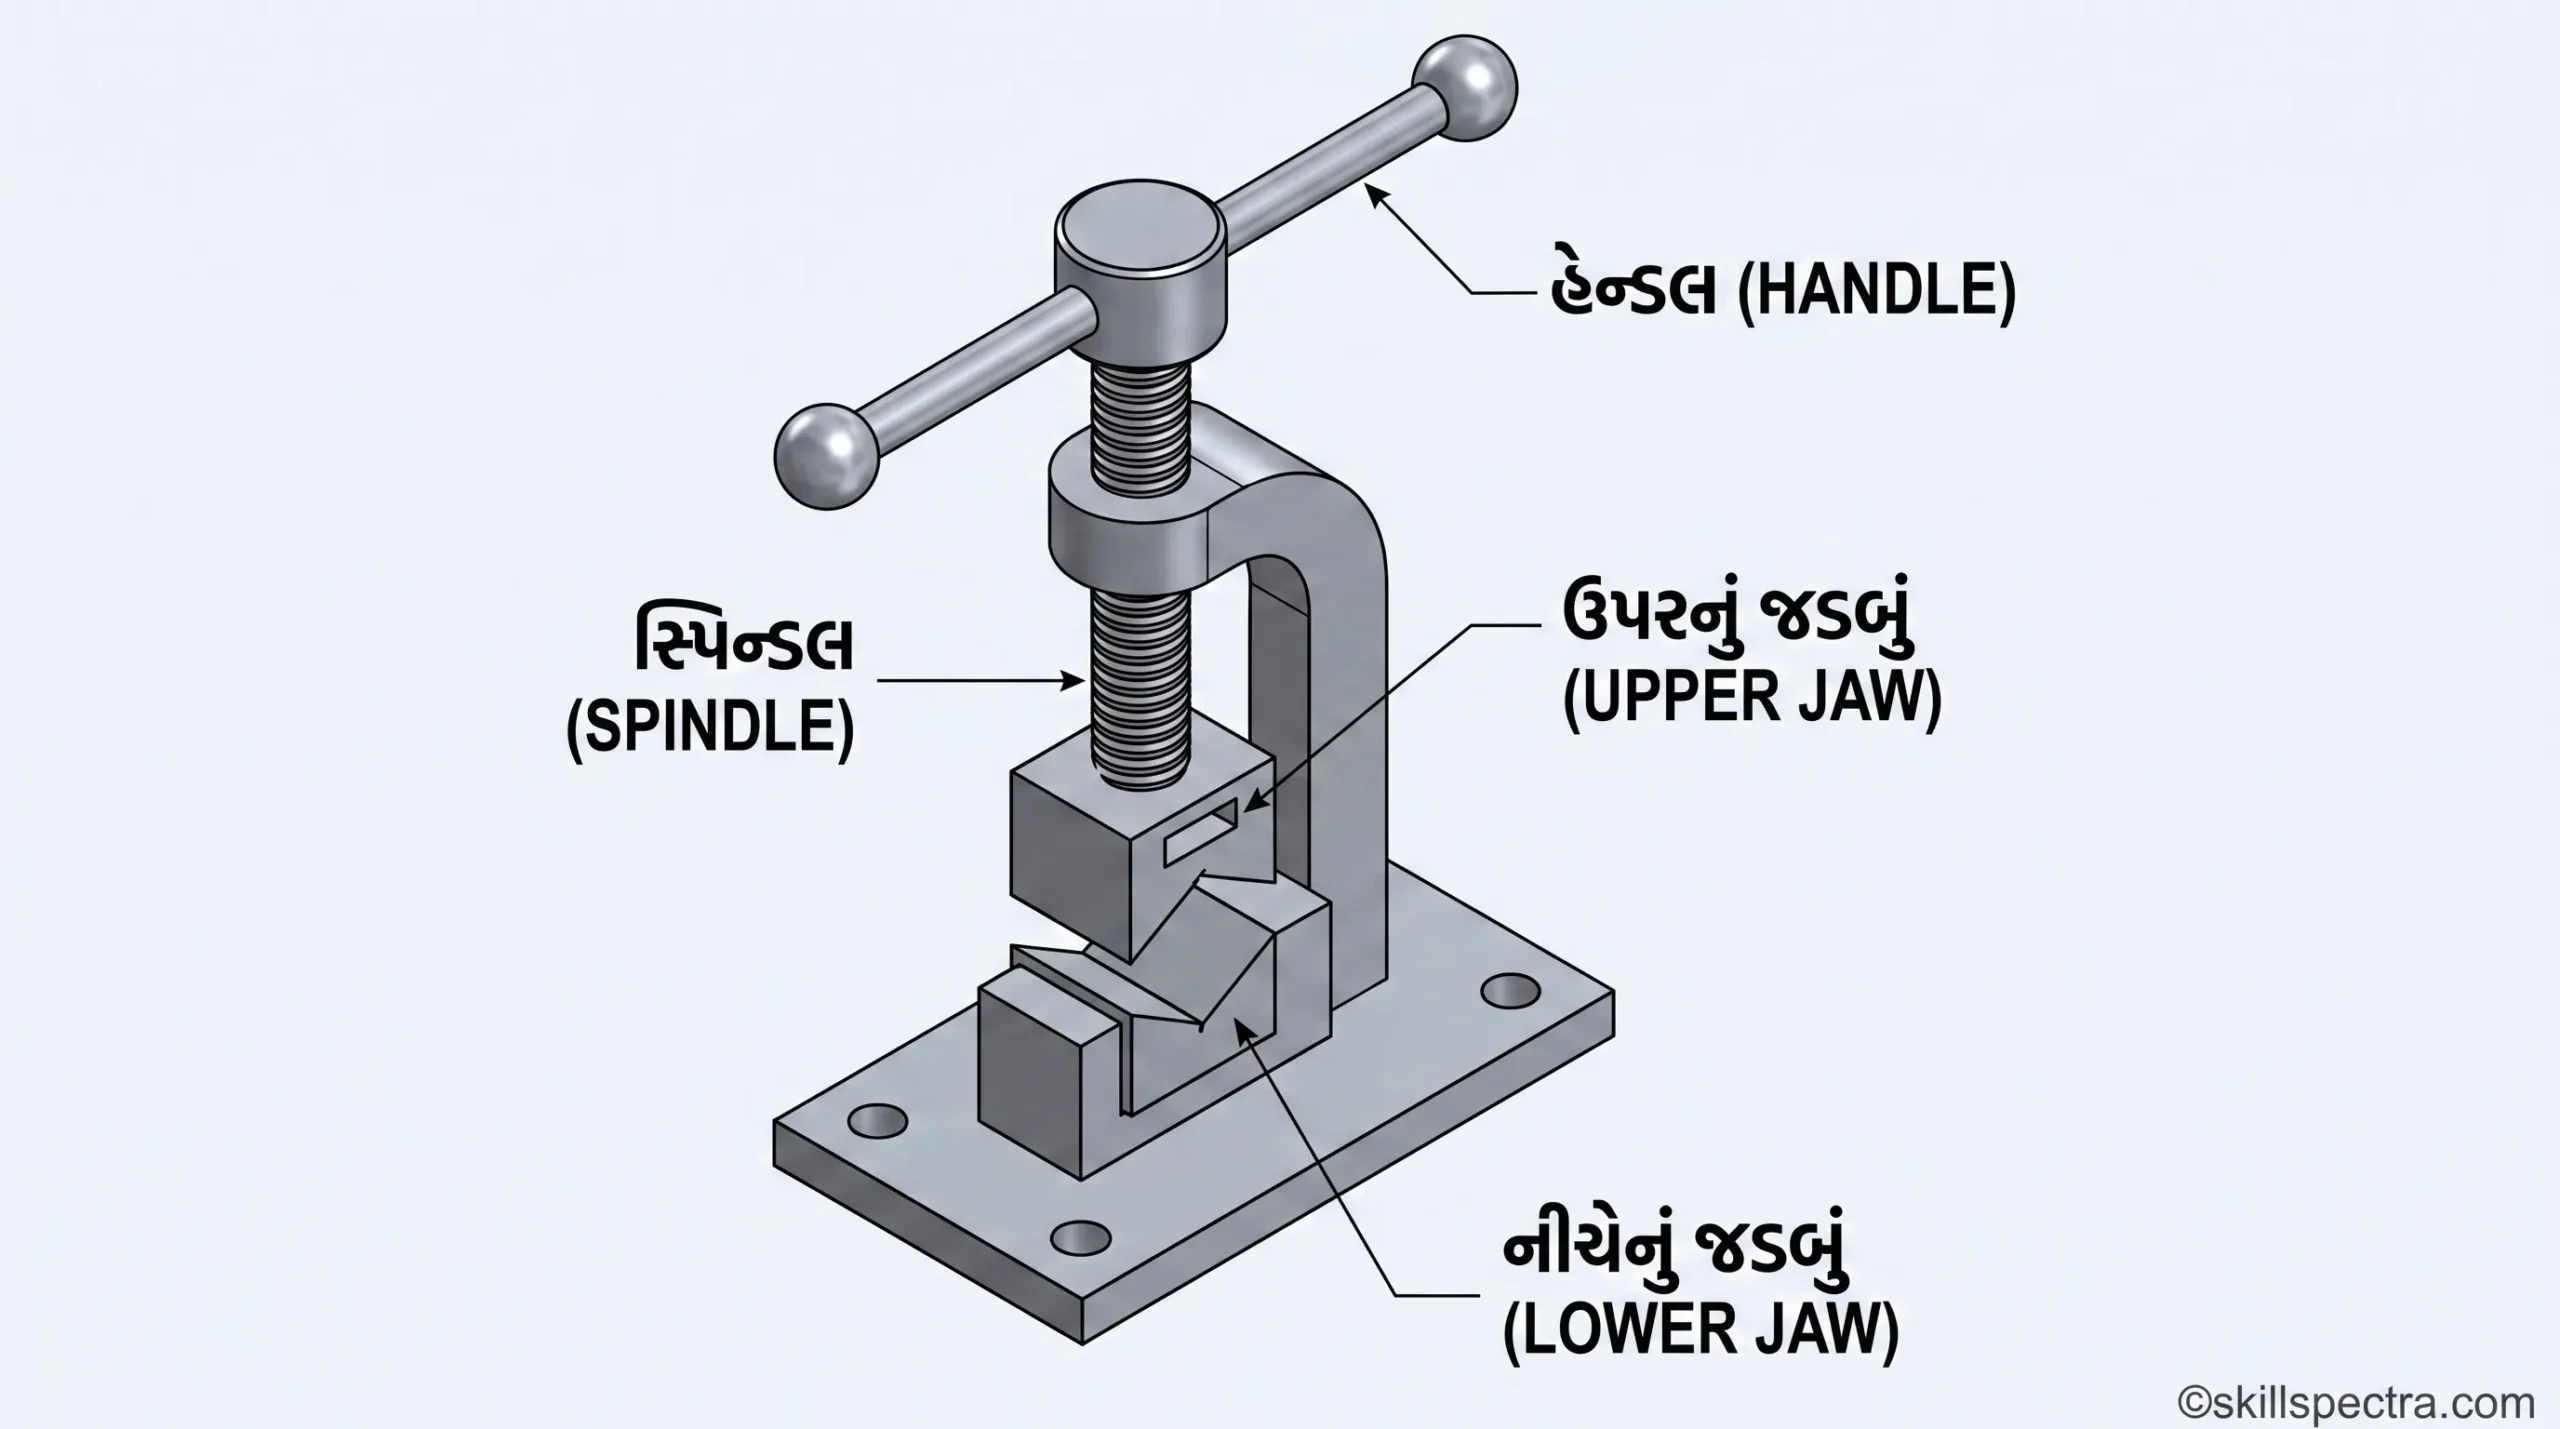
📐 5. Toolmaker’s vice (Fig 5)
Toolmaker’s vice નો ઉપયોગ એવા નાના કામો (small jobs) માટે થાય છે જેમાં filing, drilling કે marking કરવાની જરૂર હોય.
- આ vice નો ઉપયોગ ખાસ કરીને surface plate પર રાખીને કરવામાં આવે છે.
- આ vice mild steel માંથી બનેલું હોય છે અને તે ખૂબ જ accurately machined (ચોકસાઈપૂર્વક બનાવેલું) હોય છે.
📚 Summary Table (સારાંશ)
| Vice નો પ્રકાર | મુખ્ય ઉપયોગ (Main Use) | ખાસિયત (Specialty) |
|---|---|---|
| Quick Releasing Vice | General work | Trigger થી ઝડપથી set થાય છે. |
| Pipe Vice | Round pipes & sections | 4-point grip, vertical screw. |
| Hand Vice | Small objects (rivets, keys) | Wing nut થી ઓપરેટ થાય છે. |
| Pin Vice | Very small diameter jobs | Collet chuck નો ઉપયોગ થાય છે. |
| Toolmaker’s Vice | Precision filing/marking | Mild steel, highly accurate. |
🗝️ Keywords:
- Types of Vice in Gujarati
- Mechanic Diesel ITI Lessons
- Workshop Tools Explanation
- Quick Releasing Vice Advantages
- Pipe Vice vs Hand Vice
- ITI Engineering Drawing and Theory Gujarati
- Mechanical Tools Guide Gujarati
- Vice construction and uses
🛠️ C- Clamps and Toolmaker’s Clamps: Complete Guide for Mechanic Diesel
નમસ્તે વિદ્યાર્થી મિત્રો! આજના આ લેસનમાં આપણે વર્કશોપમાં વપરાતા ખૂબ જ મહત્વના સાધનો એટલે કે Clamps વિશે શીખીશું. જ્યારે આપણે કોઈ job પર કામ કરતા હોઈએ ત્યારે તેને મજબૂતીથી પકડી રાખવા માટે Clamps નો ઉપયોગ થાય છે.
🎯 Objectives (આ પાઠના મુખ્ય હેતુઓ):
આ લેસનના અંતે તમે આ બાબતો શીખી શકશો:
- Purpose of using clamps: ક્લેમ્પ્સ વાપરવાનો હેતુ શું છે?
- Requirements of clamping devices: ક્લેમ્પિંગ ડિવાઇસમાં કયા ગુણો હોવા જોઈએ?
- Features and uses of ‘C’ clamps: ‘C’ ક્લેમ્પ્સના લક્ષણો અને તેના ઉપયોગો.
- Features of Toolmaker’s clamps: ટૂલમેકર ક્લેમ્પ્સના ખાસ ફીચર્સ.
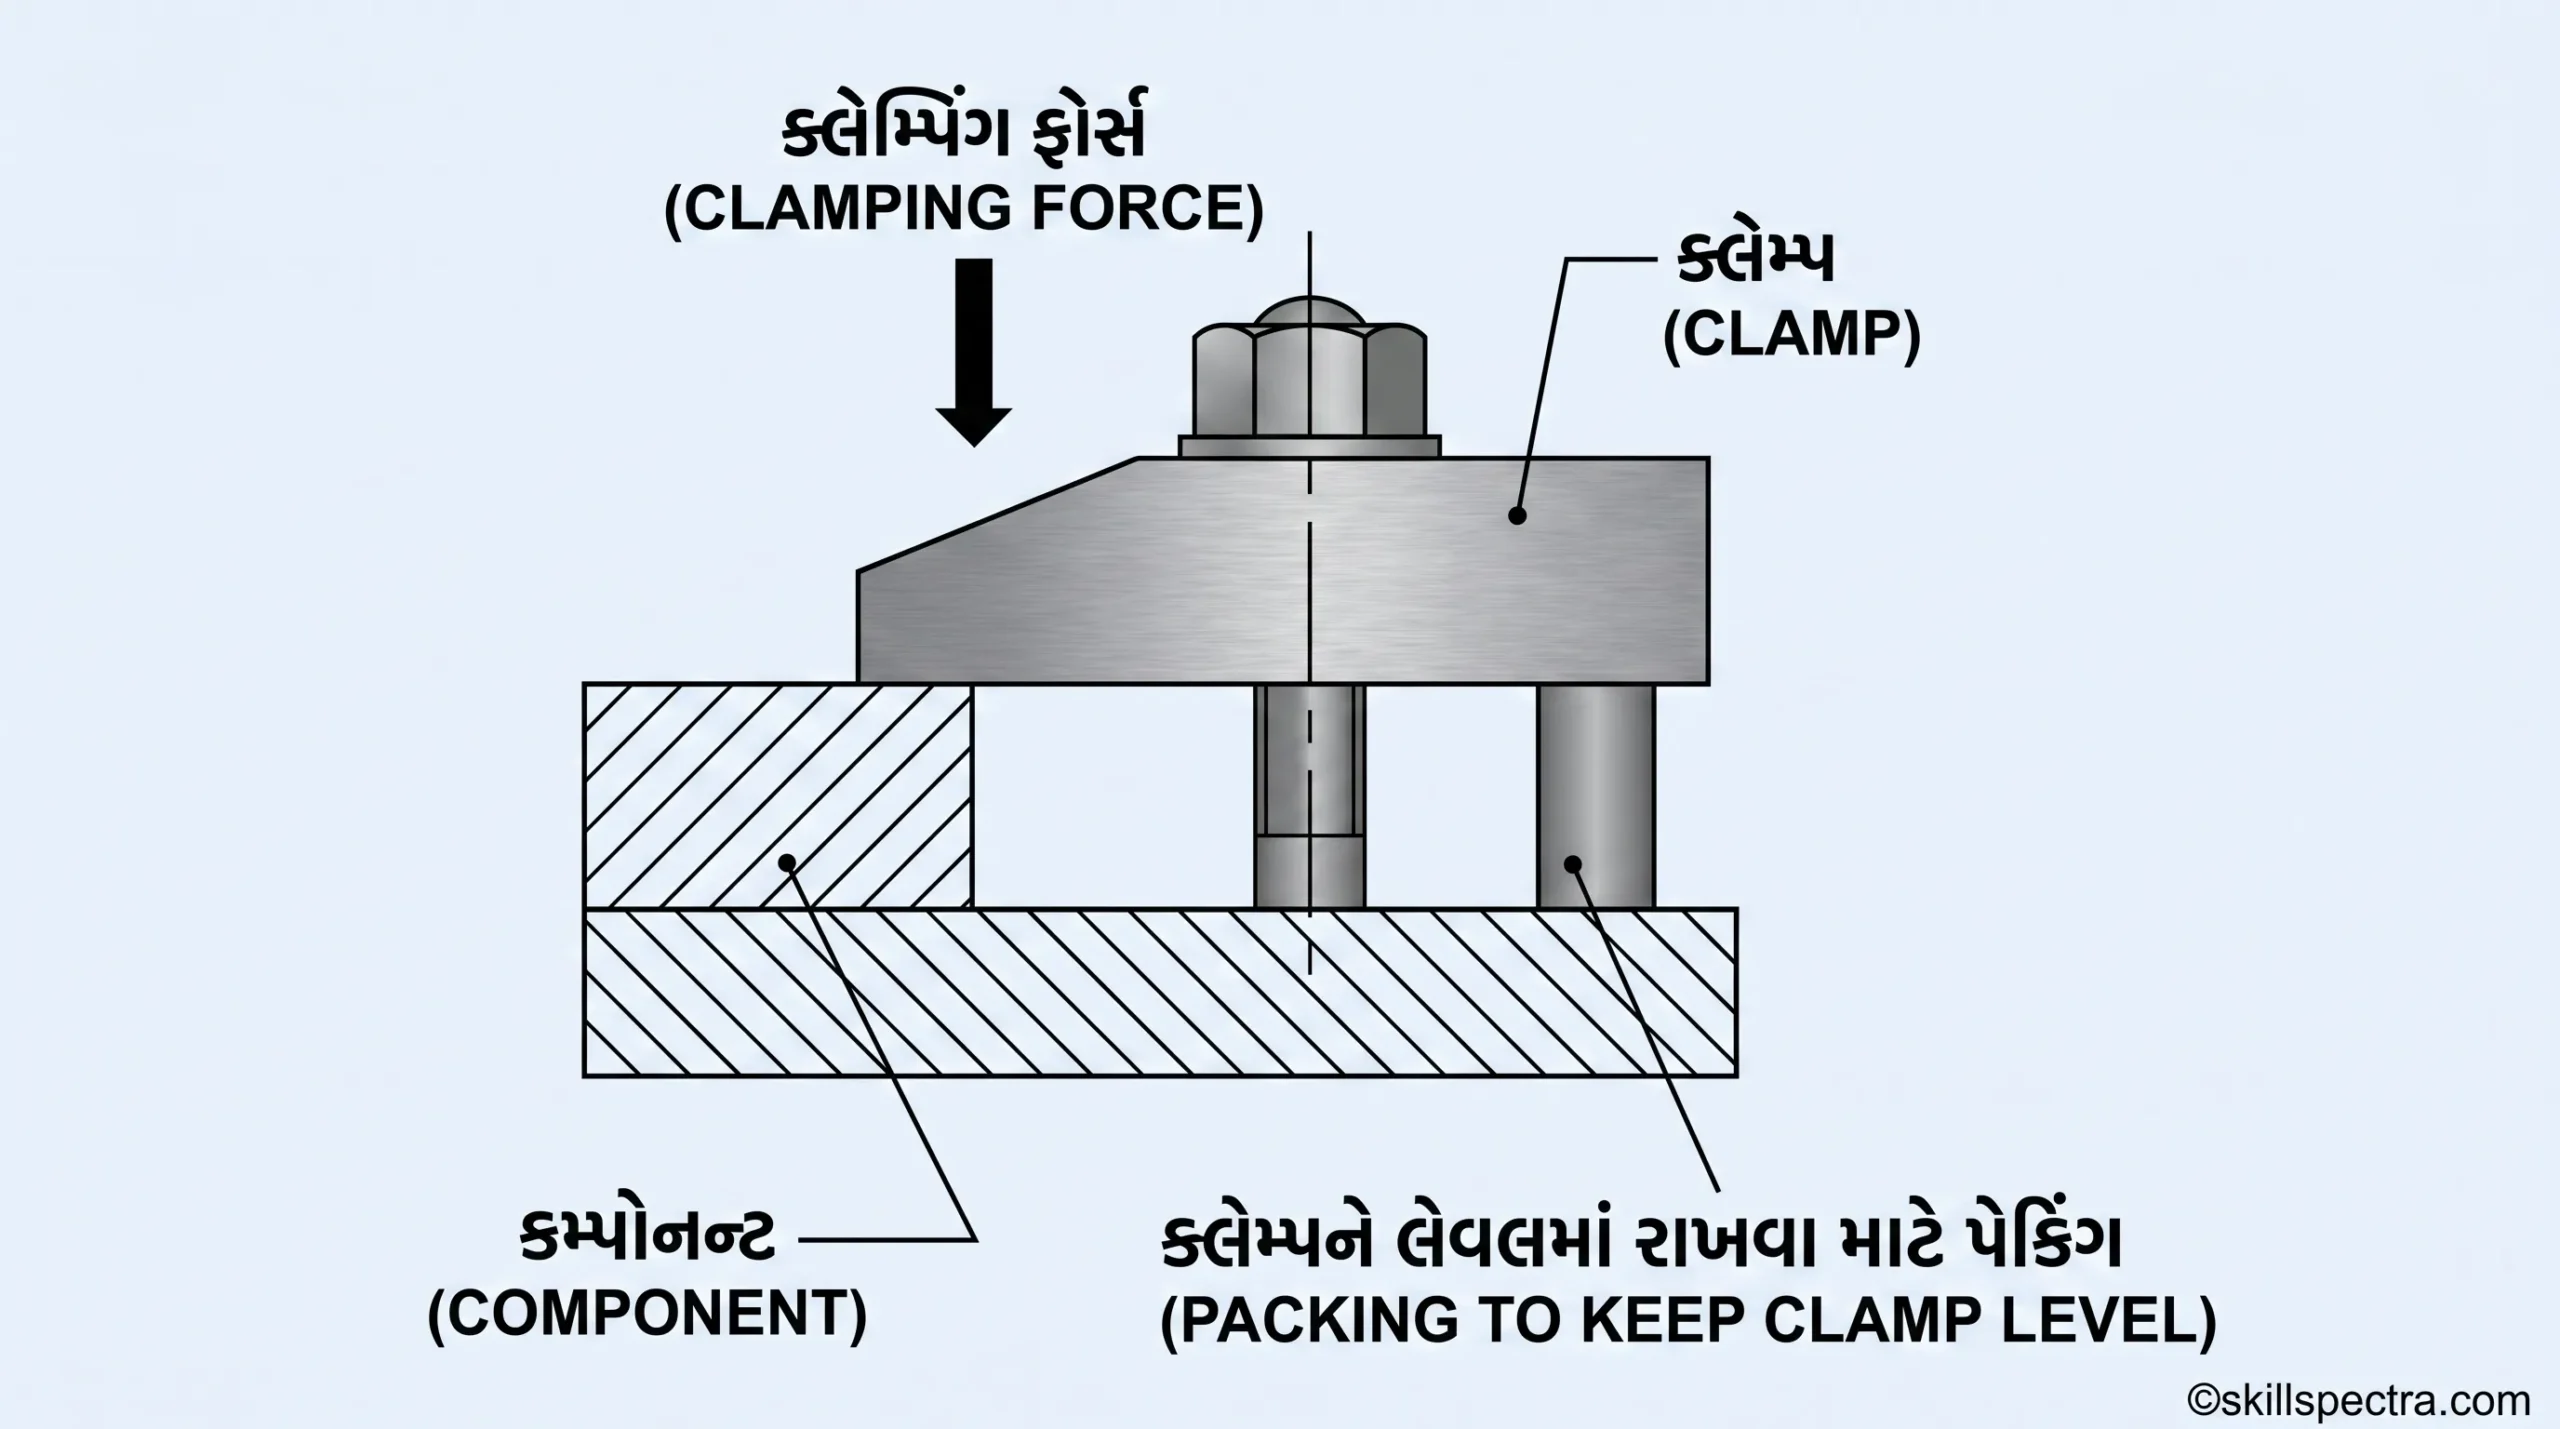
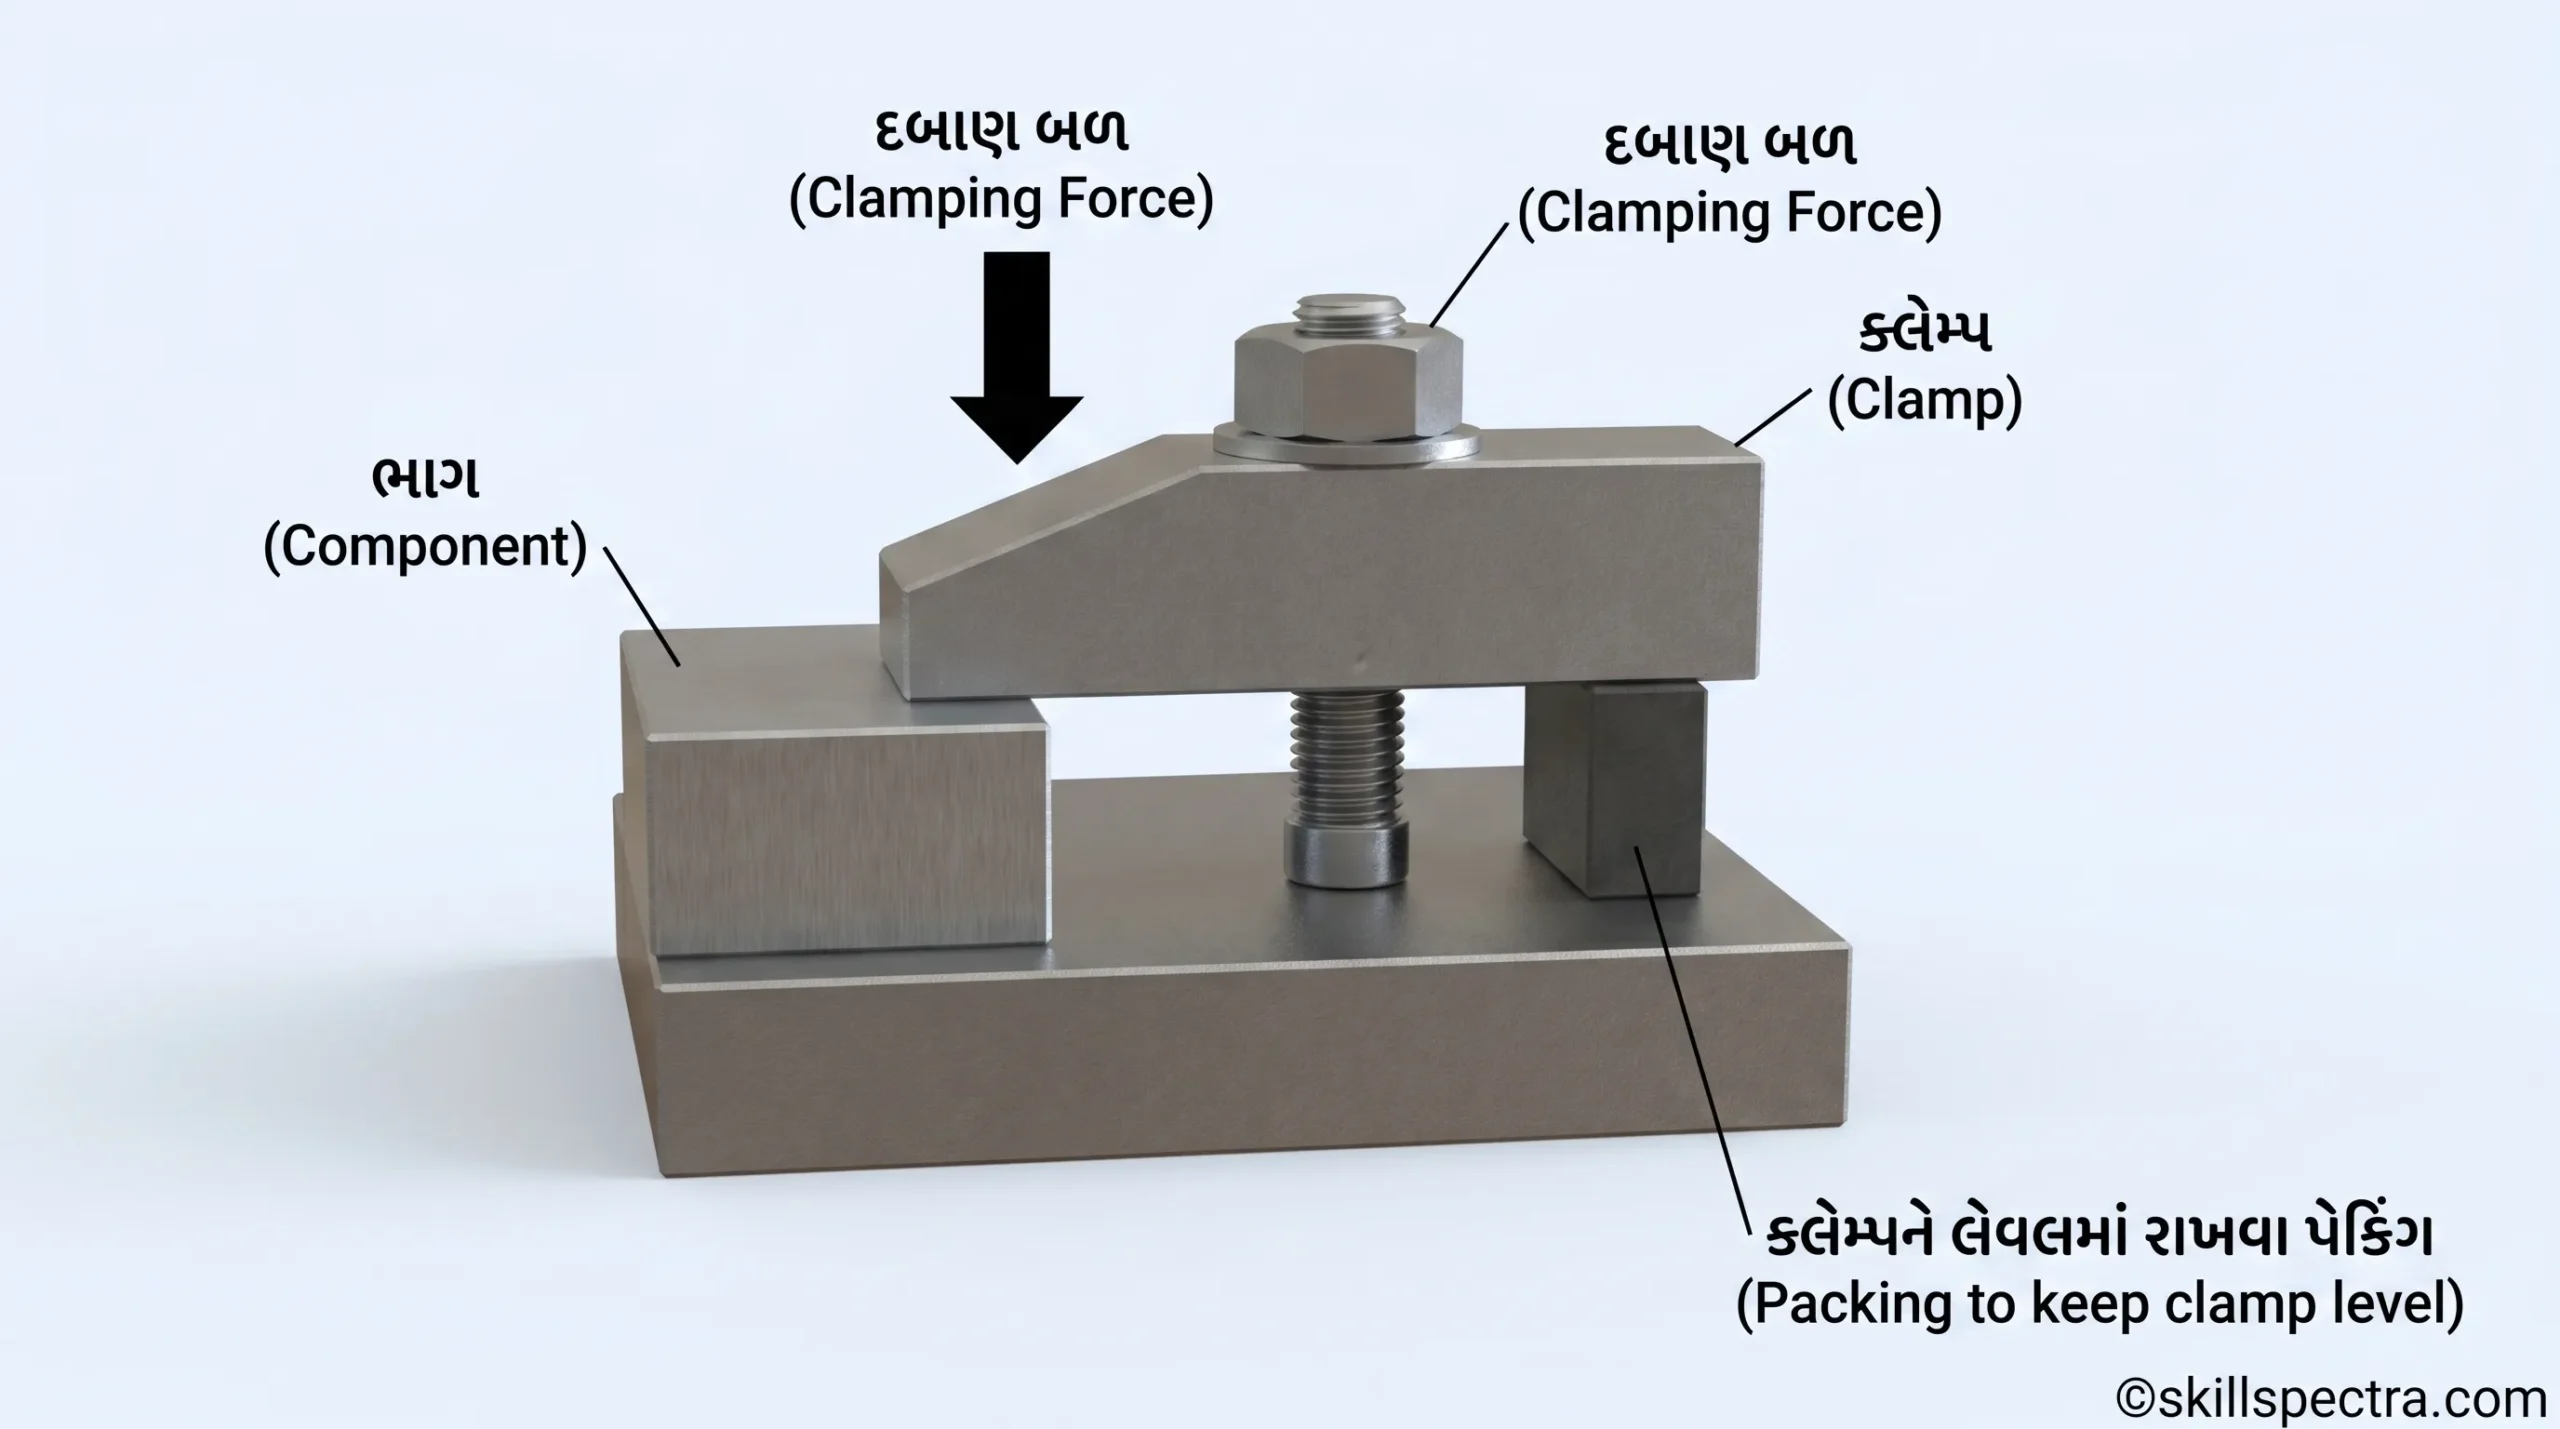
📌 Purpose of using clamps (ક્લેમ્પ્સ વાપરવાનો હેતુ)
Clamps નો ઉપયોગ work (જોબ) ની movement (હલનચલન) ને અટકાવવા માટે અને job ને મજબૂતીથી (tightly) પકડી રાખવા માટે કરવામાં આવે છે. 🗜️
⚙️ Requirements of clamping devices (ક્લેમ્પિંગ ડિવાઇસની જરૂરિયાતો)
કોઈપણ સારા ક્લેમ્પિંગ ડિવાઇસમાં નીચે મુજબની ખૂબીઓ હોવી જોઈએ:
- તે Easy loading (જોબ ચઢાવવા-ઉતારવા) માટે સક્ષમ હોવું જોઈએ.
- તે જરૂરી Clamping force (પકડવાનું દબાણ) પૂરું પાડતું હોવું જોઈએ.
- તે Minimum movement સાથે lock થવા માટે સક્ષમ હોવું જોઈએ.
- તે અલગ-અલગ range of sizes (વિવિધ માપના જોબ) ને સમાવી શકવું જોઈએ.
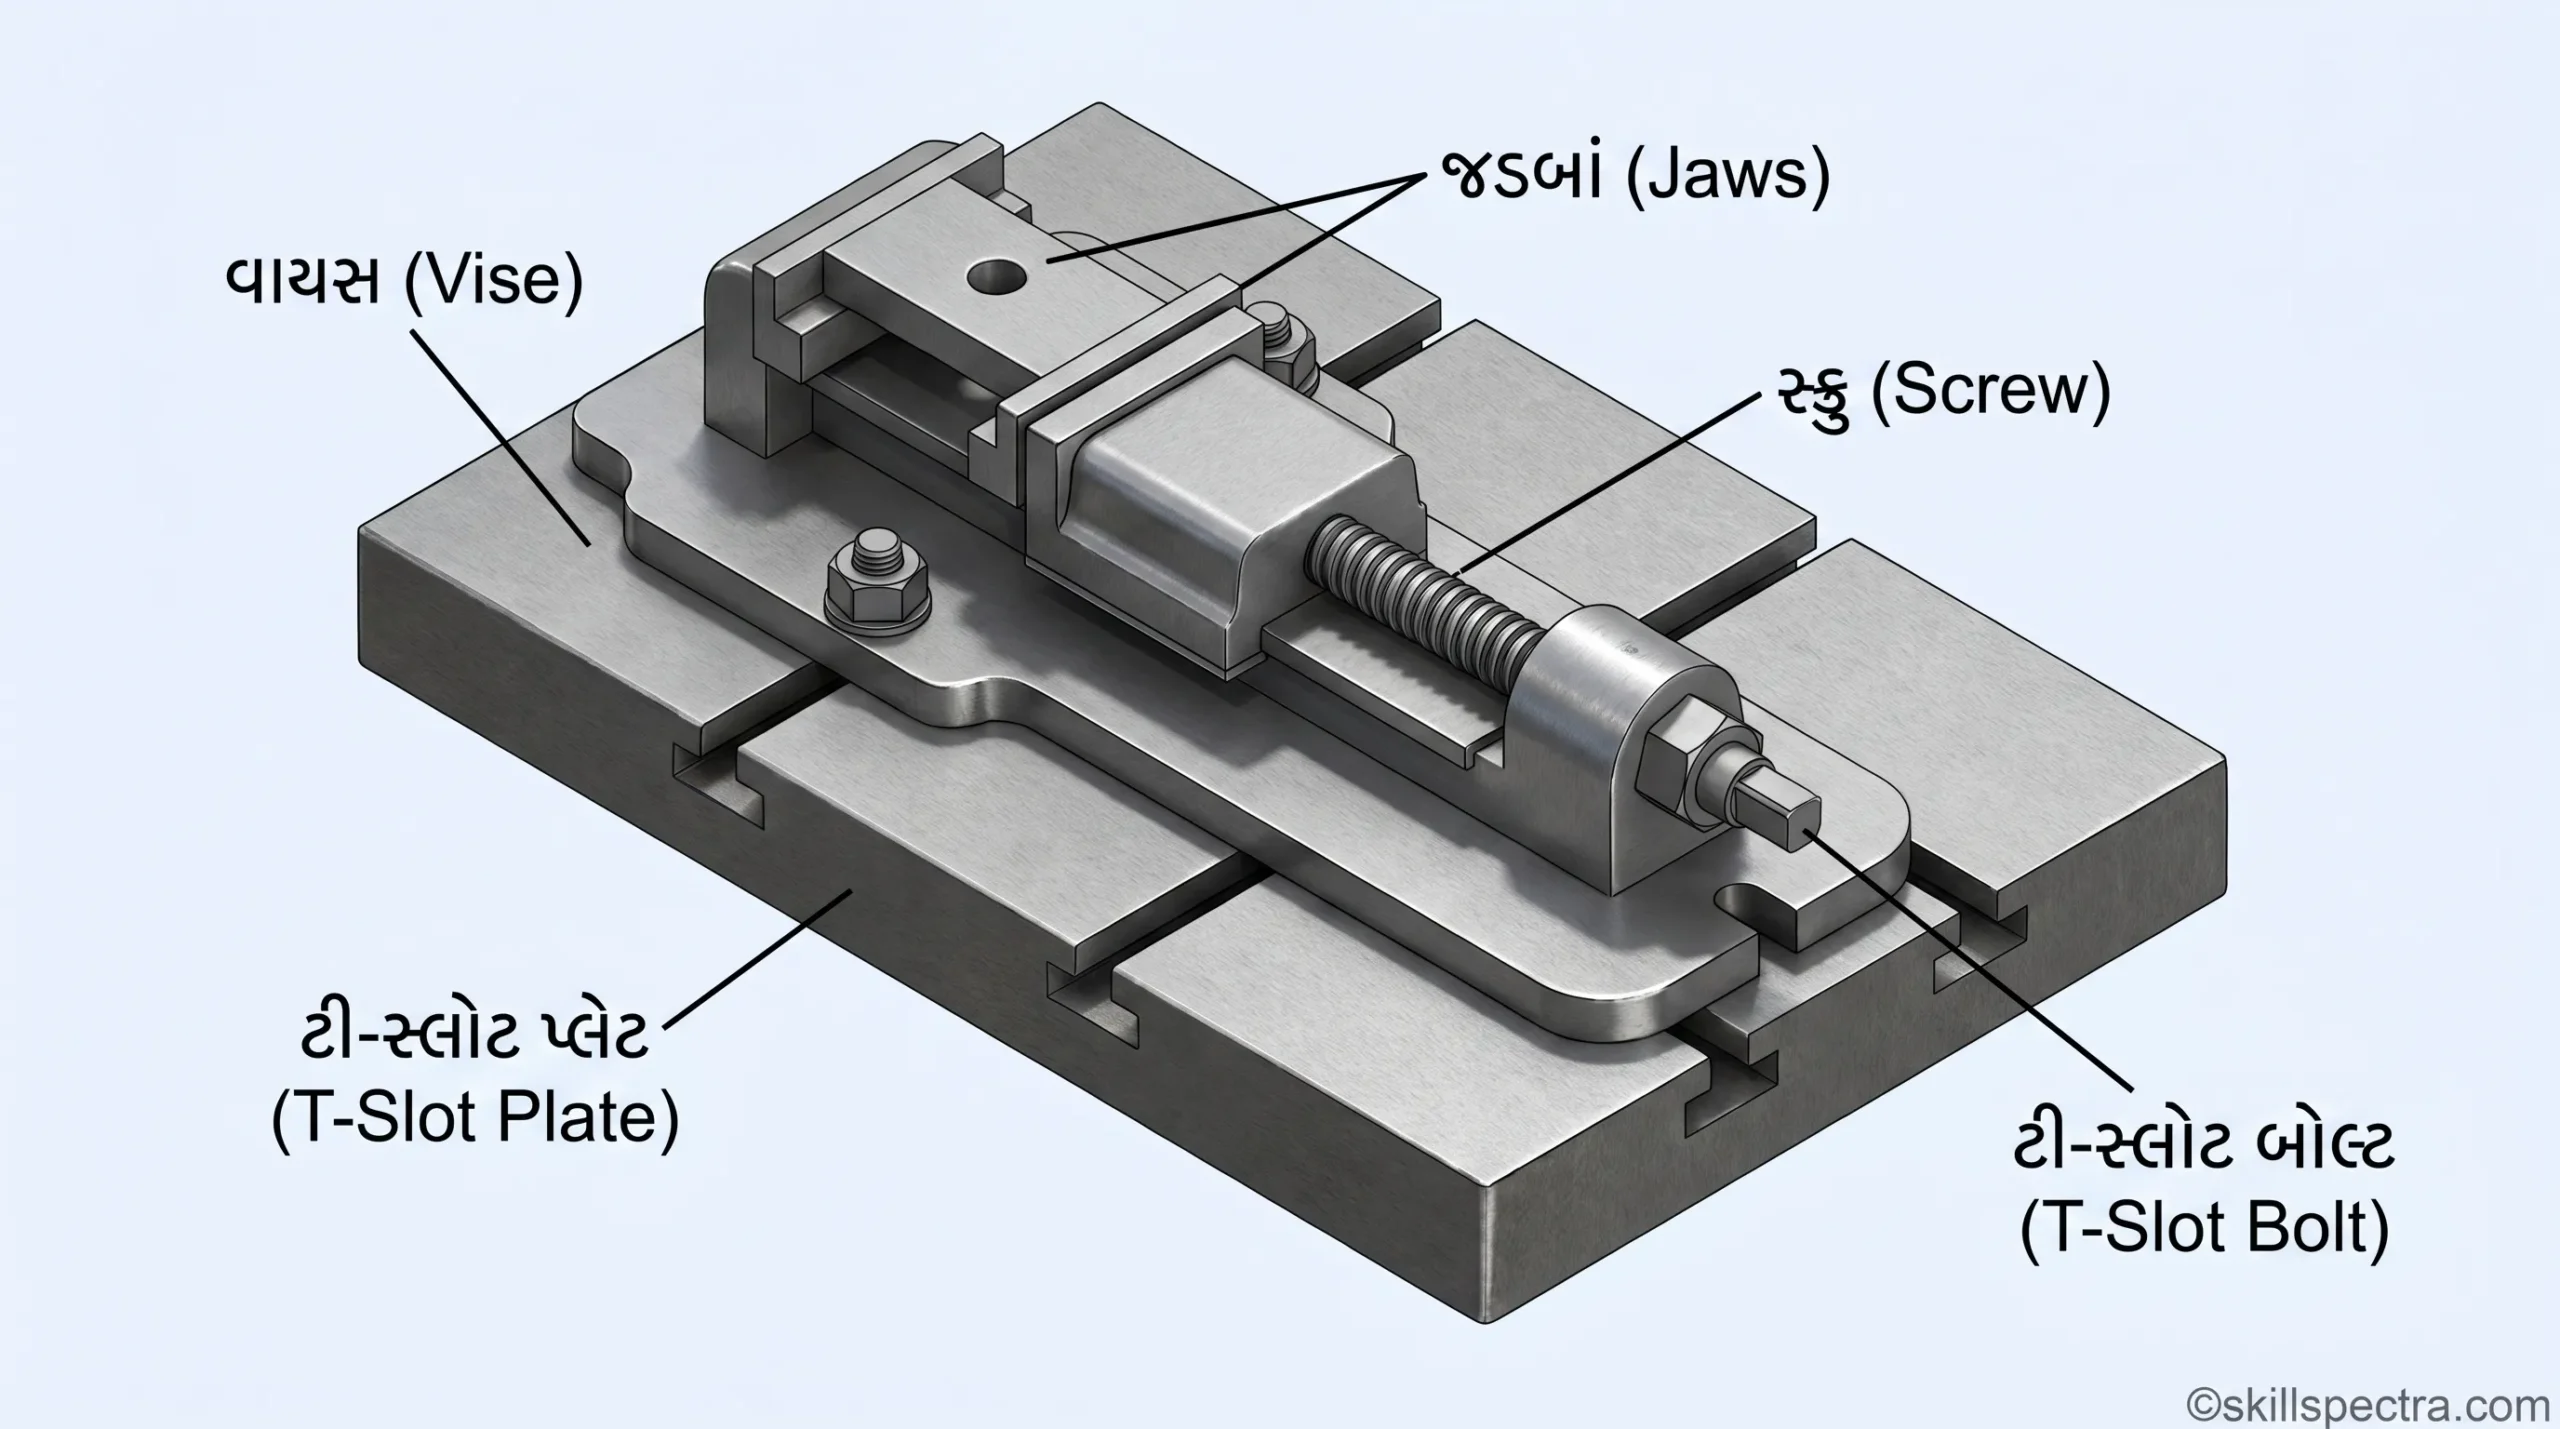
(Fig 1) માં એક સામાન્ય ક્લેમ્પિંગ ડિવાઇસ બતાવ્યું છે, જેમાં clamping force મેળવવા માટે screw and nut નો ઉપયોગ થાય છે.
🔧 ‘C’ Clamps (C-ક્લેમ્પ્સ)
આ ક્લેમ્પ્સનો આકાર અંગ્રેજી અક્ષર ‘C’ જેવો હોય છે.
- Body: તેની બોડી forged અથવા cast કરેલી હોય છે.
- End: તેનો એક છેડો machined flat (સપાટ) કરેલો હોય છે.
- Screw-rod: બીજા છેડે hole કરીને તેમાં આંટા (threaded) પાડેલા હોય છે જેથી screw-rod લગાવી શકાય, જે handle દ્વારા ઓપરેટ થાય છે.
- Swivel Pad: Screw-rod ના છેડે એક swivel pad હોય છે જે મુક્ત રીતે ફરી શકે છે (free to revolve).
- Serrated Face: ક્લેમ્પને harden કરવામાં આવે છે અને તેની સપાટી (face) serrated (ખરબચડી) હોય છે જેથી પકડ મજબૂત રહે. (Fig 2)

💡 ‘C’ Clamps ના ઉપયોગો:
- આ ક્લેમ્પ્સનો ઉપયોગ Angle plate કે Drill press table પર કામ પકડવા માટે થાય છે.
- બે કે તેથી વધુ workpieces ને એકસાથે પકડી રાખવા માટે પણ તે વપરાય છે.
- Swivel pad ને લીધે જે સપાટીઓ સમાંતર (not parallel) નથી, ત્યાં પણ આસાનીથી ક્લેમ્પિંગ કરી શકાય છે.
- તે Light and heavy duty (હળવા અને ભારે કામ) બંને માટે ઉપલબ્ધ છે.
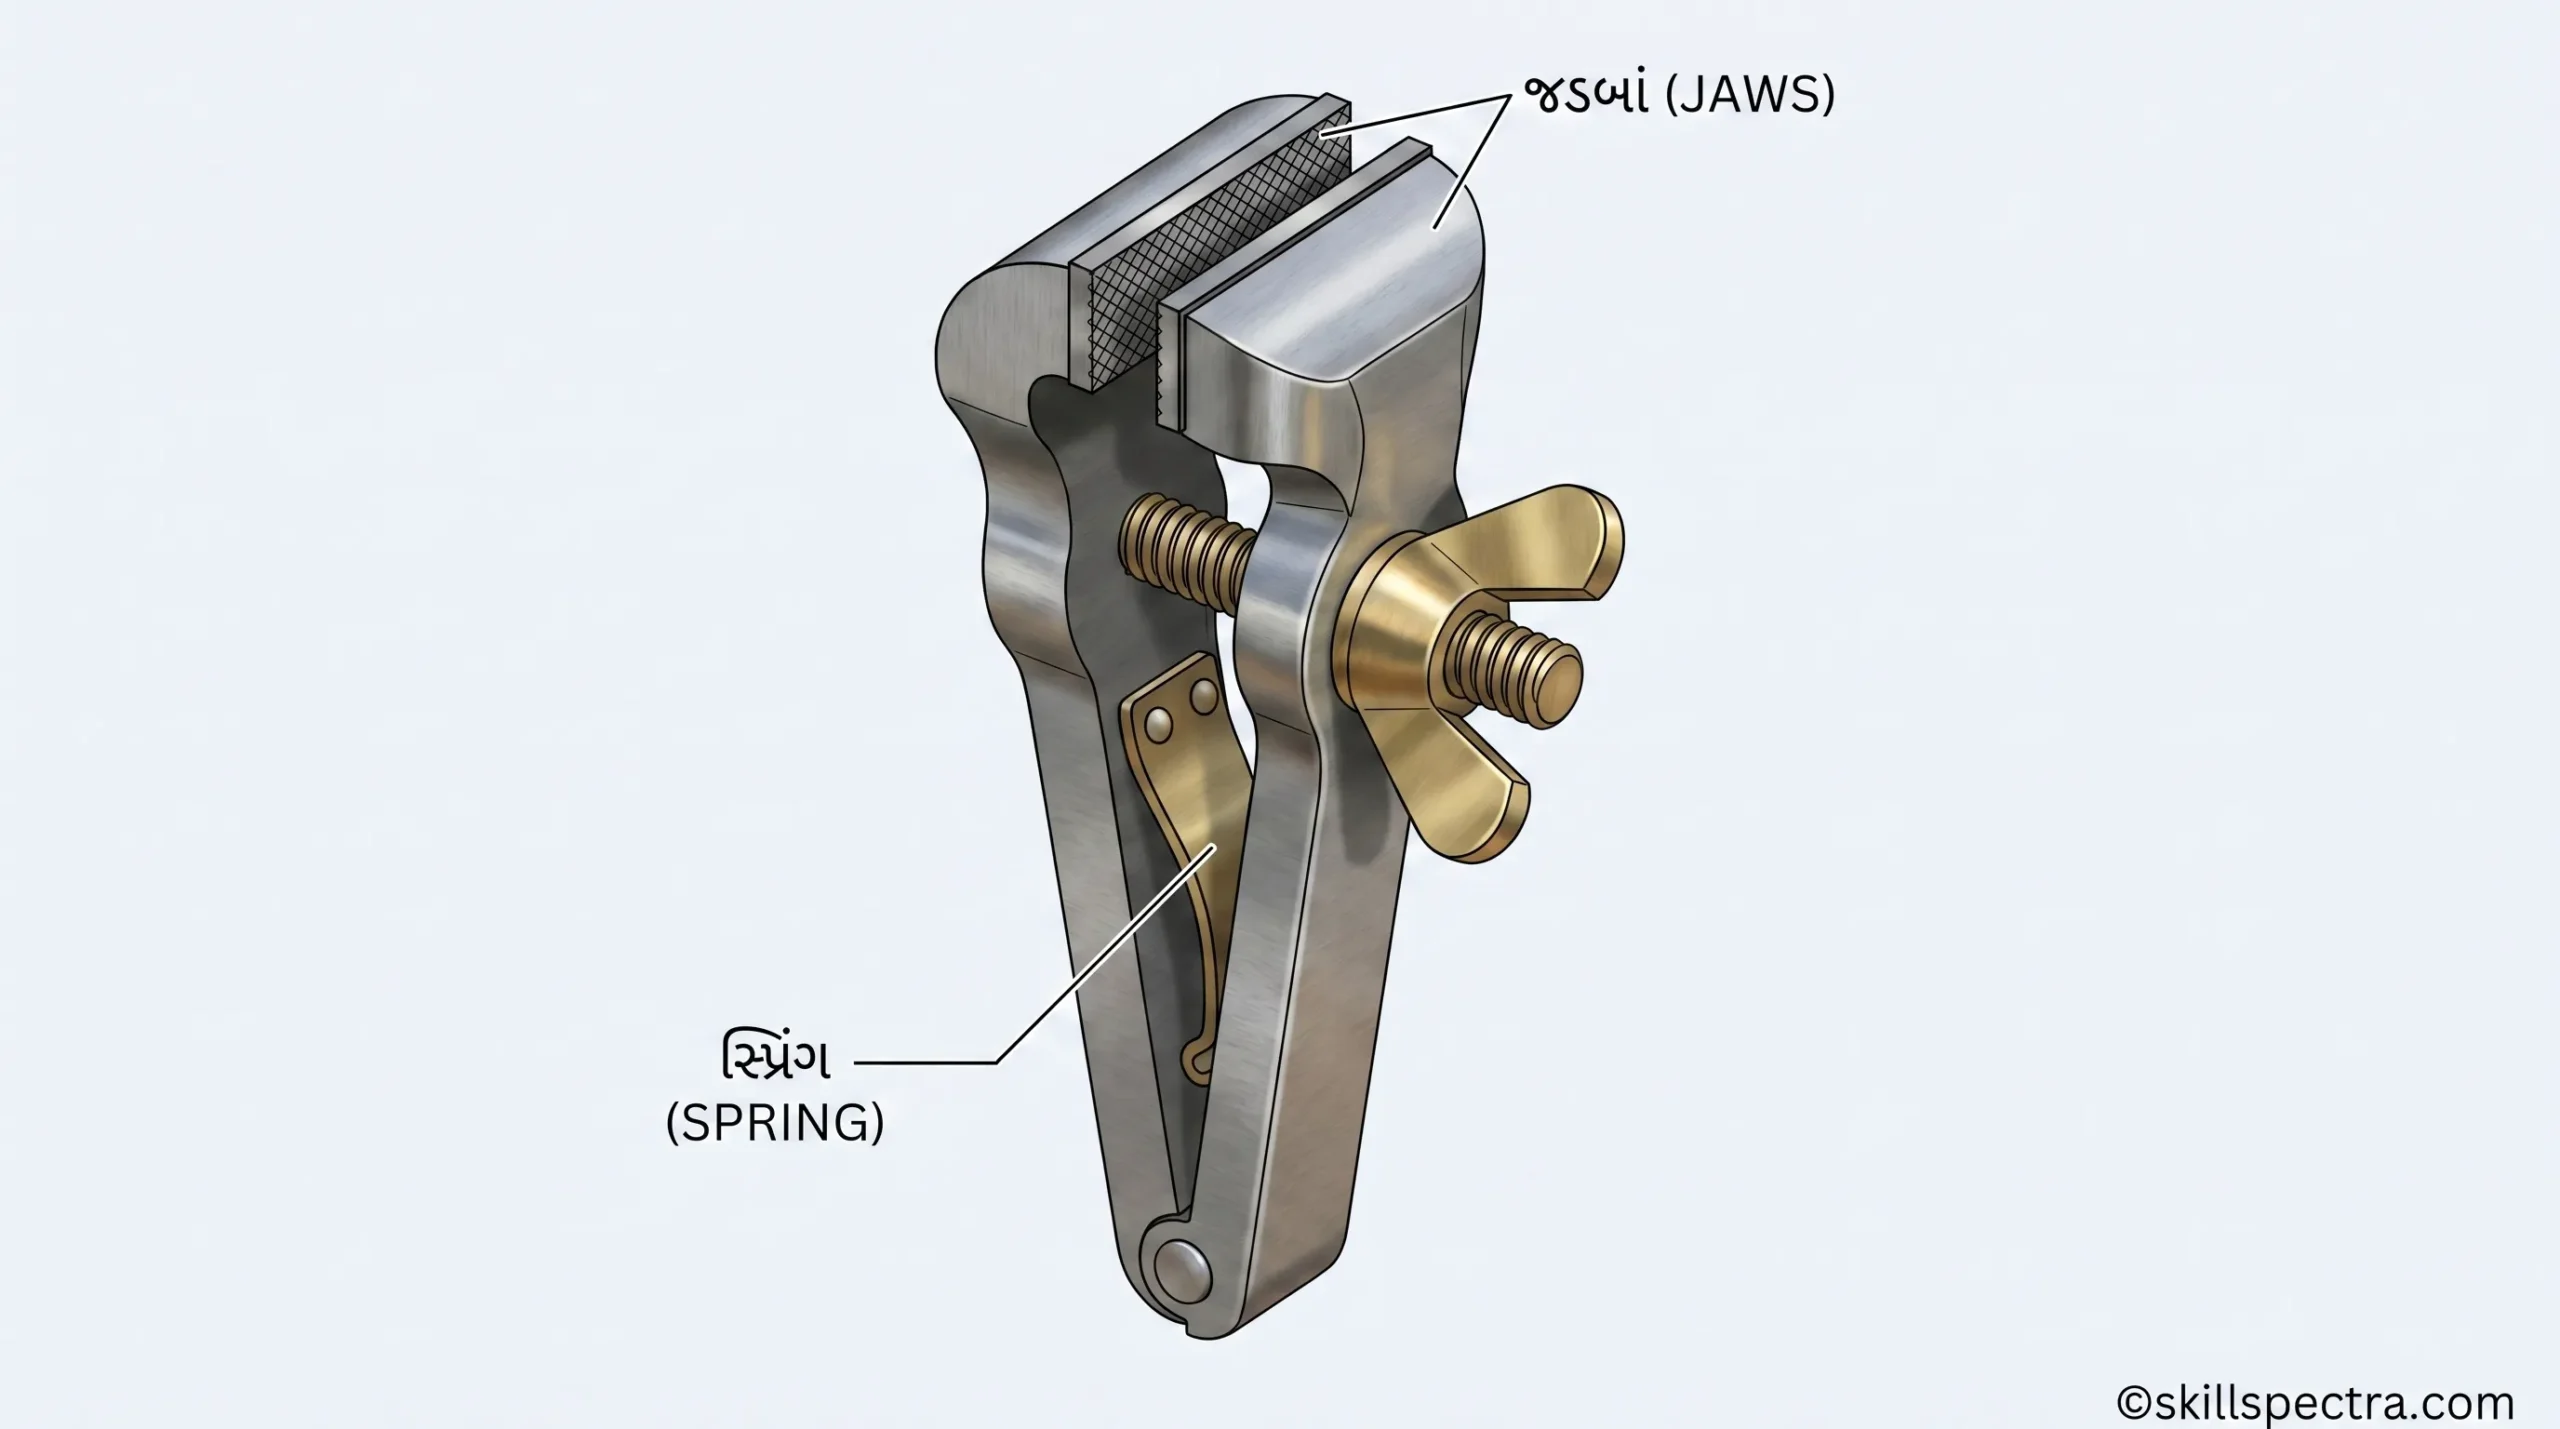
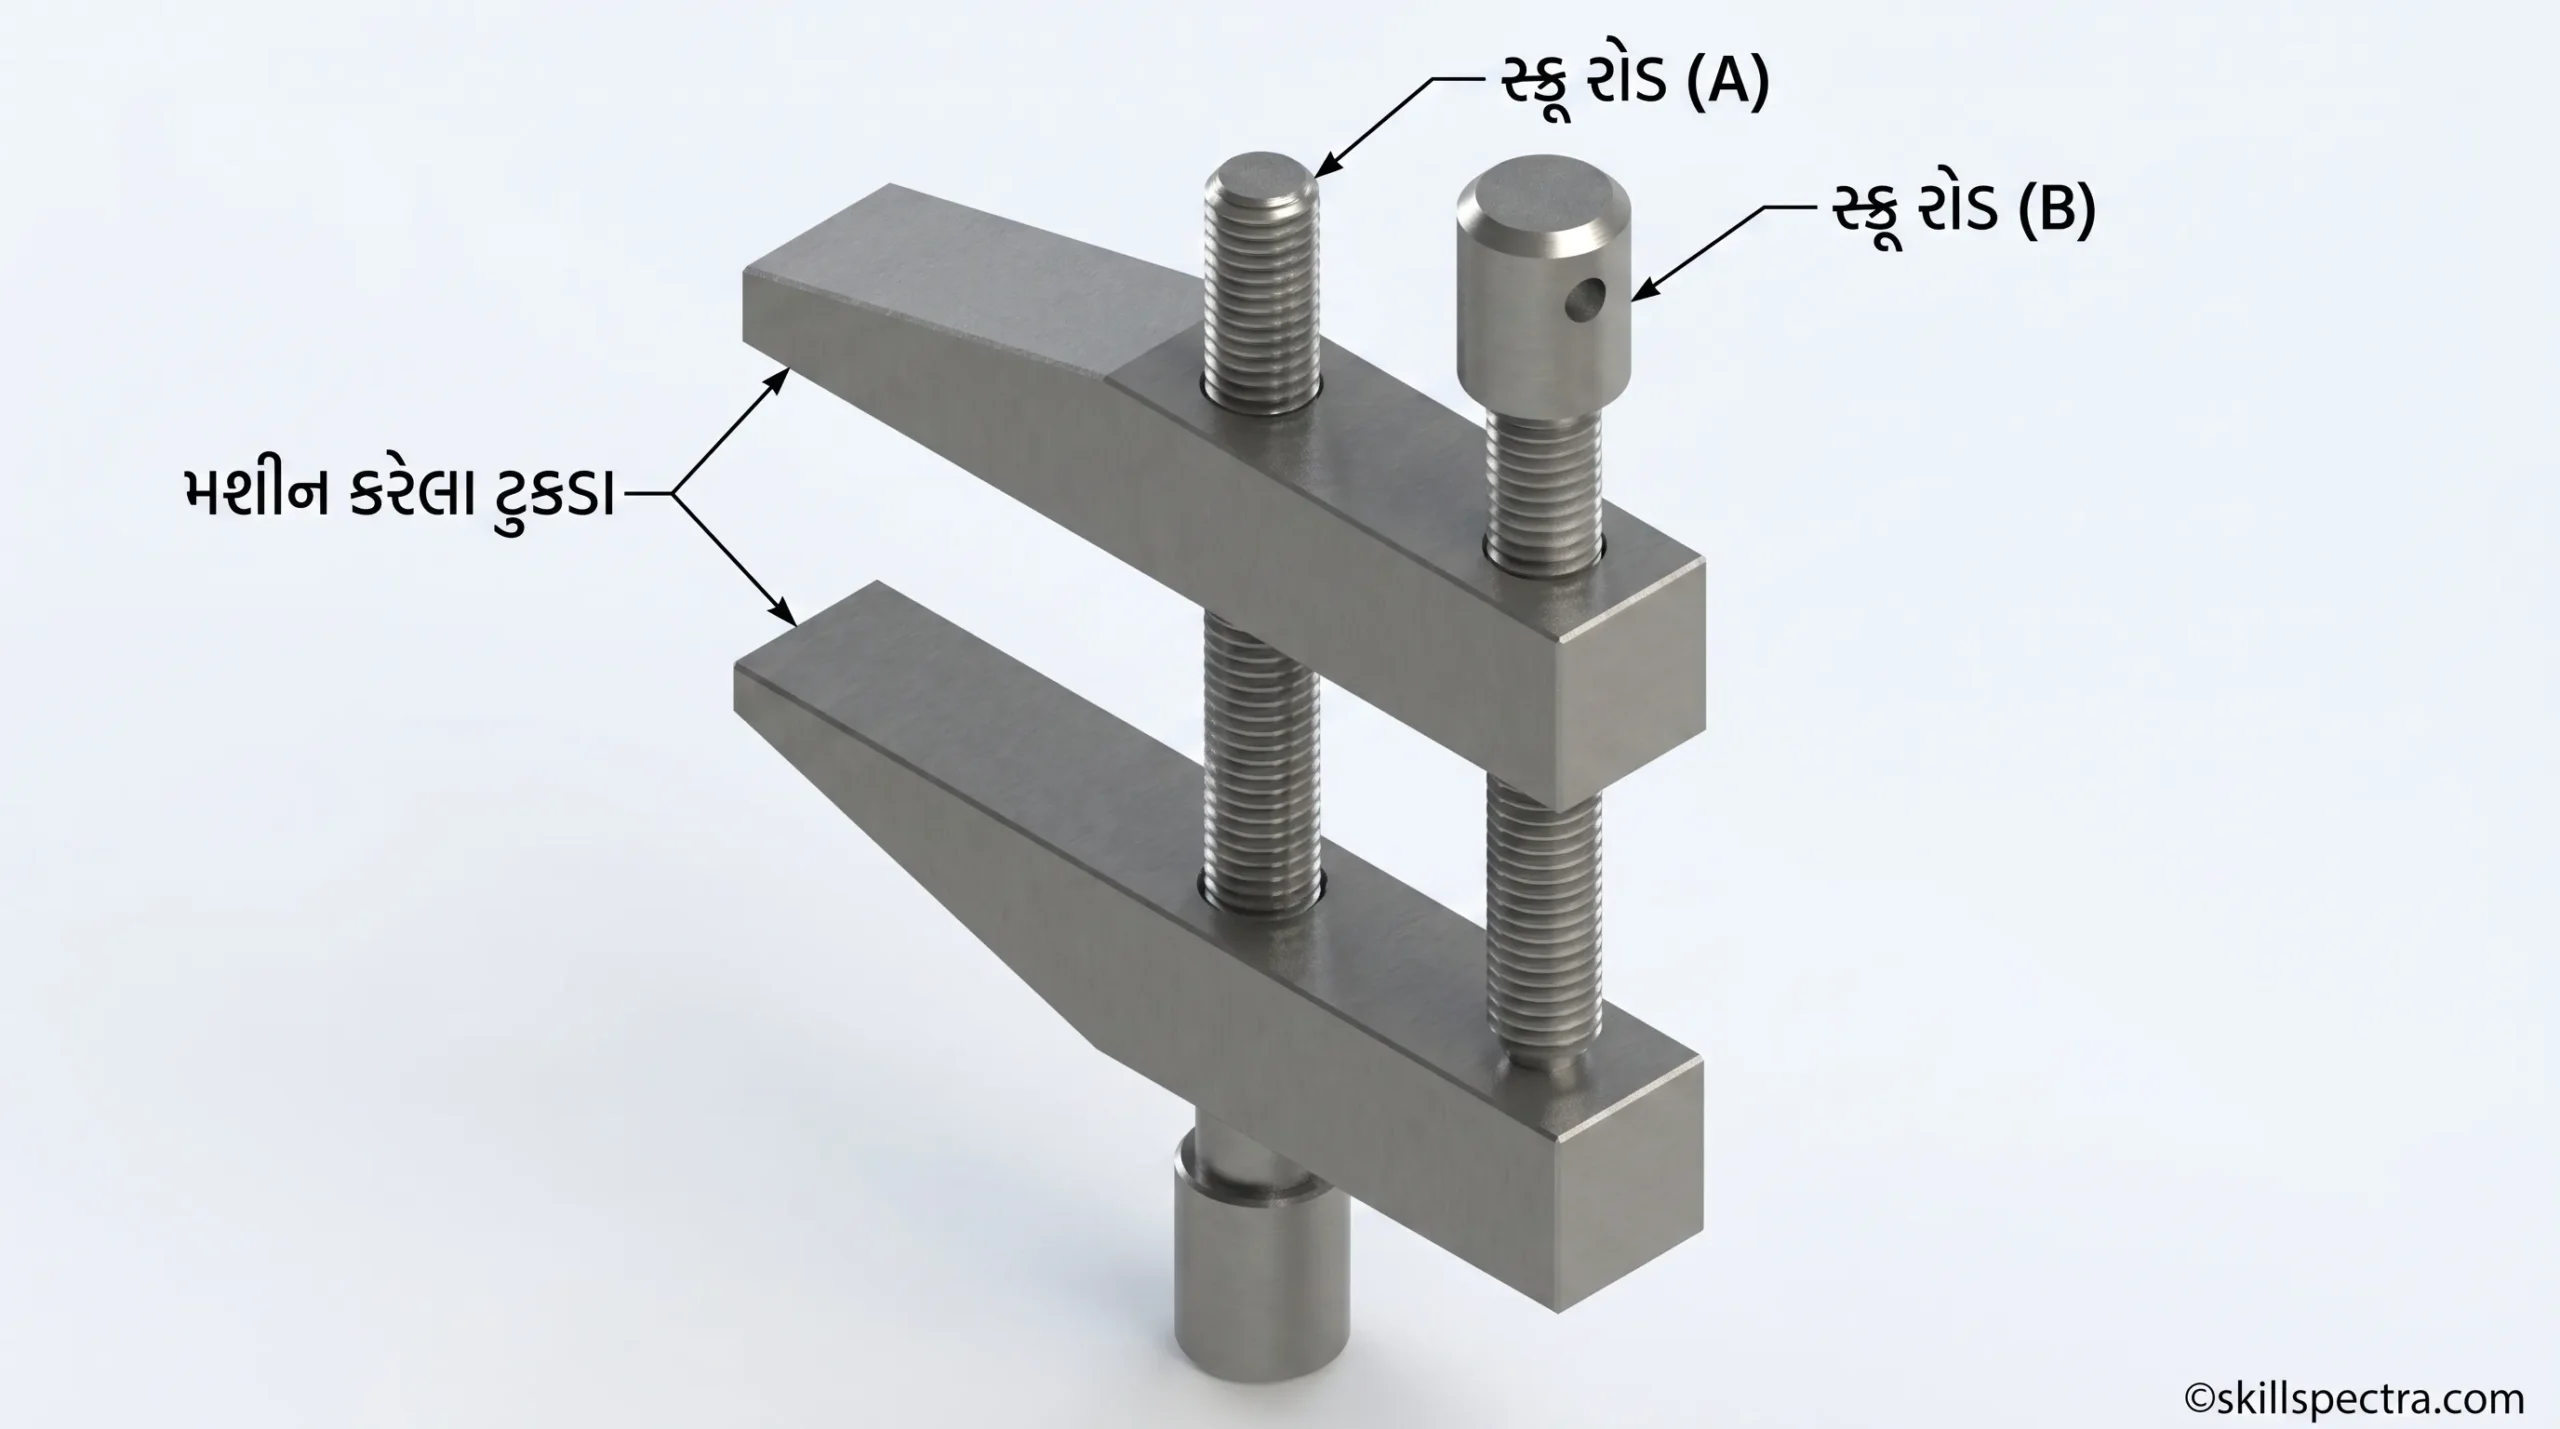
🛠️ Toolmaker’s Clamps (ટૂલમેકર ક્લેમ્પ્સ)
આ પ્રકારના ક્લેમ્પ્સનો ઉપયોગ મુખ્યત્વે Toolmakers દ્વારા નાના, મશીનિંગ કરેલા સપાટ ટુકડાઓને પકડી રાખવા માટે થાય છે. 📐
- Construction: આમાં બે લંબચોરસ સ્ટીલના ટુકડા (rectangular pieces of steel) હોય છે જે સચોટ રીતે મશીનિંગ કરેલા હોય છે.
- Inner faces: તેની અંદરની સપાટીઓ એકબીજાને એકદમ સમાંતર (perfectly parallel) હોય છે.
- Threaded rods: આ ક્લેમ્પ બે threaded rods દ્વારા એસેમ્બલ થયેલા હોય છે.
- Screw-rod (A): બે હોલ્ડિંગ ફેસ વચ્ચેનો ગેપ (gap) એડજસ્ટ કરવા માટે તેને એક દિશામાં ફેરવવામાં આવે છે.
- Screw (B): જ્યારે તેને ટાઈટ કરવામાં આવે છે, ત્યારે તે જરૂરી pressure જાળવી રાખે છે. (Fig 3)
- Cylindrical Pin: Screw-rod (B) ના હેડ પર એક હોલ હોય છે, જેમાં cylindrical pin નાખીને તેને વધુ ટાઈટ કરી શકાય છે.
⚠️ નોંધ: Toolmaker’s clamp ભારે કામ (heavy operations) માટે યોગ્ય નથી કારણ કે તેનો કોન્ટેક્ટ એરિયા મર્યાદિત હોય છે. તે ફક્ત હળવા કામ (light jobs) માટે જ છે. તેને Parallel clamp તરીકે પણ ઓળખવામાં આવે છે.
🔗 ‘U’ Clamps (U-ક્લેમ્પ્સ)
આ ક્લેમ્પ્સનો ઉપયોગ ‘V’ Blocks ની સાથે accessory તરીકે થાય છે.
- આ ક્લેમ્પ્સનો મુખ્ય હેતુ ગોળ જોબ (round work) ને ‘V’ ગ્રુવમાં સુરક્ષિત રીતે પકડી રાખવાનો છે.
- તેનો ઉપયોગ Layout operations અને Machining operations દરમિયાન થાય છે.
✅ Keywords:
આ બ્લોગ પોસ્ટ કે લેસન માટે નીચેના કીવર્ડ્સ વાપરો:
- C-Clamps Gujarati guide
- Toolmaker’s clamps features
- Mechanic Diesel clamping devices
- What is C-clamp used for?
- Parallel clamp vs C-clamp
- Workshop tools in Gujarati and English
- ITT Mechanic Diesel Theory Exercise 1.2.09-11
- Types of Clamps for Engineering
Spanners and Their Uses (સ્પાનર્સ અને તેનો ઉપયોગ) 🛠️
Objectives (ઉદ્દેશ્યો):
આ લેસનના અંતે તમે નીચેની બાબતો શીખી શકશો:
- State the necessity of spanners: સ્પાનર્સની જરૂરિયાત જણાવવી.
- Identify the different types of spanners: વિવિધ પ્રકારના સ્પાનર્સને ઓળખવા.
- Specify the spanners: સ્પાનર્સનું સ્પષ્ટીકરણ (specification) કરવું.
- List out the parts of adjustable spanners: એડજસ્ટેબલ સ્પાનર્સના ભાગોની યાદી બનાવવી.
- State the features of ‘C’ spanners and their uses: ‘C’ સ્પાનર્સની વિશેષતાઓ અને તેનો ઉપયોગ જણાવવો.
Introduction to Spanners (સ્પાનર્સનો પરિચય) 🔧
Spanners નો ઉપયોગ threaded fasteners, bolts અને nuts ને ઓપરેટ કરવા (ખોલવા કે ફિટ કરવા) માટે થાય છે. તે High tensile અથવા Alloy steel માંથી બનાવવામાં આવે છે. તેને મજબૂતી માટે Drop-forged અને Heat-treated કરવામાં આવે છે. છેલ્લે, તેને પકડવામાં સરળતા રહે તે માટે Smooth surface finish આપવામાં આવે છે.
વિવિધ પરિસ્થિતિઓમાં કામ કરવાની સરળતા રહે તે માટે Spanners અલગ-અલગ આકાર (shape) માં ઉપલબ્ધ હોય છે.
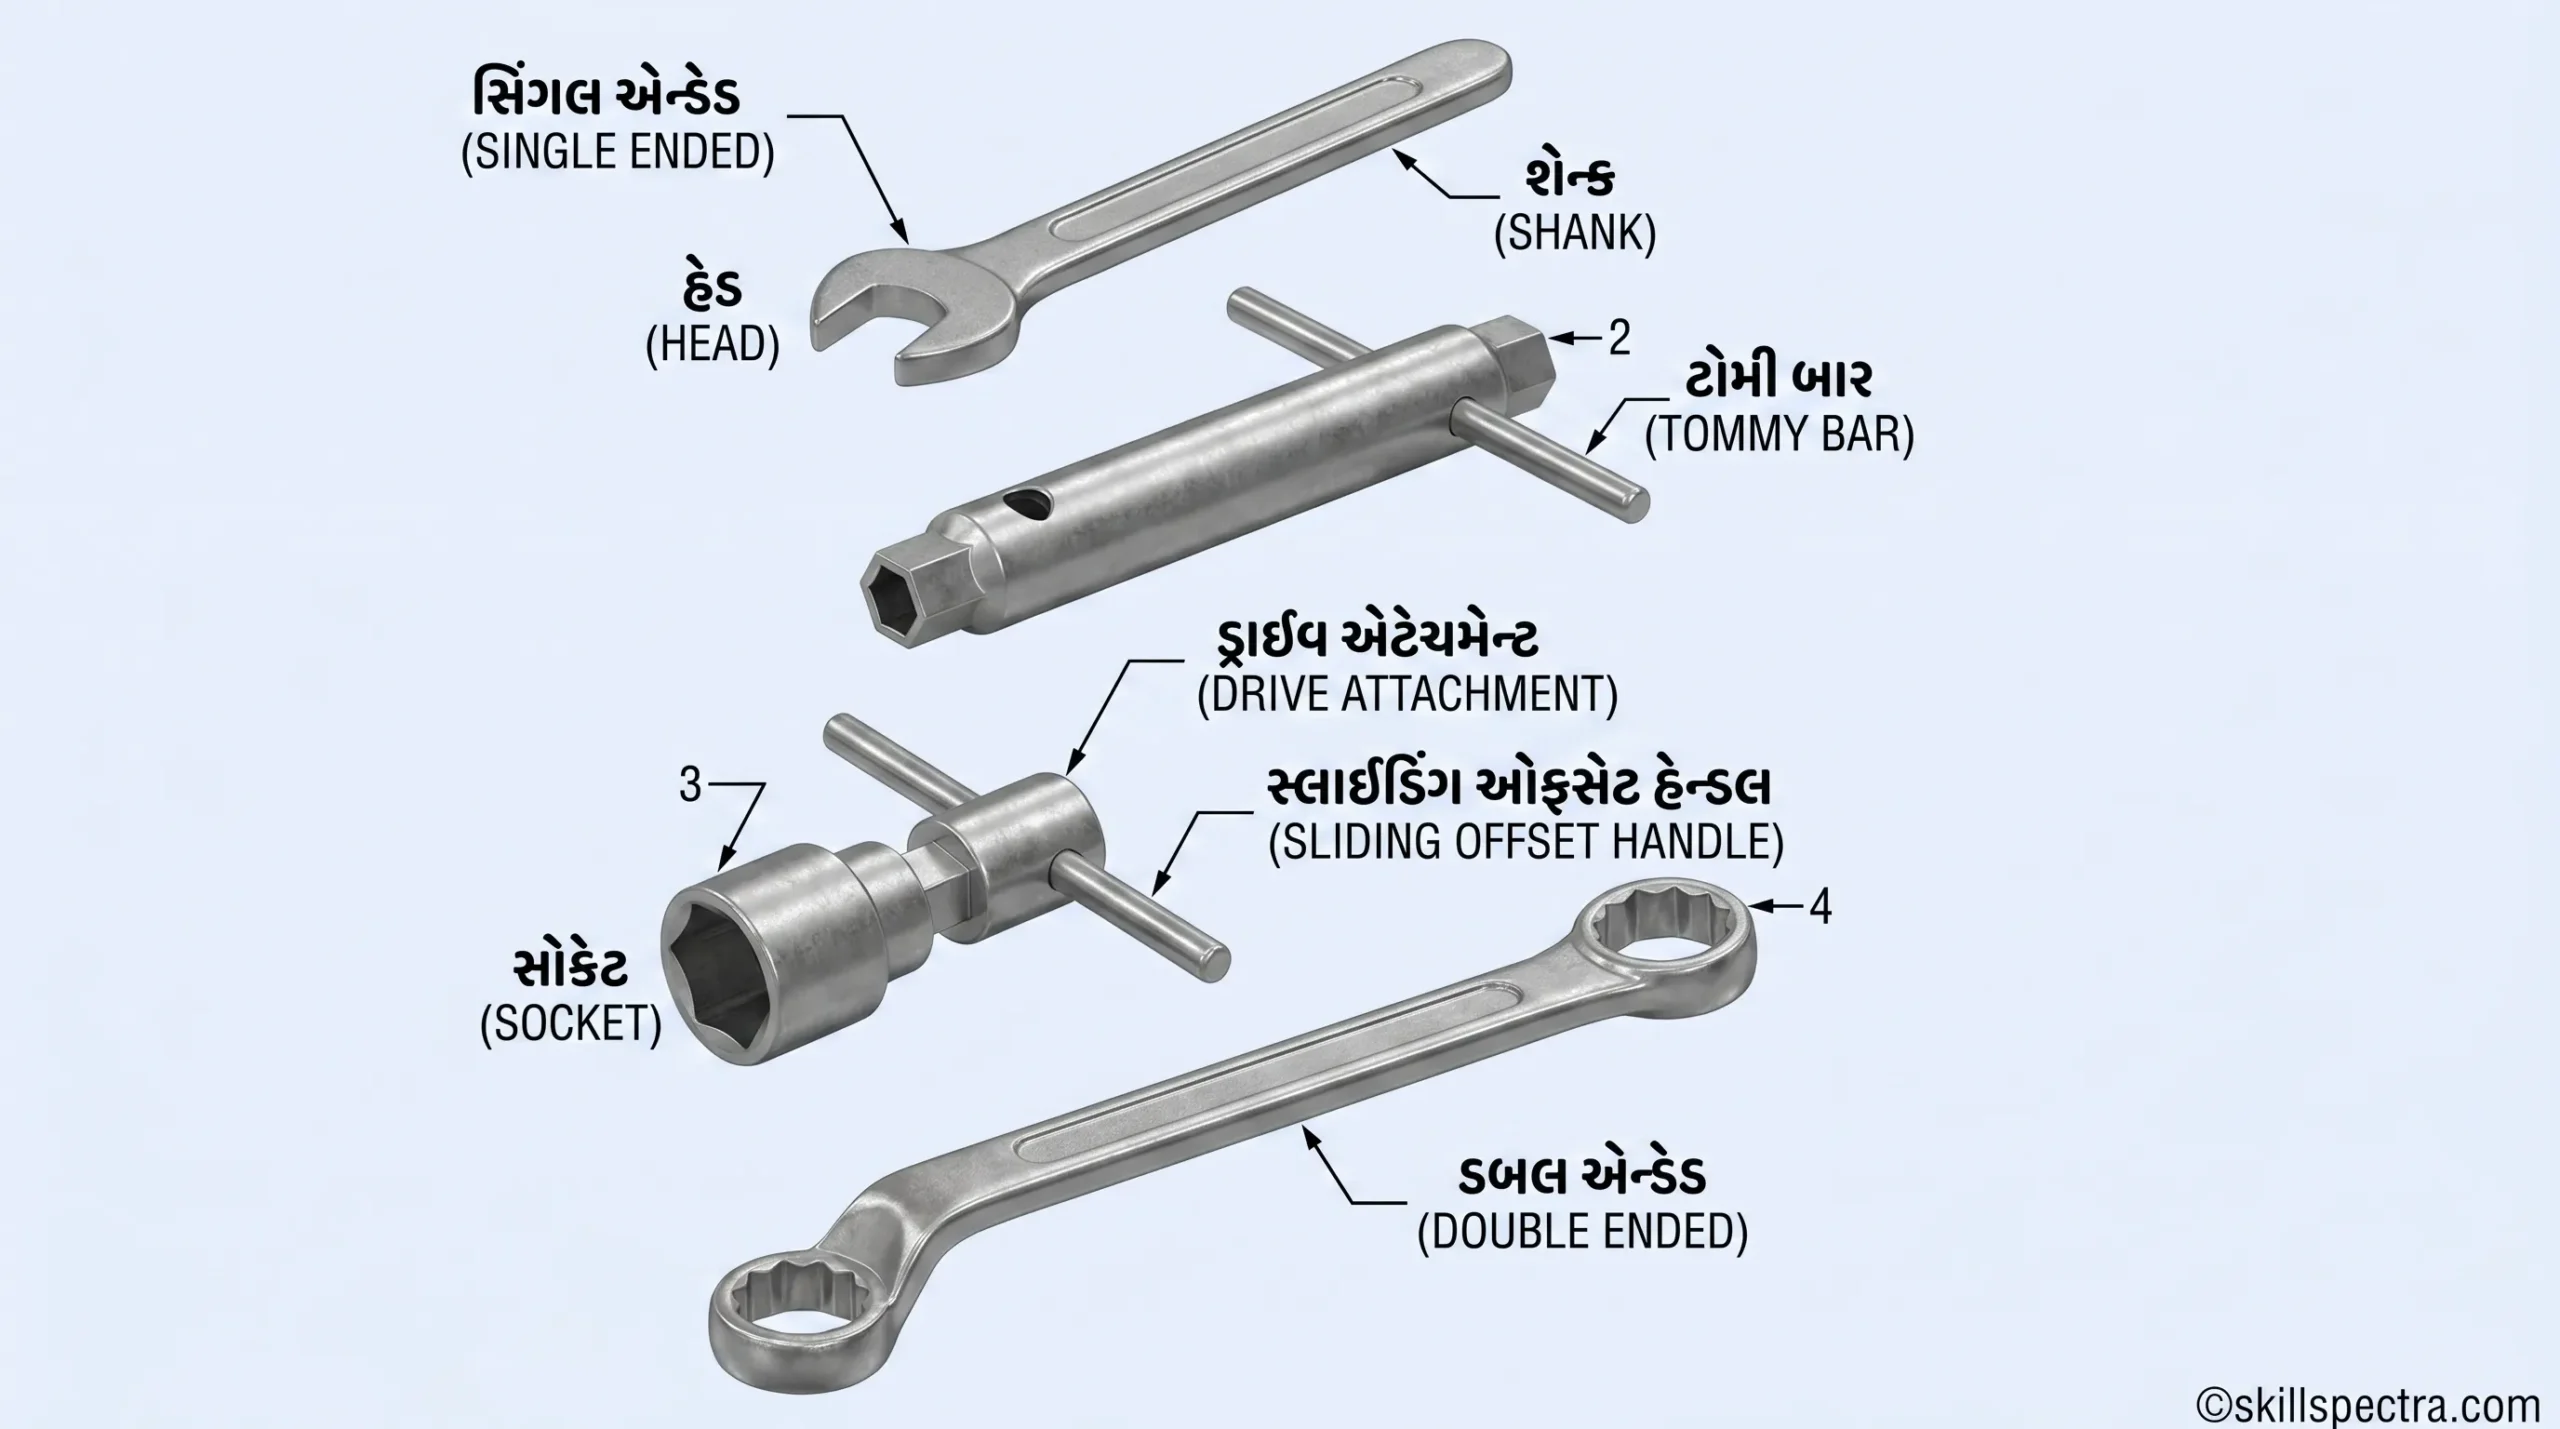
The basic types of spanners are (Fig 1):
- Open end spanners (1)
- Tube or tubular box spanners (2)
- Socket spanners (3)
- Ring spanners (4)
સાચો spanner બરાબર ફિટ થાય છે અને કામ કરવા માટે પૂરતી જગ્યા આપે છે. તે ઓછા સમયમાં કામ પૂર્ણ કરવાની પરવાનગી આપે છે.
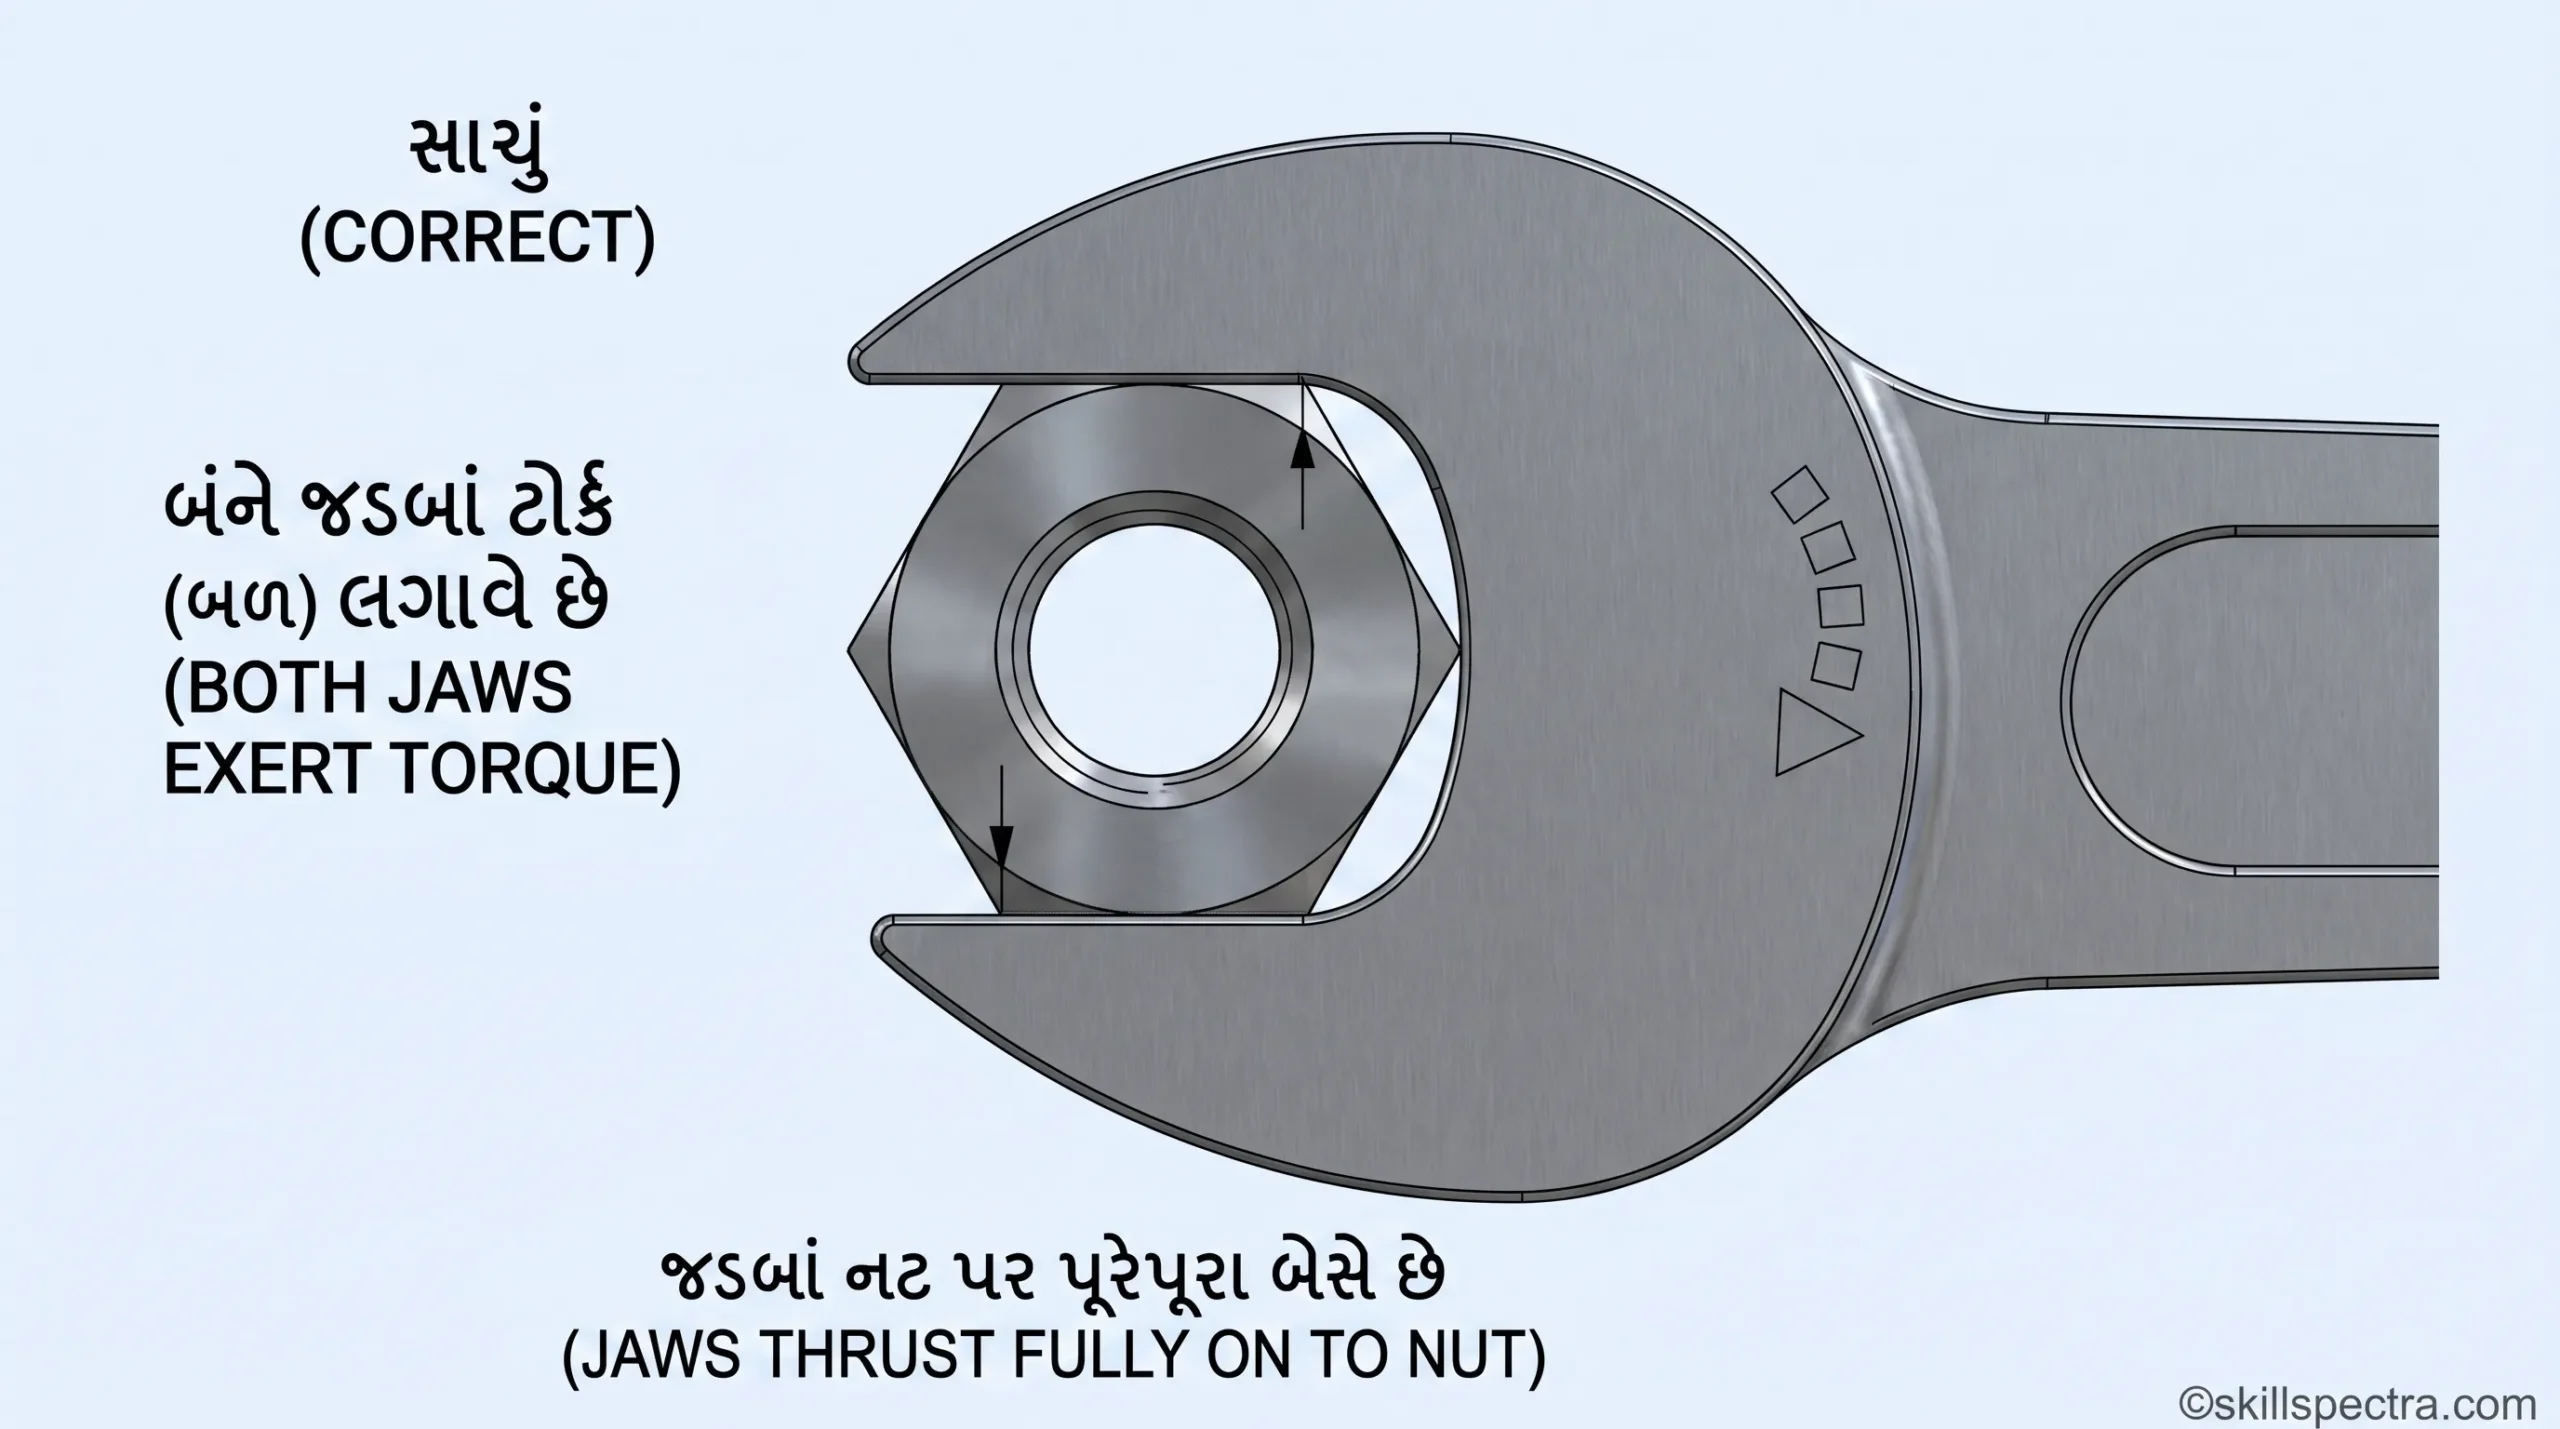
Safe use of Spanners (સ્પાનર્સનો સુરક્ષિત ઉપયોગ) ⚠️
સ્પાનર્સનો સુરક્ષિત રીતે ઉપયોગ કરવા માટે નીચેના મુદ્દાઓ ધ્યાનમાં રાખવા જોઈએ:
- Pulling on the shank: Open end અને ring spanners નો ઉપયોગ હંમેશા shank ને ખેંચીને (pulling) કરો.
- Safe pulling: ખેંચવું (Pulling) એ સૌથી સુરક્ષિત રીત છે, કારણ કે જો spanner અચાનક લપસી જાય તો હાથ અથડાવાની શક્યતા ઓછી રહે છે.
- Pushing technique: જો તમારે spanner ને ધક્કો મારવાની (push) ફરજ પડે, તો હાથની હથેળીના નીચેના ભાગનો ઉપયોગ કરો અને હાથ ખુલ્લો રાખો.
- Large spanners: મોટા સ્પાનર્સ માટે હંમેશા બંને હાથનો ઉપયોગ કરો.
- Balance: પોતાનું સંતુલન (balance) જાળવો અને મજબૂત ઊભા રહો જેથી જો spanner લપસી જાય તો તમે પડી ન જાઓ.
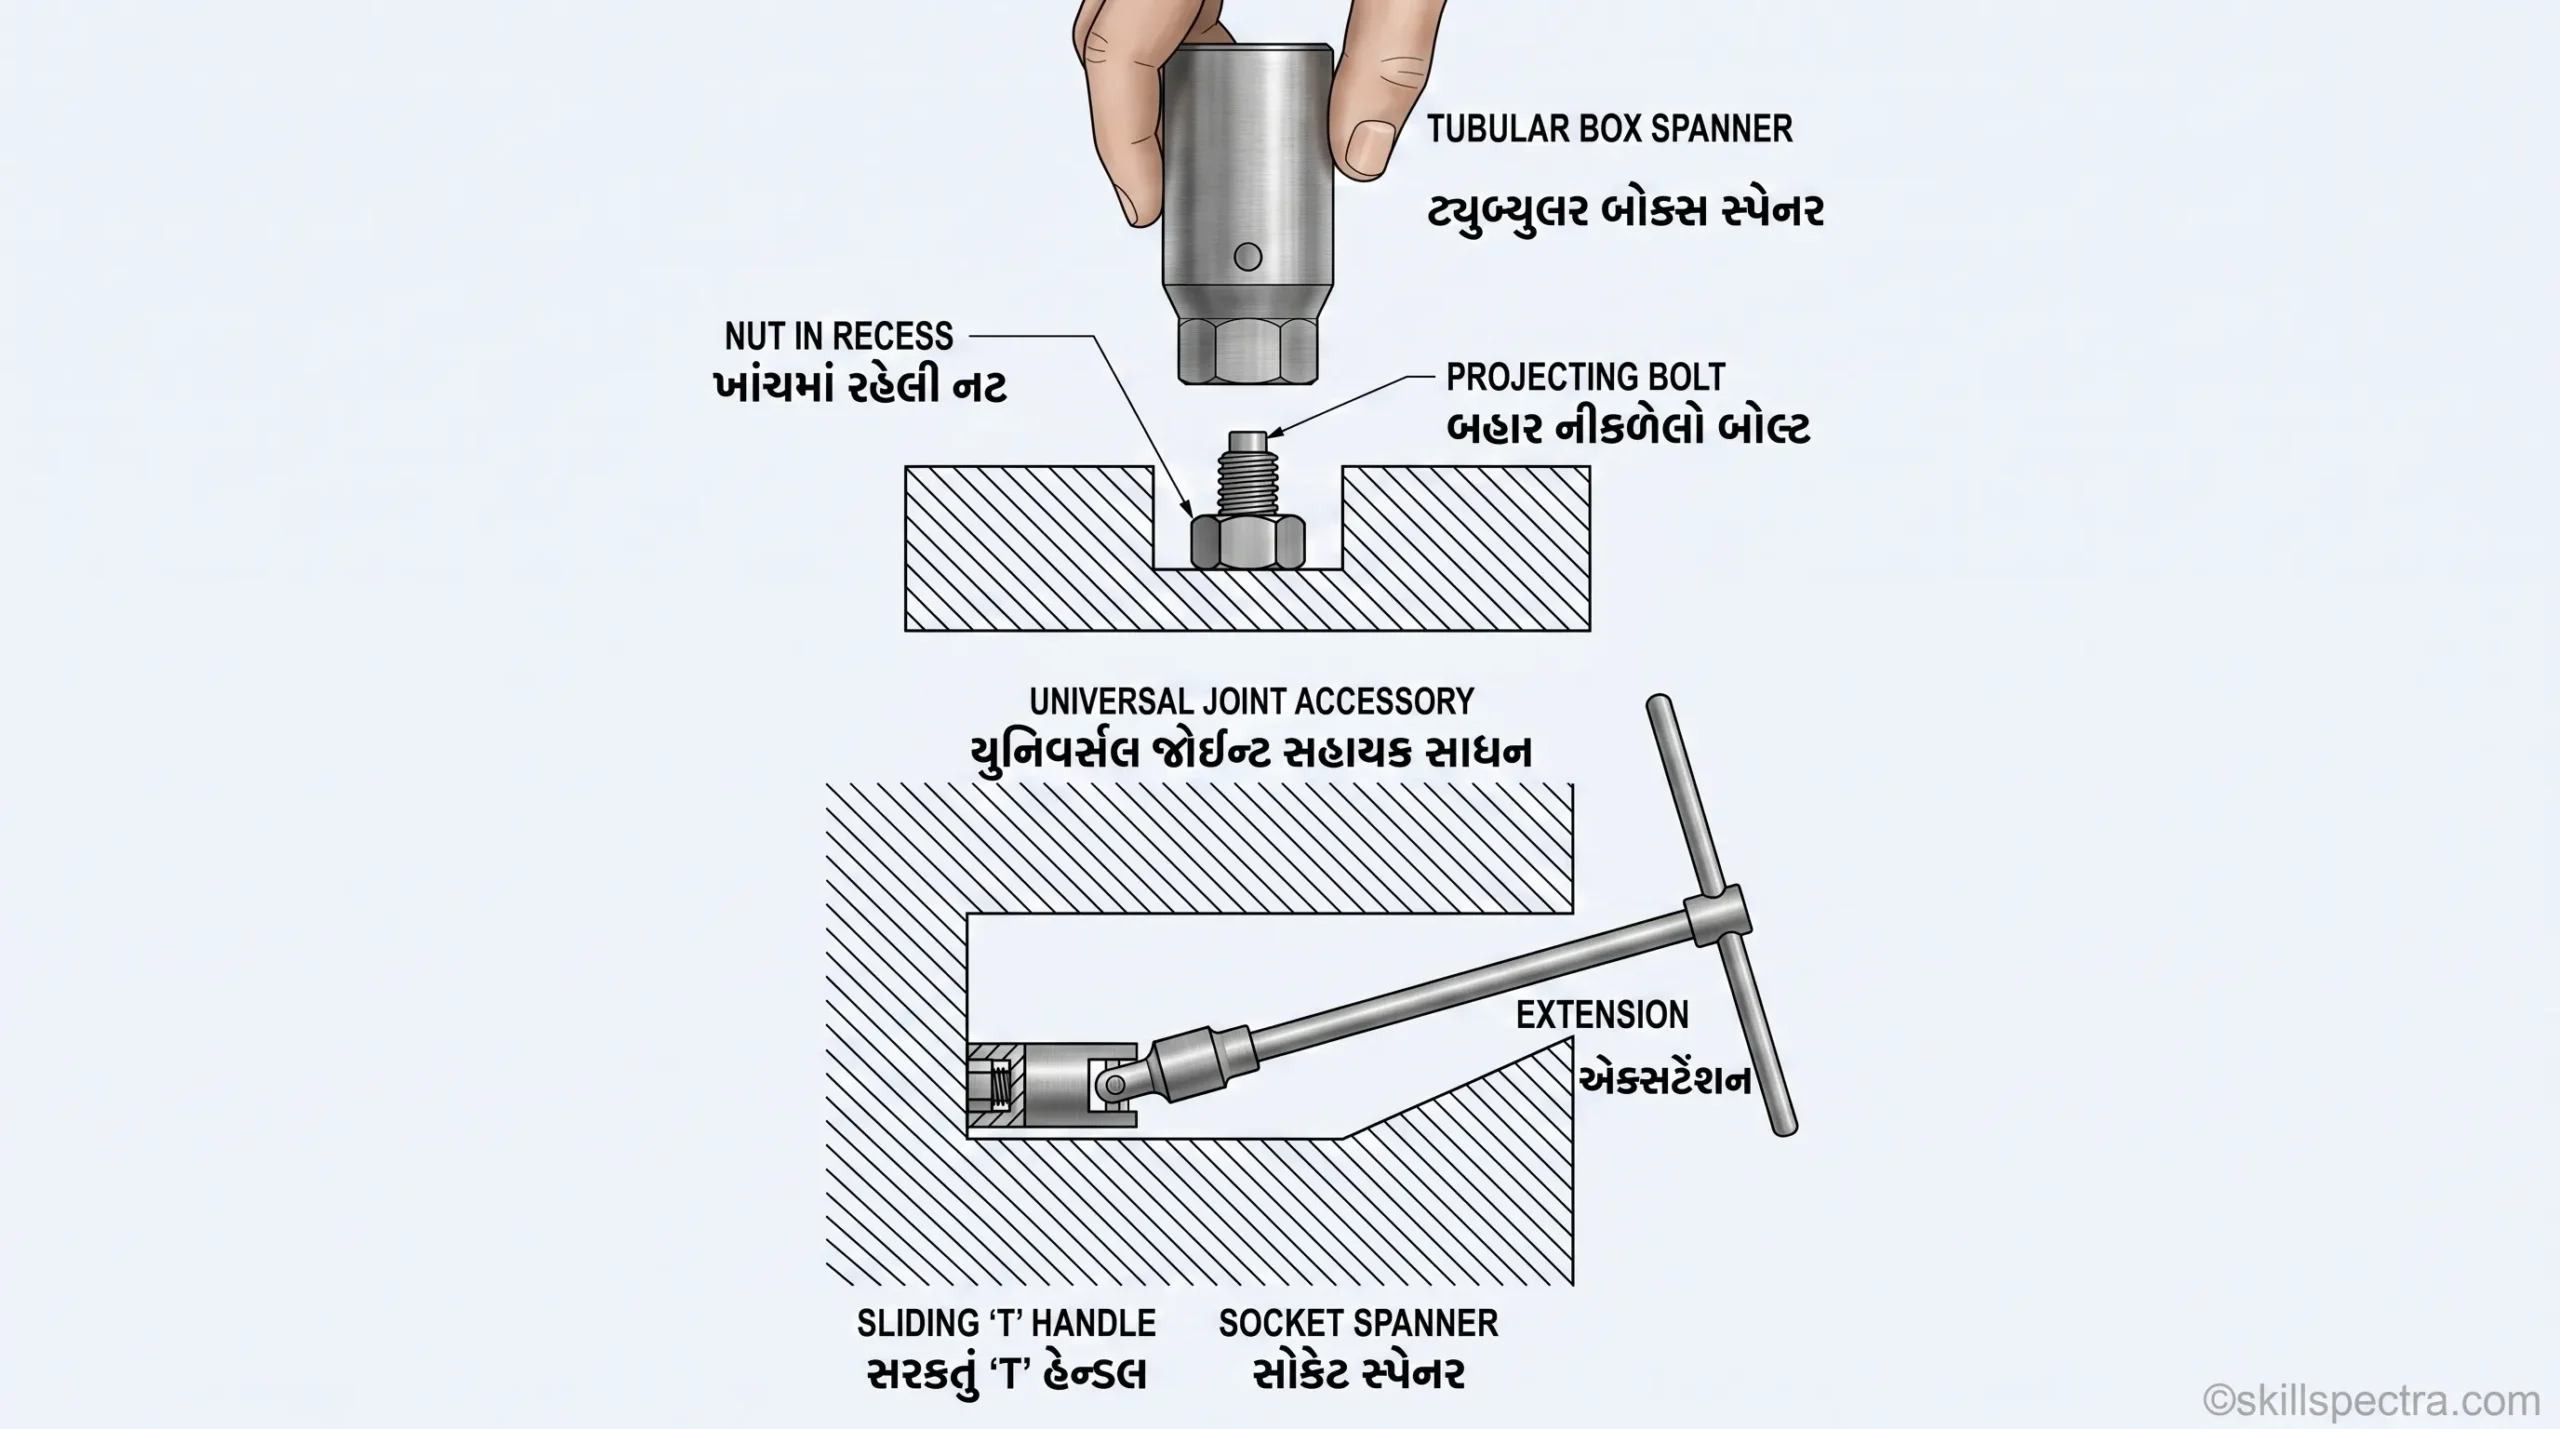
- Tubular box spanners: ફિગરમાં દર્શાવ્યા મુજબ જ્યારે tubular box spanners નો ઉપયોગ કરો ત્યારે બંને હાથ વાપરો.
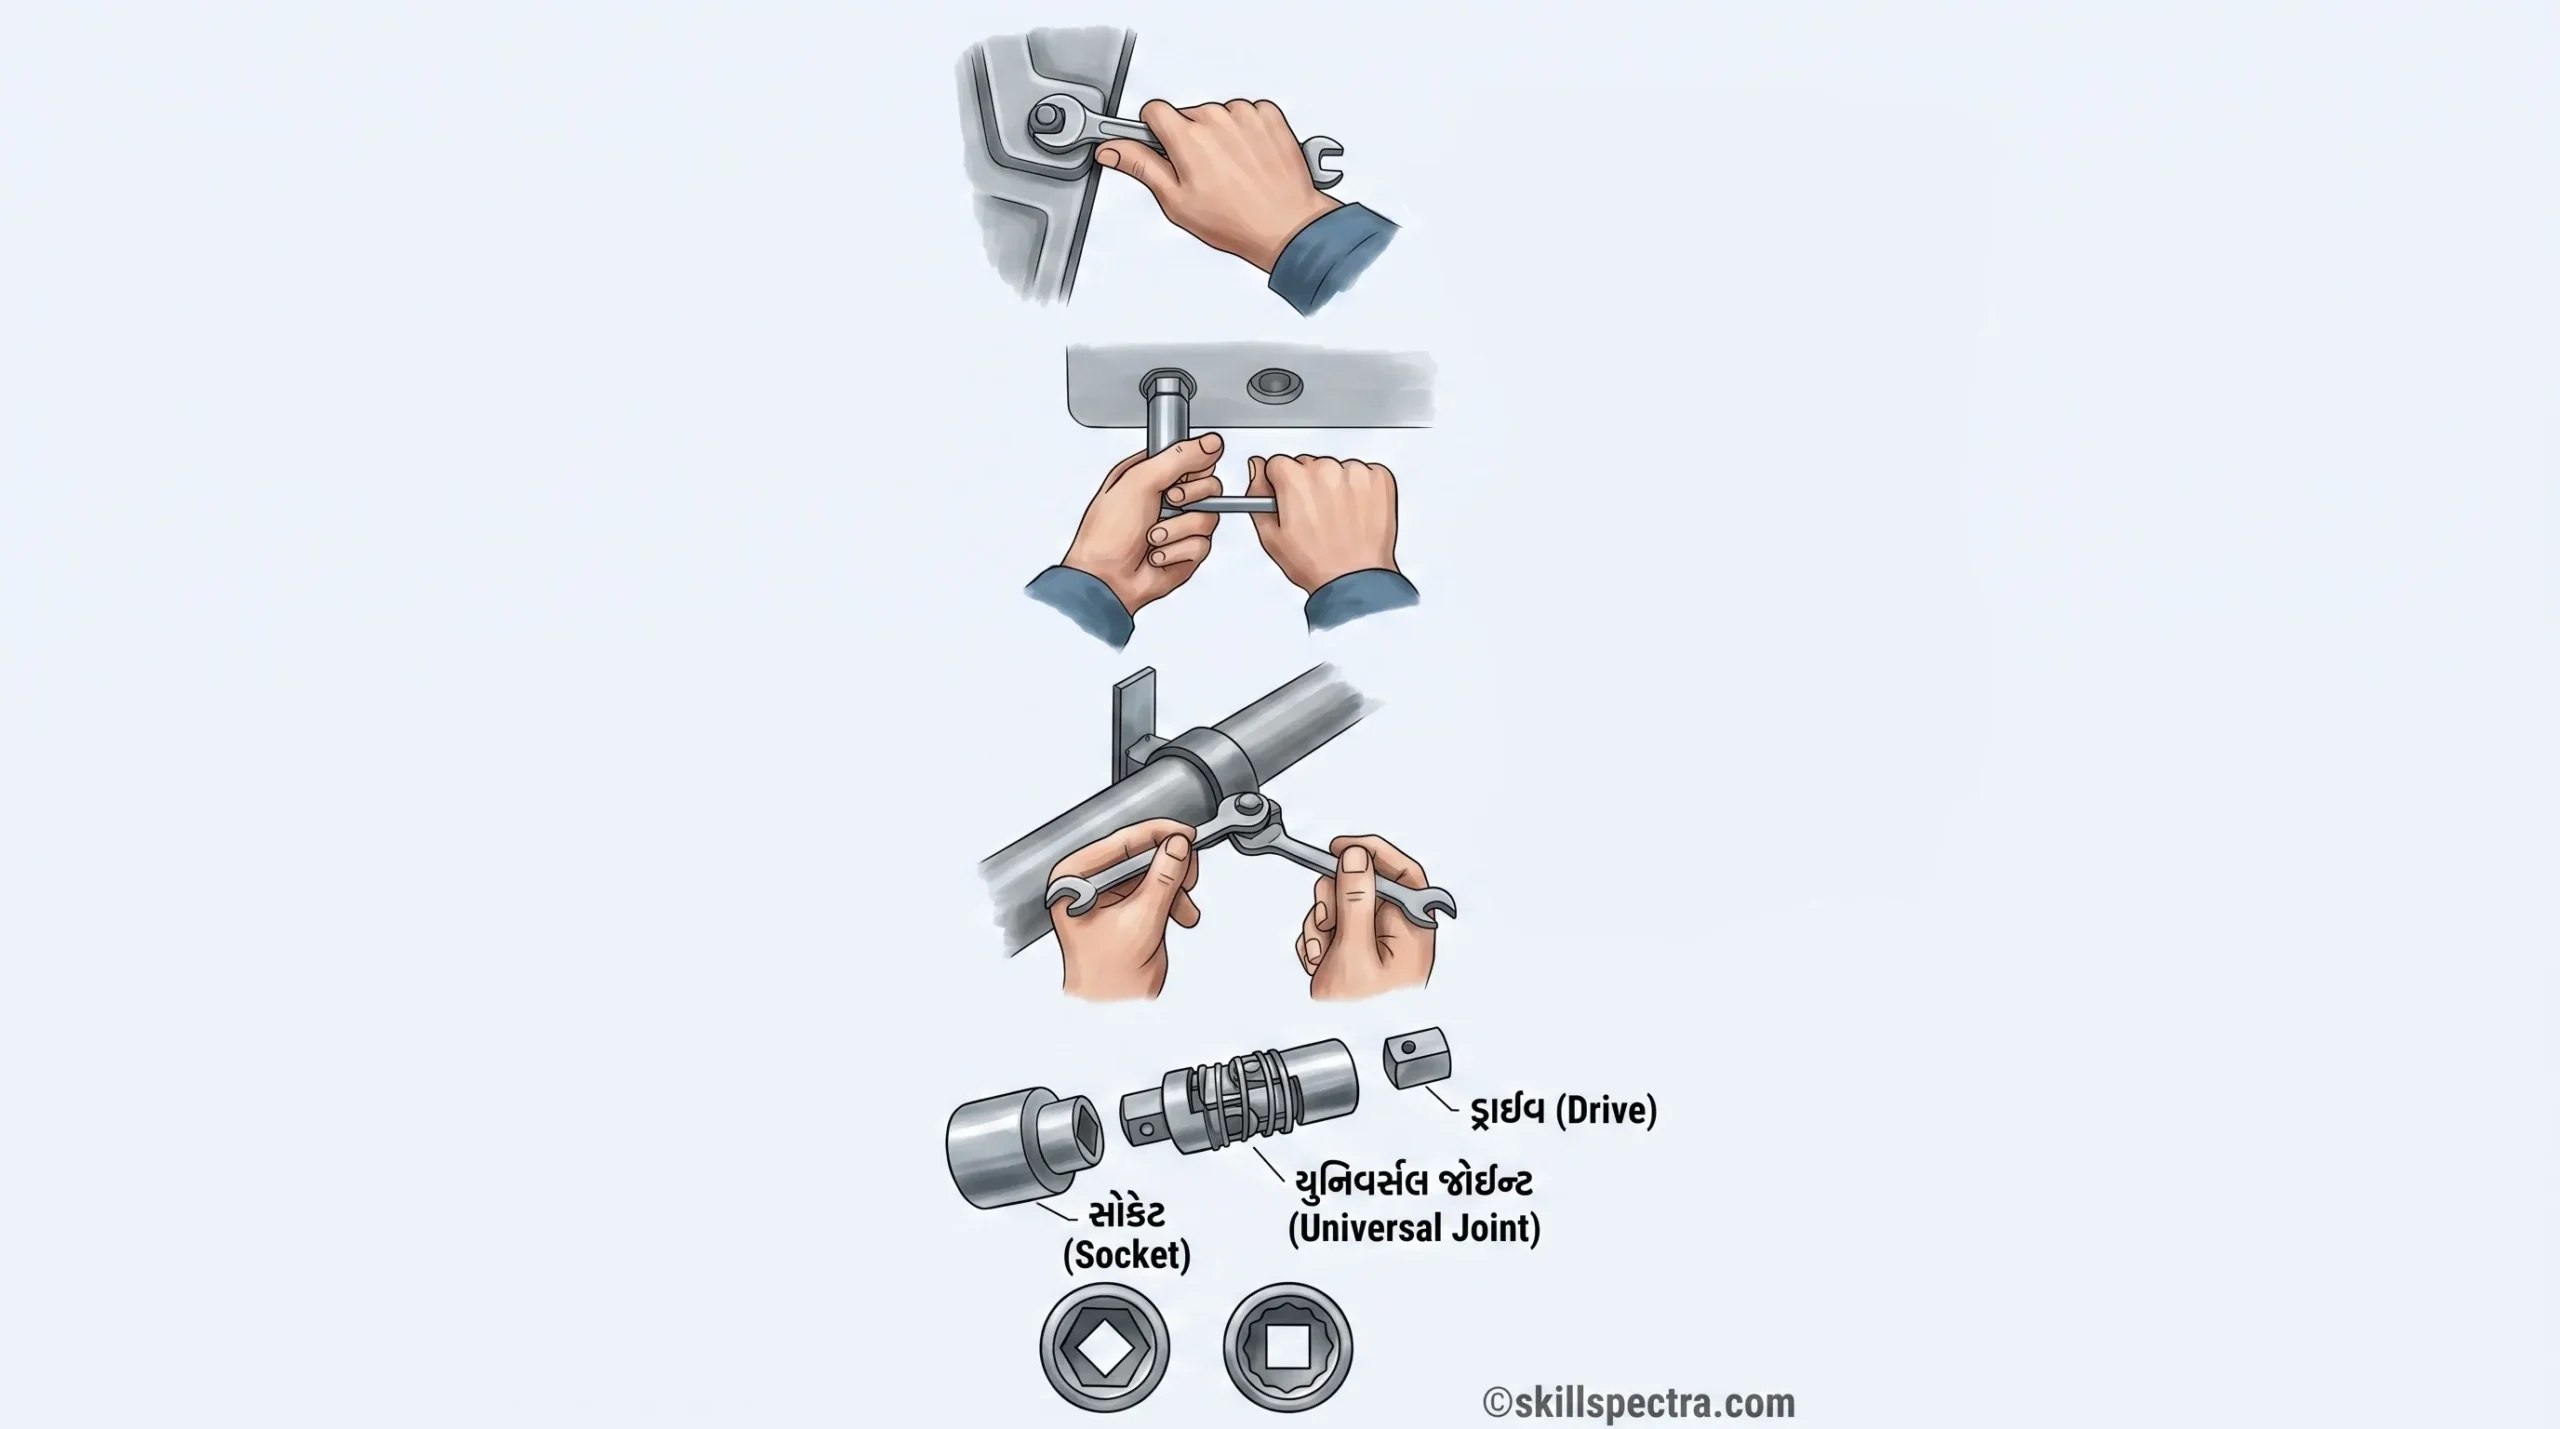
- Two spanners: નટ ફેરવતી વખતે બોલ્ટના હેડને ફરતો રોકવા માટે ફિગરમાં દર્શાવ્યા મુજબ બે સ્પાનર્સનો ઉપયોગ કરો.
- Socket accessories: Socket spanners ને એવા એસેસરીઝ દ્વારા ફેરવી શકાય છે જેમાં square driving ends હોય.
Size and Identification of Spanners (સ્પાનર્સનું કદ અને ઓળખ) 📏
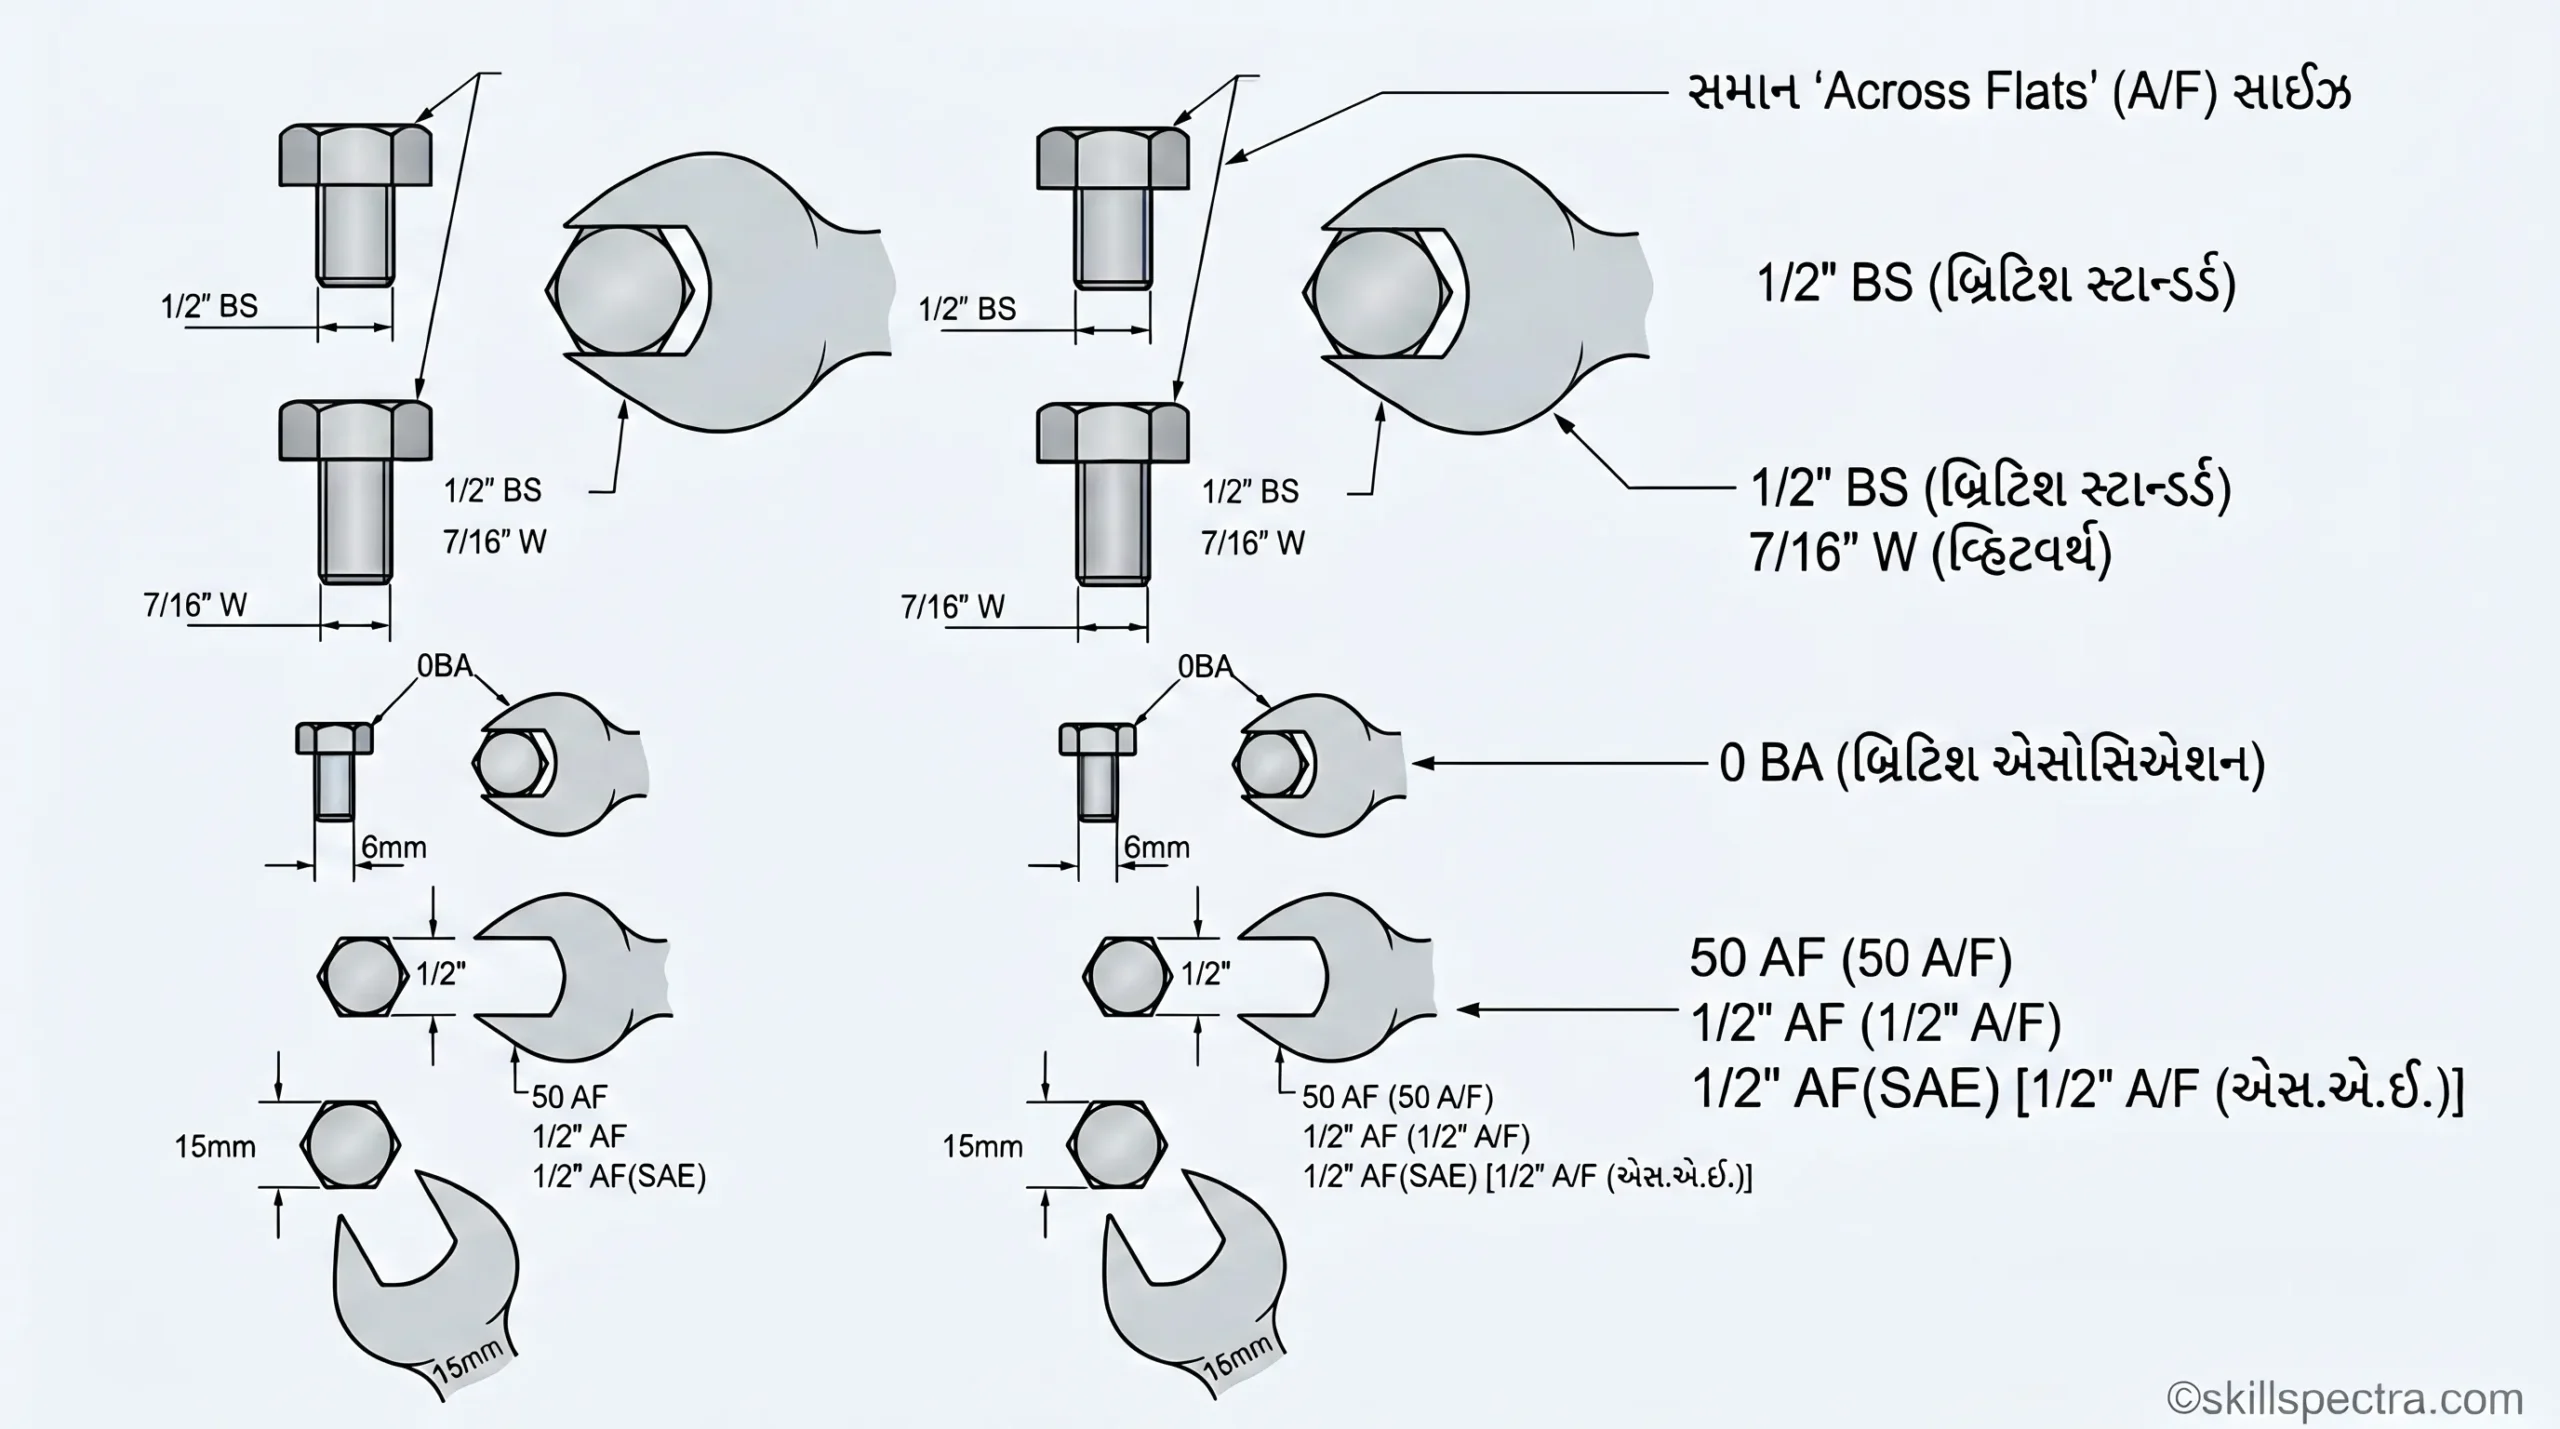
Spanner ની size તે જે nut કે bolt પર ફિટ થાય છે તેના દ્વારા નક્કી થાય છે. નટ કે બોલ્ટના flats વચ્ચેનું અંતર size અને thread system મુજબ બદલાય છે (Fig 4).
- British system: બોલ્ટની nominal size નો ઉપયોગ સ્પાનરને ઓળખવા માટે થાય છે (Fig 3).
- Unified standard system (Fig 3): સ્પાનર્સ પર એક નંબર હોય છે જે hexagon ના flats વચ્ચેની nominal fractional size ના ગેસ રિક્વાયરમેન્ટ ડેસિમલ ઇક્વિવેલન્ટ પર આધારિત હોય છે. તે A/F સાઇન સાથે અથવા સાઇન વગર હોય છે.
- Metric system: આ સિસ્ટમમાં સ્પાનર્સ પર jaw opening ની સાઇઝ મિલીમીટરમાં લખેલી હોય છે, જેની પાછળ સંક્ષેપમાં ‘mm’ લખેલું હોય છે.
To fit exactly, a spanner must be (બરાબર ફિટ થવા માટે સ્પાનર હોવો જોઈએ):
- Of the correct size (સાચી સાઈઝનો).
- Placed correctly on the nut (નટ પર બરાબર રીતે ગોઠવાયેલો).
- In good condition (સારી સ્થિતિમાં).
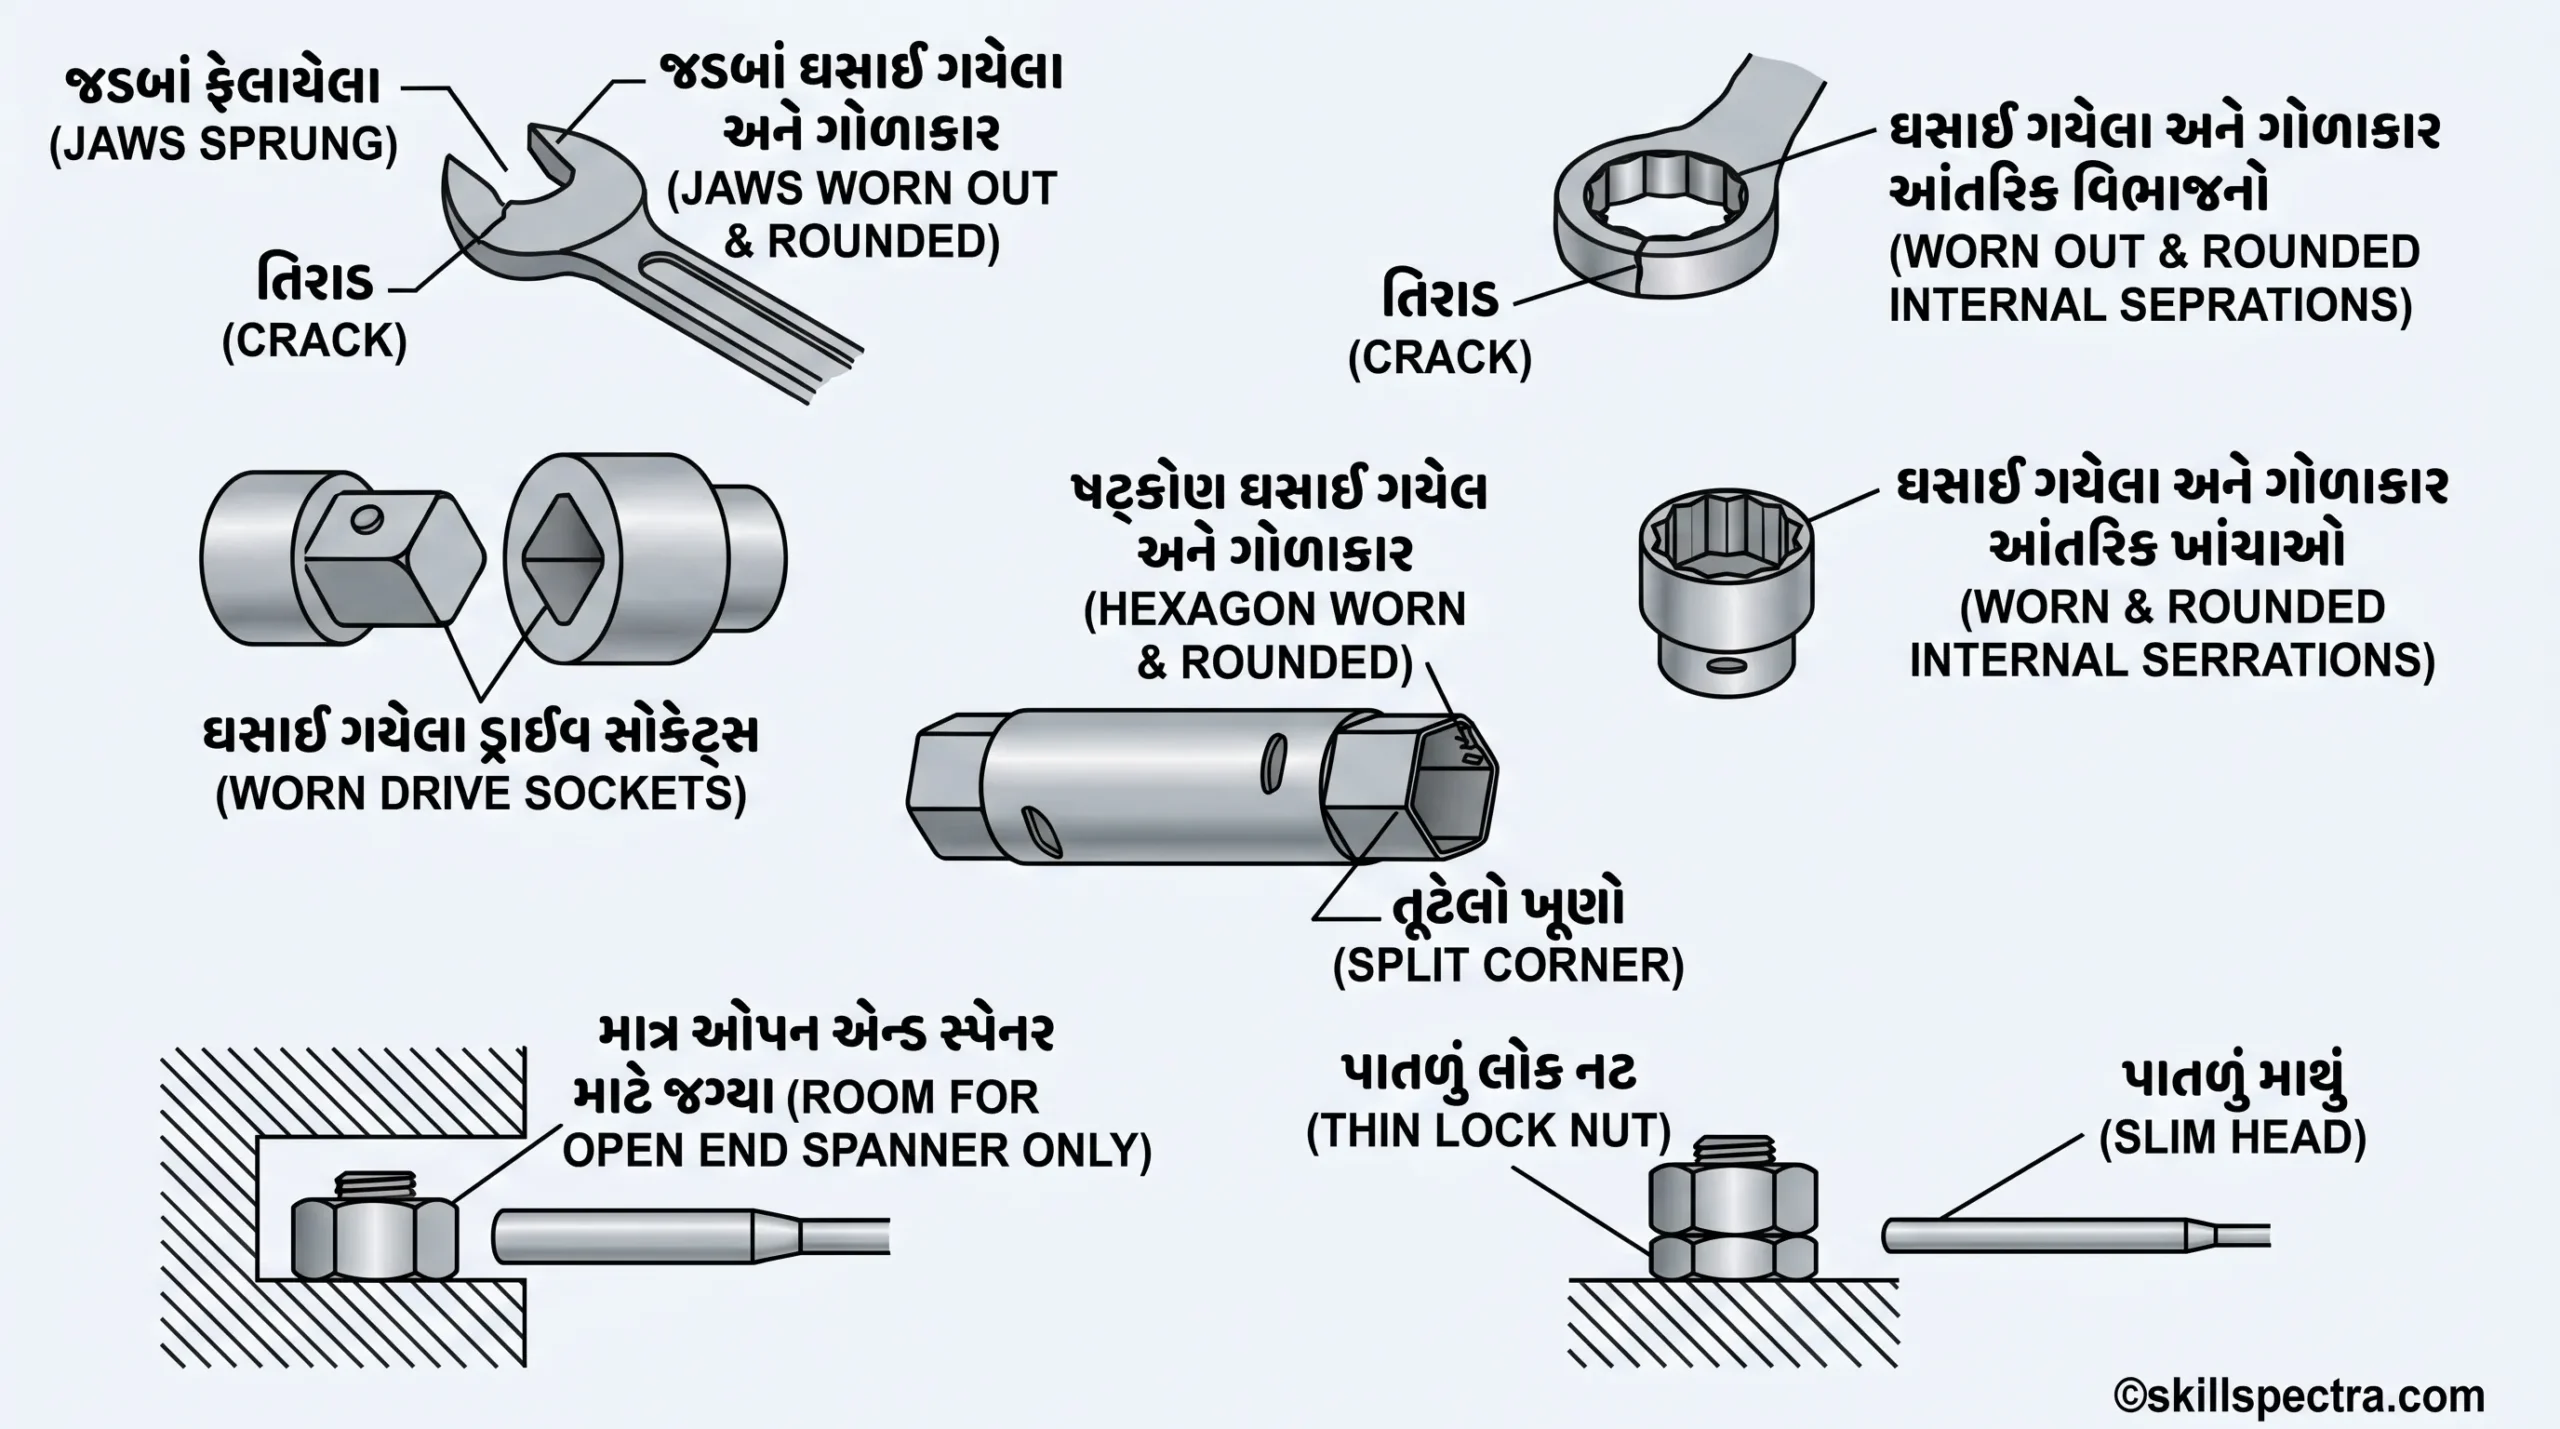
Maintenance and Selection (જાળવણી અને પસંદગી) 🛠️
- Defective spanners: કોઈપણ ખામીયુક્ત સ્પાનર્સને કાઢી નાખો (Discard). અહીં ફિગરમાં દર્શાવેલ ખામીયુક્ત સ્પાનર્સ ઉપયોગ માટે જોખમી છે (Fig 5).
- Selection: એવા સ્પાનર્સ પસંદ કરો જે કામ કરવા માટે પૂરતી જગ્યા (room) આપે.
- Inaccessible positions: જે જગ્યાએ પહોંચવું મુશ્કેલ હોય ત્યાં socket spanners અને ખાસ ડ્રોઈંગ એસેસરીઝનો ઉપયોગ કરી શકાય છે.
Length of Spanners (સ્પાનર્સની લંબાઈ) 📏
સામાન્ય રીતે સ્પાનર્સની લંબાઈ તેના jaw opening ની પહોળાઈ કરતા લગભગ દસ ગણી (ten times) હોય છે. સ્પાનરની લંબાઈ વધારવા માટે પાઈપનો ઉપયોગ કરીને ક્યારેય વધુ પડતું ખેંચાણ (excessive pull) ન આપો.
વધારે પડતા ટોર્ક (Excess torque) ના પરિણામો:
- Striping the thread (થ્રેડ ઘસાઈ જવા).
- Shearing the bolt (બોલ્ટ તૂટી જવો).
- Straining the jaws of the spanner (સ્પાનરના જૉઝ પર તાણ આવવી).
- Making the spanner slip and cause an accident (સ્પાનર લપસી જવો અને અકસ્માત થવો).
Adjustable Spanners (એડજસ્ટેબલ સ્પાનર્સ) 🔧
Adjustable spanners (Fig 7 & 8) ઓપન એન્ડ સ્પાનર જેવા જ હોય છે, પરંતુ તેમાં એક movable jaw (ચલિત જડબું) હોય છે.
- લાક્ષણિક 250mm ના સ્પાનરનું ઓપનિંગ 0 થી 28.5mm સુધી હોઈ શકે છે.
- તેની લંબાઈ 100mm થી 760mm સુધીની હોઈ શકે છે.
- તેના jaws હેન્ડલ સાથે 22 ½° ના ખૂણે સેટ હોય છે.
- Note: તે ફિક્સ્ડ સ્પાનર્સની બદલીમાં વાપરવા માટે નથી. ભારે કામ (heavy service) માટે ફિક્સ્ડ સ્પાનર્સ જ શ્રેષ્ઠ છે. જો movable jaw કે knurled screw માં તિરાડ હોય, તો તેને બદલી નાખો.
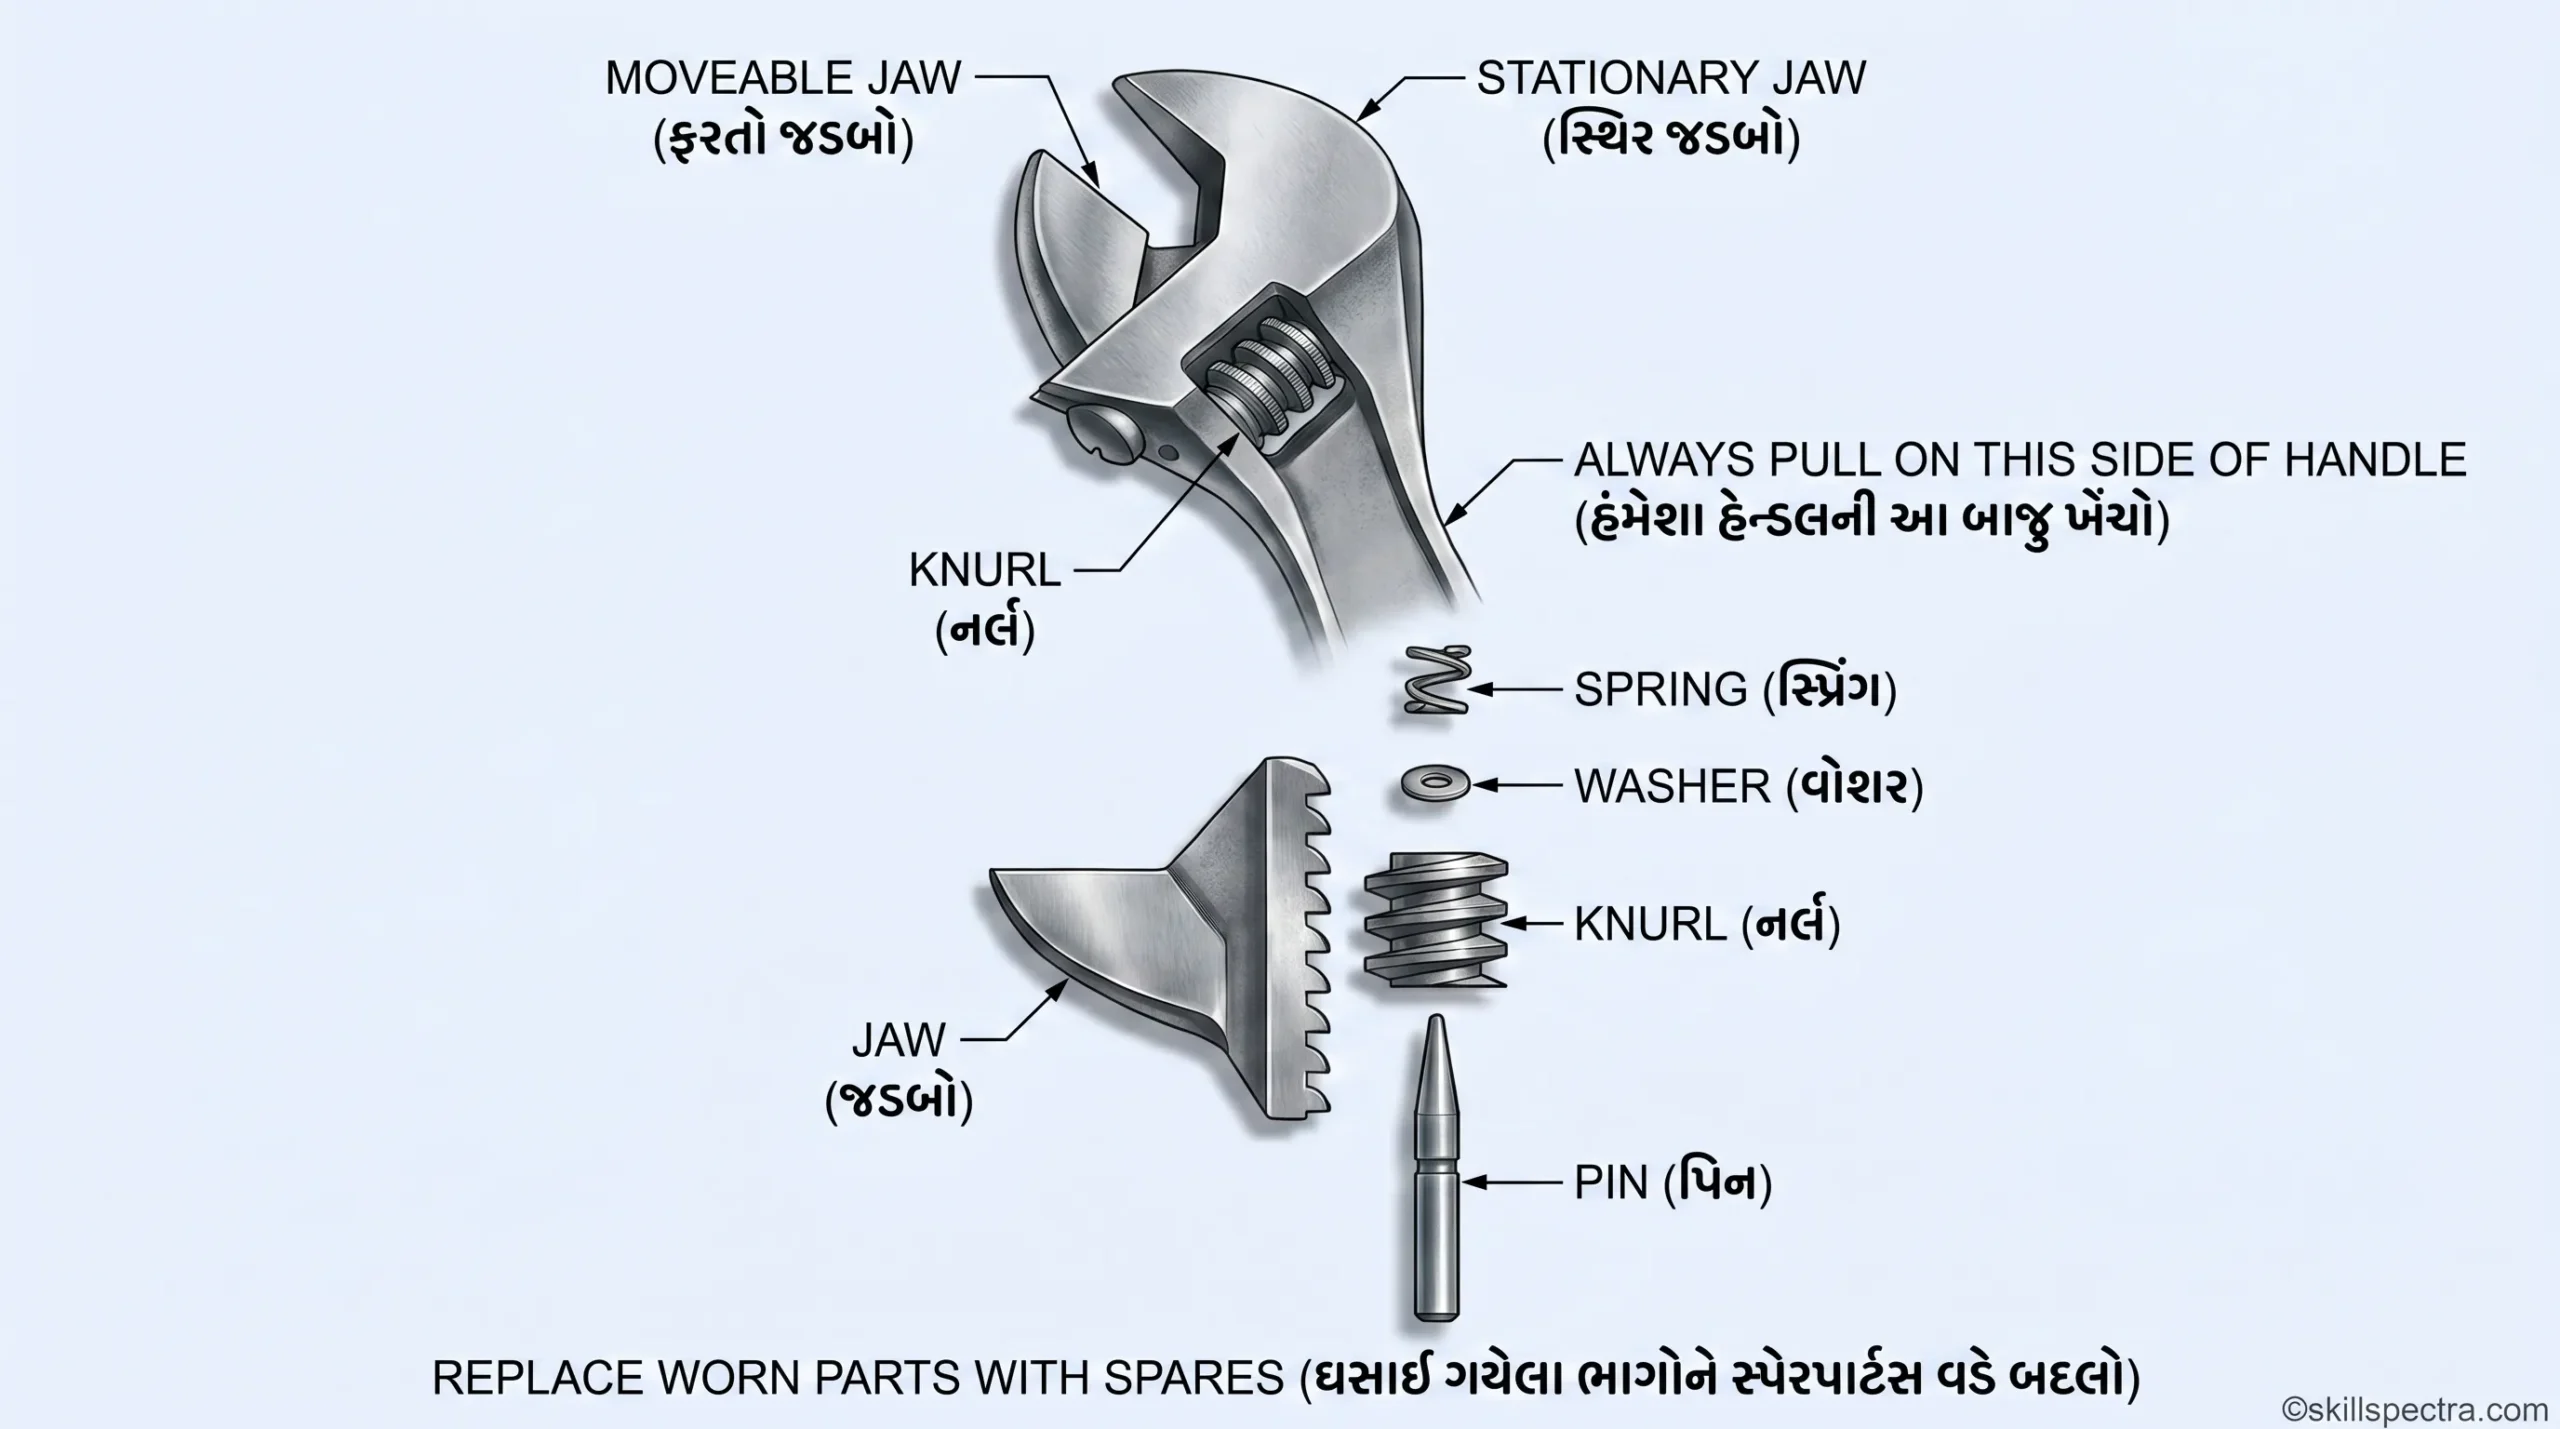
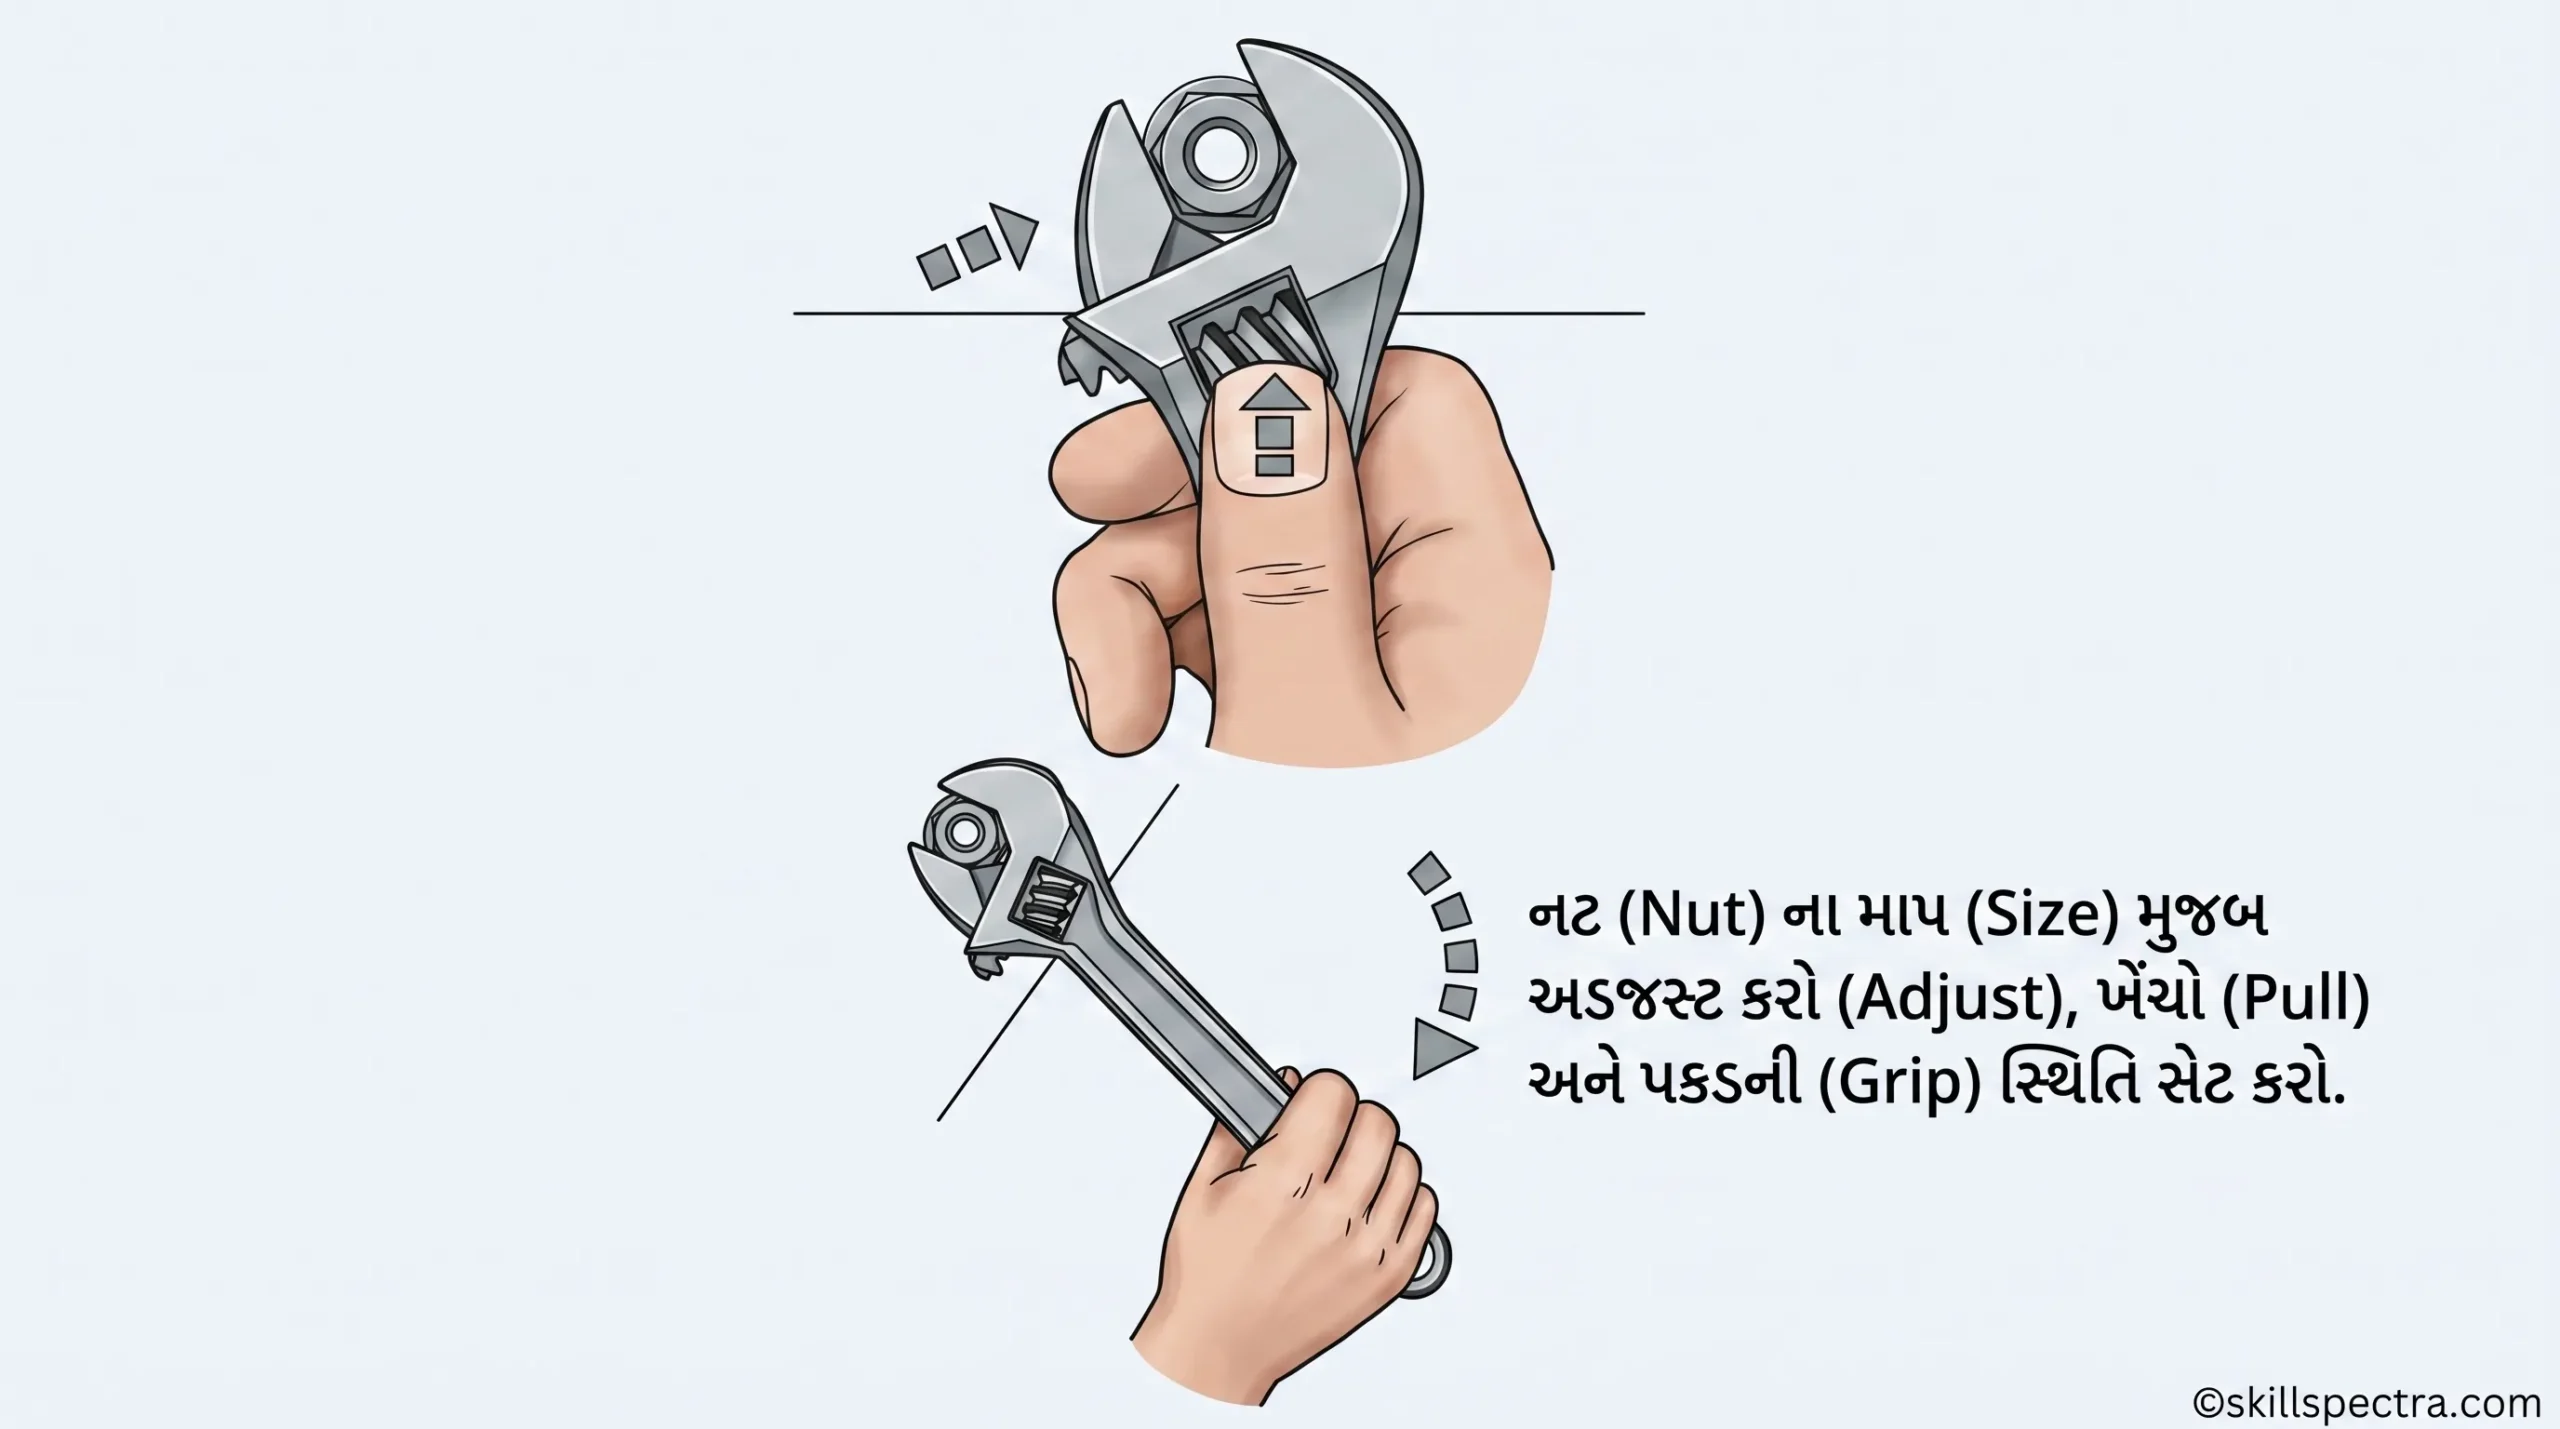
How to use Adjustable Spanner (એડજસ્ટેબલ સ્પાનરનો ઉપયોગ કેવી રીતે કરવો):
- નટ પર એવી રીતે મૂકો કે jaw opening હેન્ડલ જે દિશામાં ખેંચવાનું હોય તે જ દિશામાં રહે.
- Jaws ને નટ સાથે સંપૂર્ણ સંપર્કમાં ધકેલો.
- Knurl ને ફેરવીને જૉઝને નટ પર મજબૂત રીતે ફિટ કરો.
- સતત ખેંચો (Pull continuously).
‘C’ Spanners / Hook Spanners ⚓
તેમાં એક lug હોય છે જે ગોળ નટ (round nut) ની બહારની ધાર પર કાપેલા notch માં ફિટ થાય છે.
- તેનો ઉપયોગ 19mm થી 120mm ના વ્યાસ ધરાવતી નટ્સ માટે થાય છે.
- તેનો ઉપયોગ Micrometer ના zero-setting માટે પણ થાય છે.
Other Specialized Tools (અન્ય વિશિષ્ટ સાધનો) ⚒️
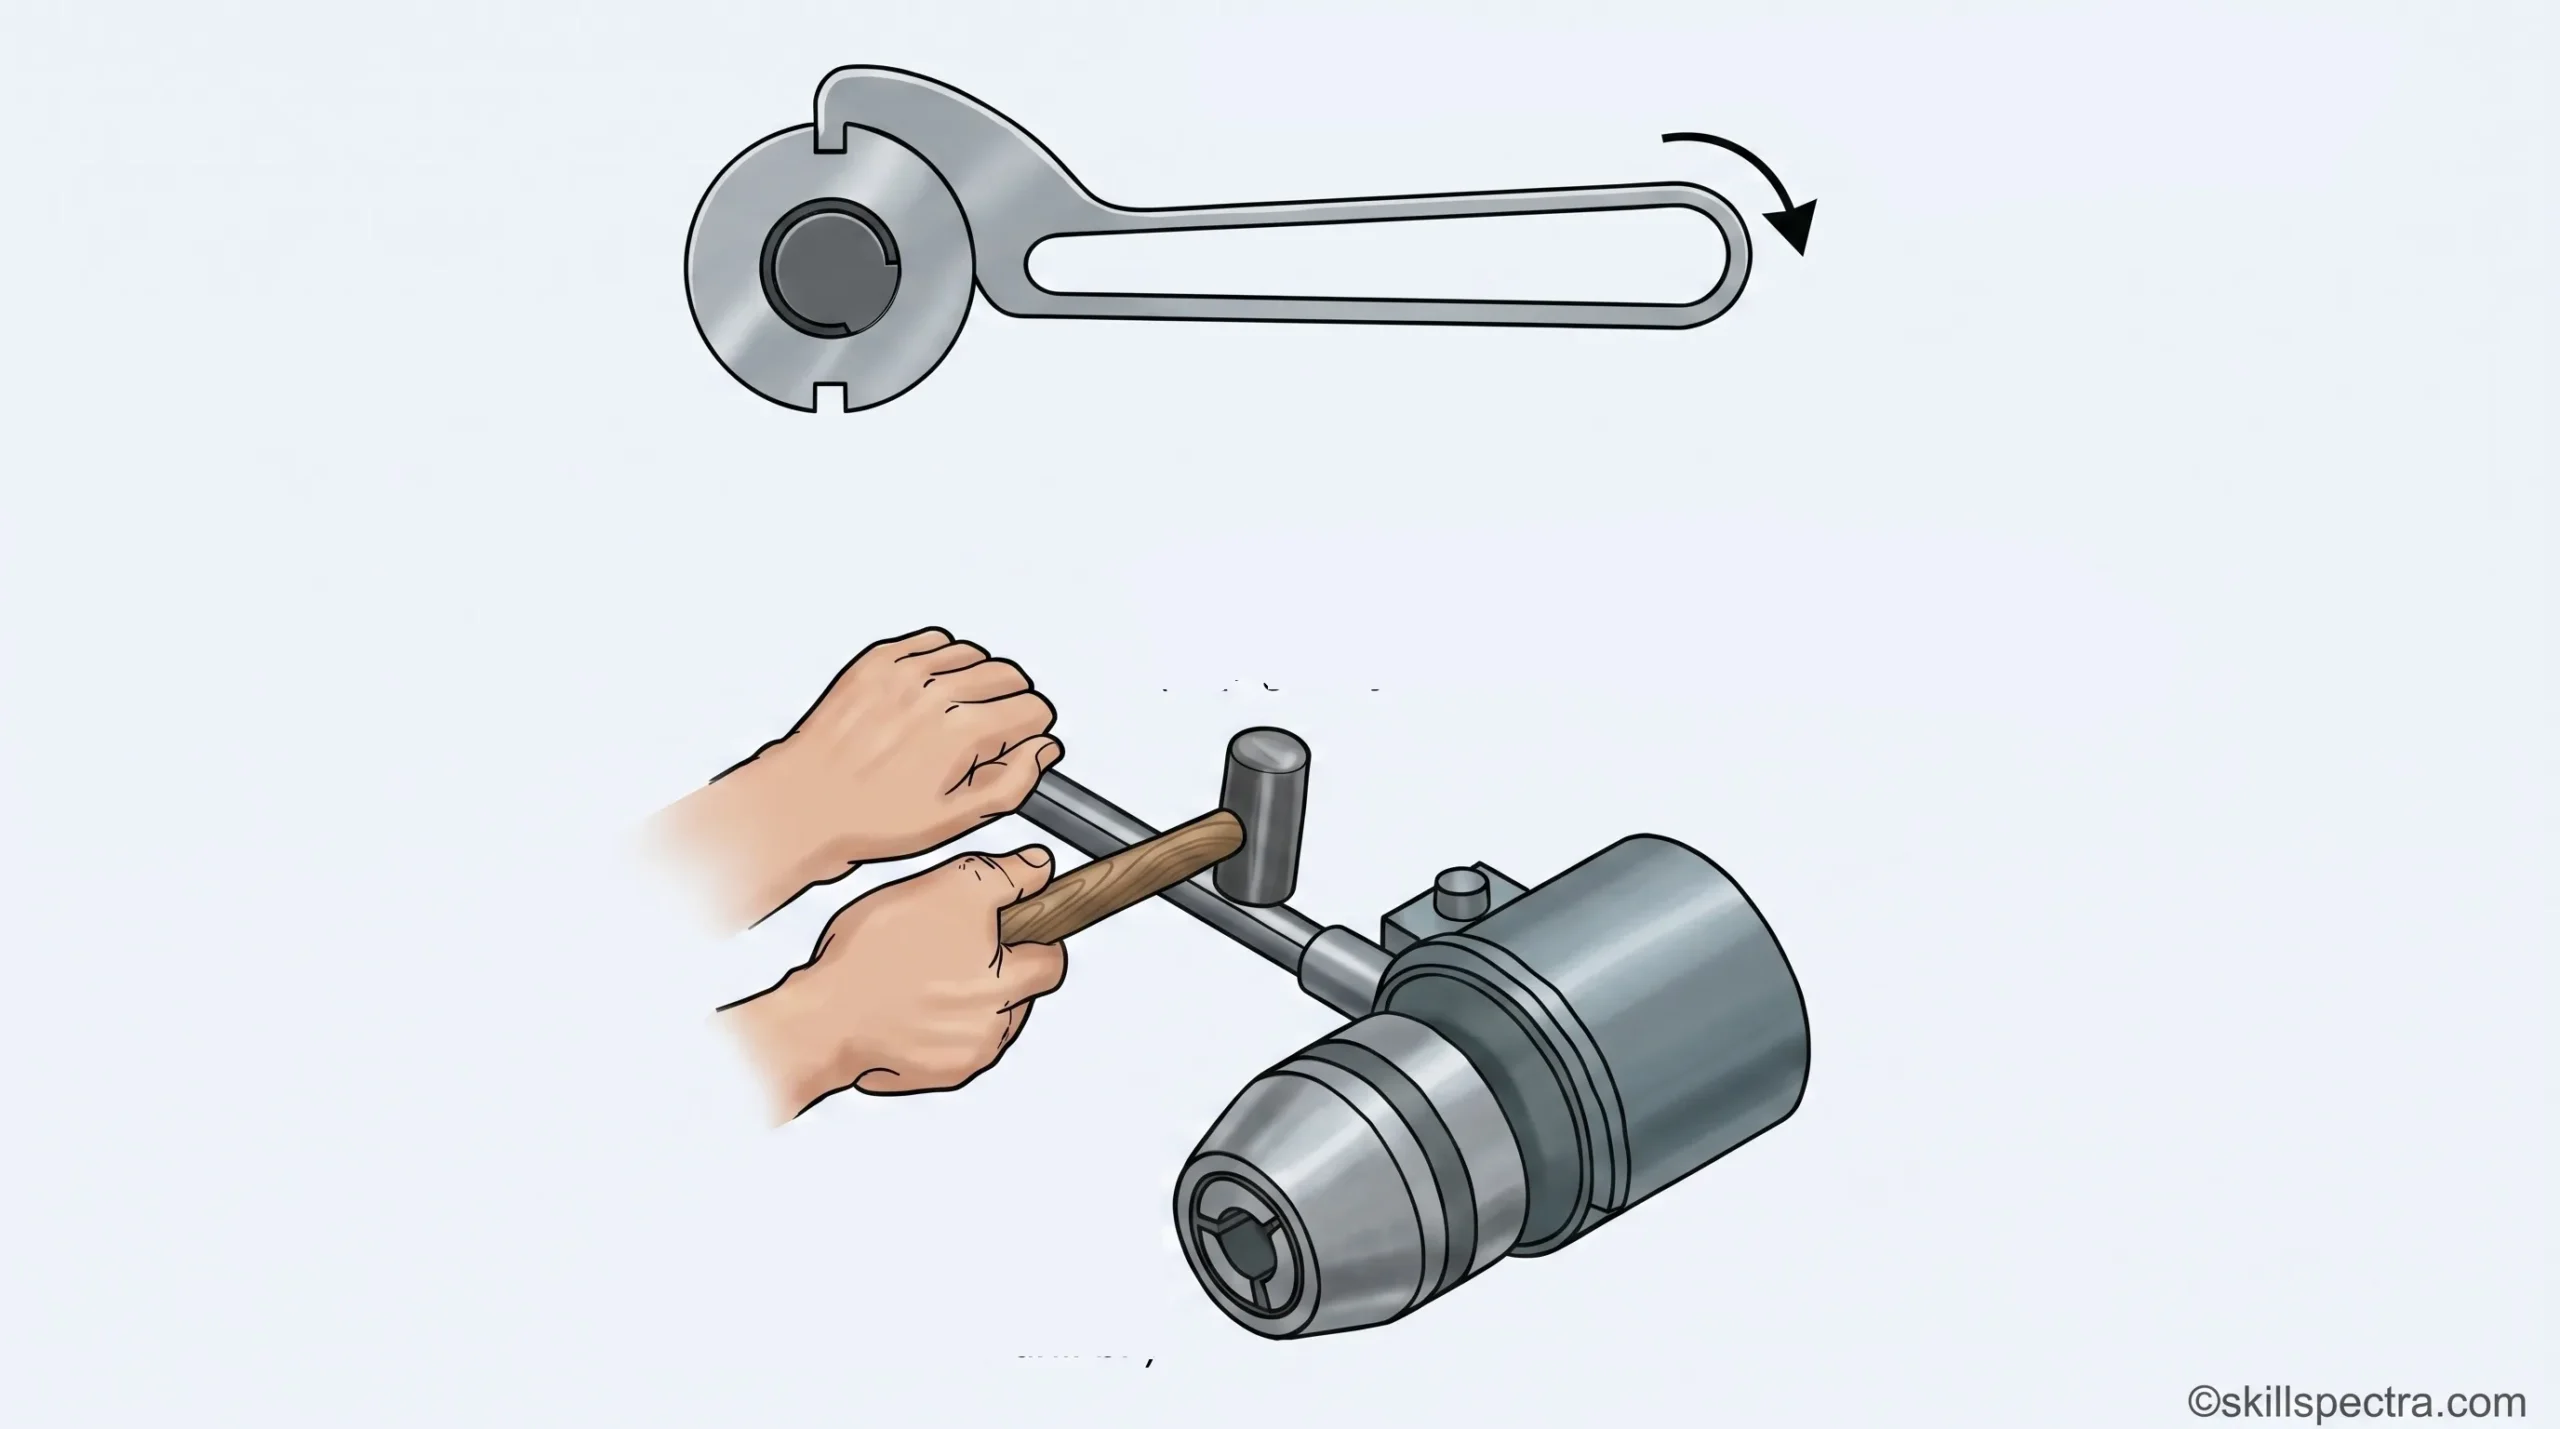
- Socket Spanners with Ratchet (Fig 10): ઝડપી કામ કરવા માટે reversible ratchet handle નો ઉપયોગ થાય છે, ખાસ કરીને જ્યાં જગ્યા ઓછી હોય.
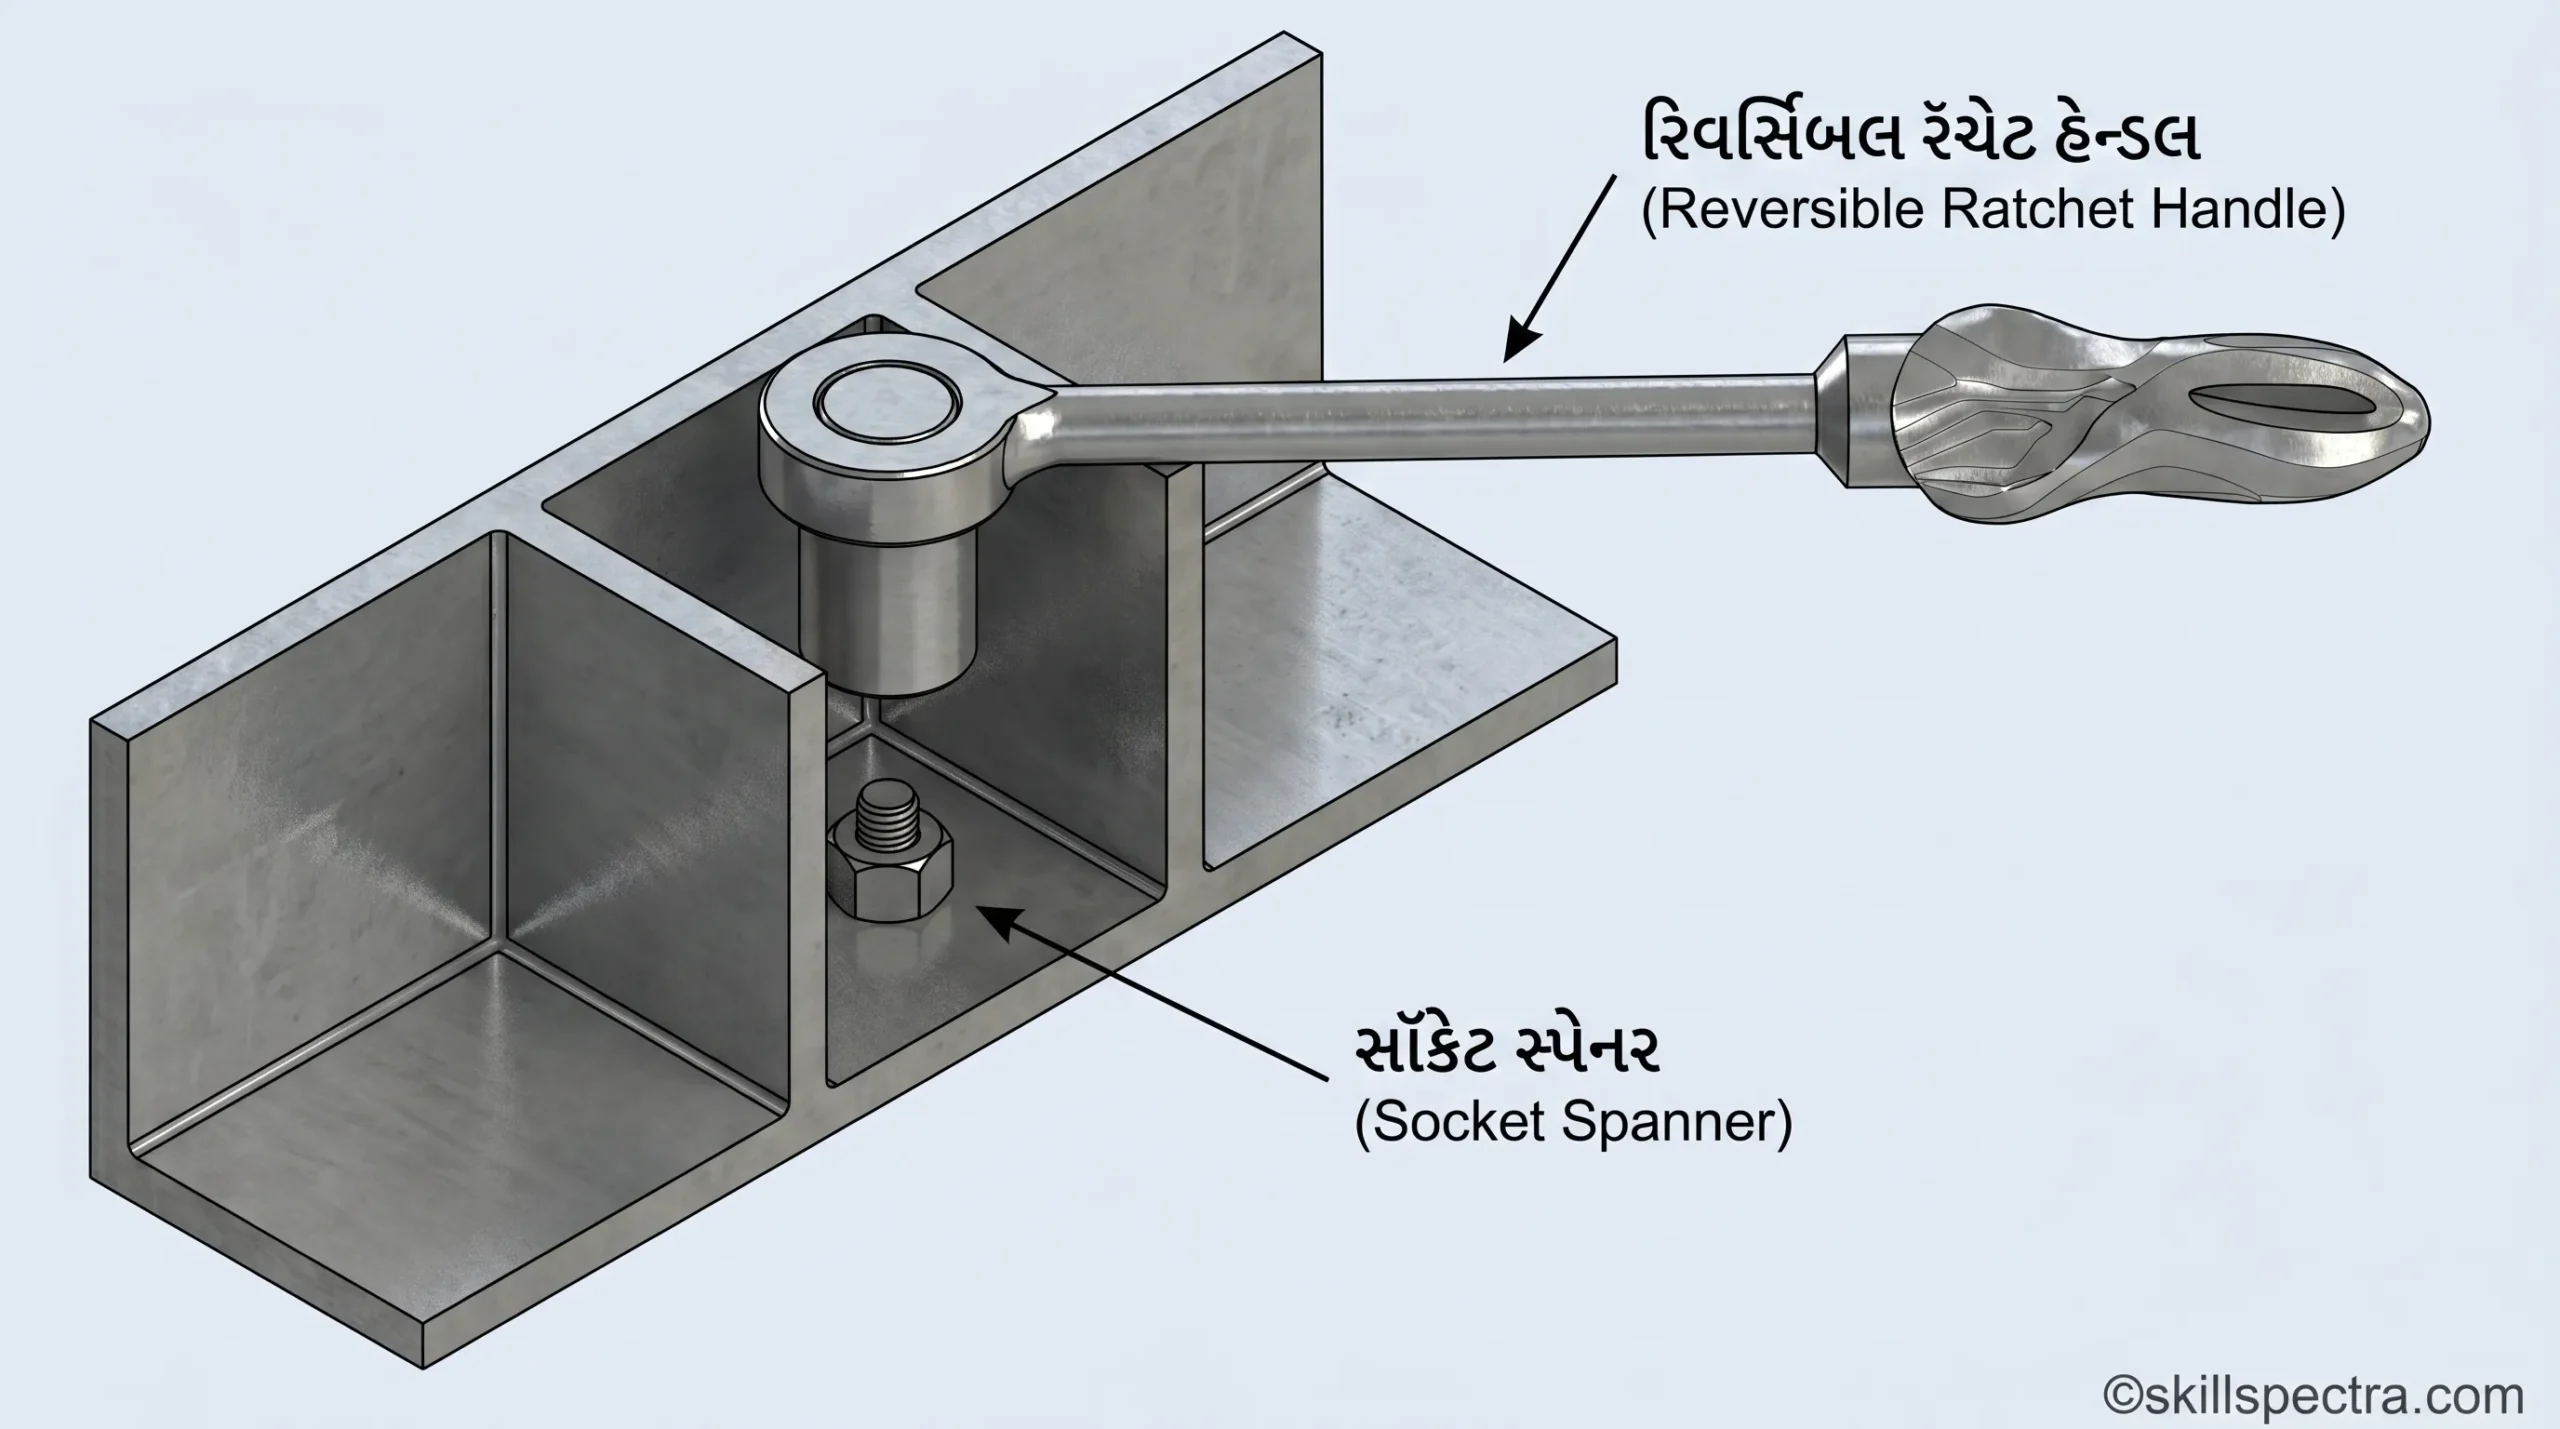
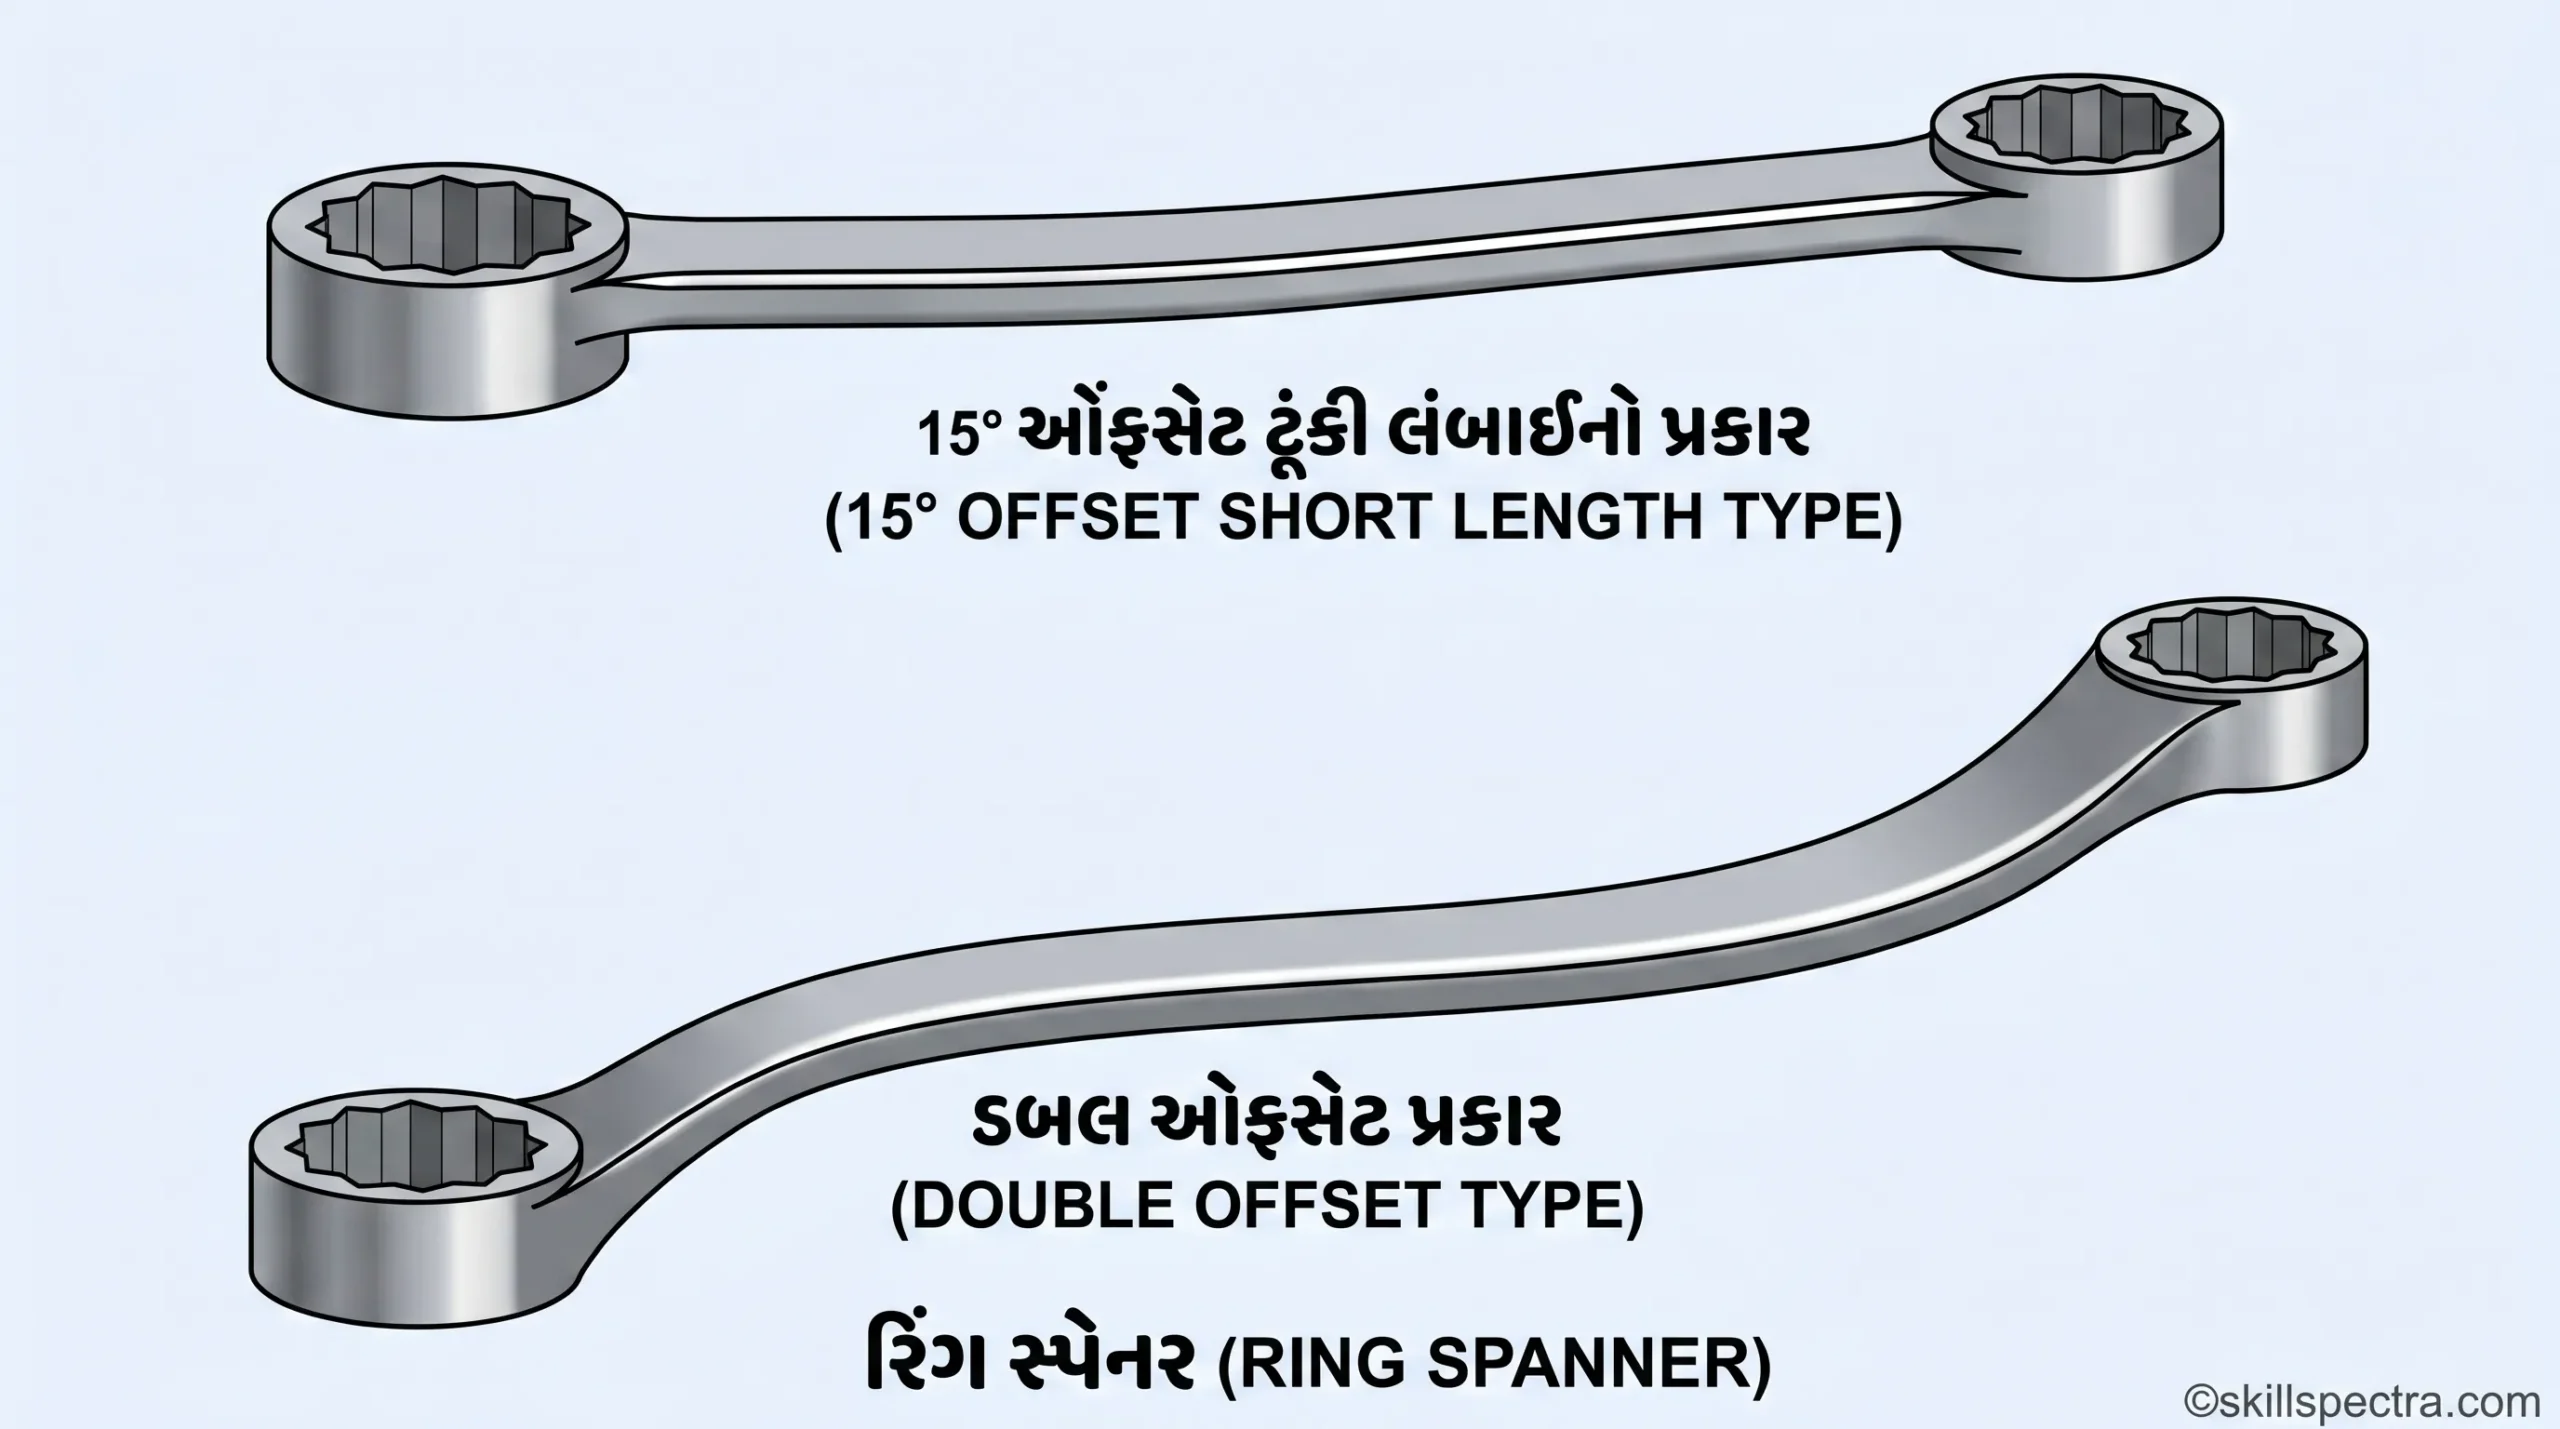
- Ring or Box Spanner (Fig 11): નટ્સને મજબૂતીથી ટાઈટ કરવા કે ખોલવા માટે વપરાય છે. તે બોલ્ટ અને નટ પર મલ્ટી-કોન્ટેક્ટ આપે છે.
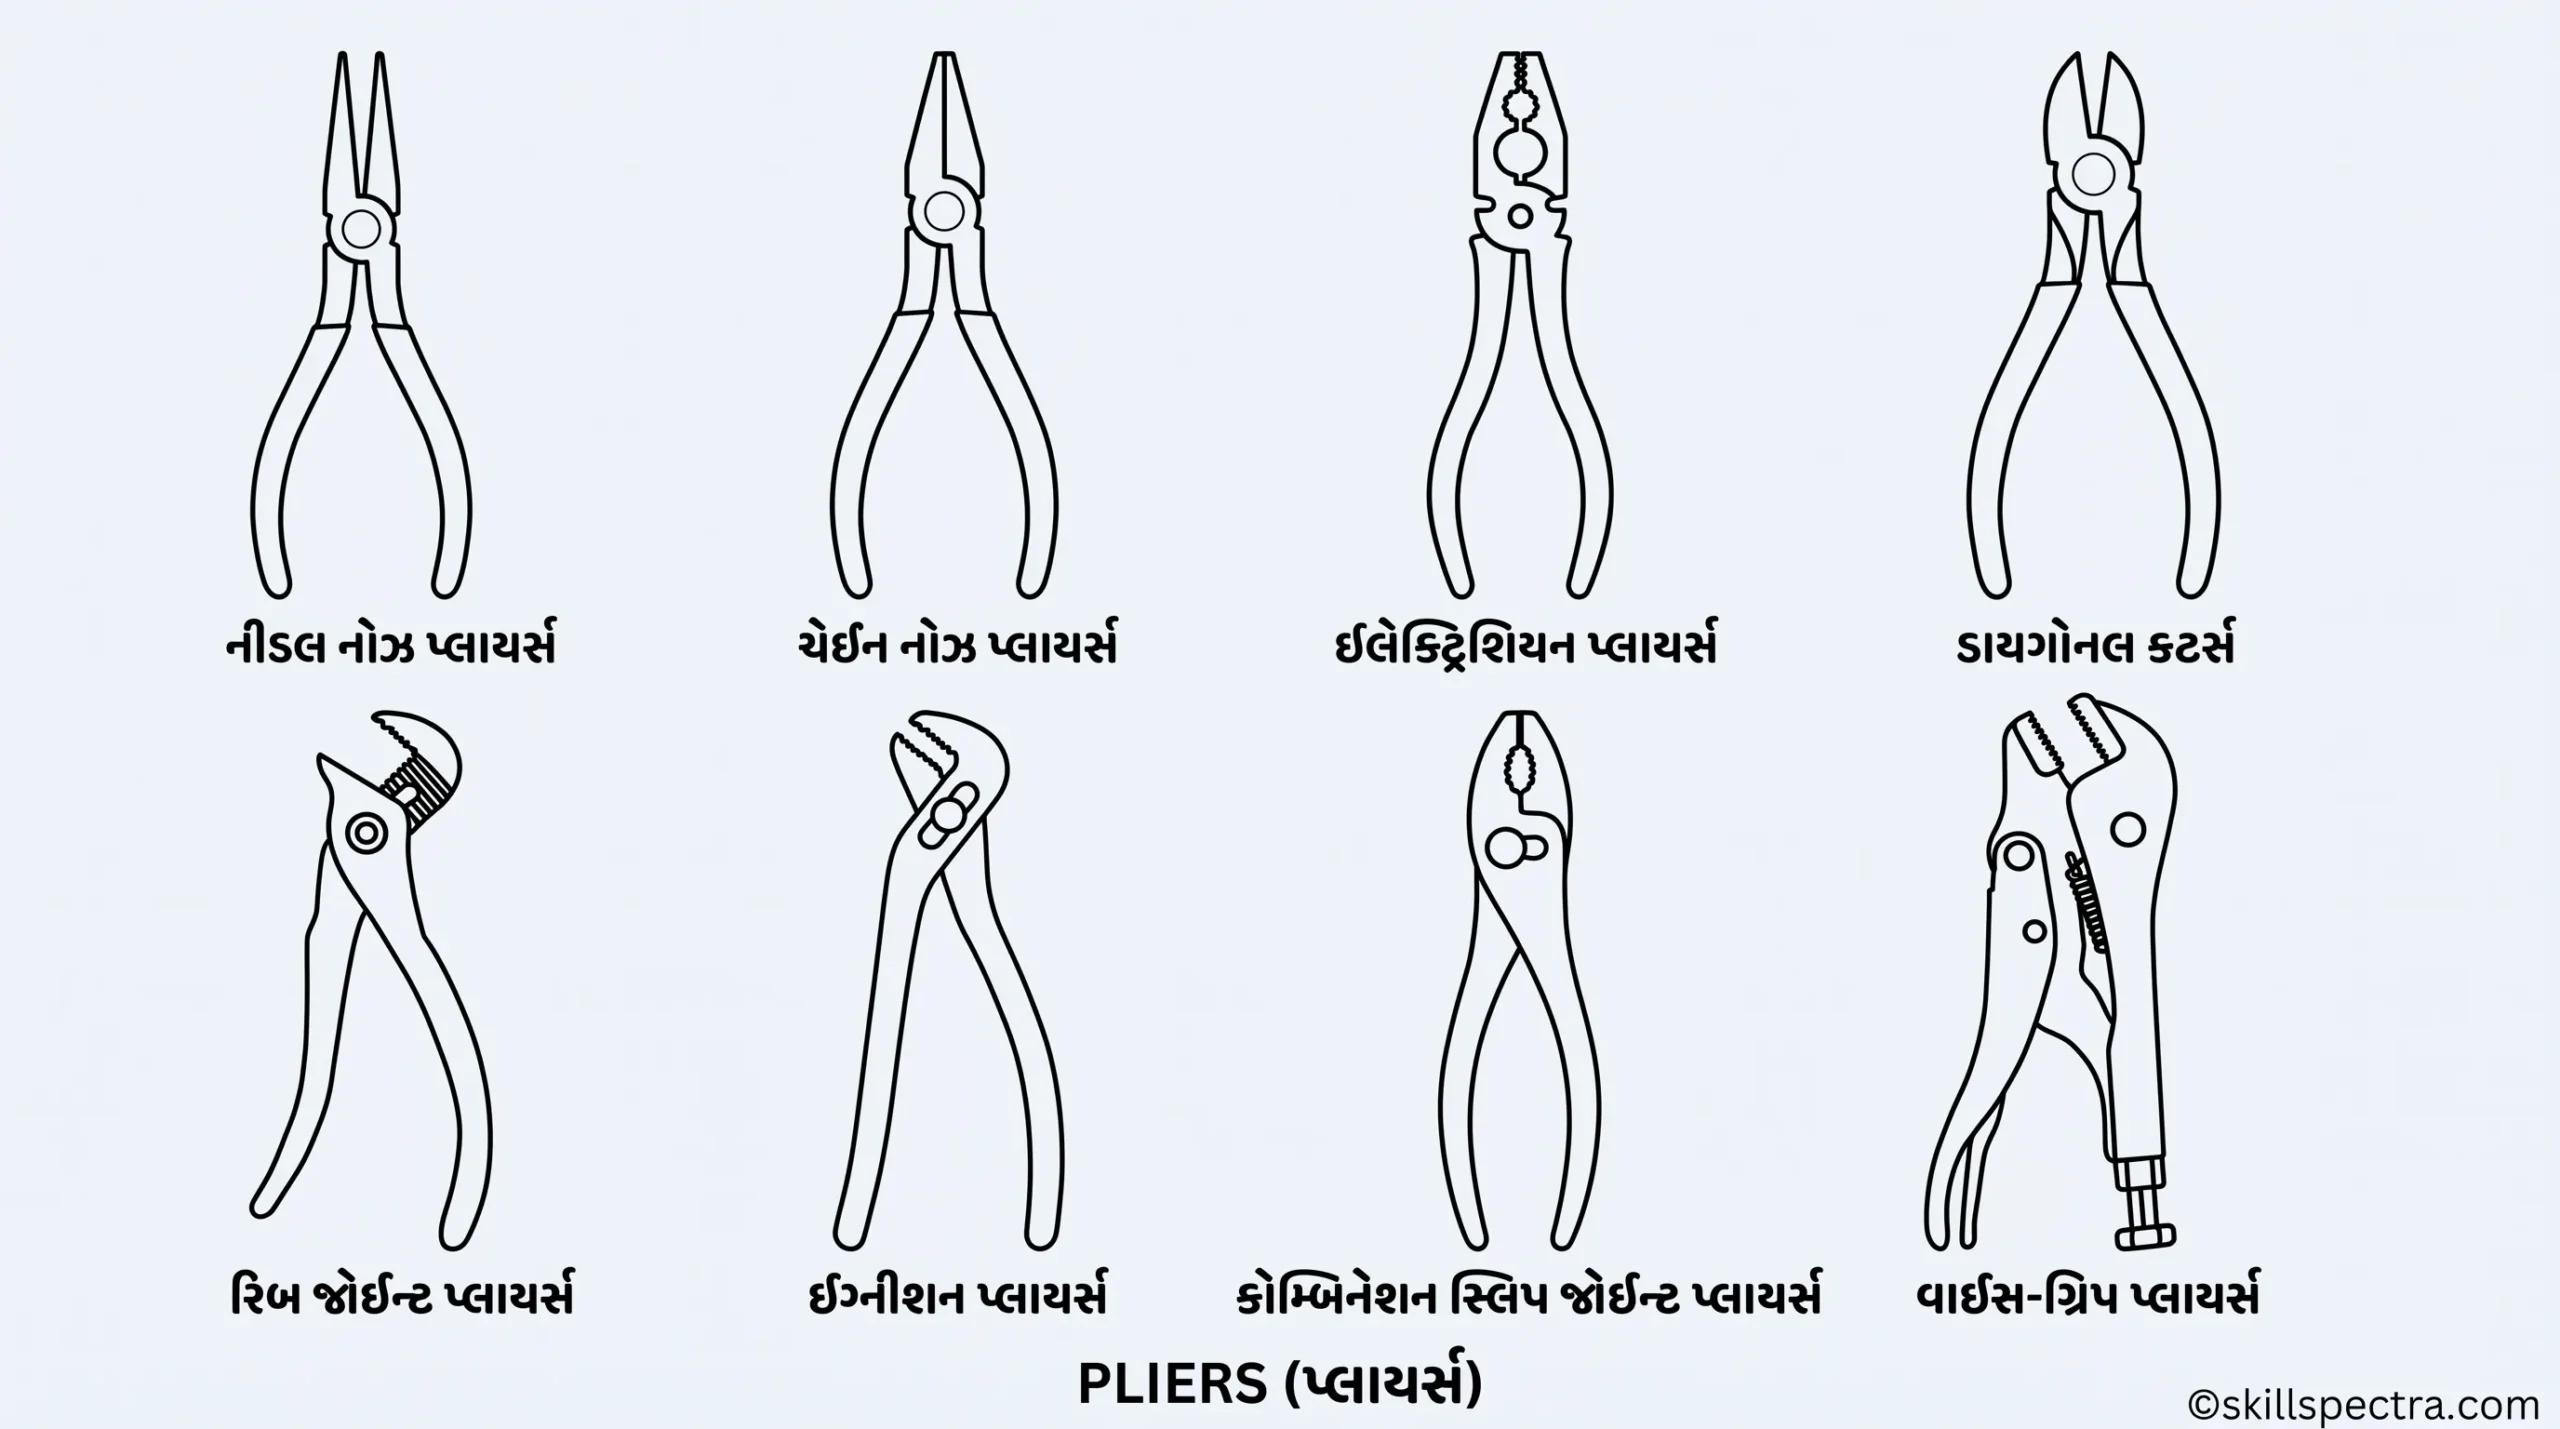
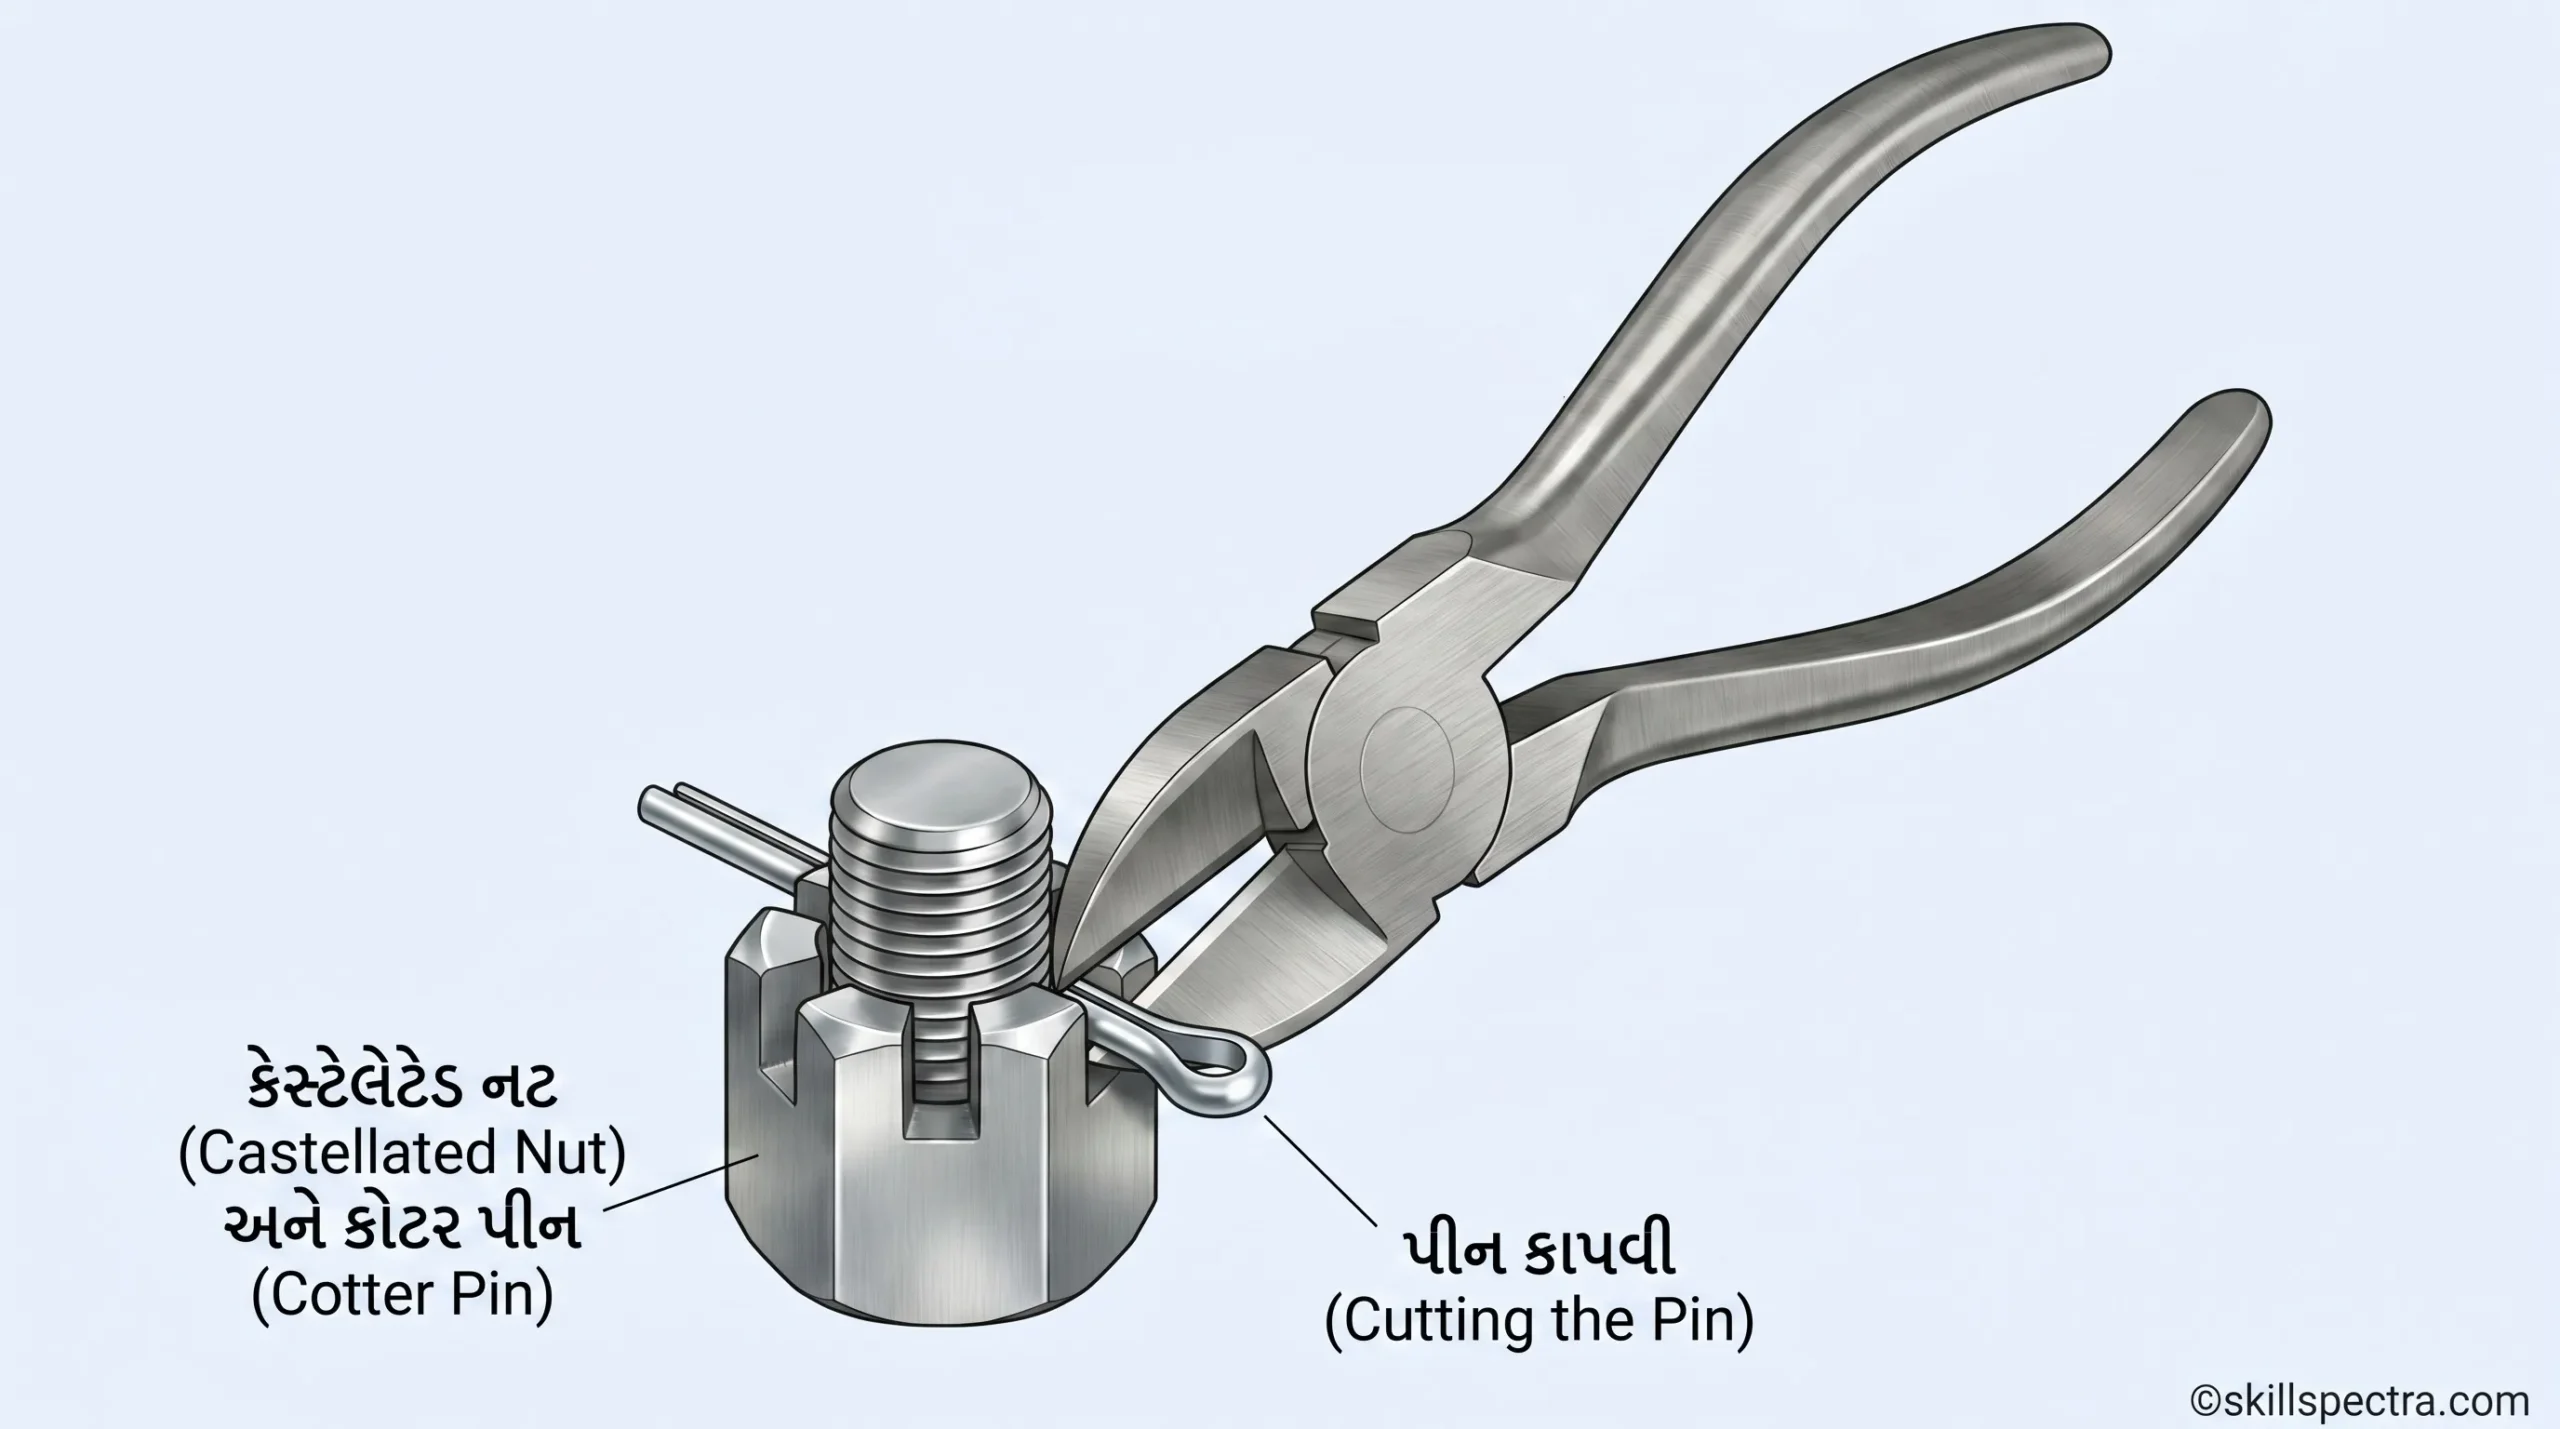
- Pliers (Fig 12): વાયર કાપવા, પાર્ટ્સ પકડવા, ઇલેક્ટ્રિકલ કનેક્શન ક્રિમ્પ કરવા અને કોટર પિન વાળવા માટે વપરાય છે. (Types: Needle nose, Chain nose, Electrician, Diagonal, etc.)
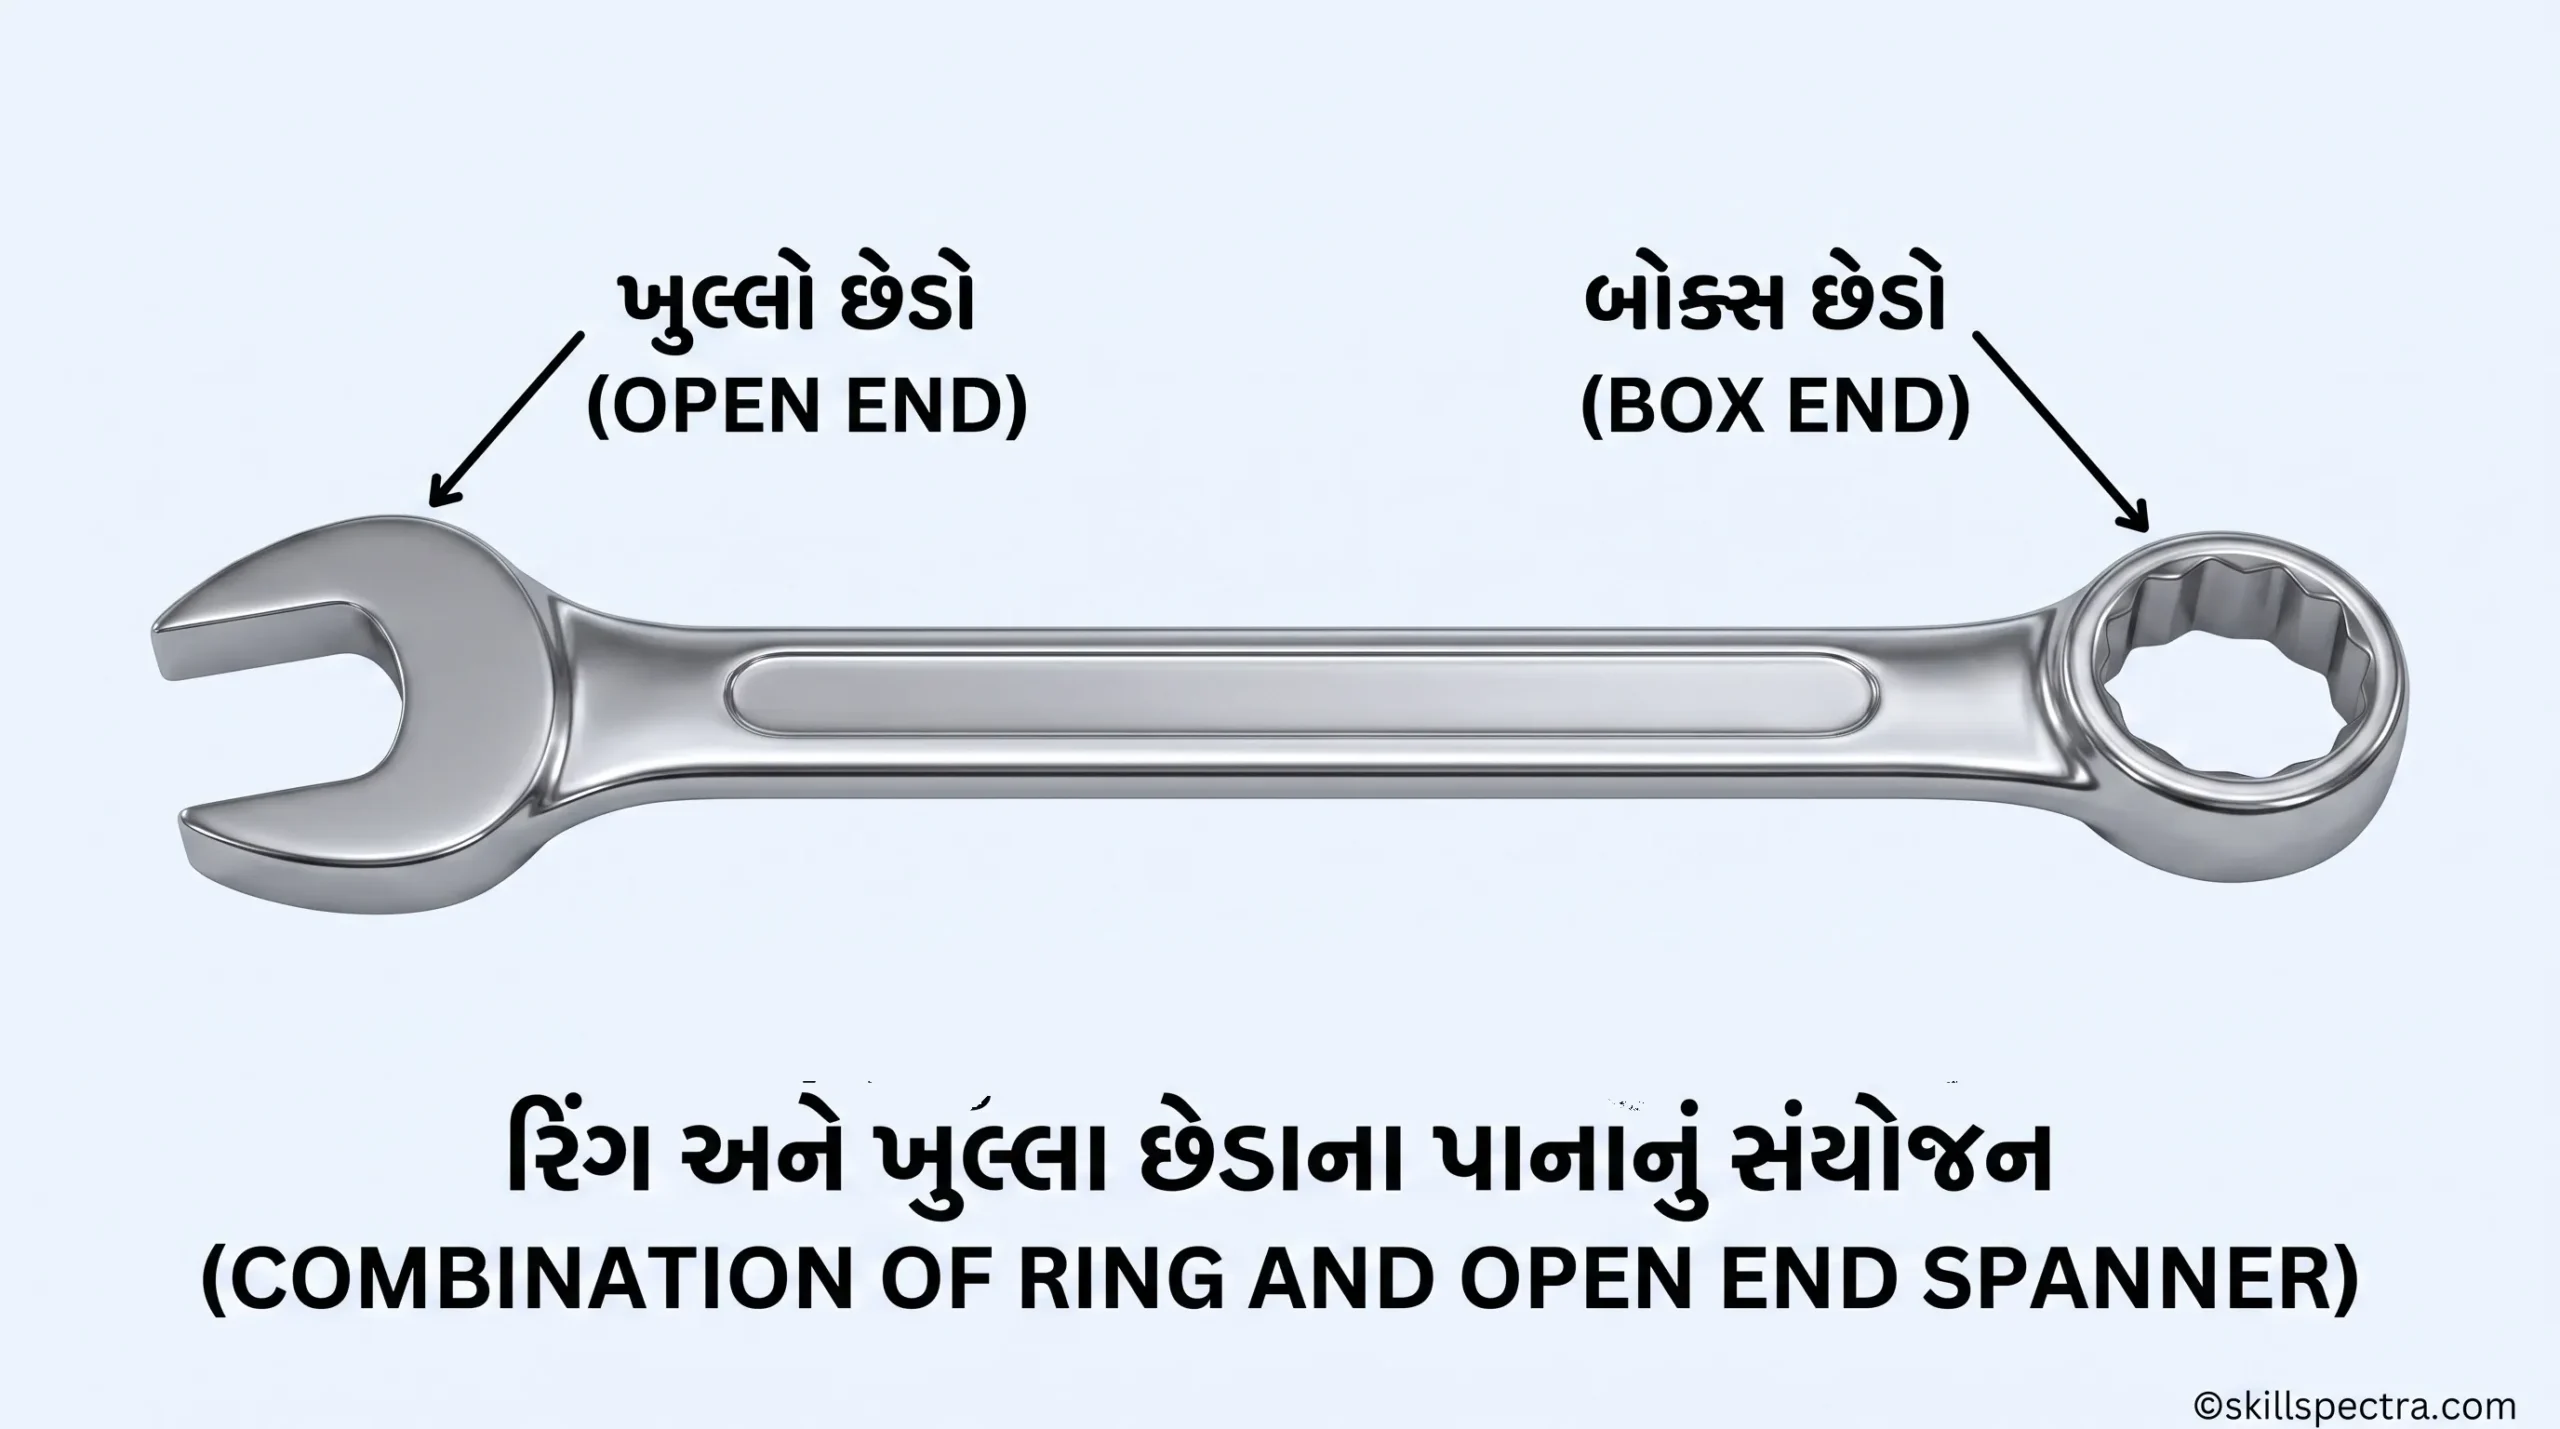
- Combination Spanner (Fig 13): આ ટૂલમાં એક છેડે open end અને બીજા છેડે box end (ring) હોય છે. બંને છેડા એક જ સાઇઝના હોય છે.
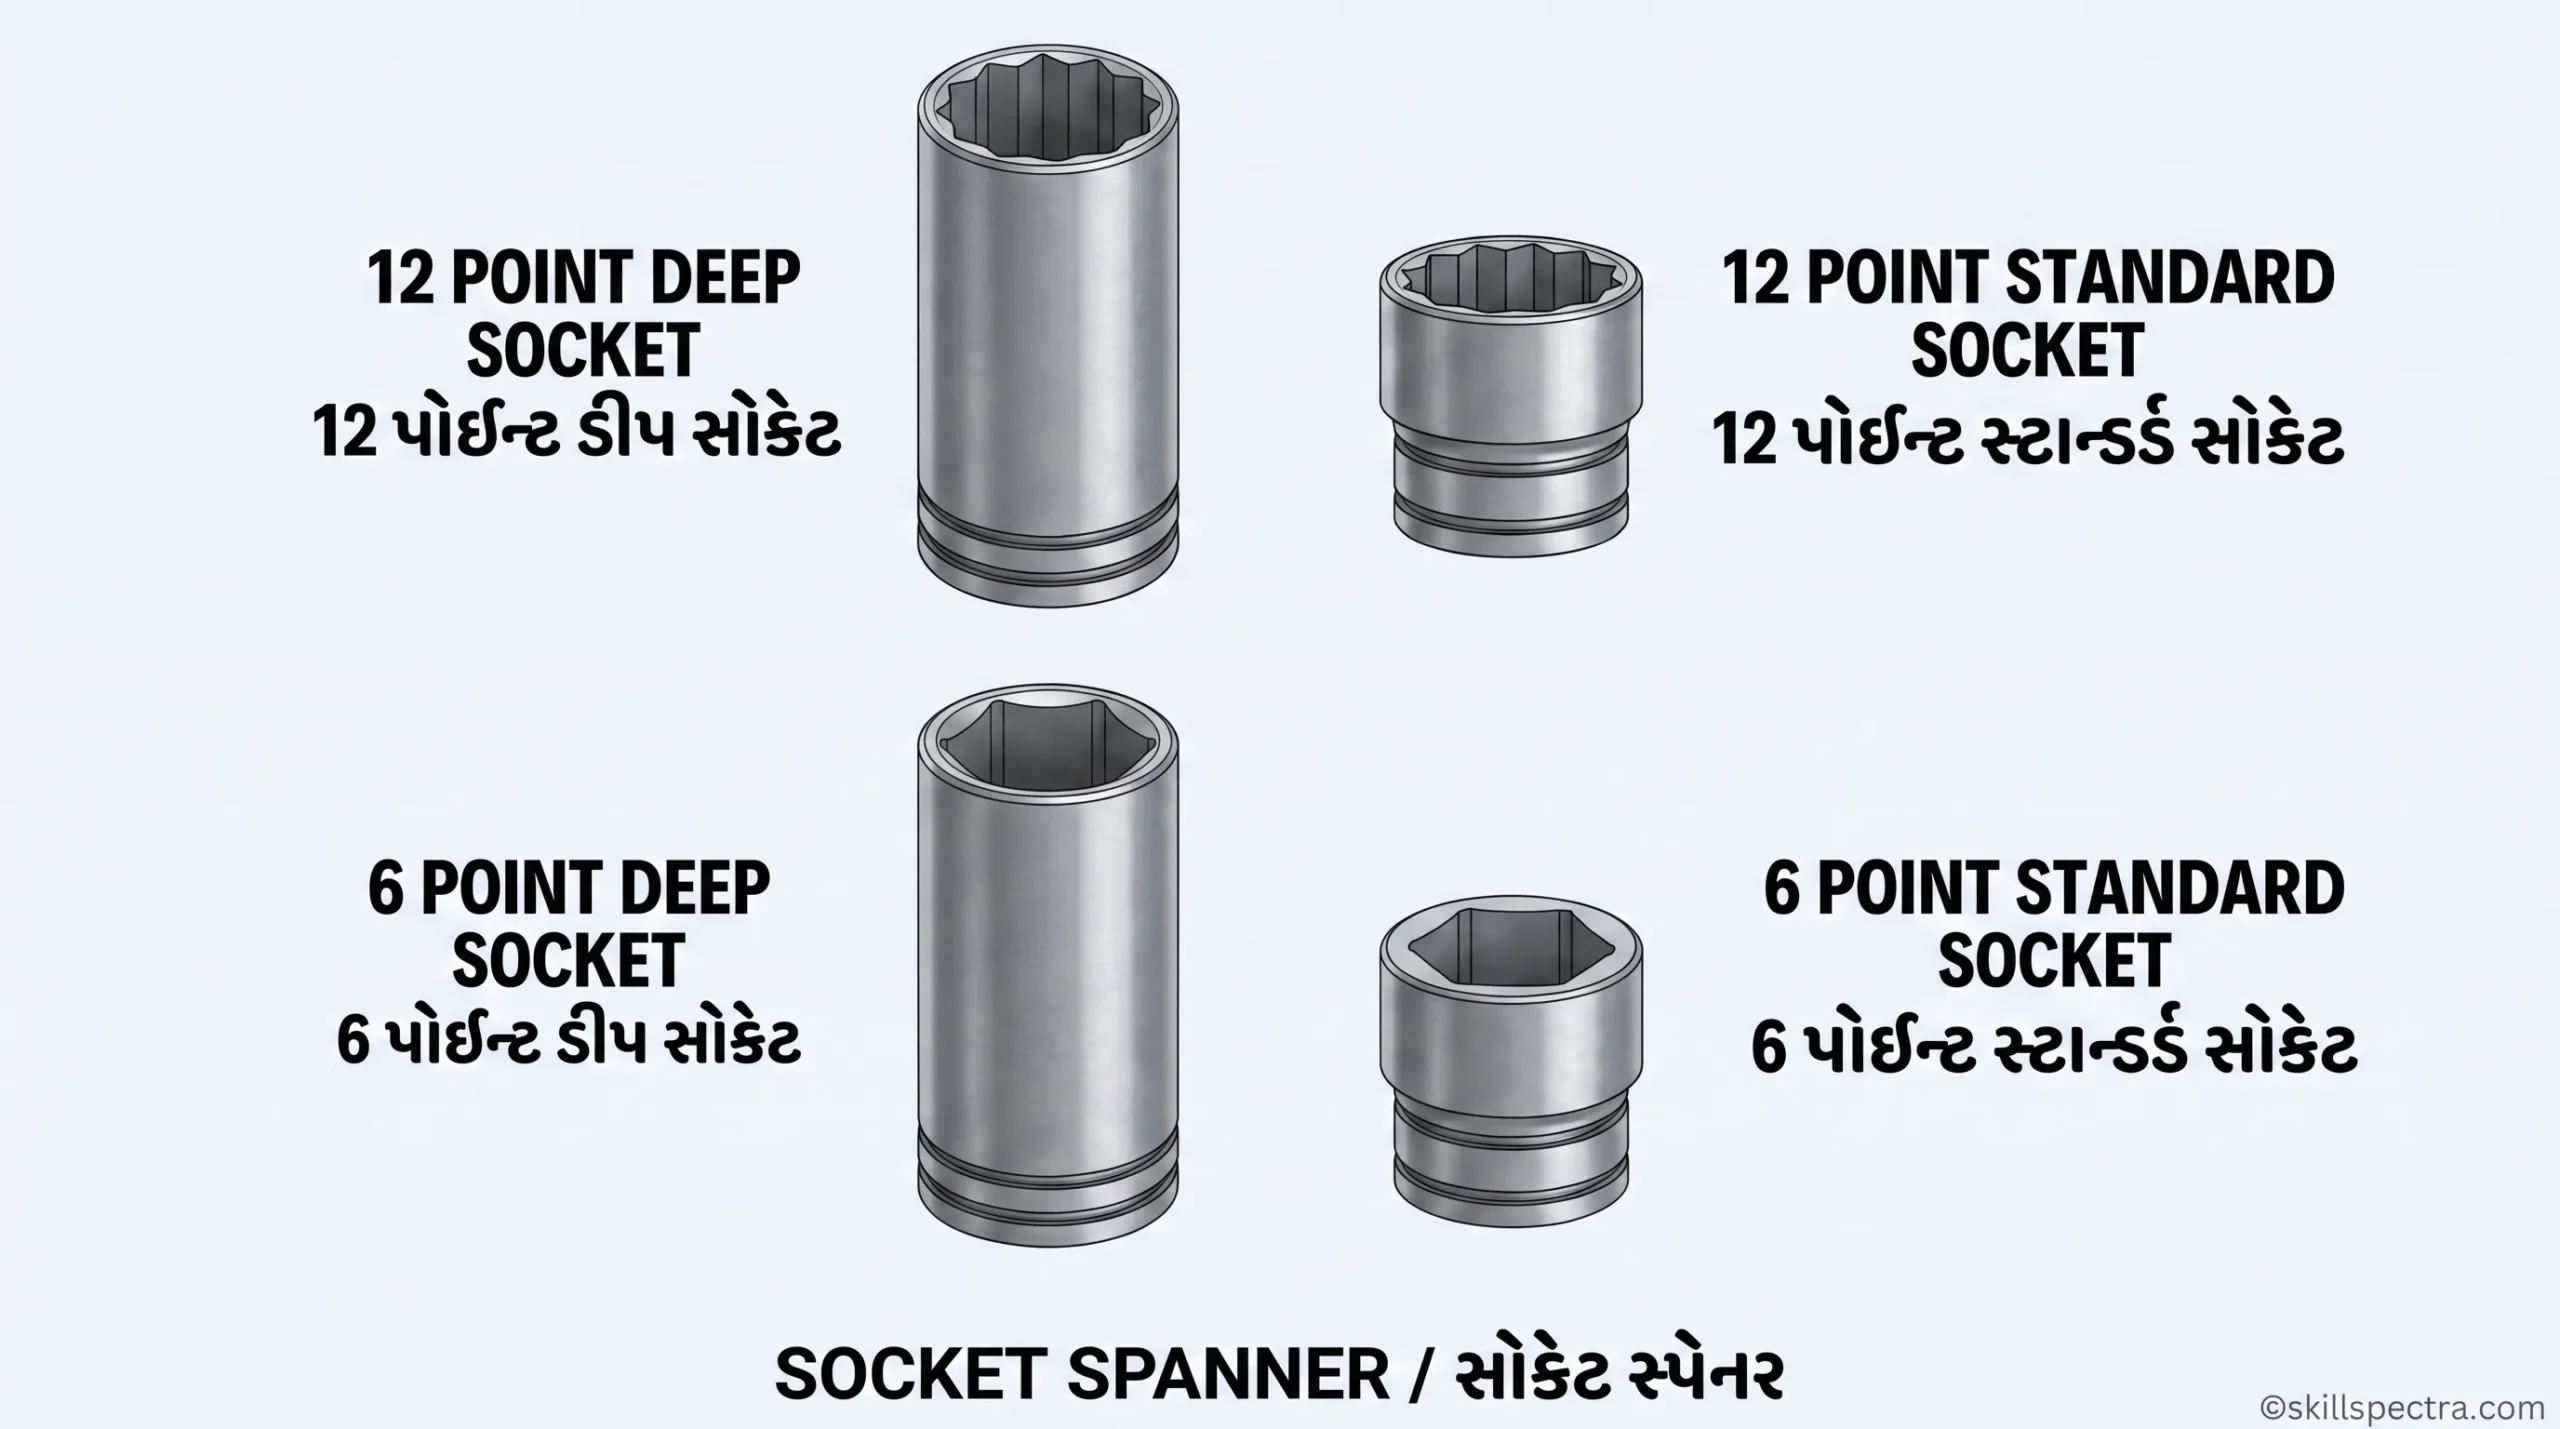
- Socket Spanners (Fig 14): આ સૌથી ઝડપી અને અનુકૂળ સ્પાનર્સ છે. તે બે સાઇઝમાં આવે છે: Standard અને Deep.
- Swivel Socket (Fig 15): તે યુઝરને ચોક્કસ ખૂણે (angle) fasteners ફેરવવાની મંજૂરી આપે છે.

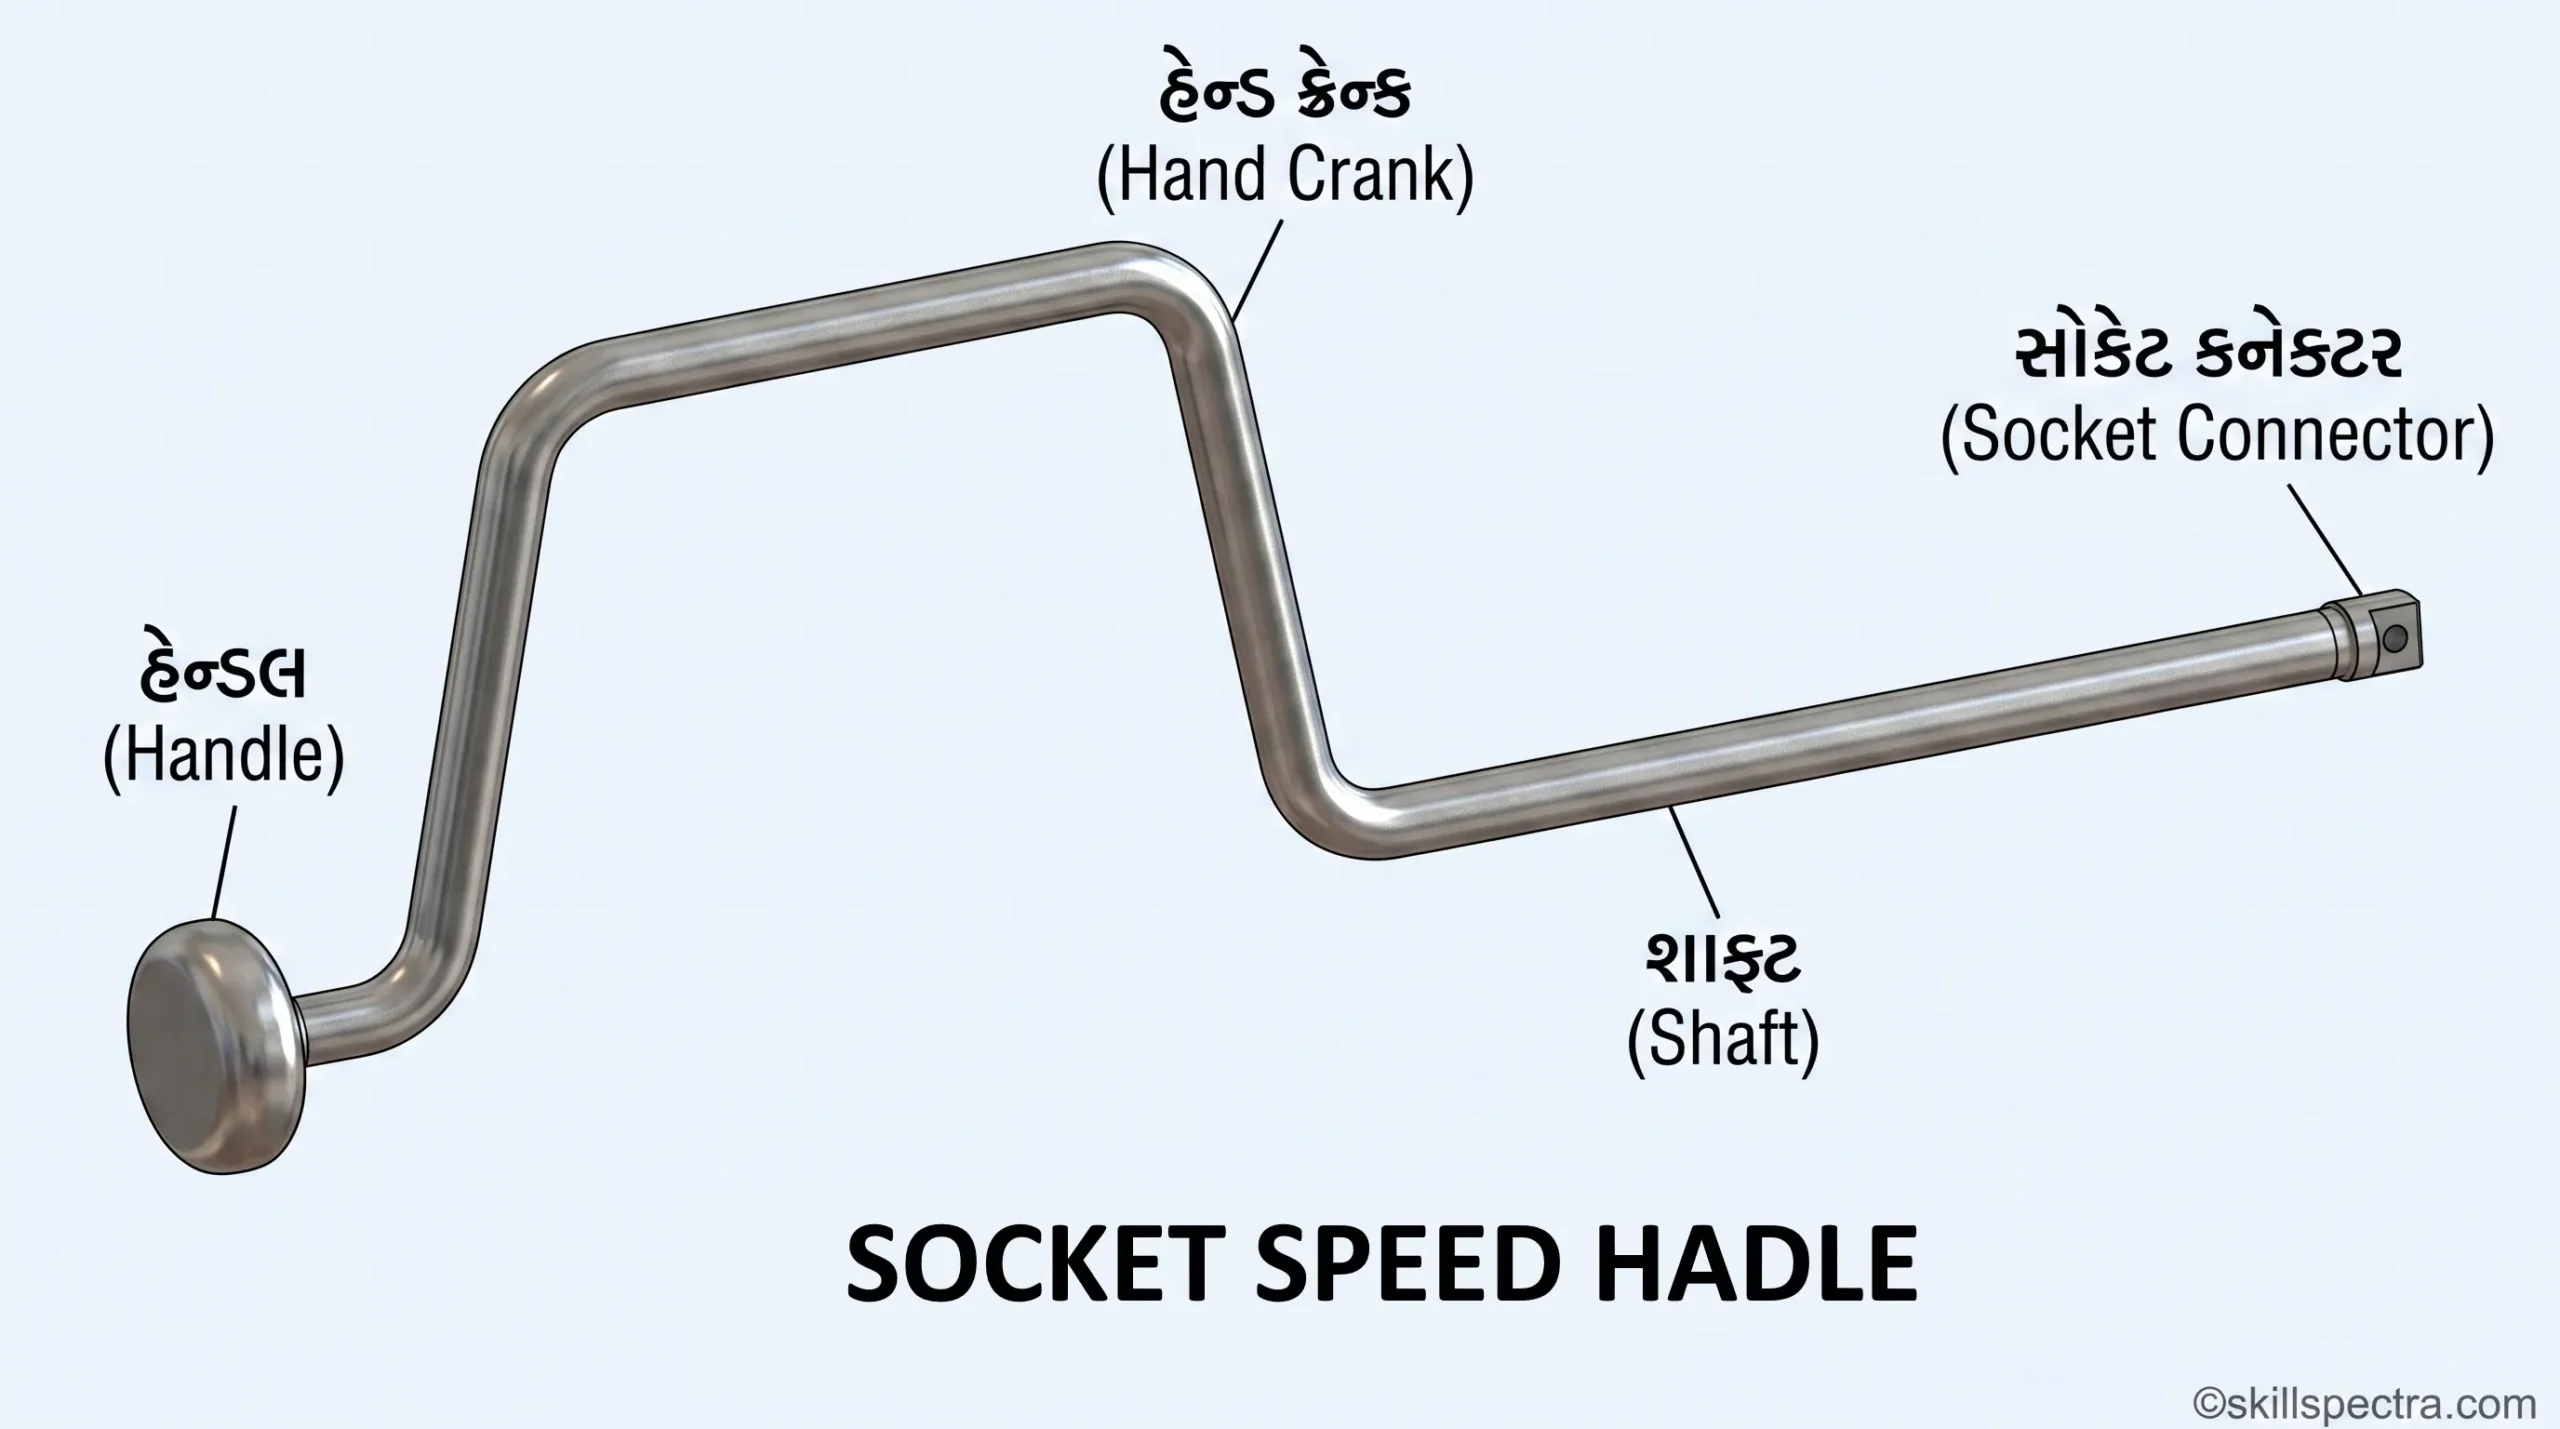
- Socket Handles: ઝડપથી કામ કરવા માટે speed handle નો ઉપયોગ થાય છે.
Safety Rules for Pliers (પ્લાયર્સ માટે સુરક્ષા નિયમો) 🛡️
- Hardened objects ને કાપવાનું ટાળો.
- નટ્સ, બોલ્ટ્સ કે ટ્યુબિંગ ફિટિંગને ફેરવવા માટે ક્યારેય પ્લાયર્સનો ઉપયોગ કરશો નહીં.
🛠️ Pliers અને Snips: મિકેનિકલ ટૂલ્સની સંપૂર્ણ સમજ (ITI Mechanic Diesel)
નમસ્તે વિદ્યાર્થીમિત્રો! આજના લેસનમાં આપણે વર્કશોપમાં સૌથી વધુ વપરાતા ટૂલ્સ Pliers અને Snips વિશે વિગતવાર શીખીશું. 🛠️🔧
Pliers (પ્લાયર્સ) 🛠️
Objectives (ઉદ્દેશ્યો): આ લેસનના અંતે તમે સમજી શકશો:
- State the features of pliers: પ્લાયર્સની લાક્ષણિકતાઓ જણાવવી.
- State the uses of pliers: પ્લાયર્સના ઉપયોગો સમજાવવા.
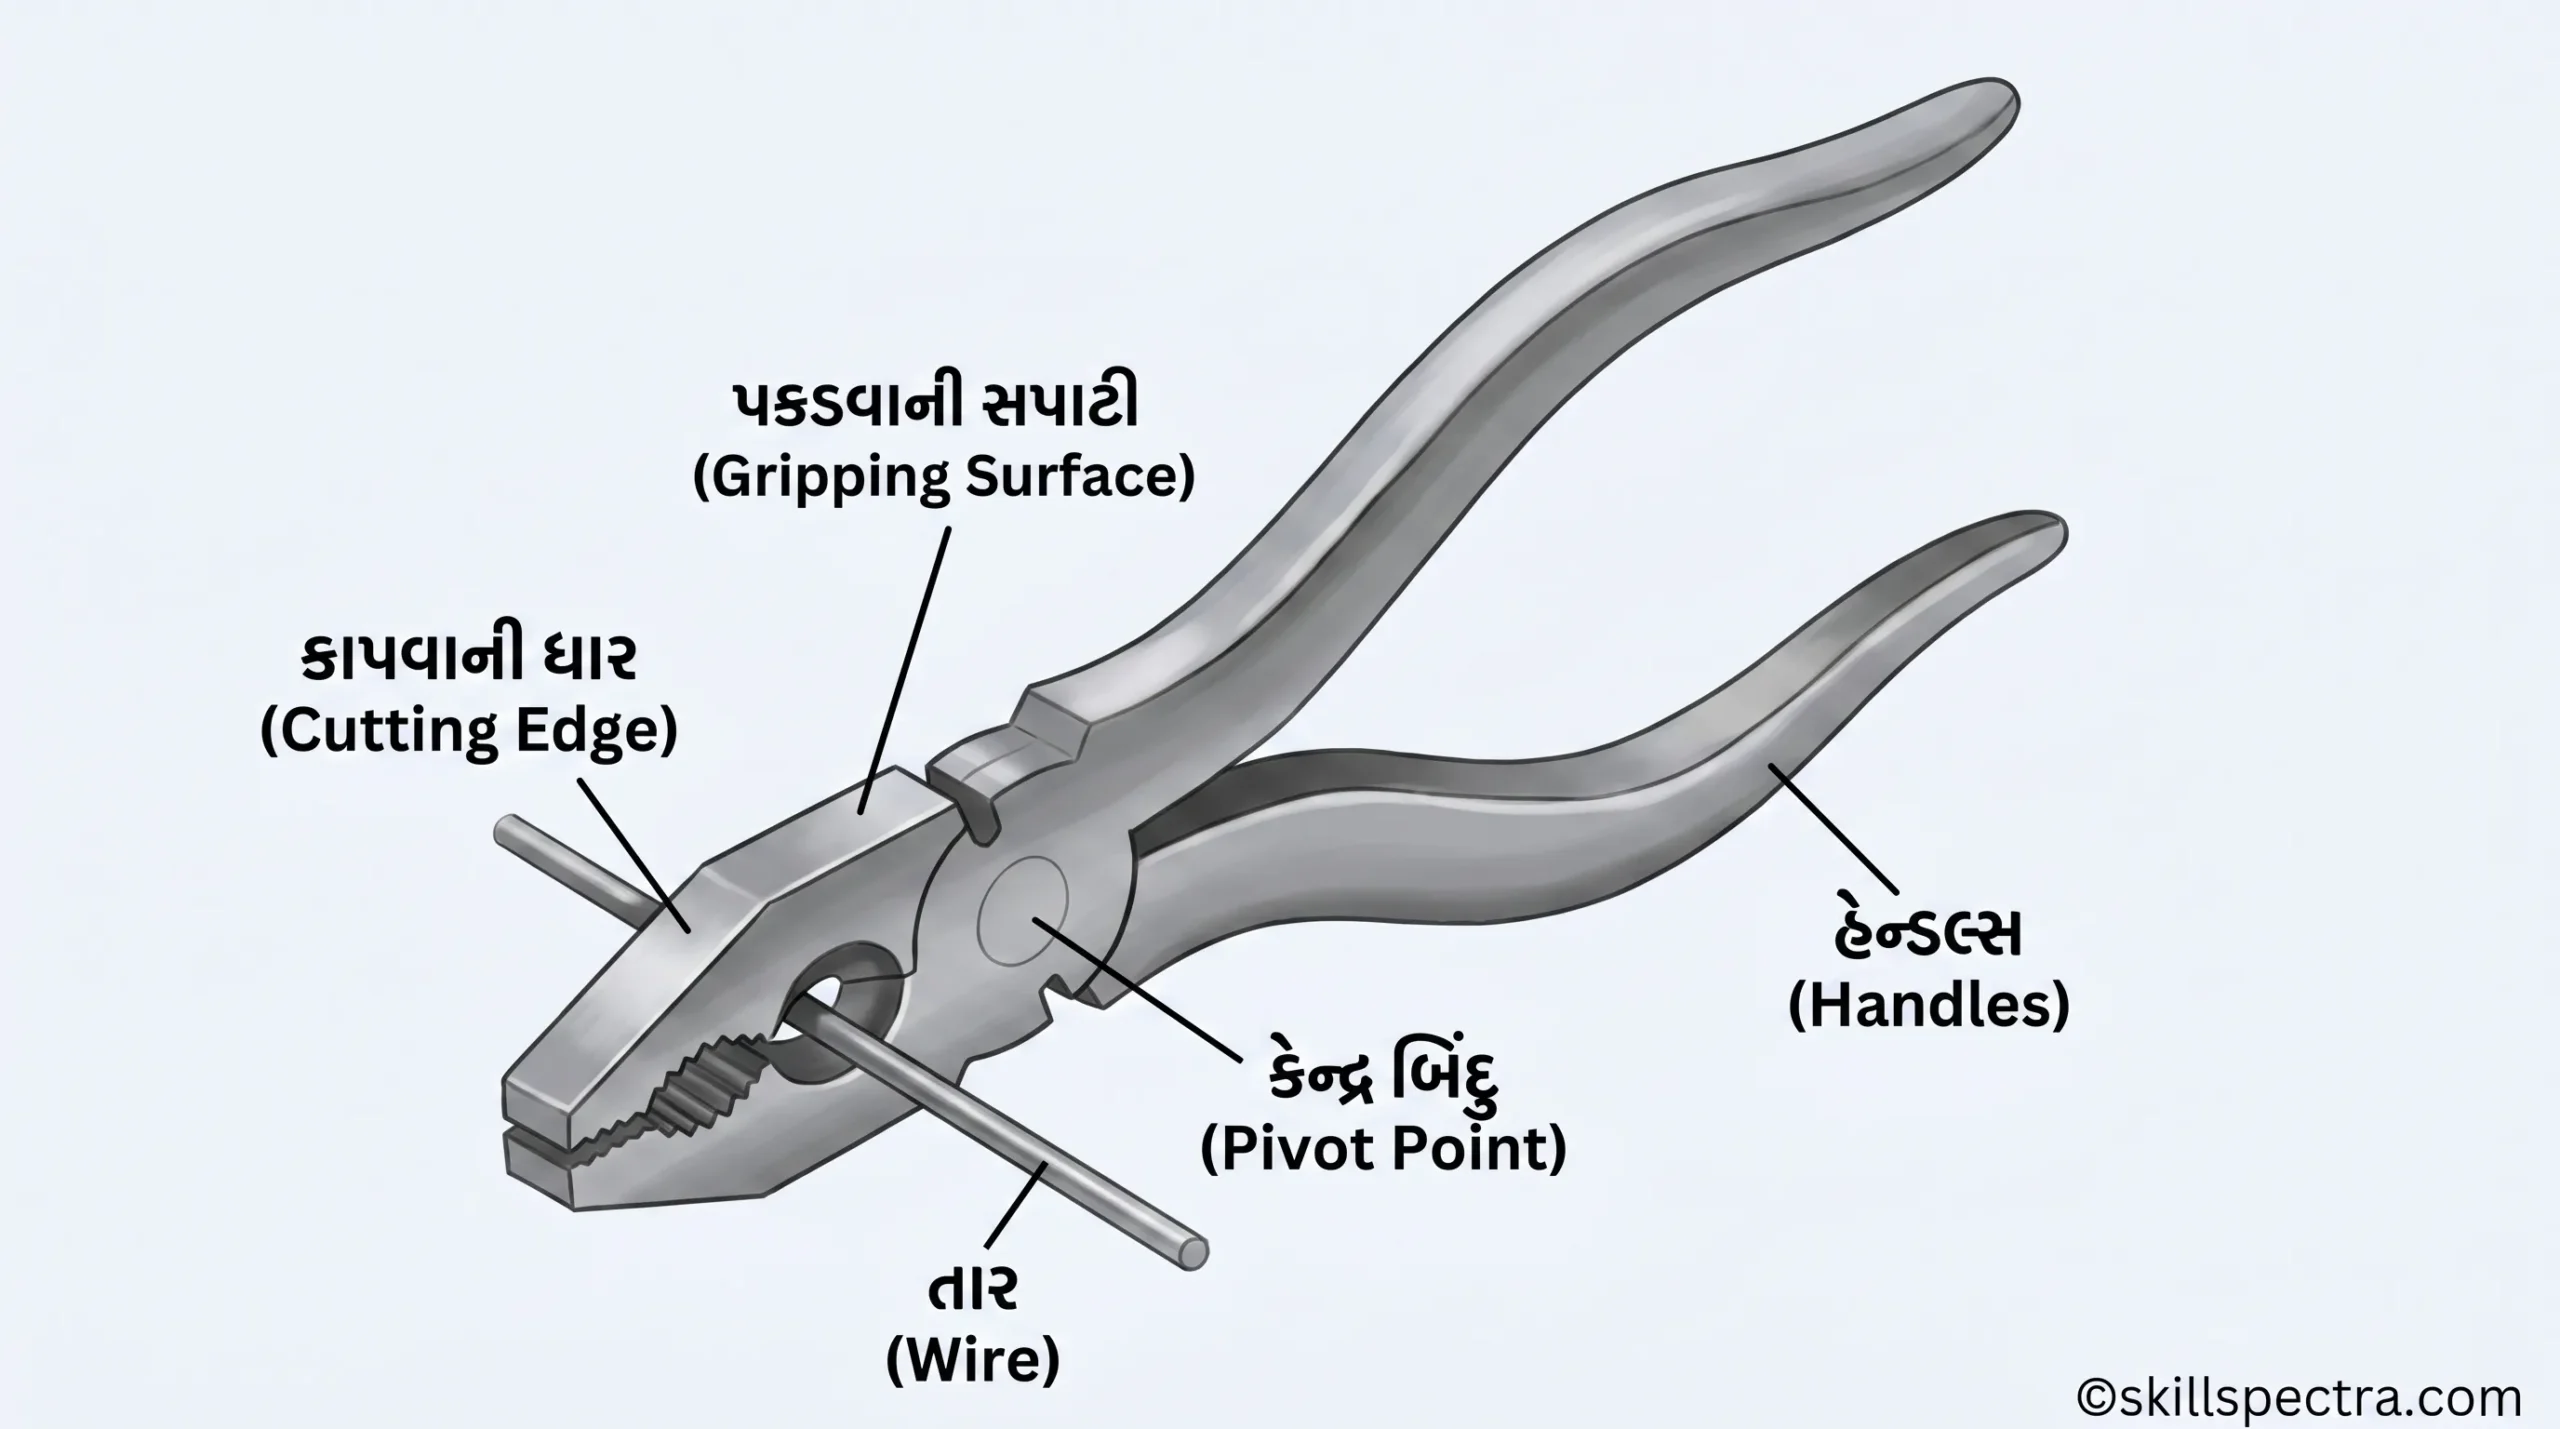
Features (લાક્ષણિકતાઓ): Pliers માં બે legs હોય છે જે pivot, hinge અથવા fulcrum pin દ્વારા એકબીજા સાથે જોડાયેલા હોય છે. દરેક leg માં એક લાંબો handle અને એક ટૂંકો jaw (જડબું) હોય છે.
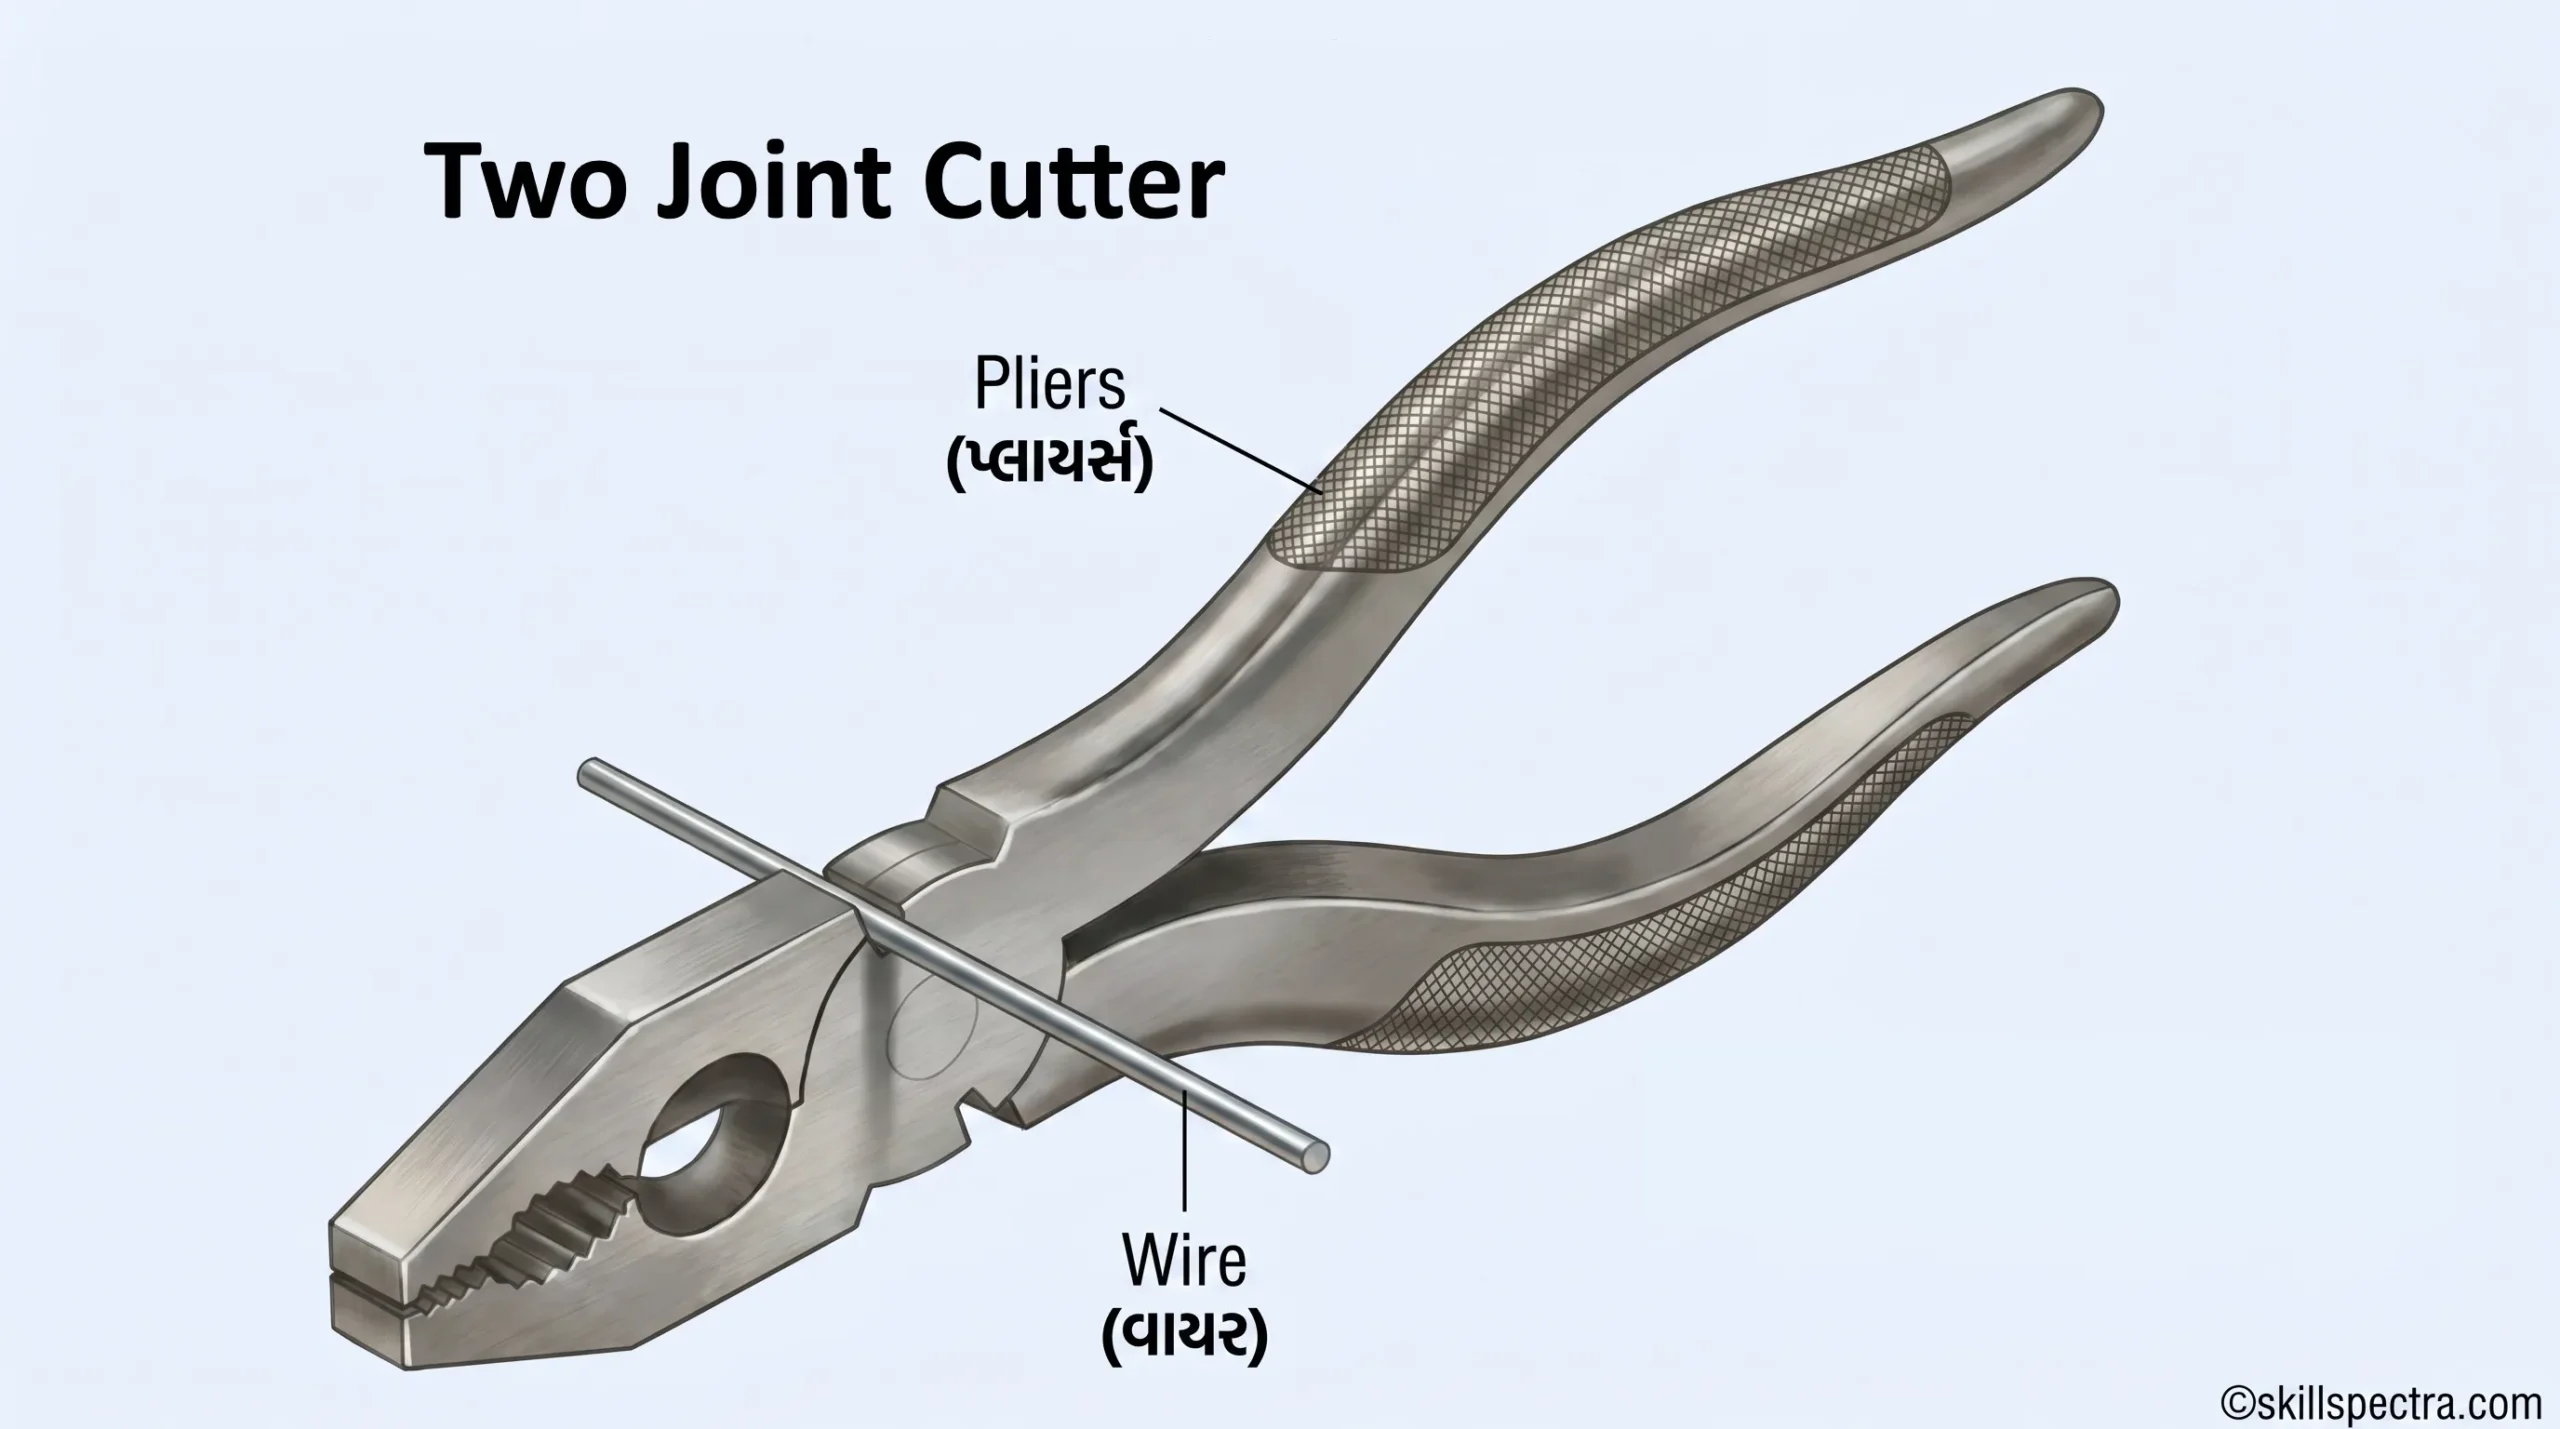
Elements of pliers with two joint cutters (Fig 1) (Combination pliers): કોમ્બિનેશન પ્લાયર્સના મુખ્ય ભાગો નીચે મુજબ છે:
- Flat jaw: સપાટ જડબું.
- Pipe grip: પાઇપ પકડવા માટેની જગ્યા.
- Side Cutters: સાઇડ કટર.
- Joint cutters: જોઈન્ટ કટર.
- Handles: પકડવા માટેના હેન્ડલ.
Features (વિશેષતાઓ):
- Flat jaw tips એ સામાન્ય પકડ (general gripping) માટે serrated (દાંતાવાળા) હોય છે.
- Pipe grip એ નળાકાર વસ્તુઓ (cylindrical objects) ને પકડવા માટે serrated હોય છે. (Fig 2) 🔩
Cutters (કટર્સ):
- Cutters નો ઉપયોગ પોચા વાયર (soft wires) કાપવા માટે થાય છે. (Fig 3)
- Two joint cutters નો ઉપયોગ સ્ટીલના વાયરને કાપવા અથવા શેરિંગ (shearing) કરવા માટે થાય છે. (Fig 4) ✂️
Handles (હેન્ડલ્સ):
- Handles નો ઉપયોગ હાથ વડે દબાણ (pressure) આપવા માટે થાય છે.
Size (કદ):
- Pliers સામાન્ય રીતે 150 mm થી 230 mm ના કદમાં ઉપલબ્ધ હોય છે. (Size = Overall length).
Other types of pliers (પ્લાયર્સના અન્ય પ્રકારો) 🛠️
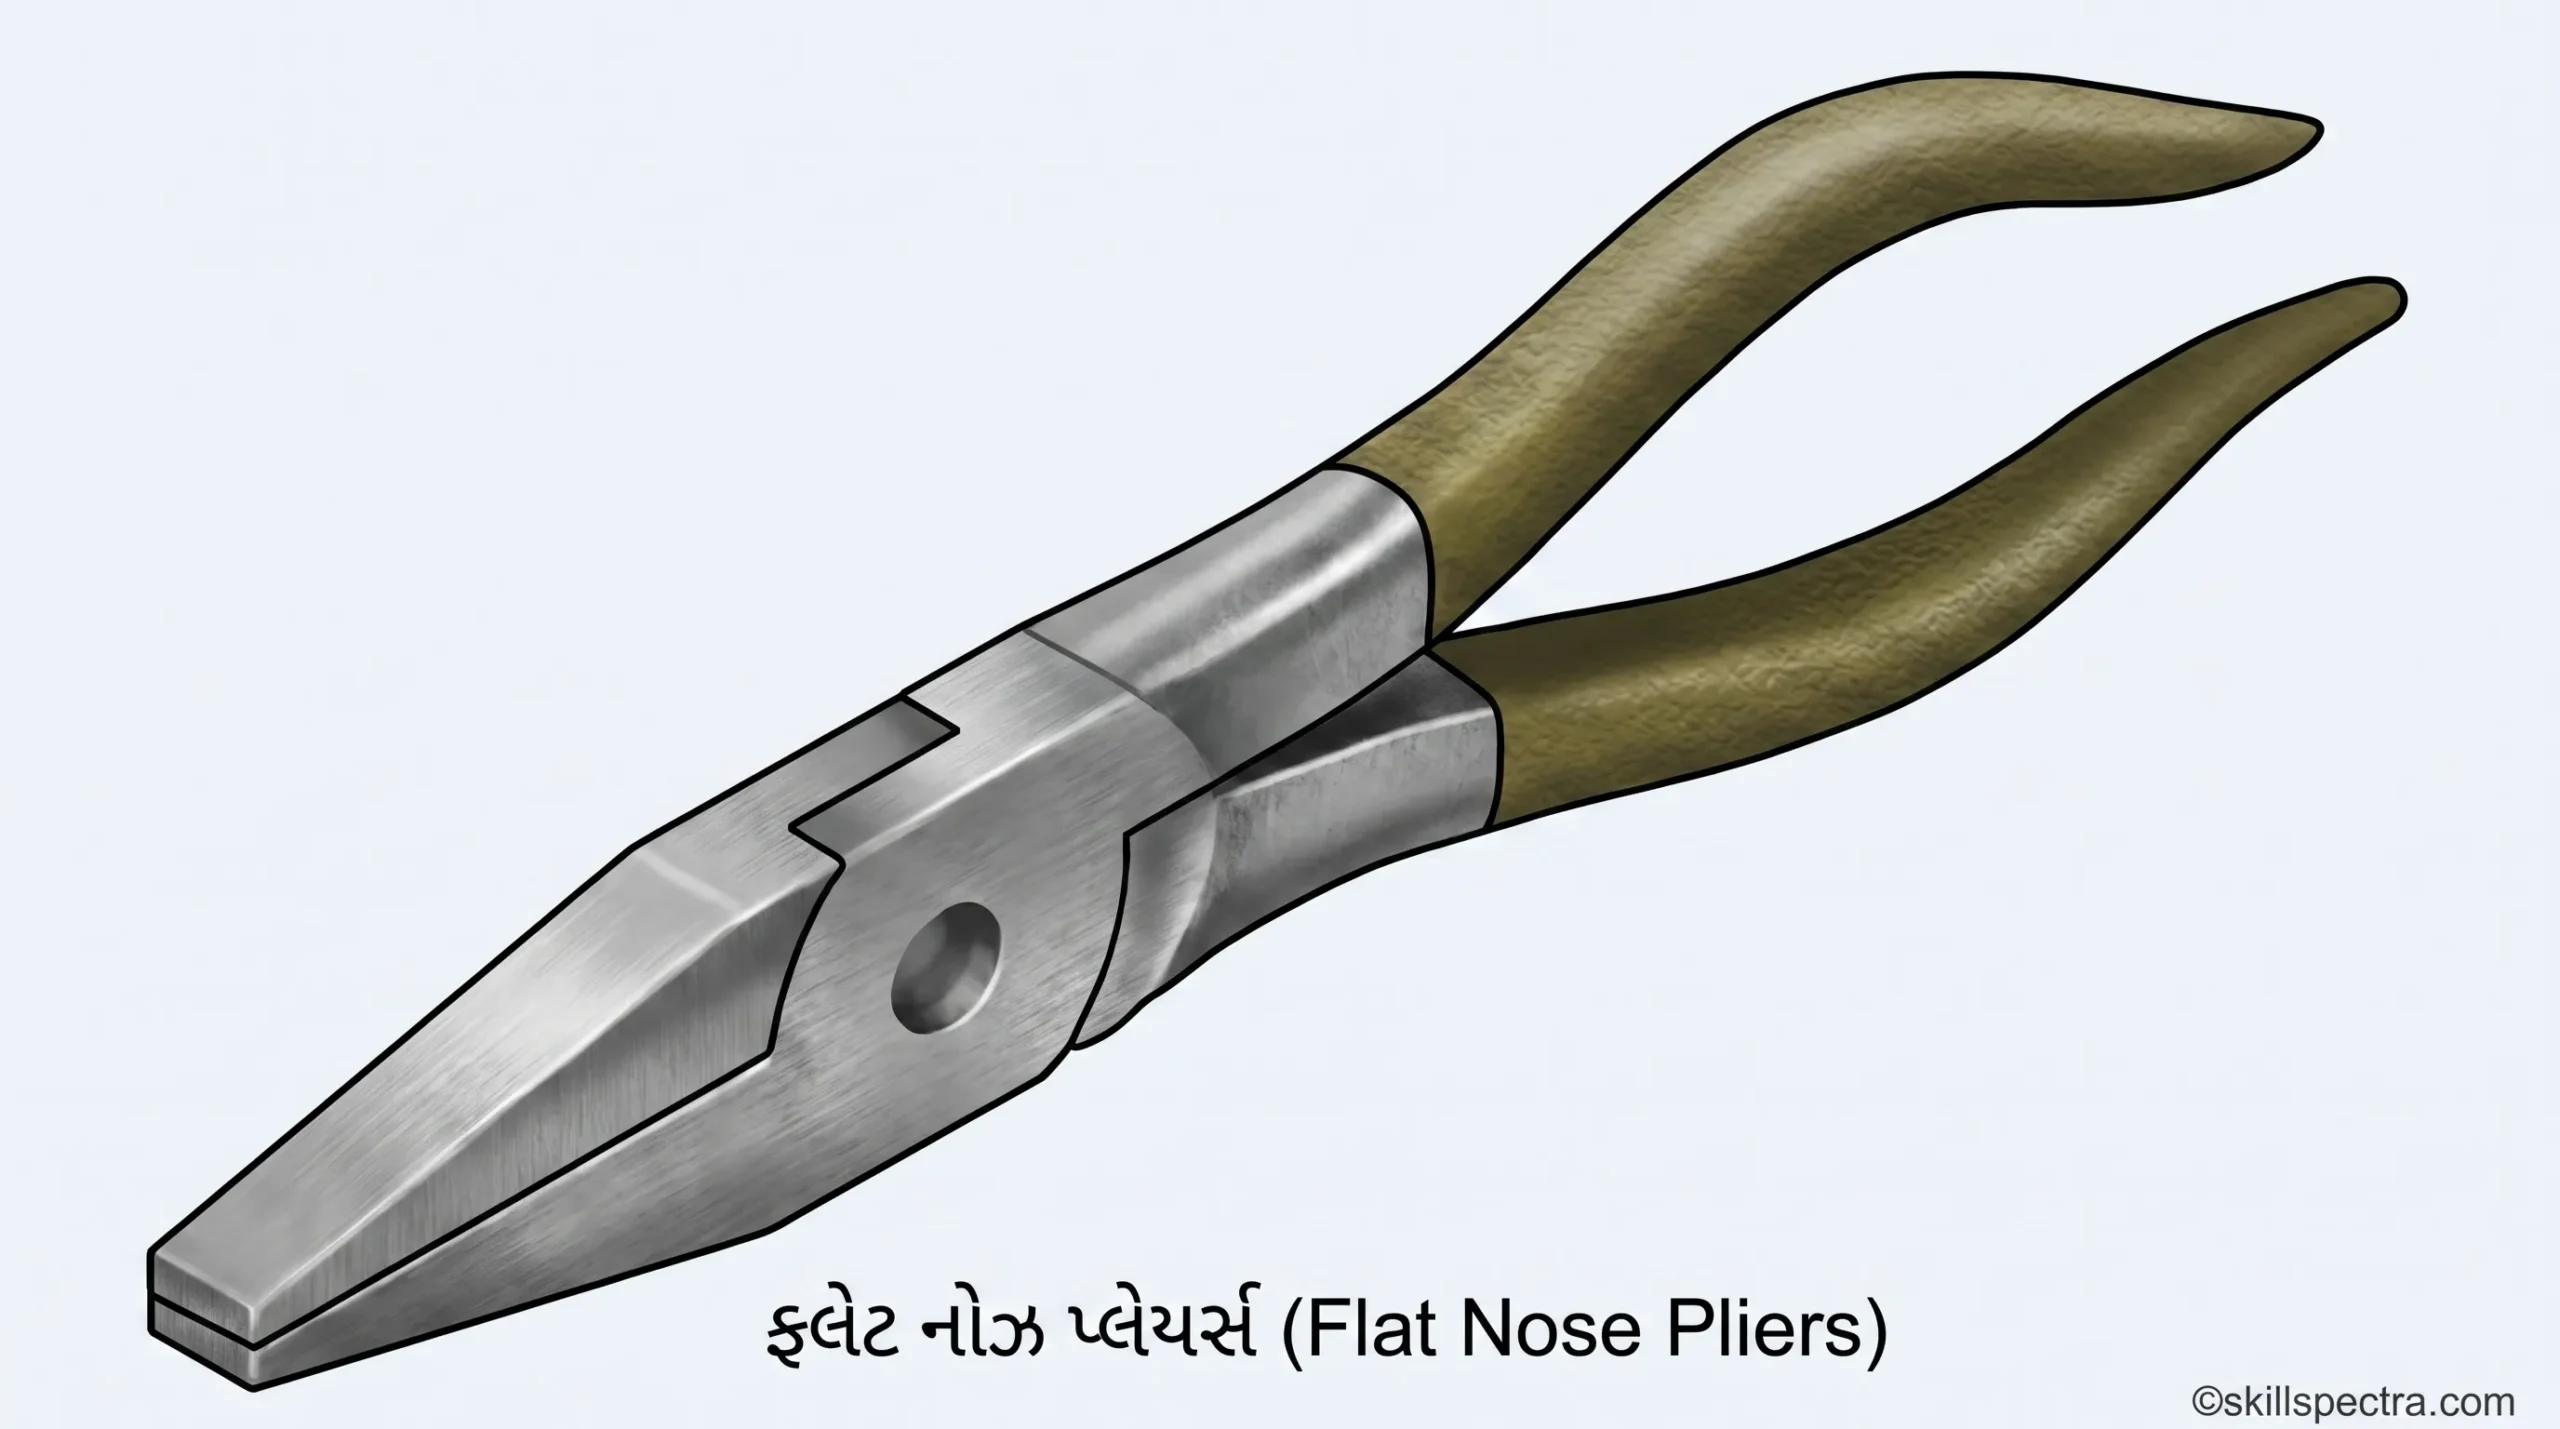
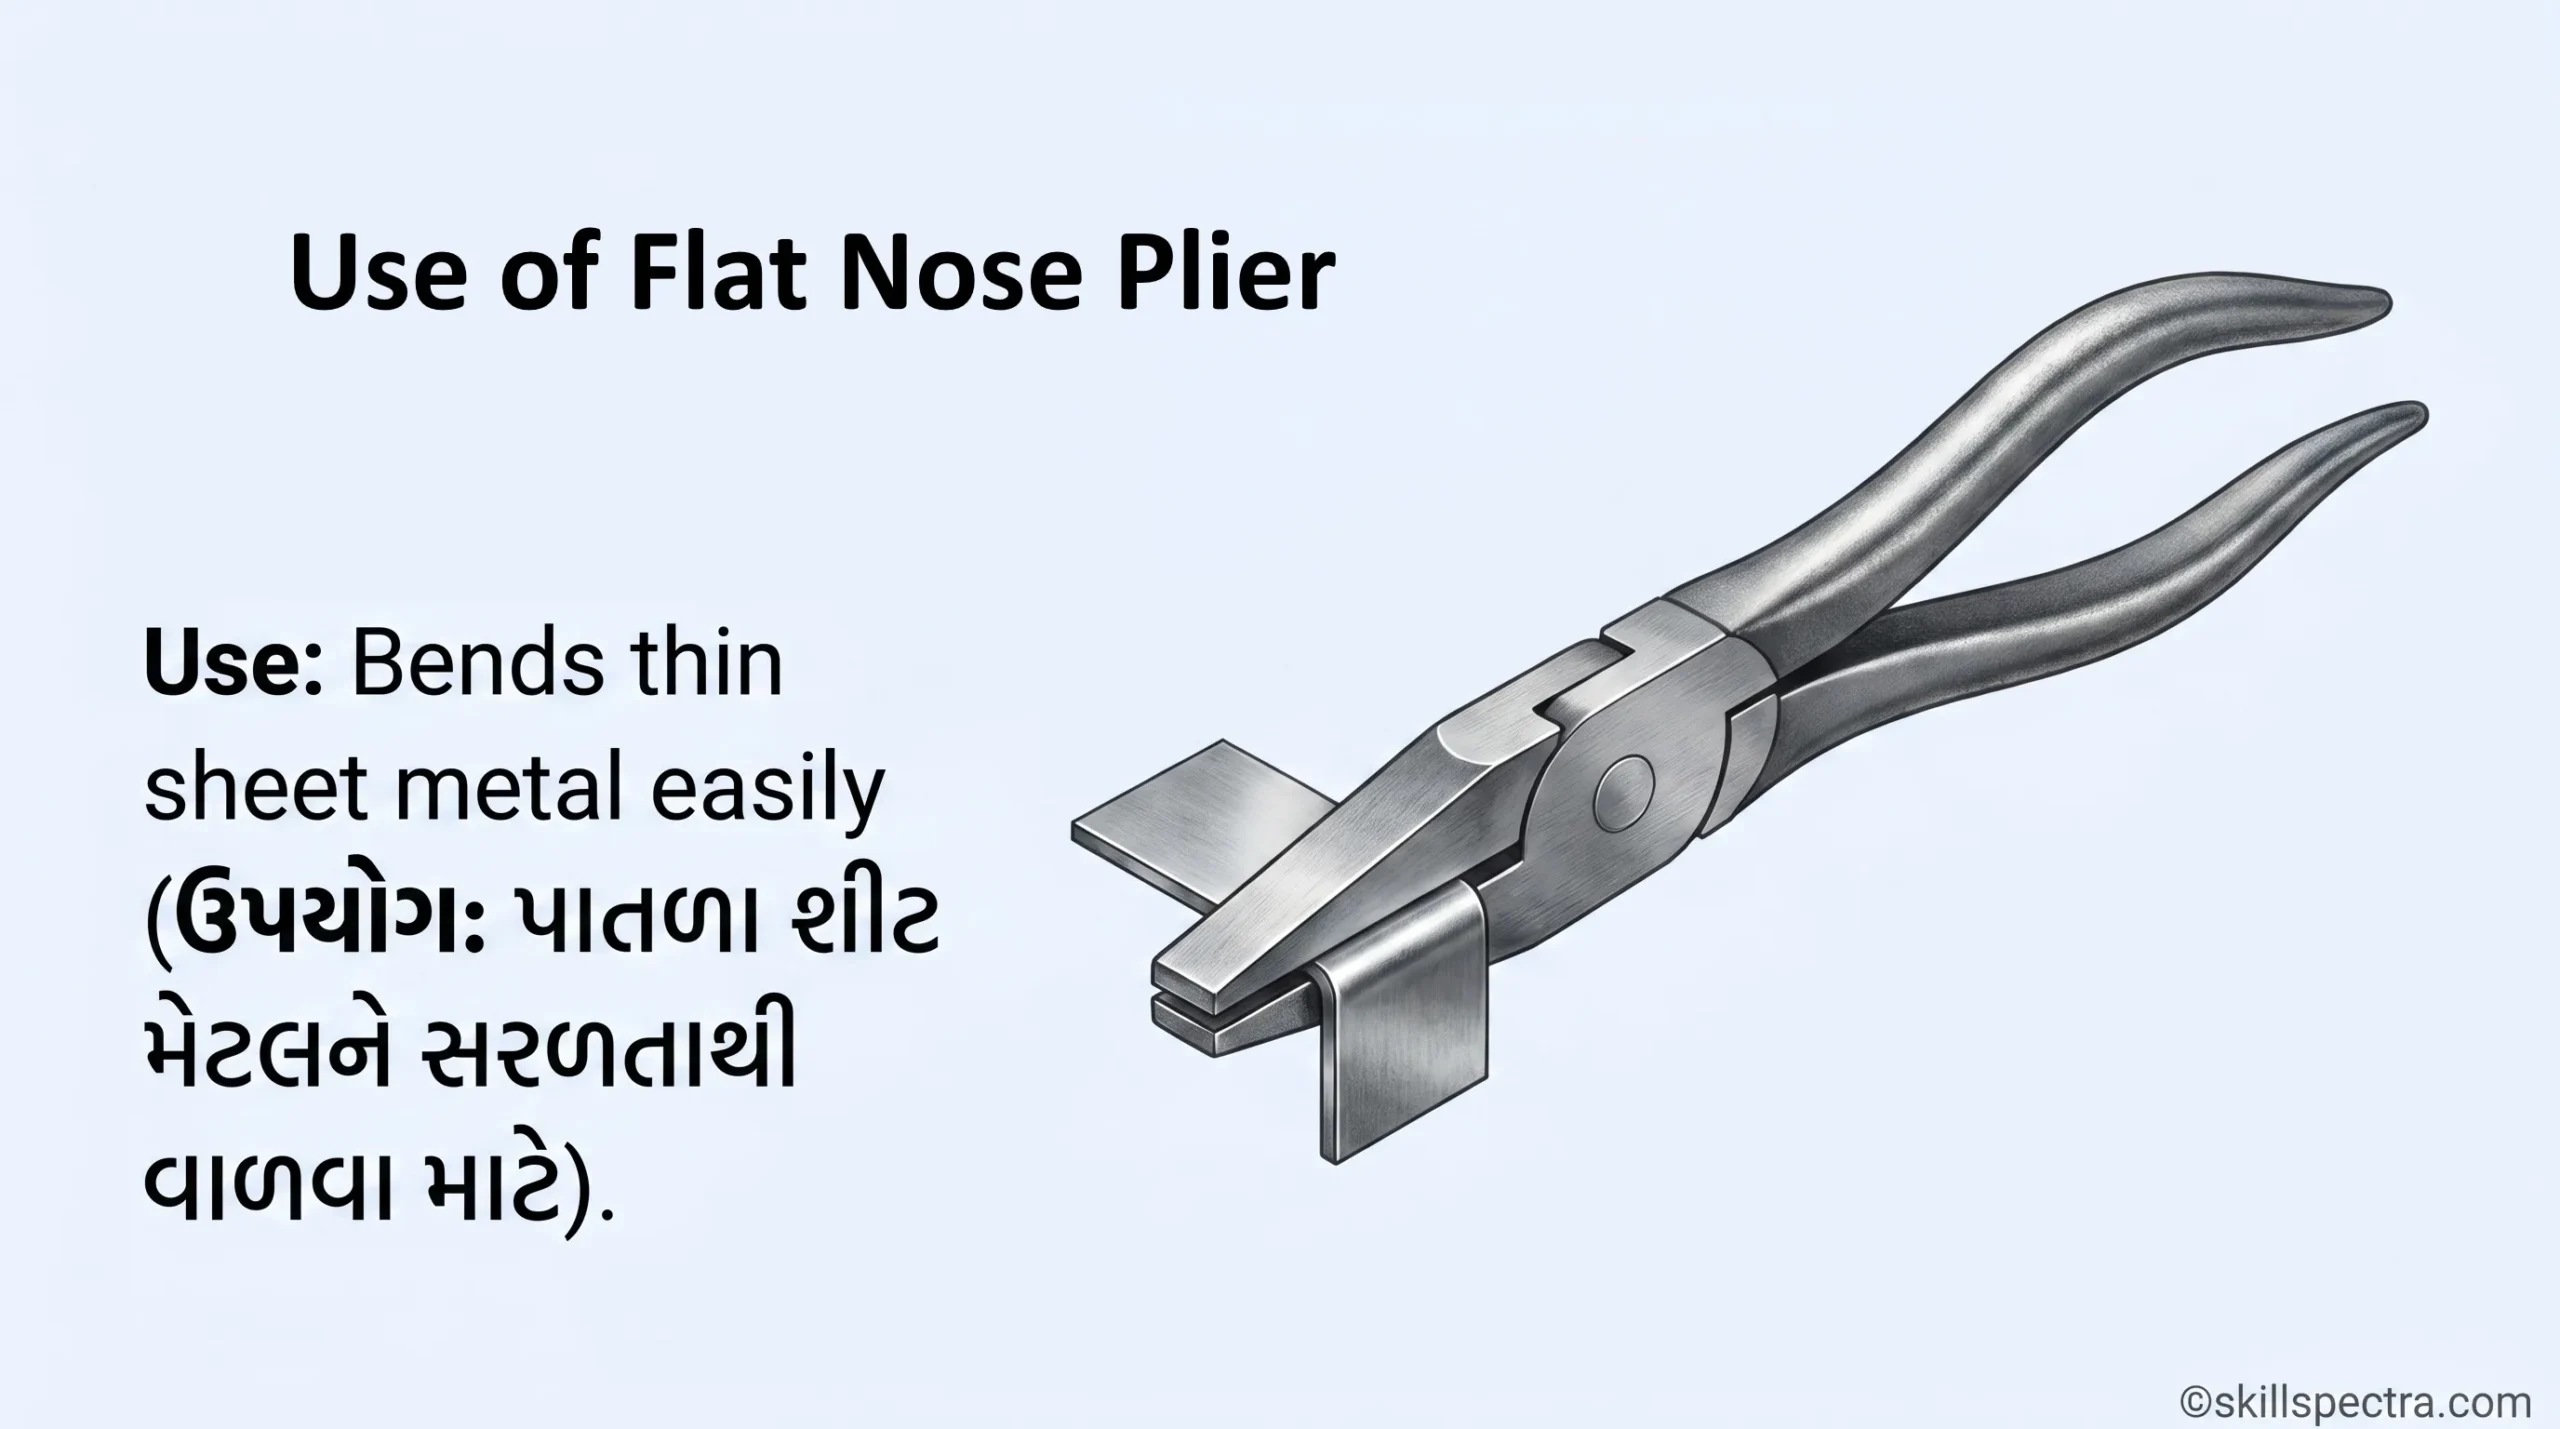
1. Flat nose pliers (ફ્લેટ નોઝ પ્લાયર્સ):
તેમાં tapered wedge jaws હોય છે જેની સપાટી સપાટ (flat) હોય છે. આ સપાટી લીસી (smooth) અથવા દાંતાવાળી (serrated) હોઈ શકે છે. (Fig 5)
- Use: તેનો ઉપયોગ પાતળી ધાતુની પટ્ટીઓને વાળવા (bending) અને ફોલ્ડ (folding) કરવા માટે થાય છે. (Fig 6)
2. Round nose pliers (રાઉન્ડ નોઝ પ્લાયર્સ):
આ પ્રકારના પ્લાયર્સમાં tapered round shaped jaws હોય છે. (Fig 7)
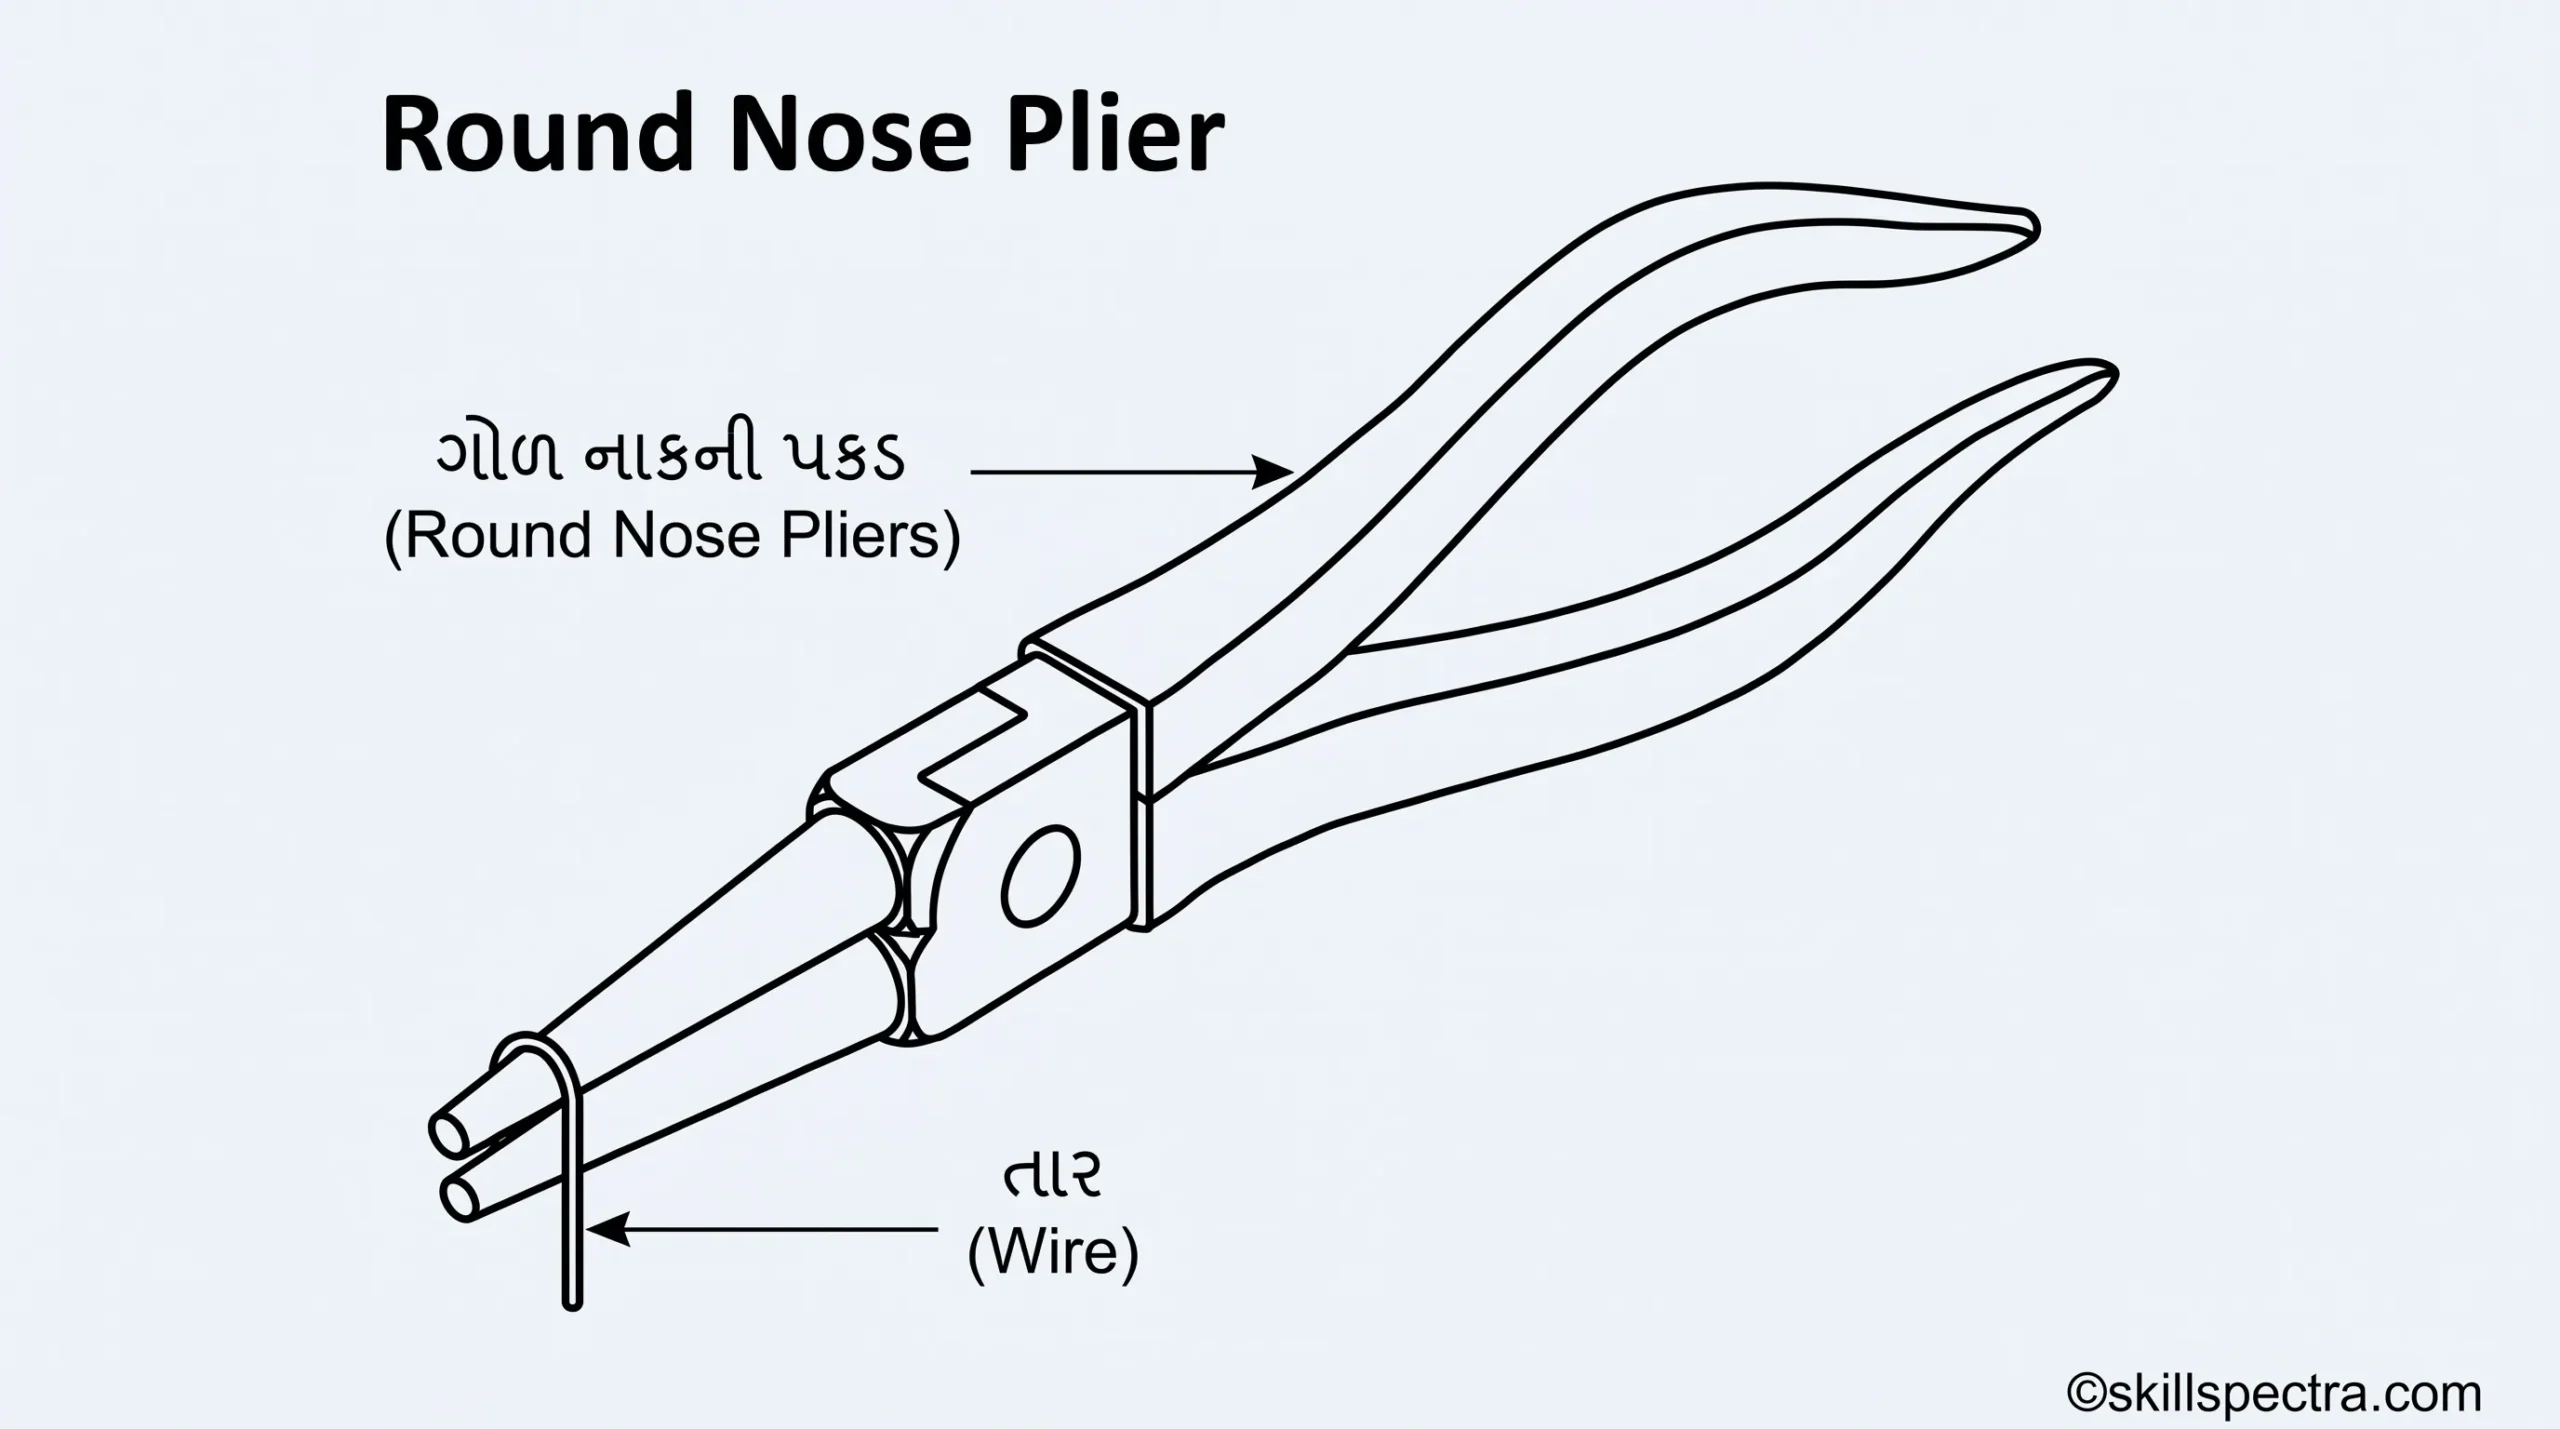

- Use: તેનો ઉપયોગ વાયરમાં લૂપ્સ (loops) બનાવવા અને ધાતુની પટ્ટીઓમાં ગોળાકાર વળાંક (circular curves) આપવા માટે થાય છે. (Fig 8) 🌀
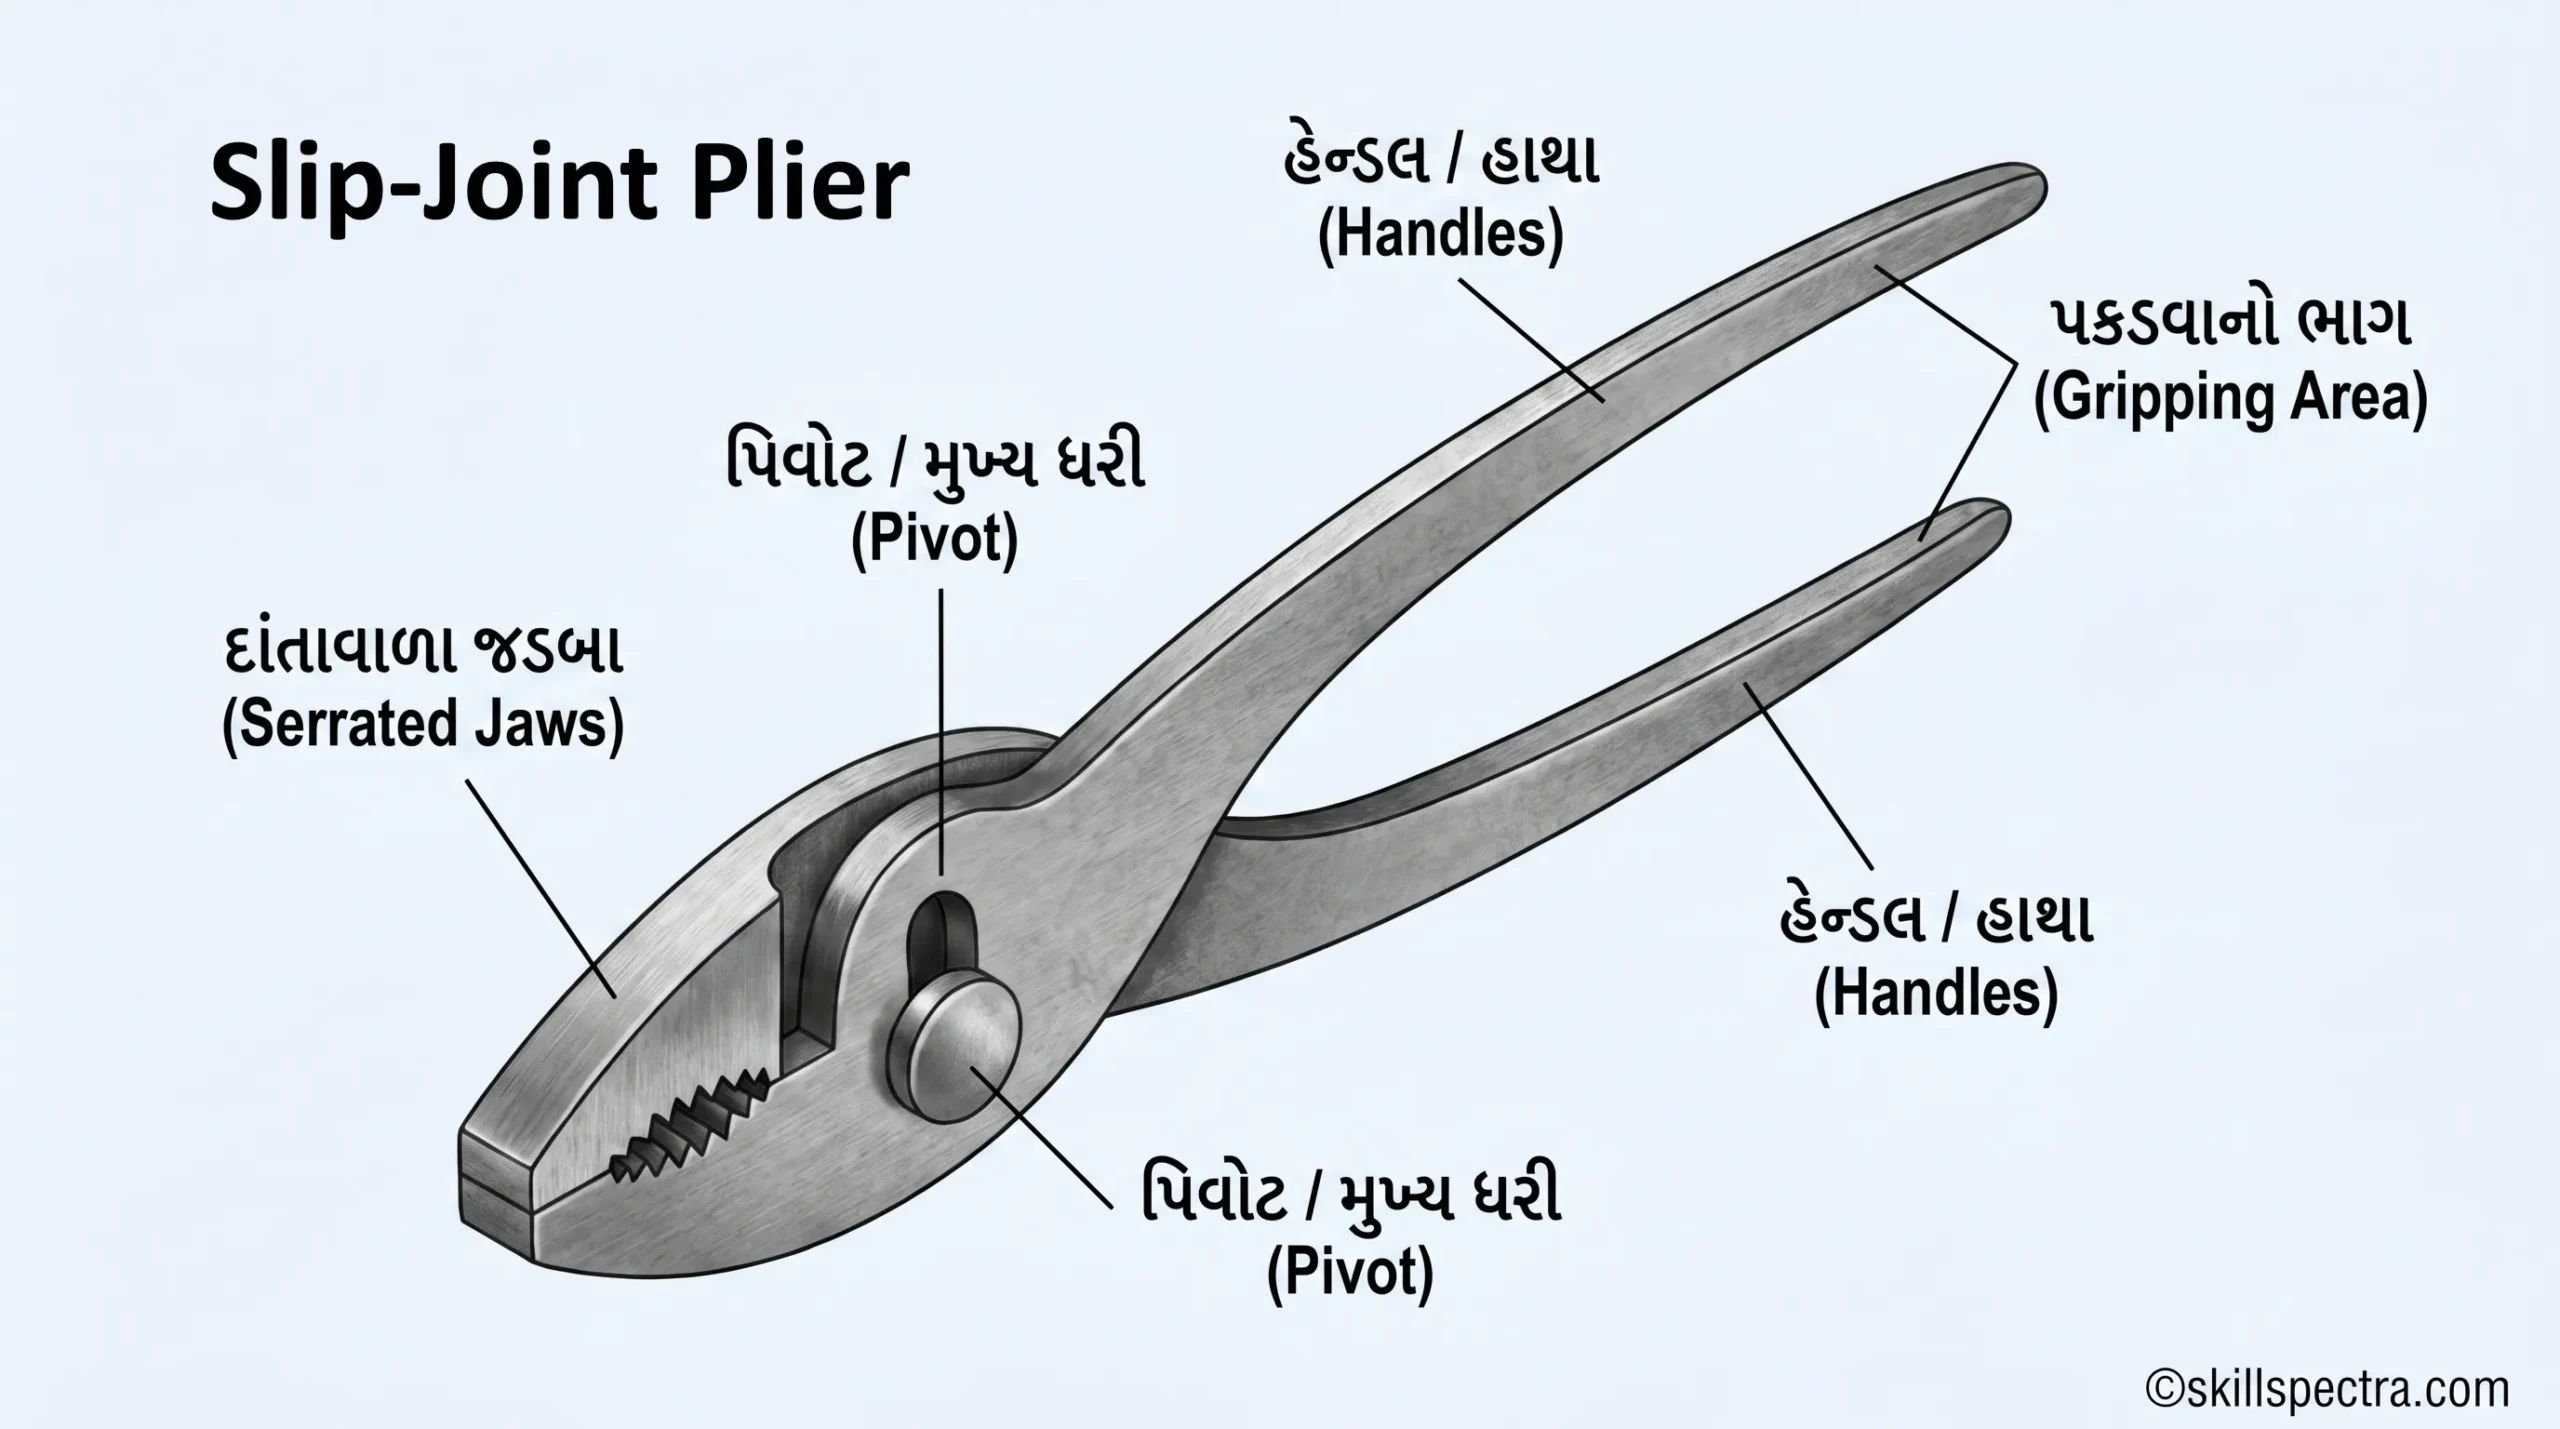
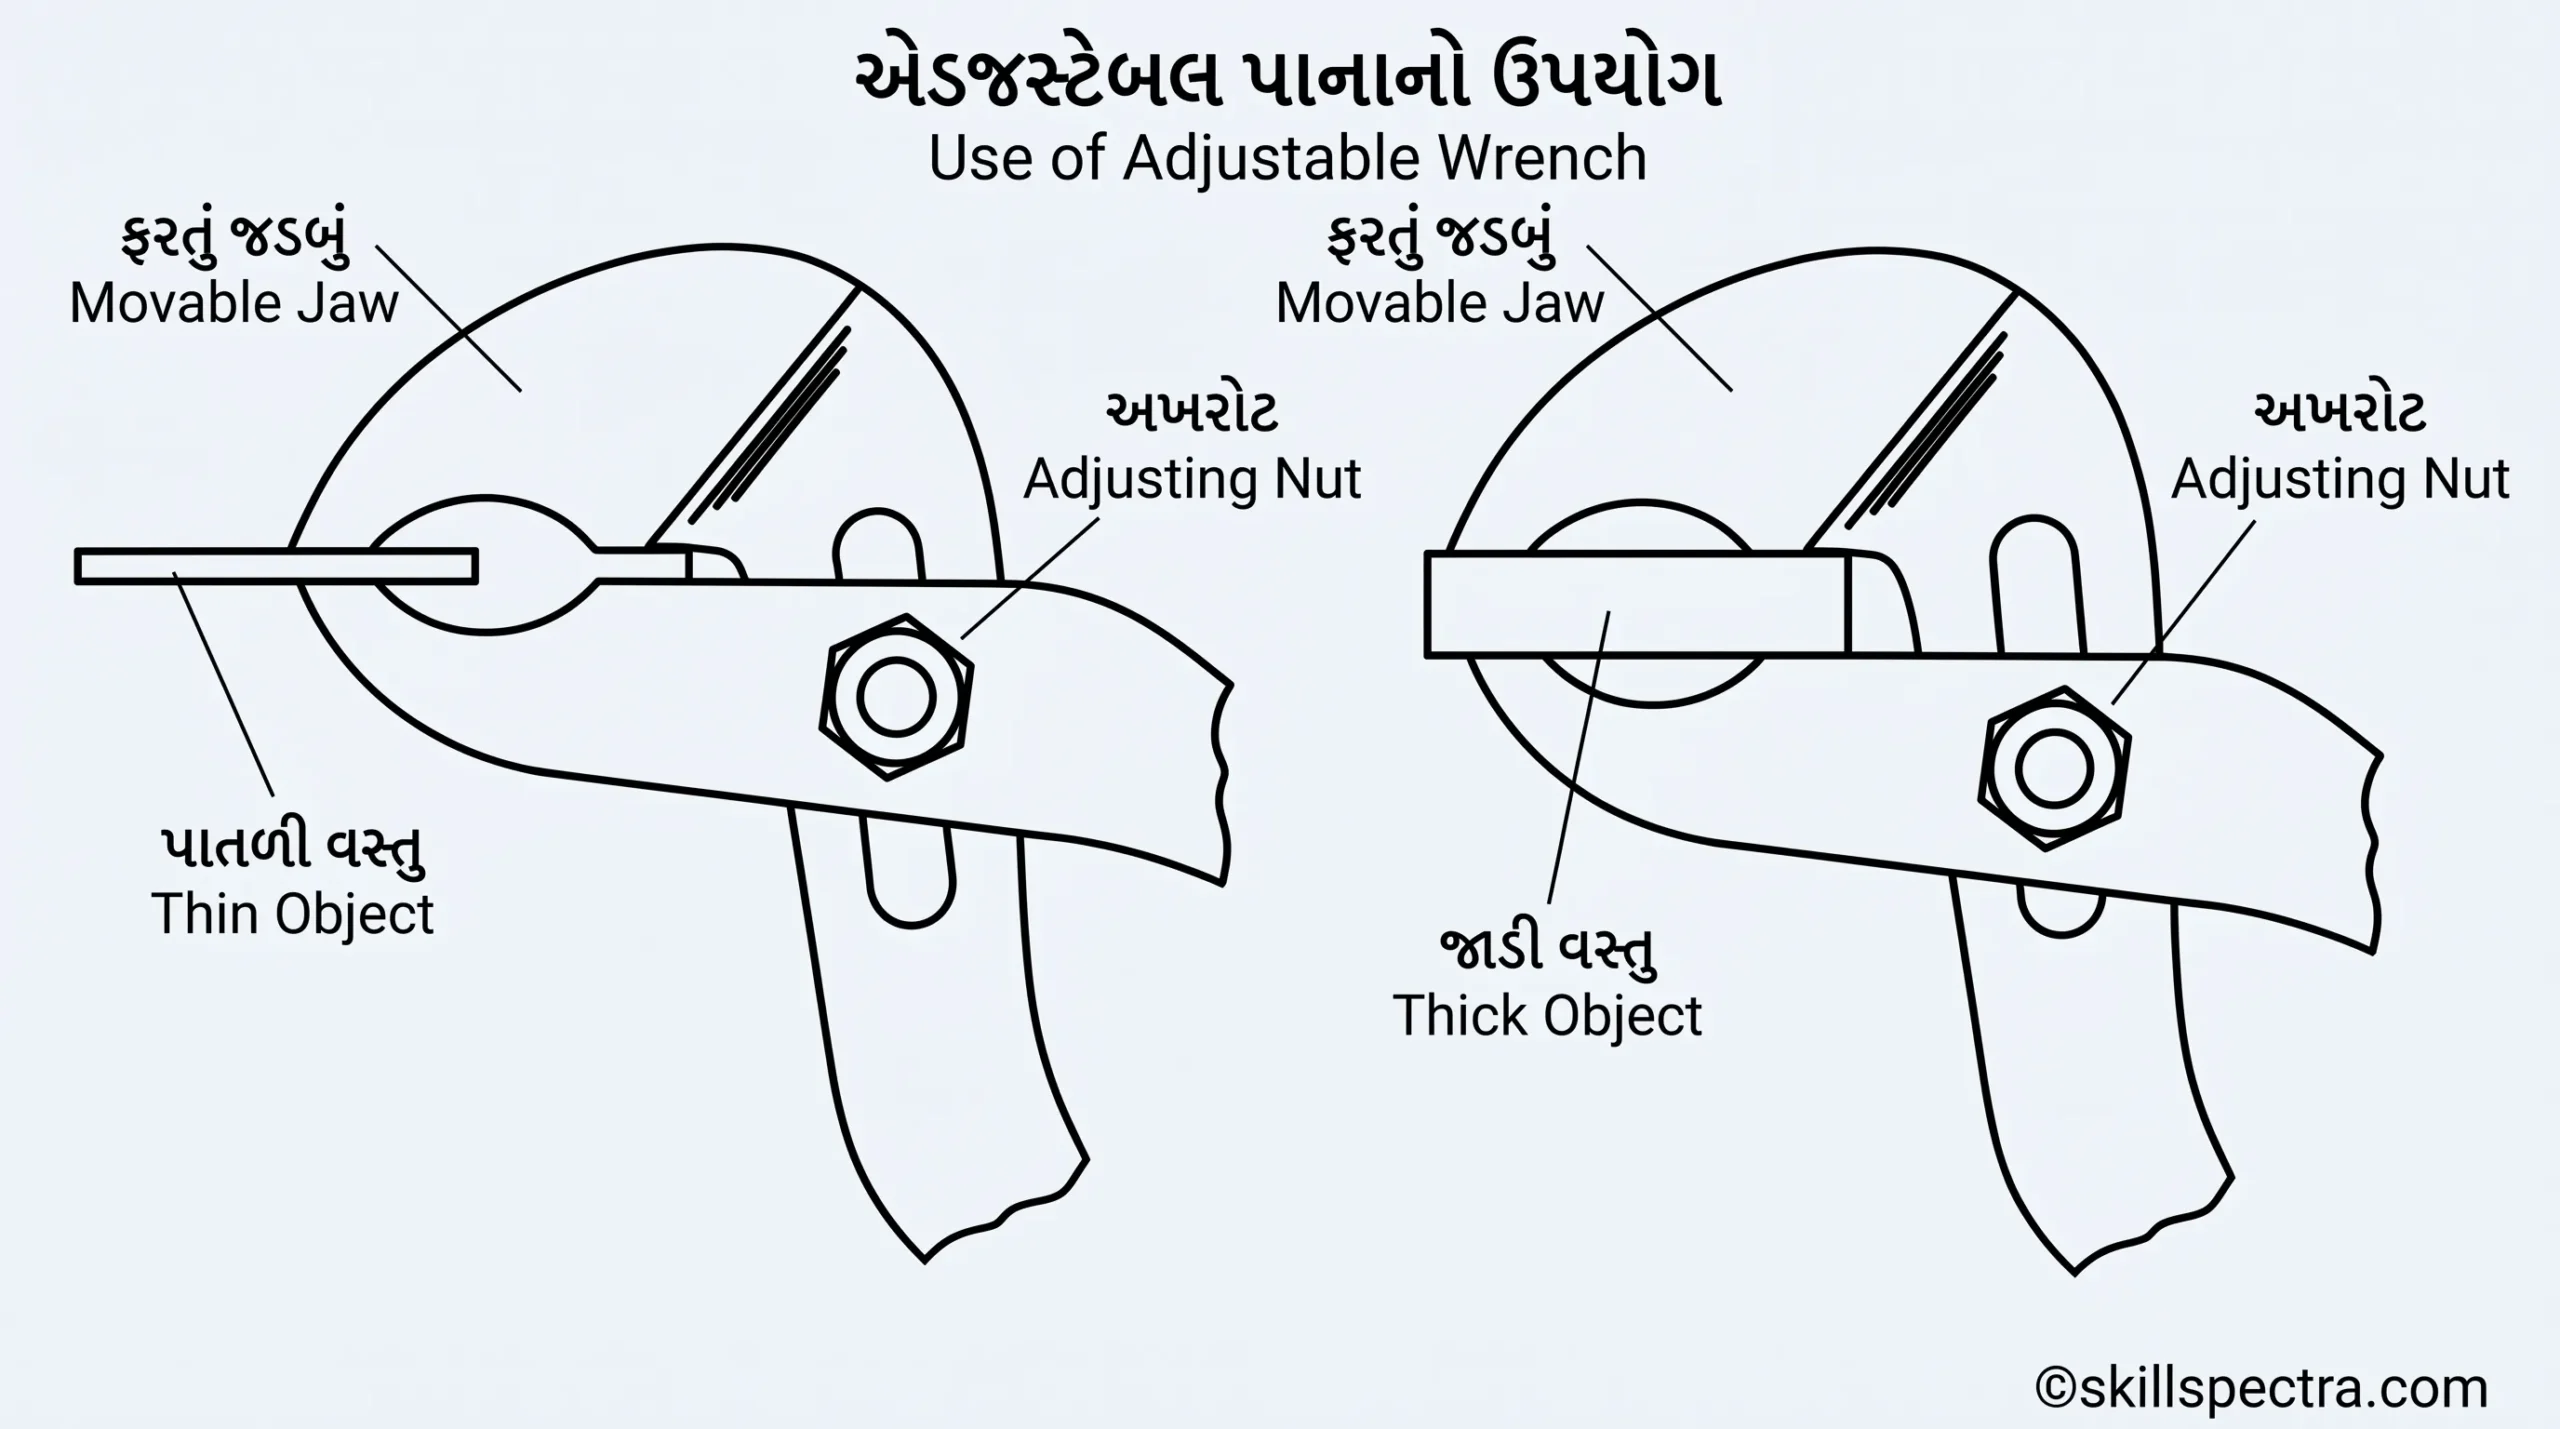
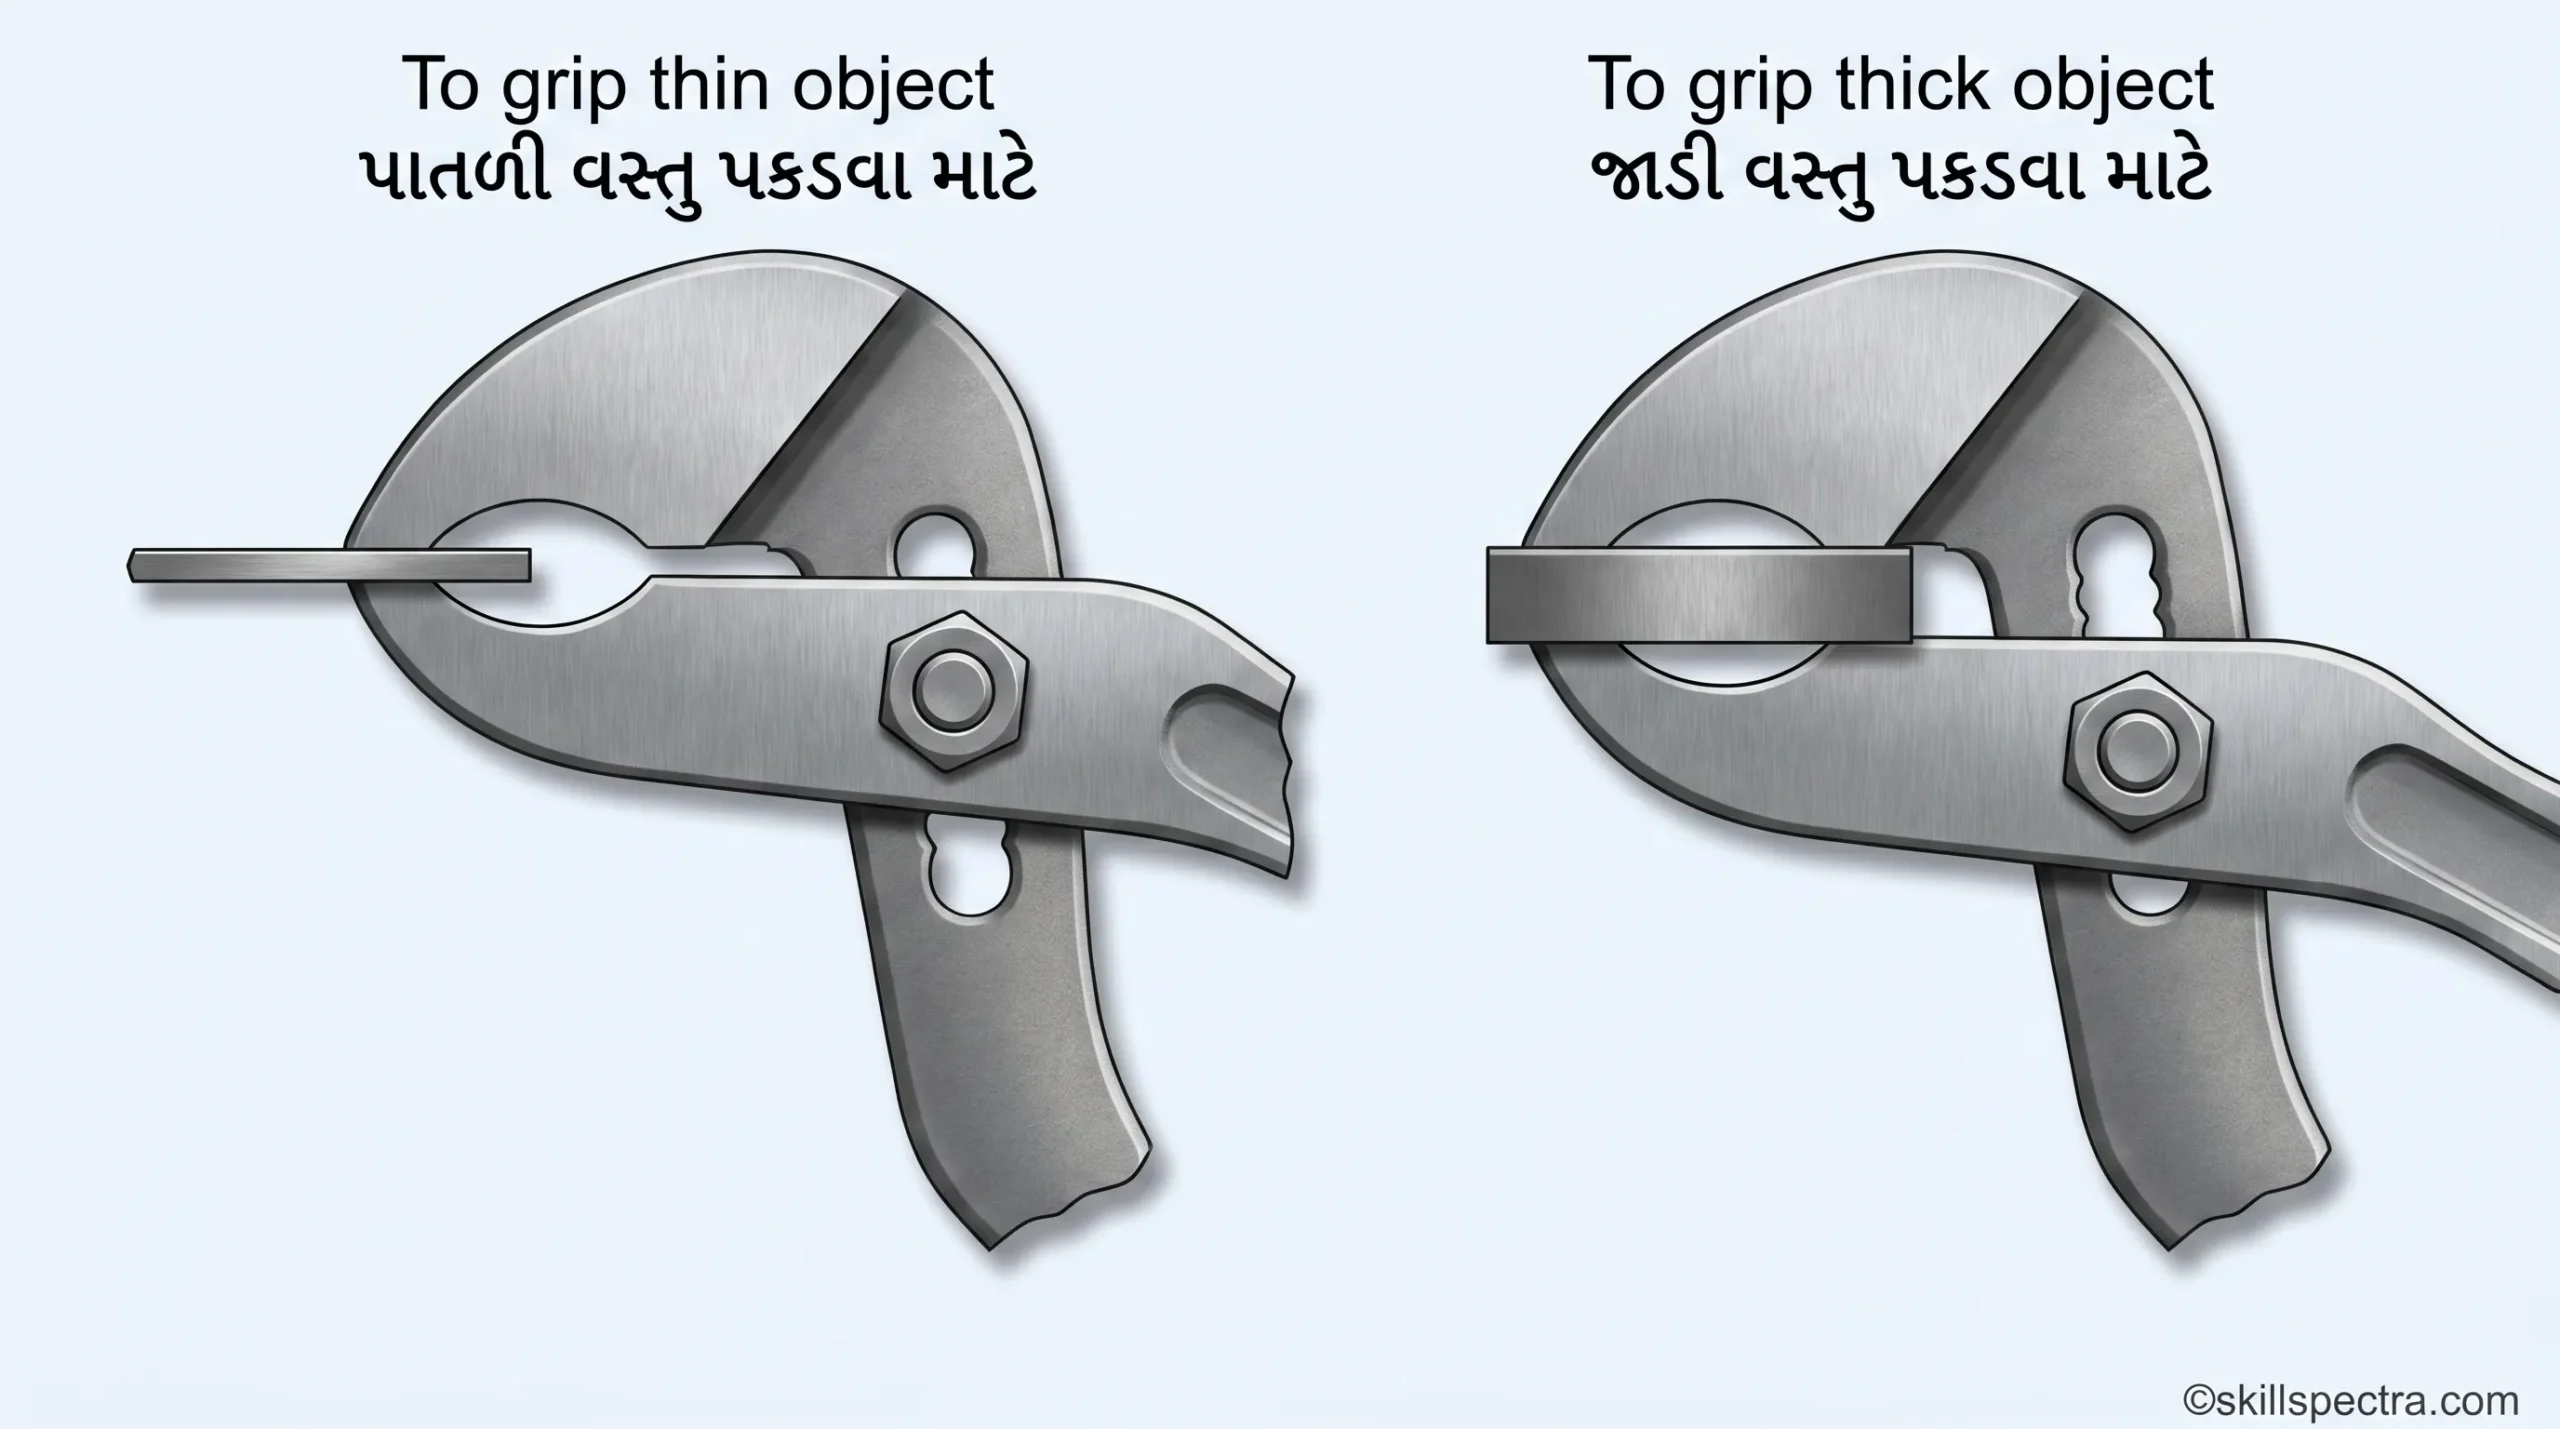
3. Slip-joint pliers (સ્લિપ-જોઈન્ટ પ્લાયર્સ):
આ પ્લાયર્સમાં pivot pins ના વિવિધ આકારોને કારણે જડબા (jaws) અલગ-અલગ રેન્જમાં ખોલી શકાય છે.
- Use: મુખ્યત્વે પકડવા (gripping) માટે વપરાય છે. (Fig 9)
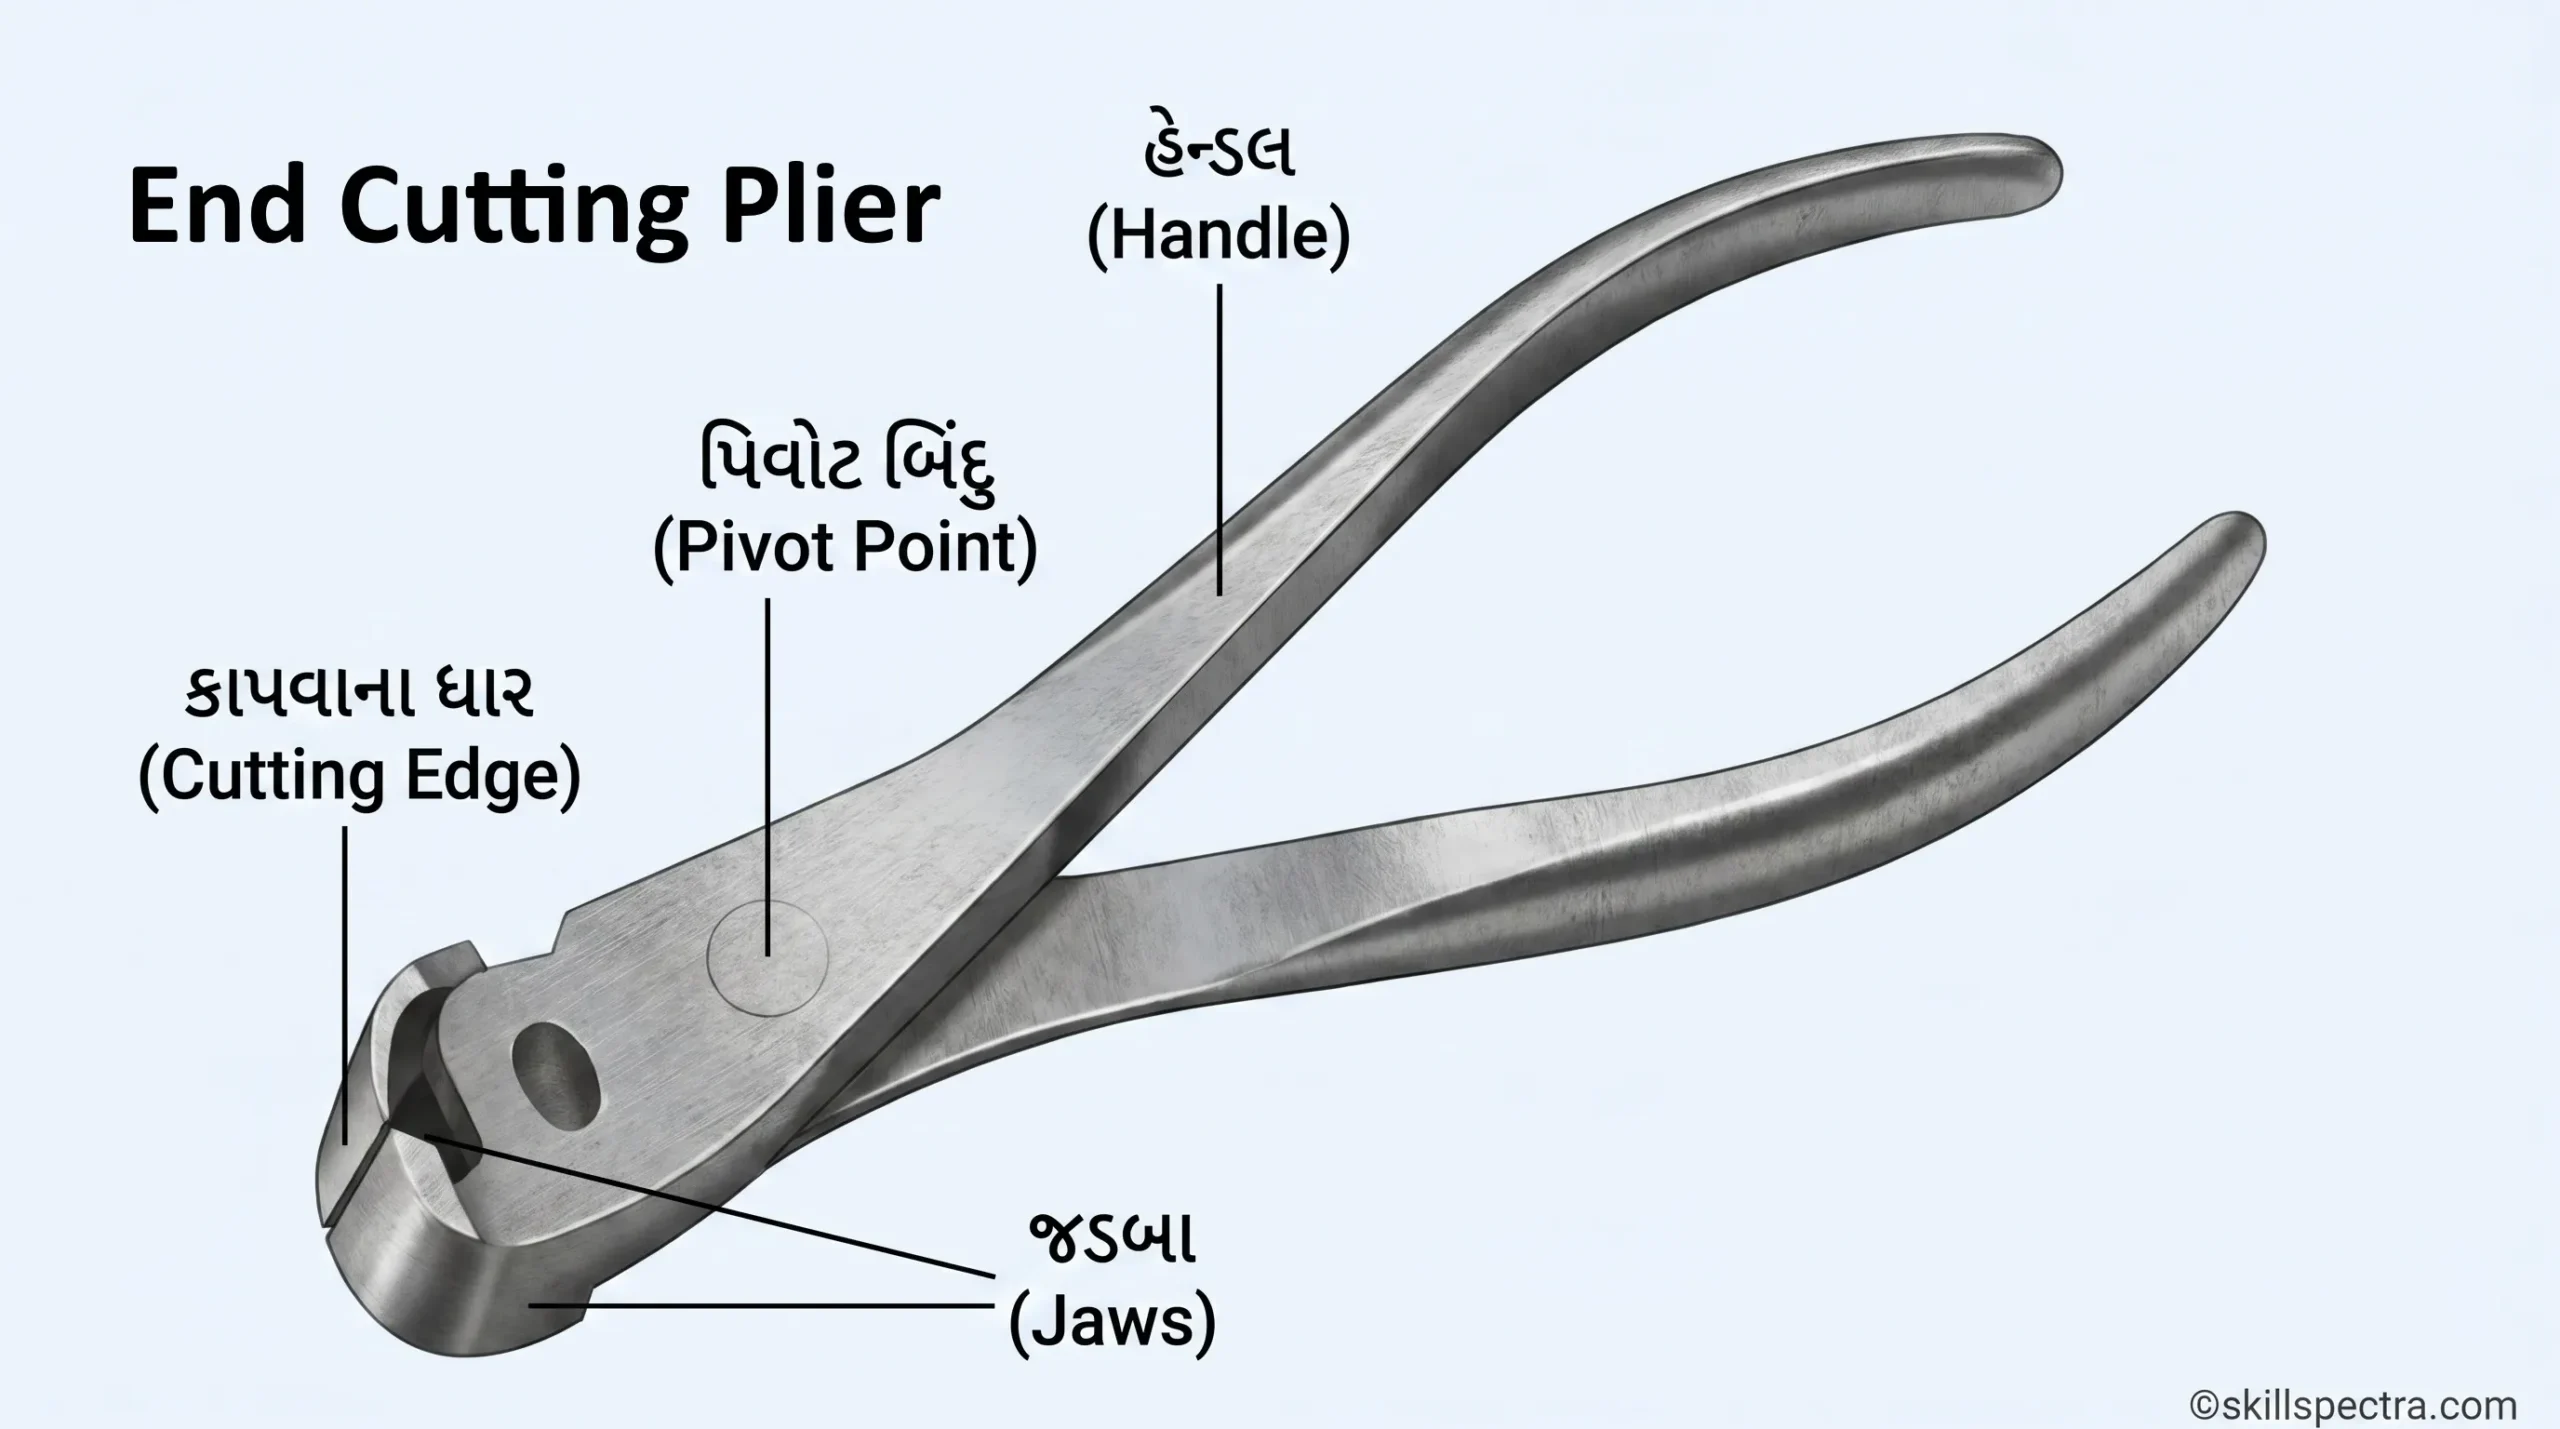
4. End cutting pliers (એન્ડ કટિંગ પ્લાયર્સ):
આ પ્લાયર્સનો ઉપયોગ પણ સાઇડ કટિંગ પ્લાયર્સની જેમ જ થાય છે. (Fig 10) ✂️
5. Circlip pliers (સર્કલિપ પ્લાયર્સ):
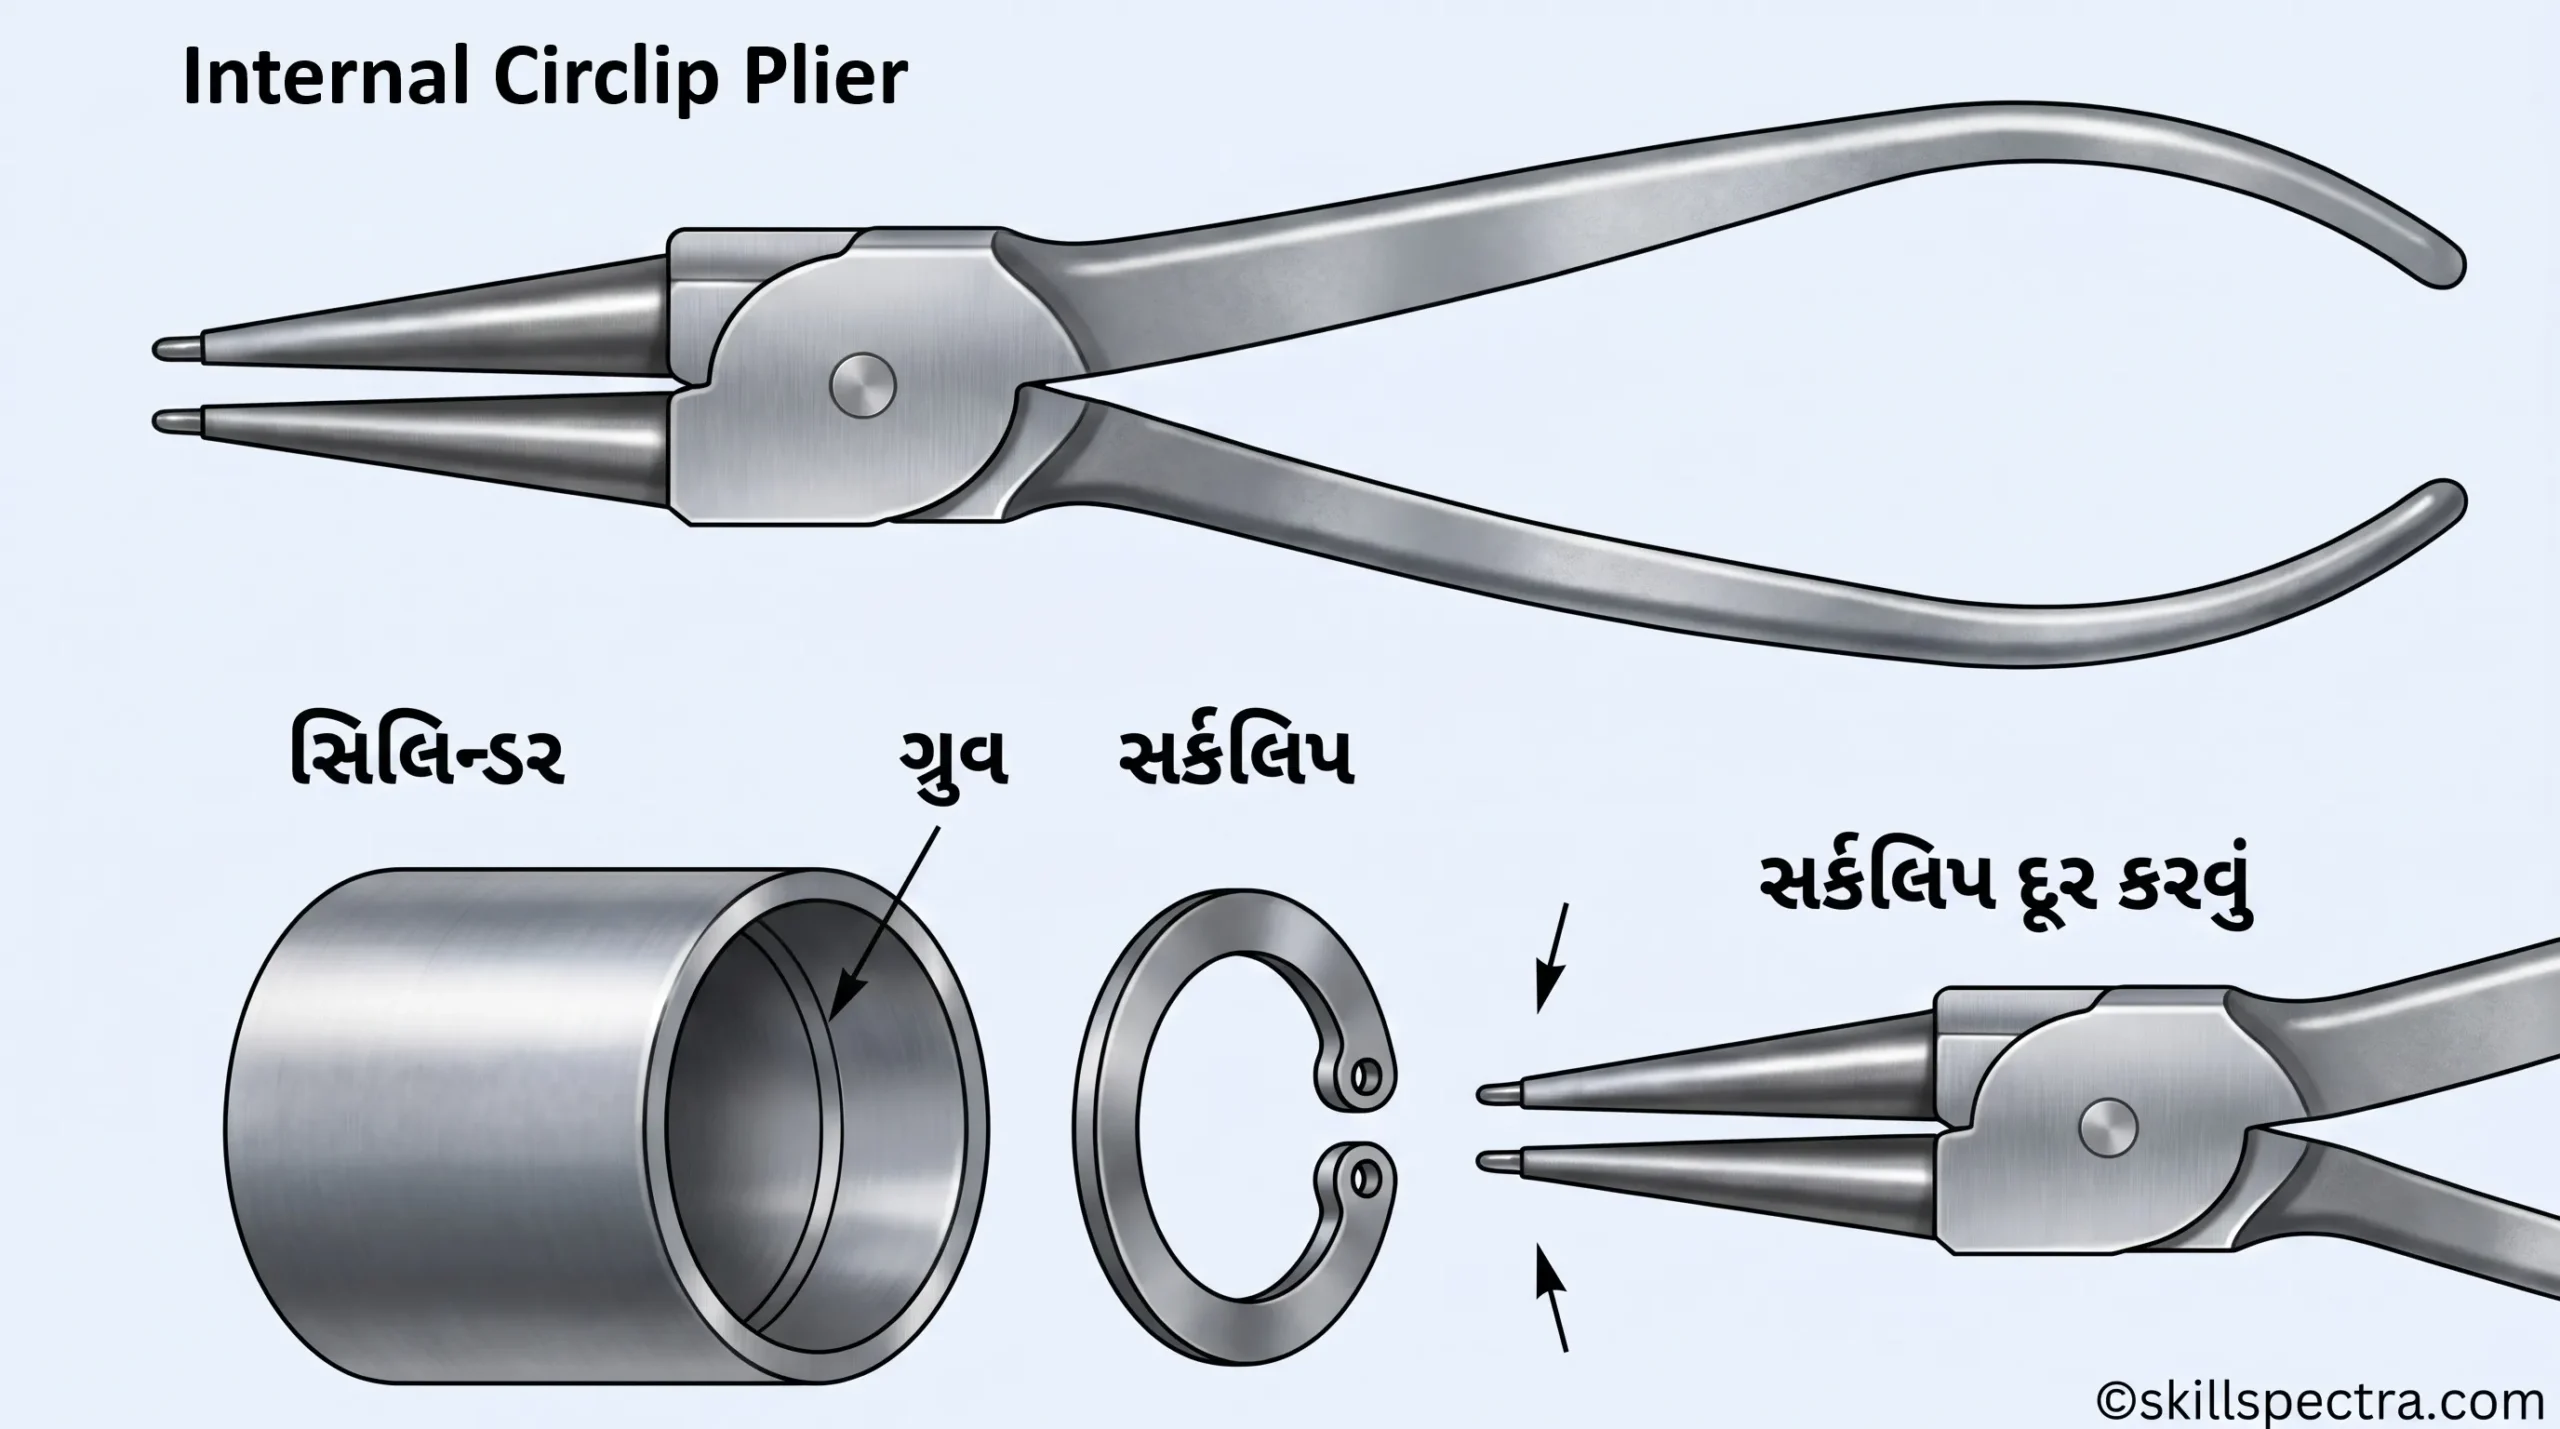
એસેમ્બલી વર્કમાં circlips ફિટ કરવા અને કાઢવા માટે આનો ઉપયોગ થાય છે.
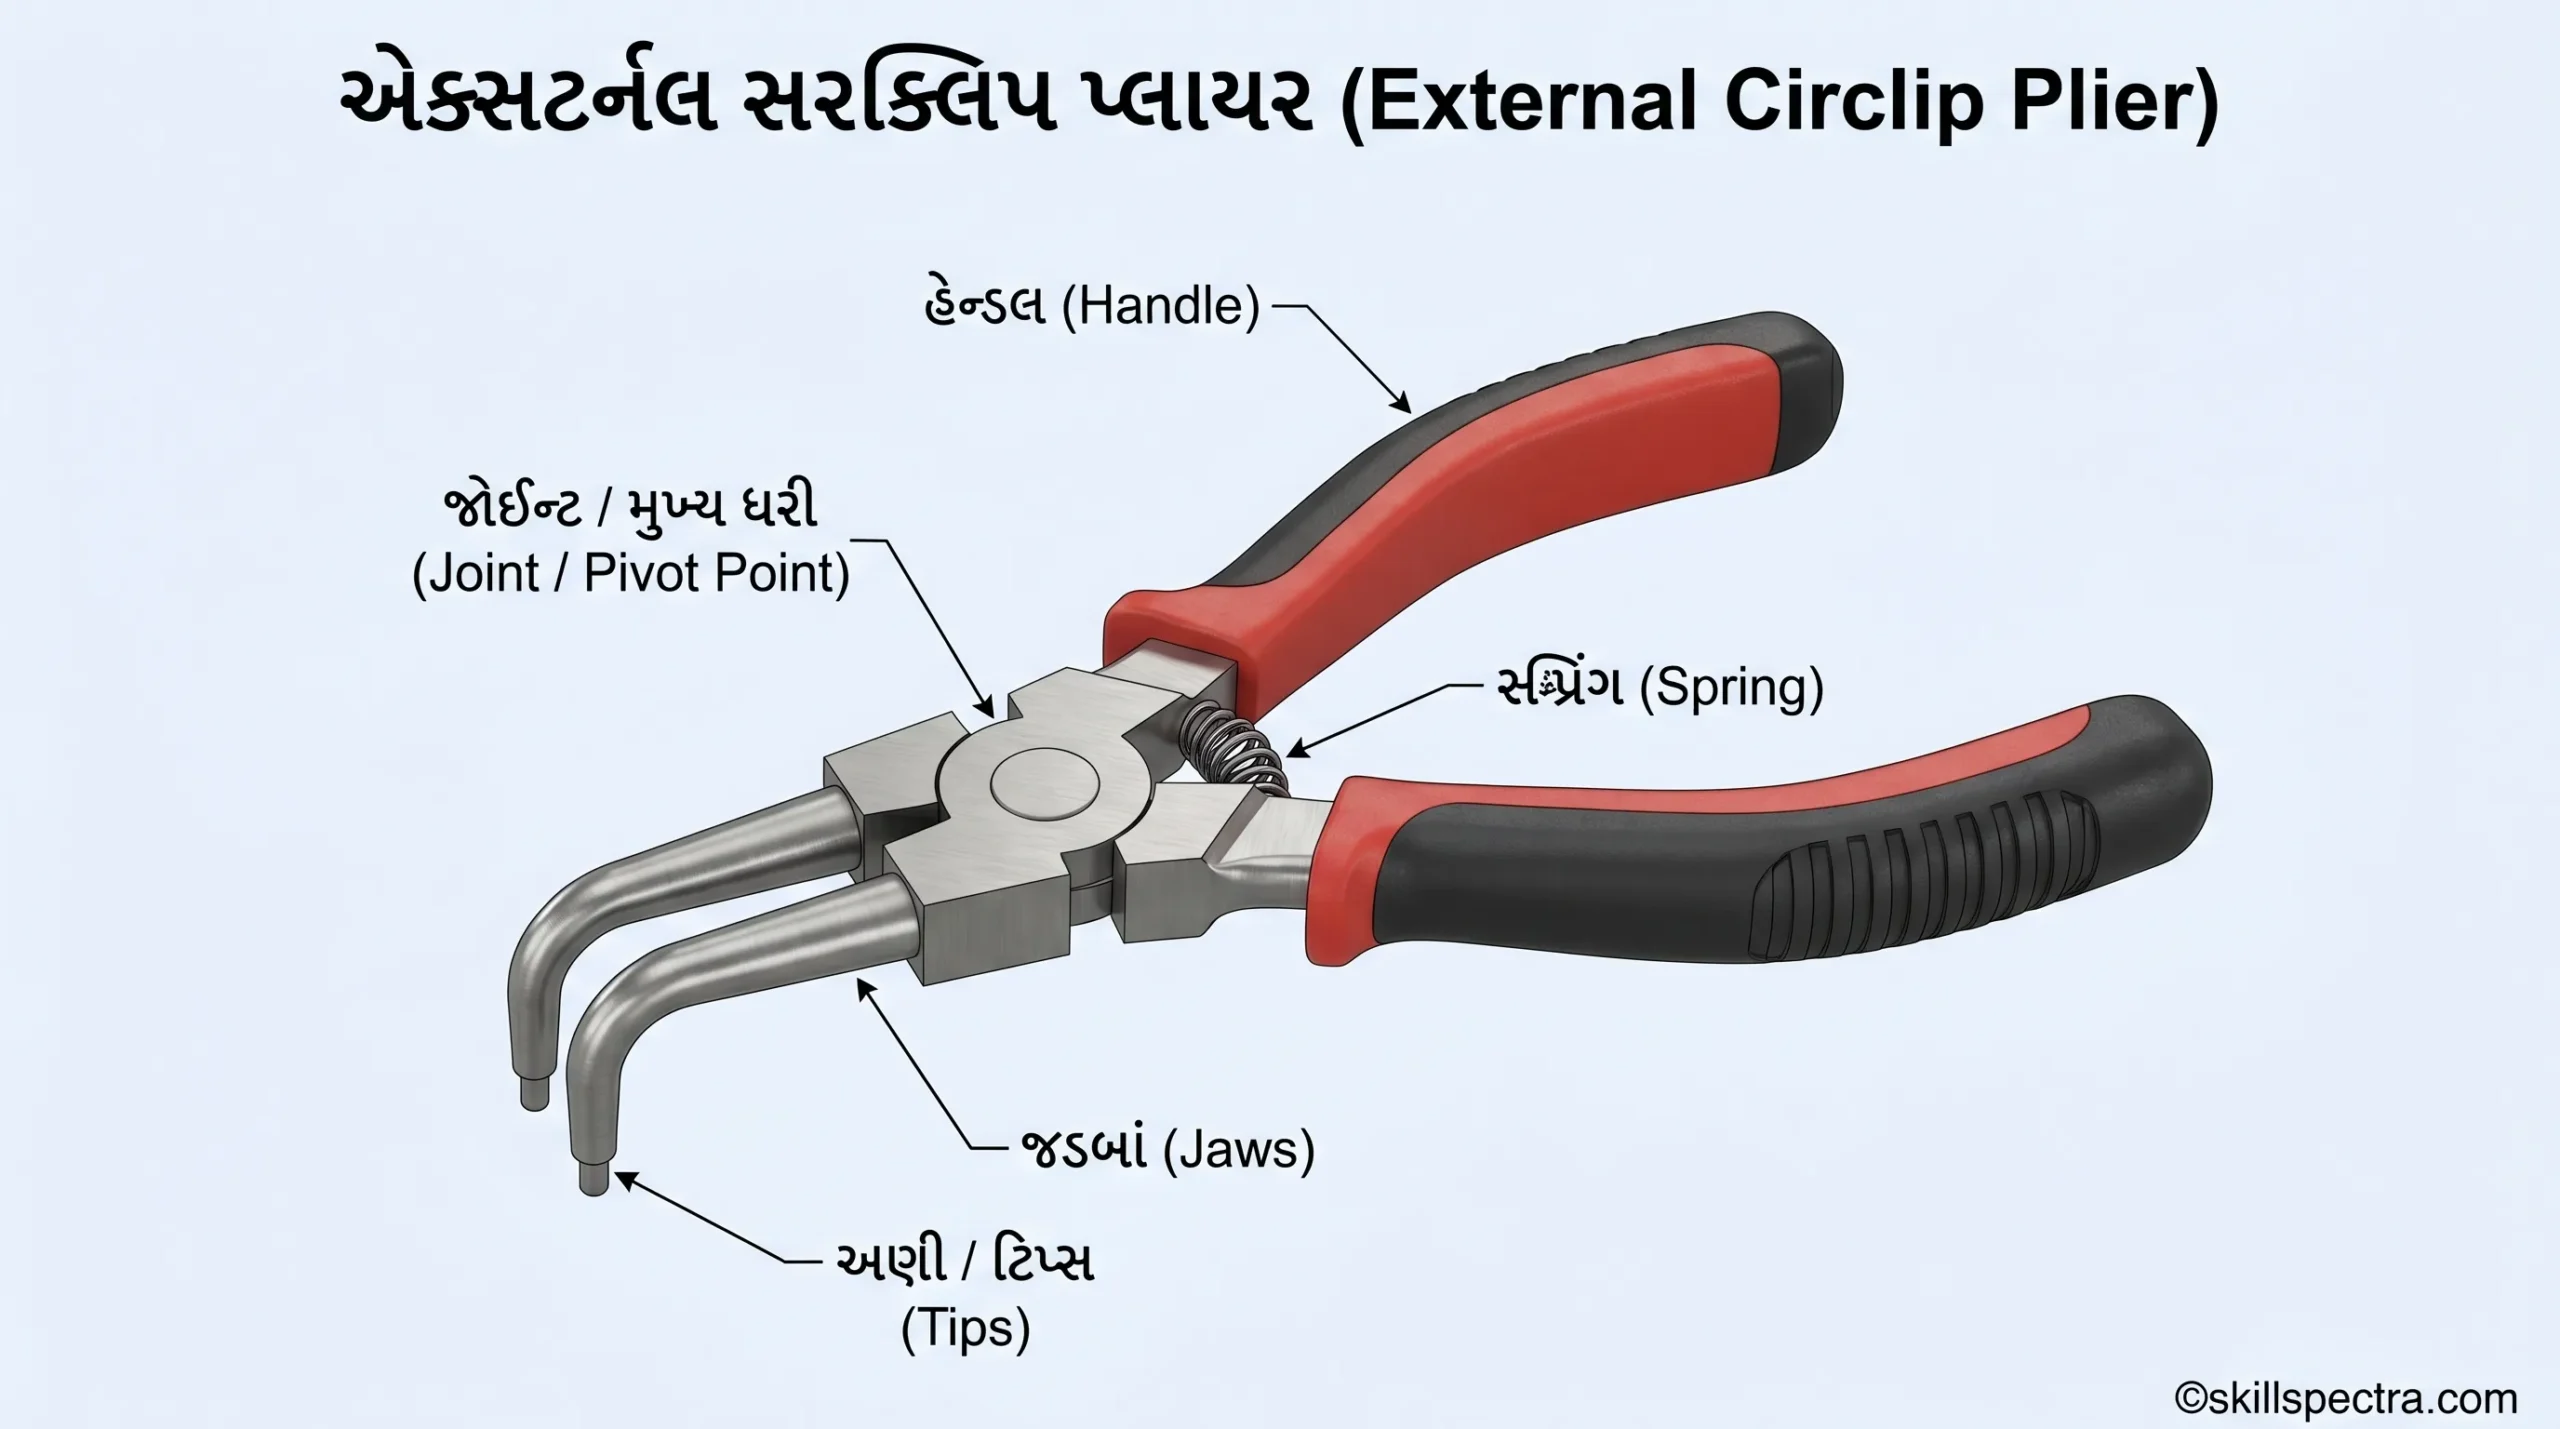
- Internal circlip plier: આનો ઉપયોગ બોર (bore) ની અંદરના ભાગમાં રહેલી ઇન્ટરનલ સર્કલિપને બેસાડવા કે કાઢવા માટે થાય છે. (Fig 11) ⭕
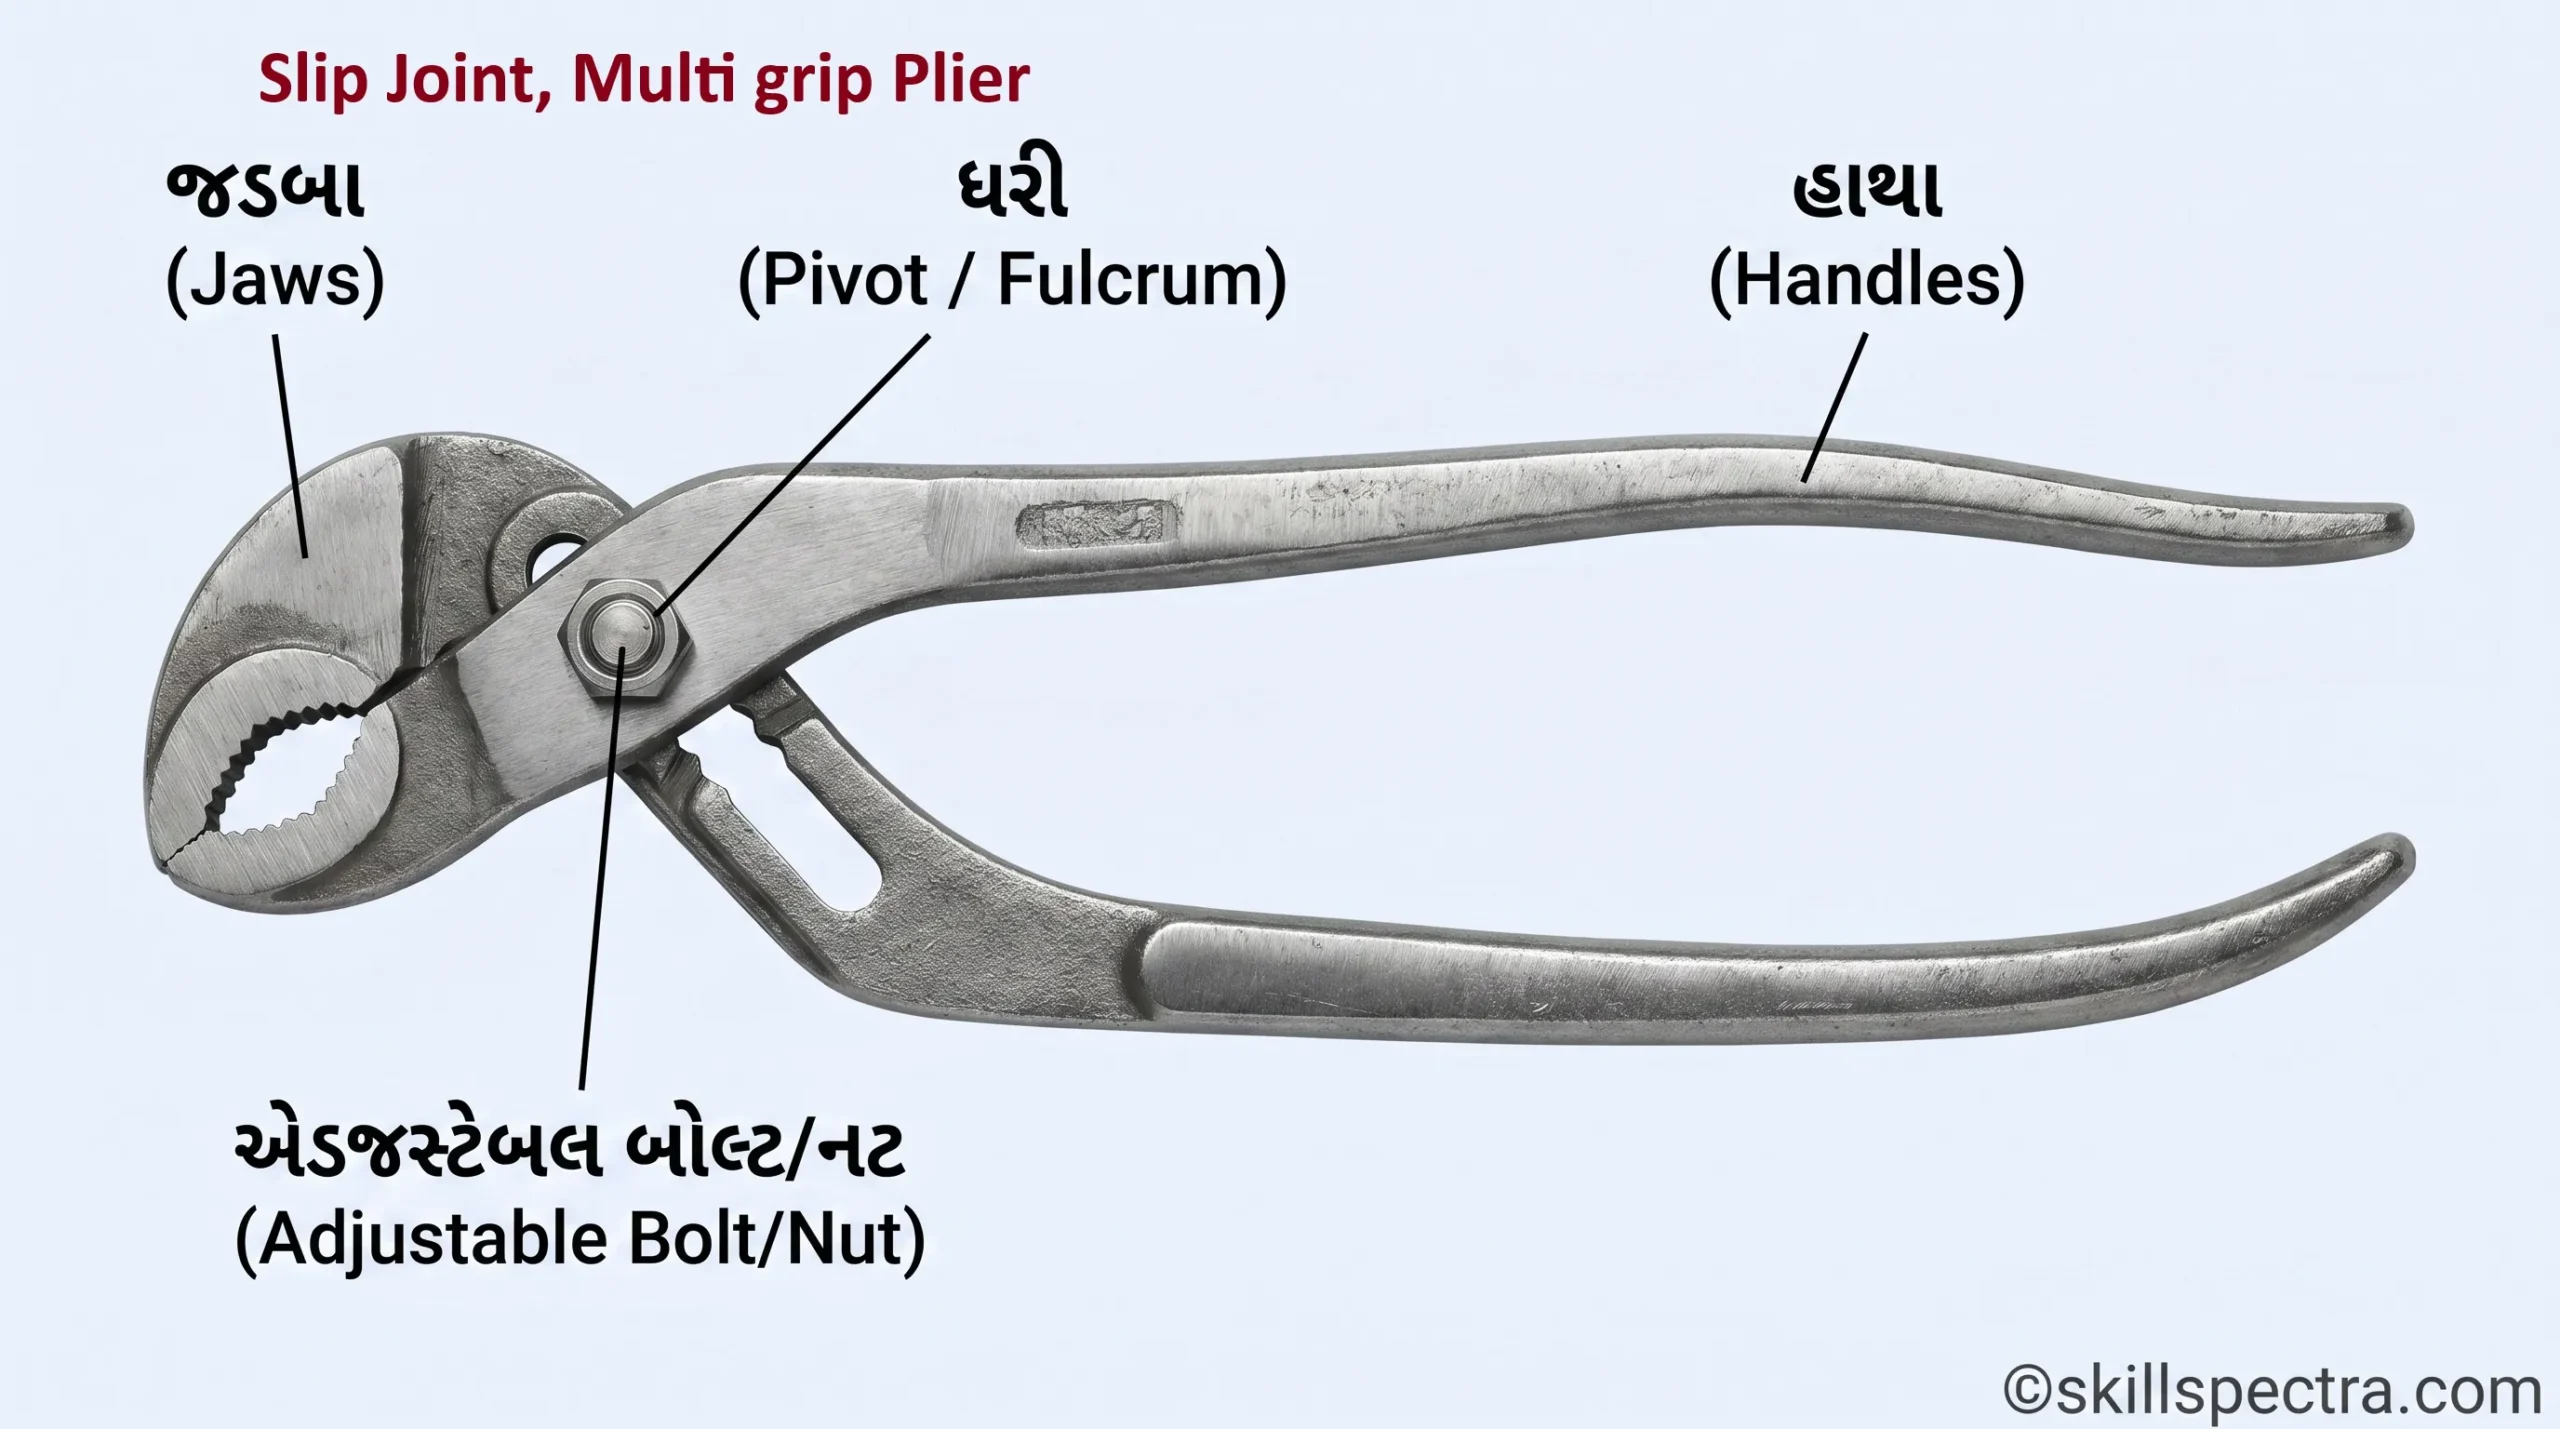
6. Slip-joint, multi-grip pliers:
આ ગ્રીપ પ્લાયર્સ જેવું જ છે પરંતુ તેમાં legs માં વધુ ઓપનિંગ્સ (openings) હોય છે. તે સમાંતર પકડ (parallel gripping) પૂરી પાડે છે. (Fig 12) તેના લેગનો આકાર અને લંબાઈ સ્લિપ-જોઈન્ટ પ્લાયર્સ કરતા અલગ હોય છે. (Fig 13)
7. Side cutting pliers (સાઇડ કટિંગ પ્લાયર્સ):
તેમાં જડબાં (jaws) એક ખૂણે (angle) સેટ કરેલા હોય છે. (Fig 14)
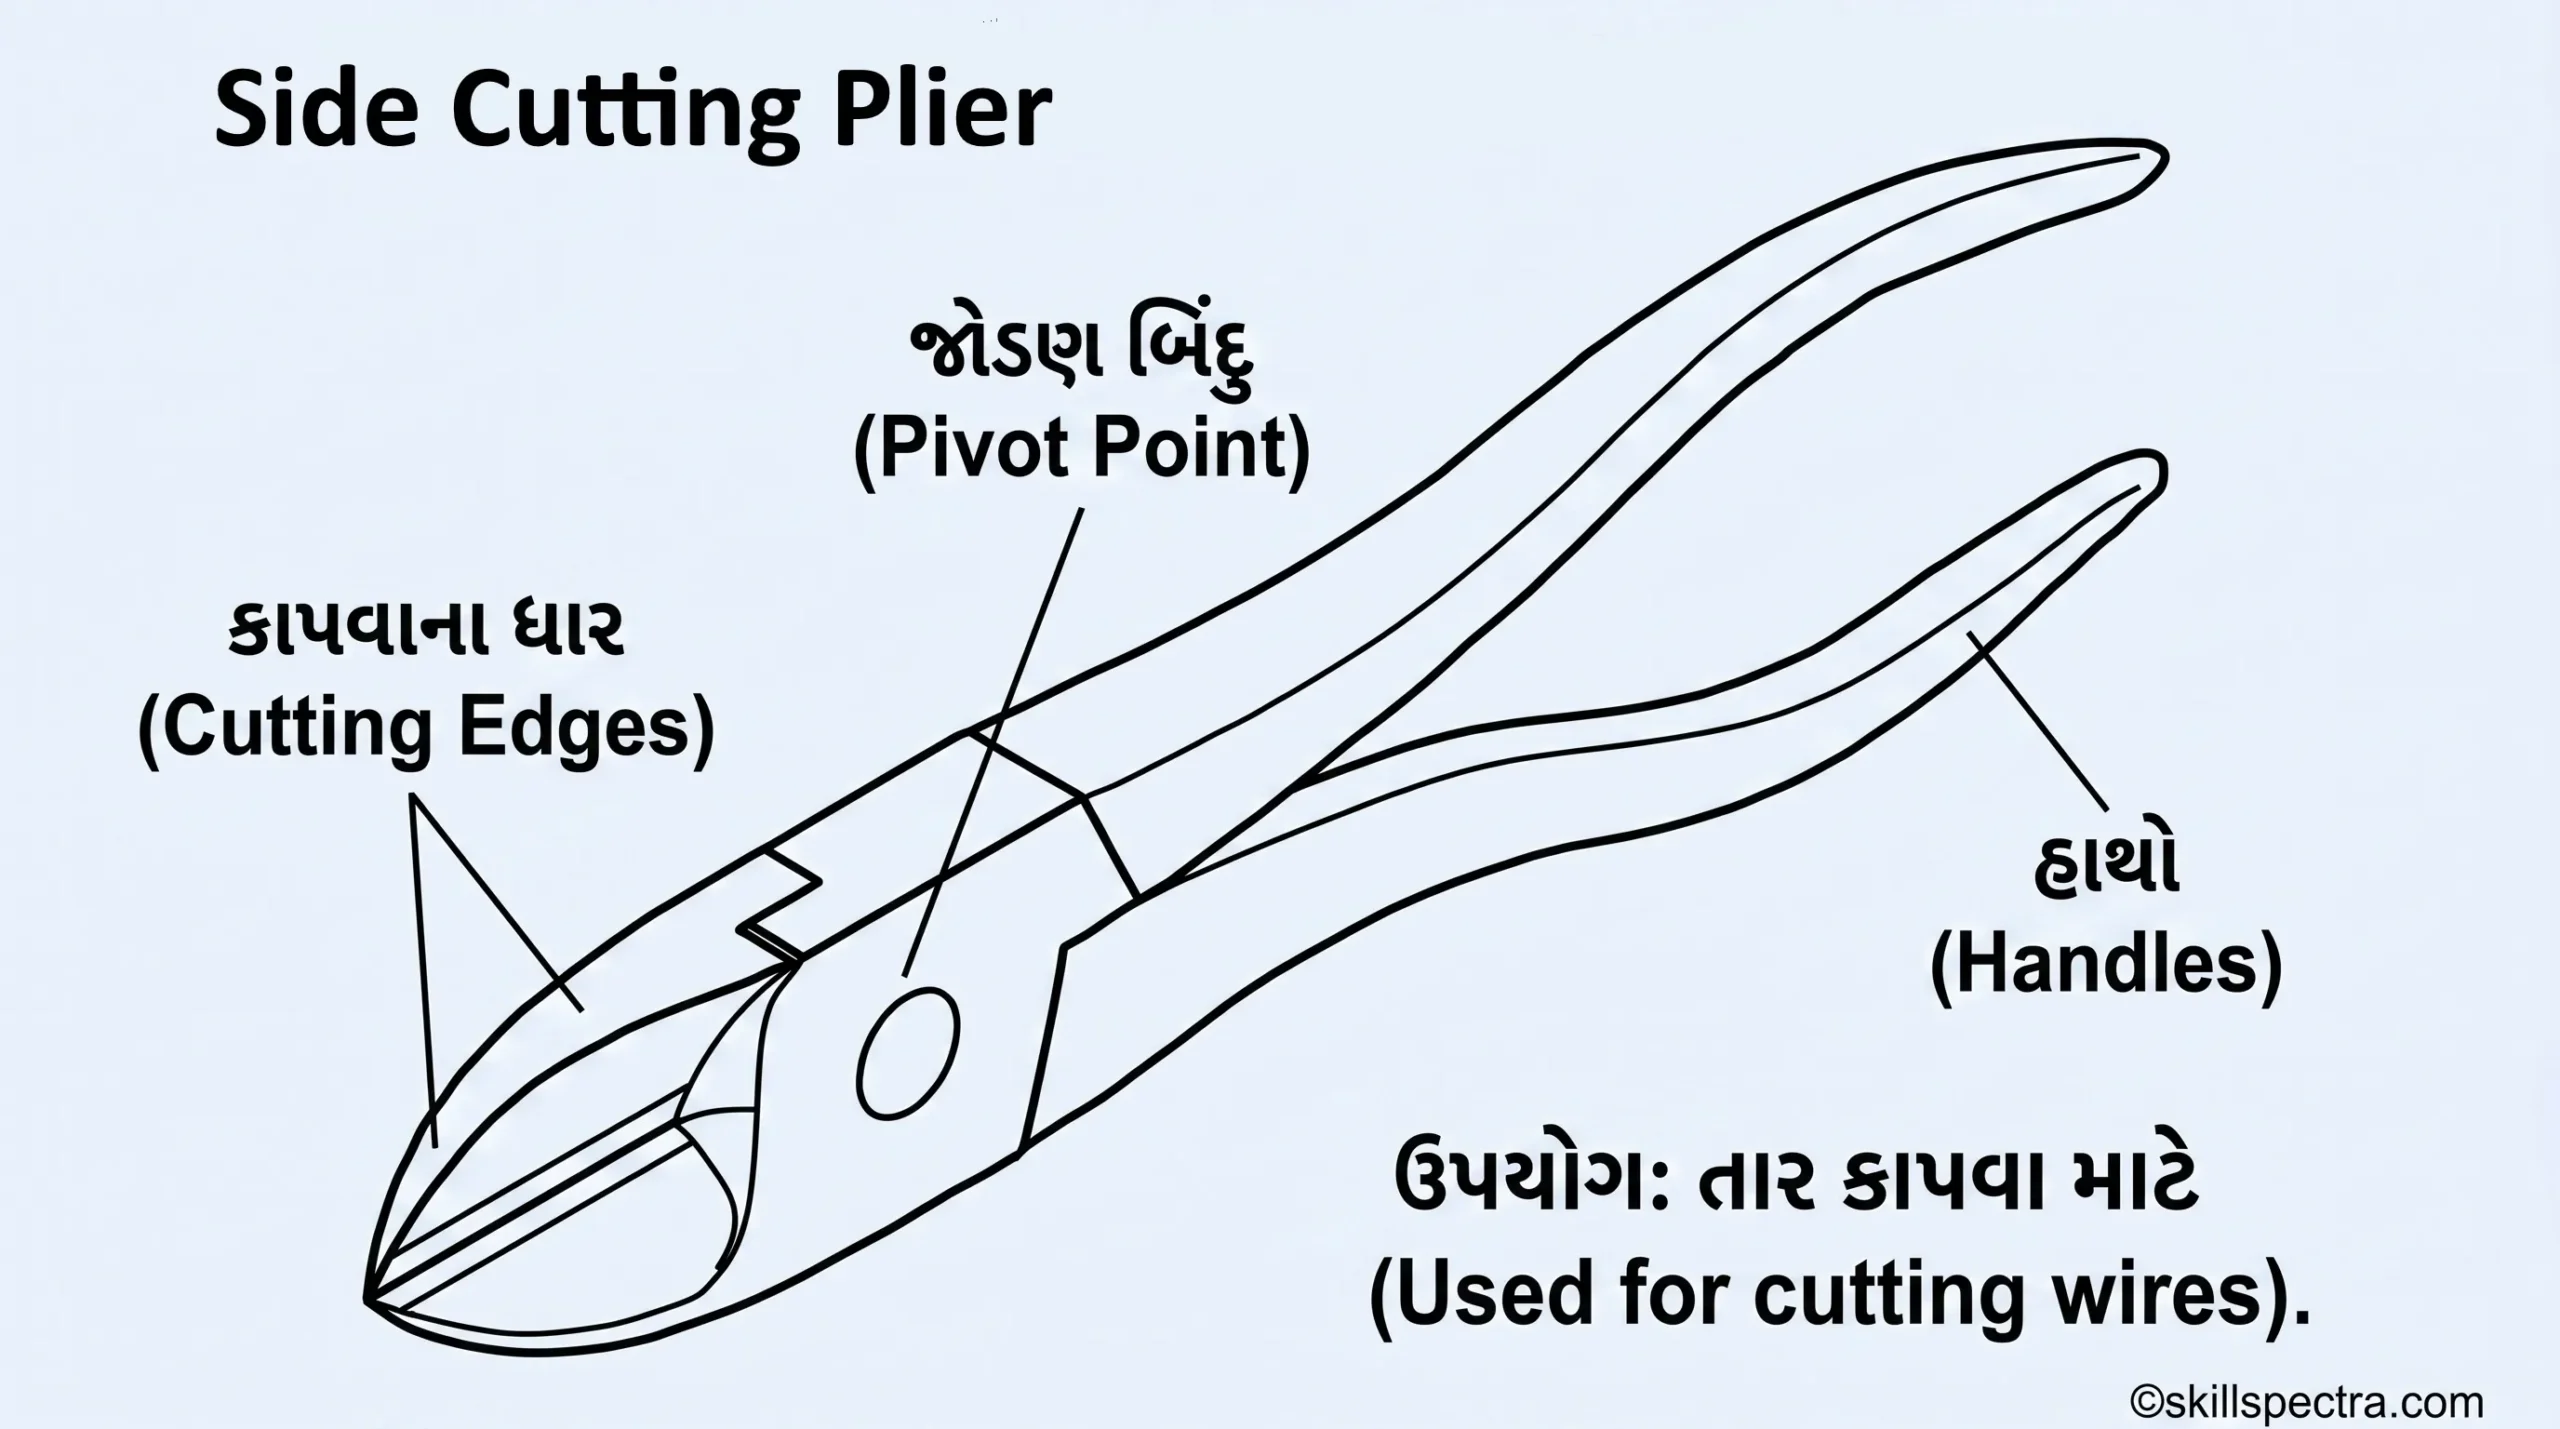

- Use: સાંકડી જગ્યામાં વાયર કાપવા માટે અને cotter pin ને ફેલાવવા (spreading) માટે વપરાય છે. (Fig 15)
8. External circlip pliers:
આનો ઉપયોગ શાફ્ટ (shafts) પરની બહારની સર્કલિપ (external circlip) ને ફિટ કરવા કે કાઢવા માટે થાય છે.
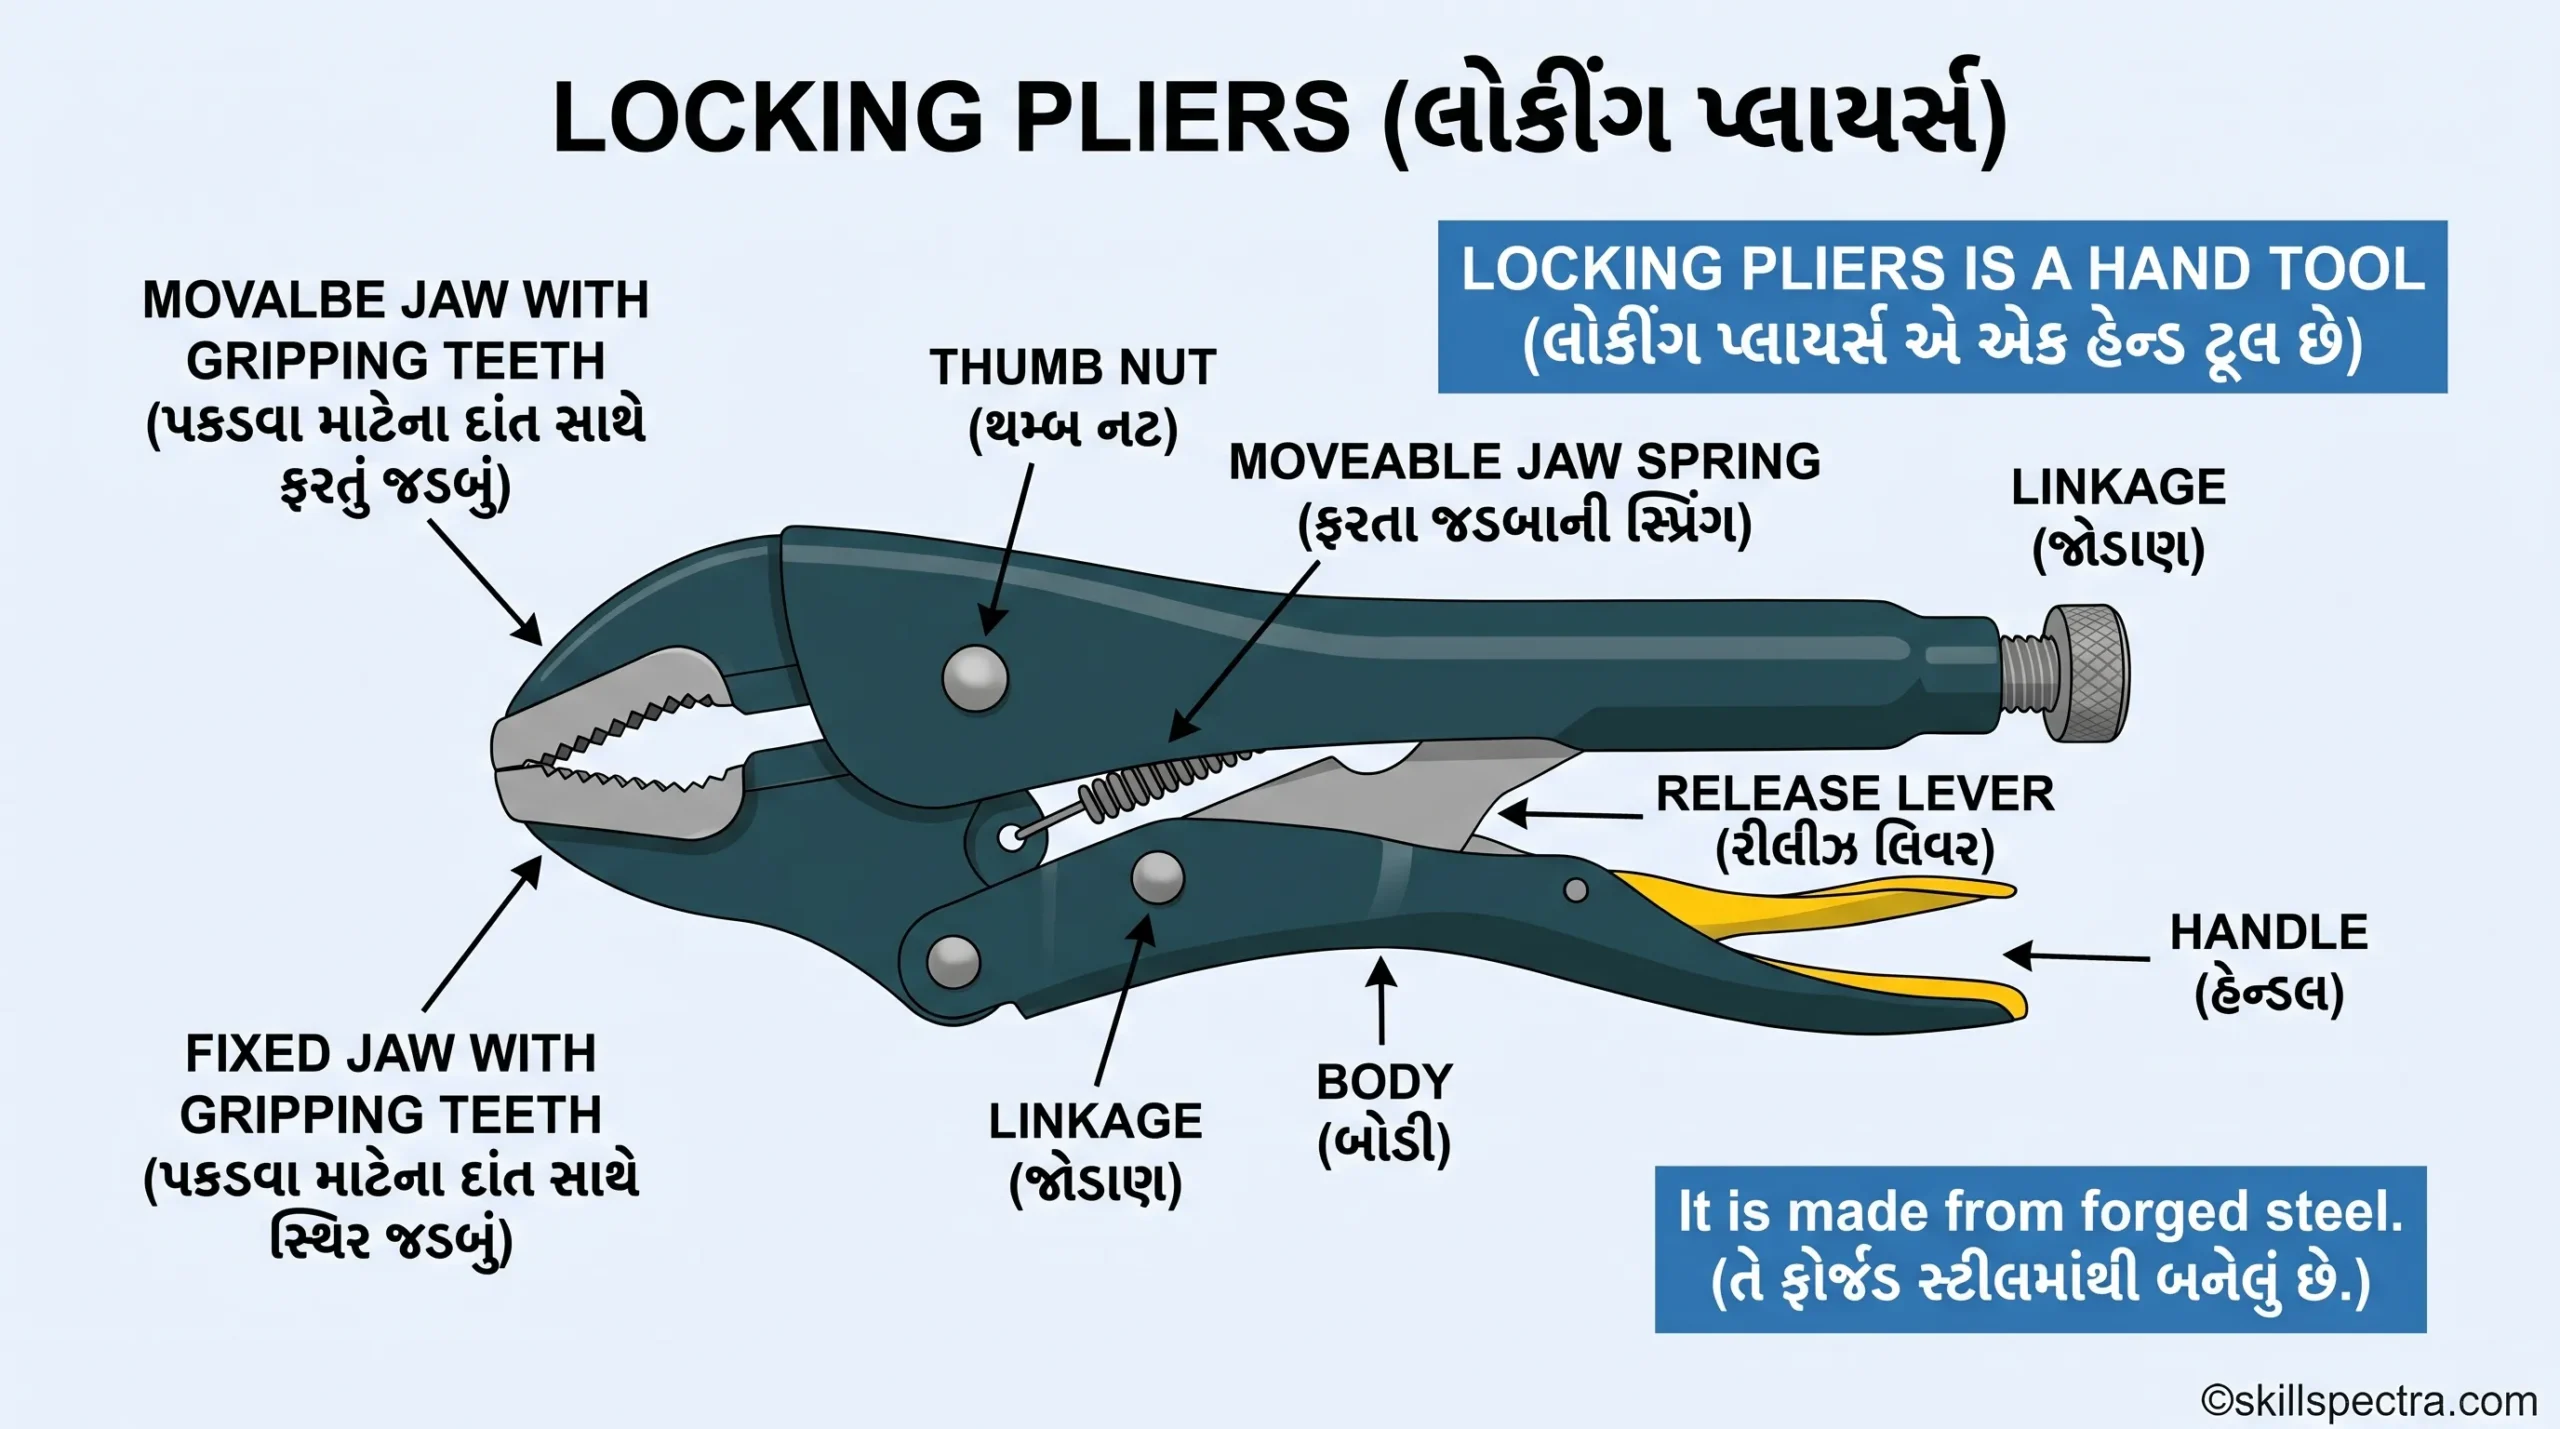
9. Locking pliers (લોકીંગ પ્લાયર્સ):
આમાં એક locking lever હોય છે જે જડબાંને કોઈપણ આકારની વસ્તુ પર મજબૂત રીતે લોક કરી દે છે.
- તેમાં high gripping power હોય છે.
- હેન્ડલમાં આપેલો screw લિવર એક્શનને કામના કદ મુજબ એડજસ્ટ કરવામાં મદદ કરે છે.
SNIPS (Straight and Bent) ✂️
Objectives (ઉદ્દેશ્યો): આ લેસનના અંતે તમે:
- Straight and bent snips ના ઉપયોગો જણાવશો.
- Lever shears ના ફીચર્સ અને ઉપયોગ જણાવશો.
- Circle cutting machines ના ઉપયોગો સમજશો.
Definition (વ્યાખ્યા): Snip, જેને hand shear પણ કહેવામાં આવે છે, તે કાતર (scissors) જેવું ટૂલ છે. તેનો ઉપયોગ 1.2mm thickness સુધીની પાતળી ધાતુની શીટ્સ (metal sheets) કાપવા માટે થાય છે. 📄✂️
Types of snips (shears): ધાતુને સીધી અથવા ગોળાકાર કાપવા માટે વિવિધ પ્રકારની સ્નિપ્સ ઉપલબ્ધ છે:
- Straight snips: સીધા કટિંગ માટે.
- Curved snips: વળાંકવાળા કટિંગ માટે.
સ્નિપ્સની પસંદગી જે તે કામના આકાર અને પ્રકાર પર આધાર રાખે છે.
Keywords 🗝️
આ શબ્દોનો ઉપયોગ તમારા ટેગ્સ અને ડિસ્ક્રિપ્શનમાં કરો:
- Mechanic Diesel Tools Gujarati
- Types of Pliers and their uses
- Combination Pliers functions
- Circlip Pliers internal external
- Snips tool for metal cutting
- Hand tools for ITI students
- Difference between Straight and Bent Snips
- Locking pliers features
- Gujarati Technical Education
Instructor Note: વિદ્યાર્થીઓને સમજાવતી વખતે દરેક આકૃતિ (Fig 1 થી Fig 15) નો સંદર્ભ અવશ્ય આપવો જેથી તેઓ ટૂલના આકાર અને તેના કામને વધુ સારી રીતે સમજી શકે. 😊
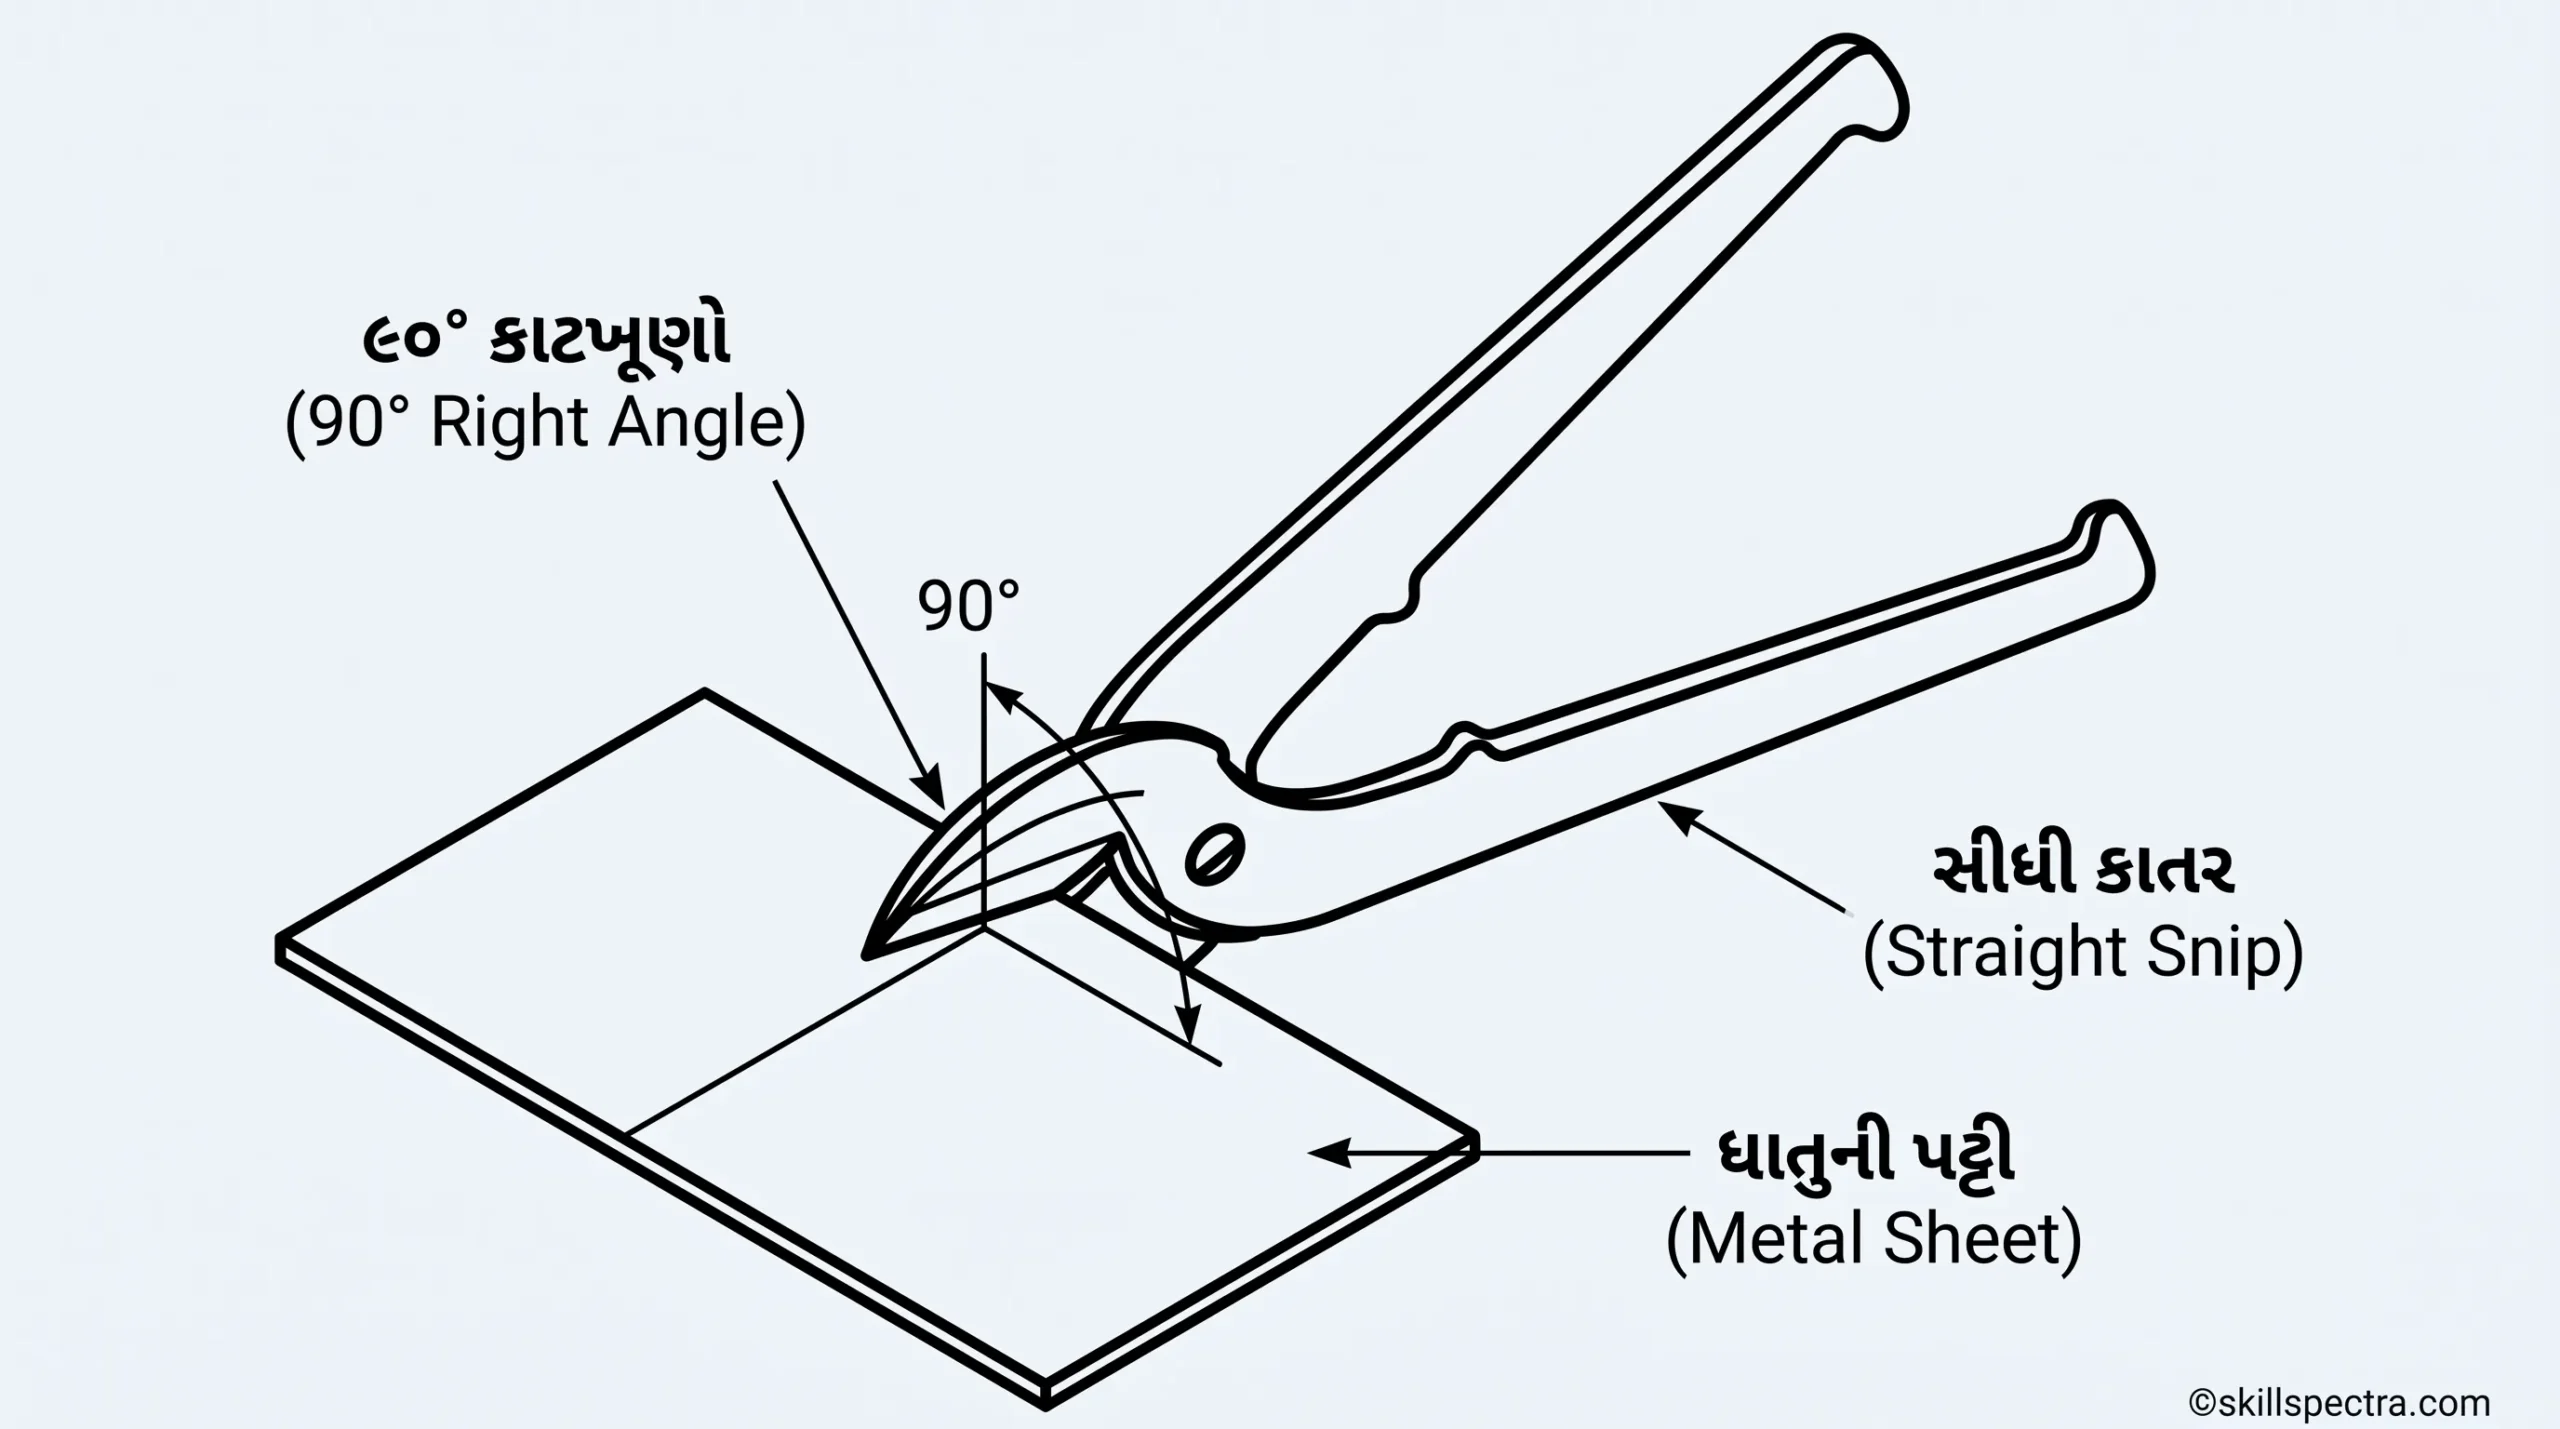
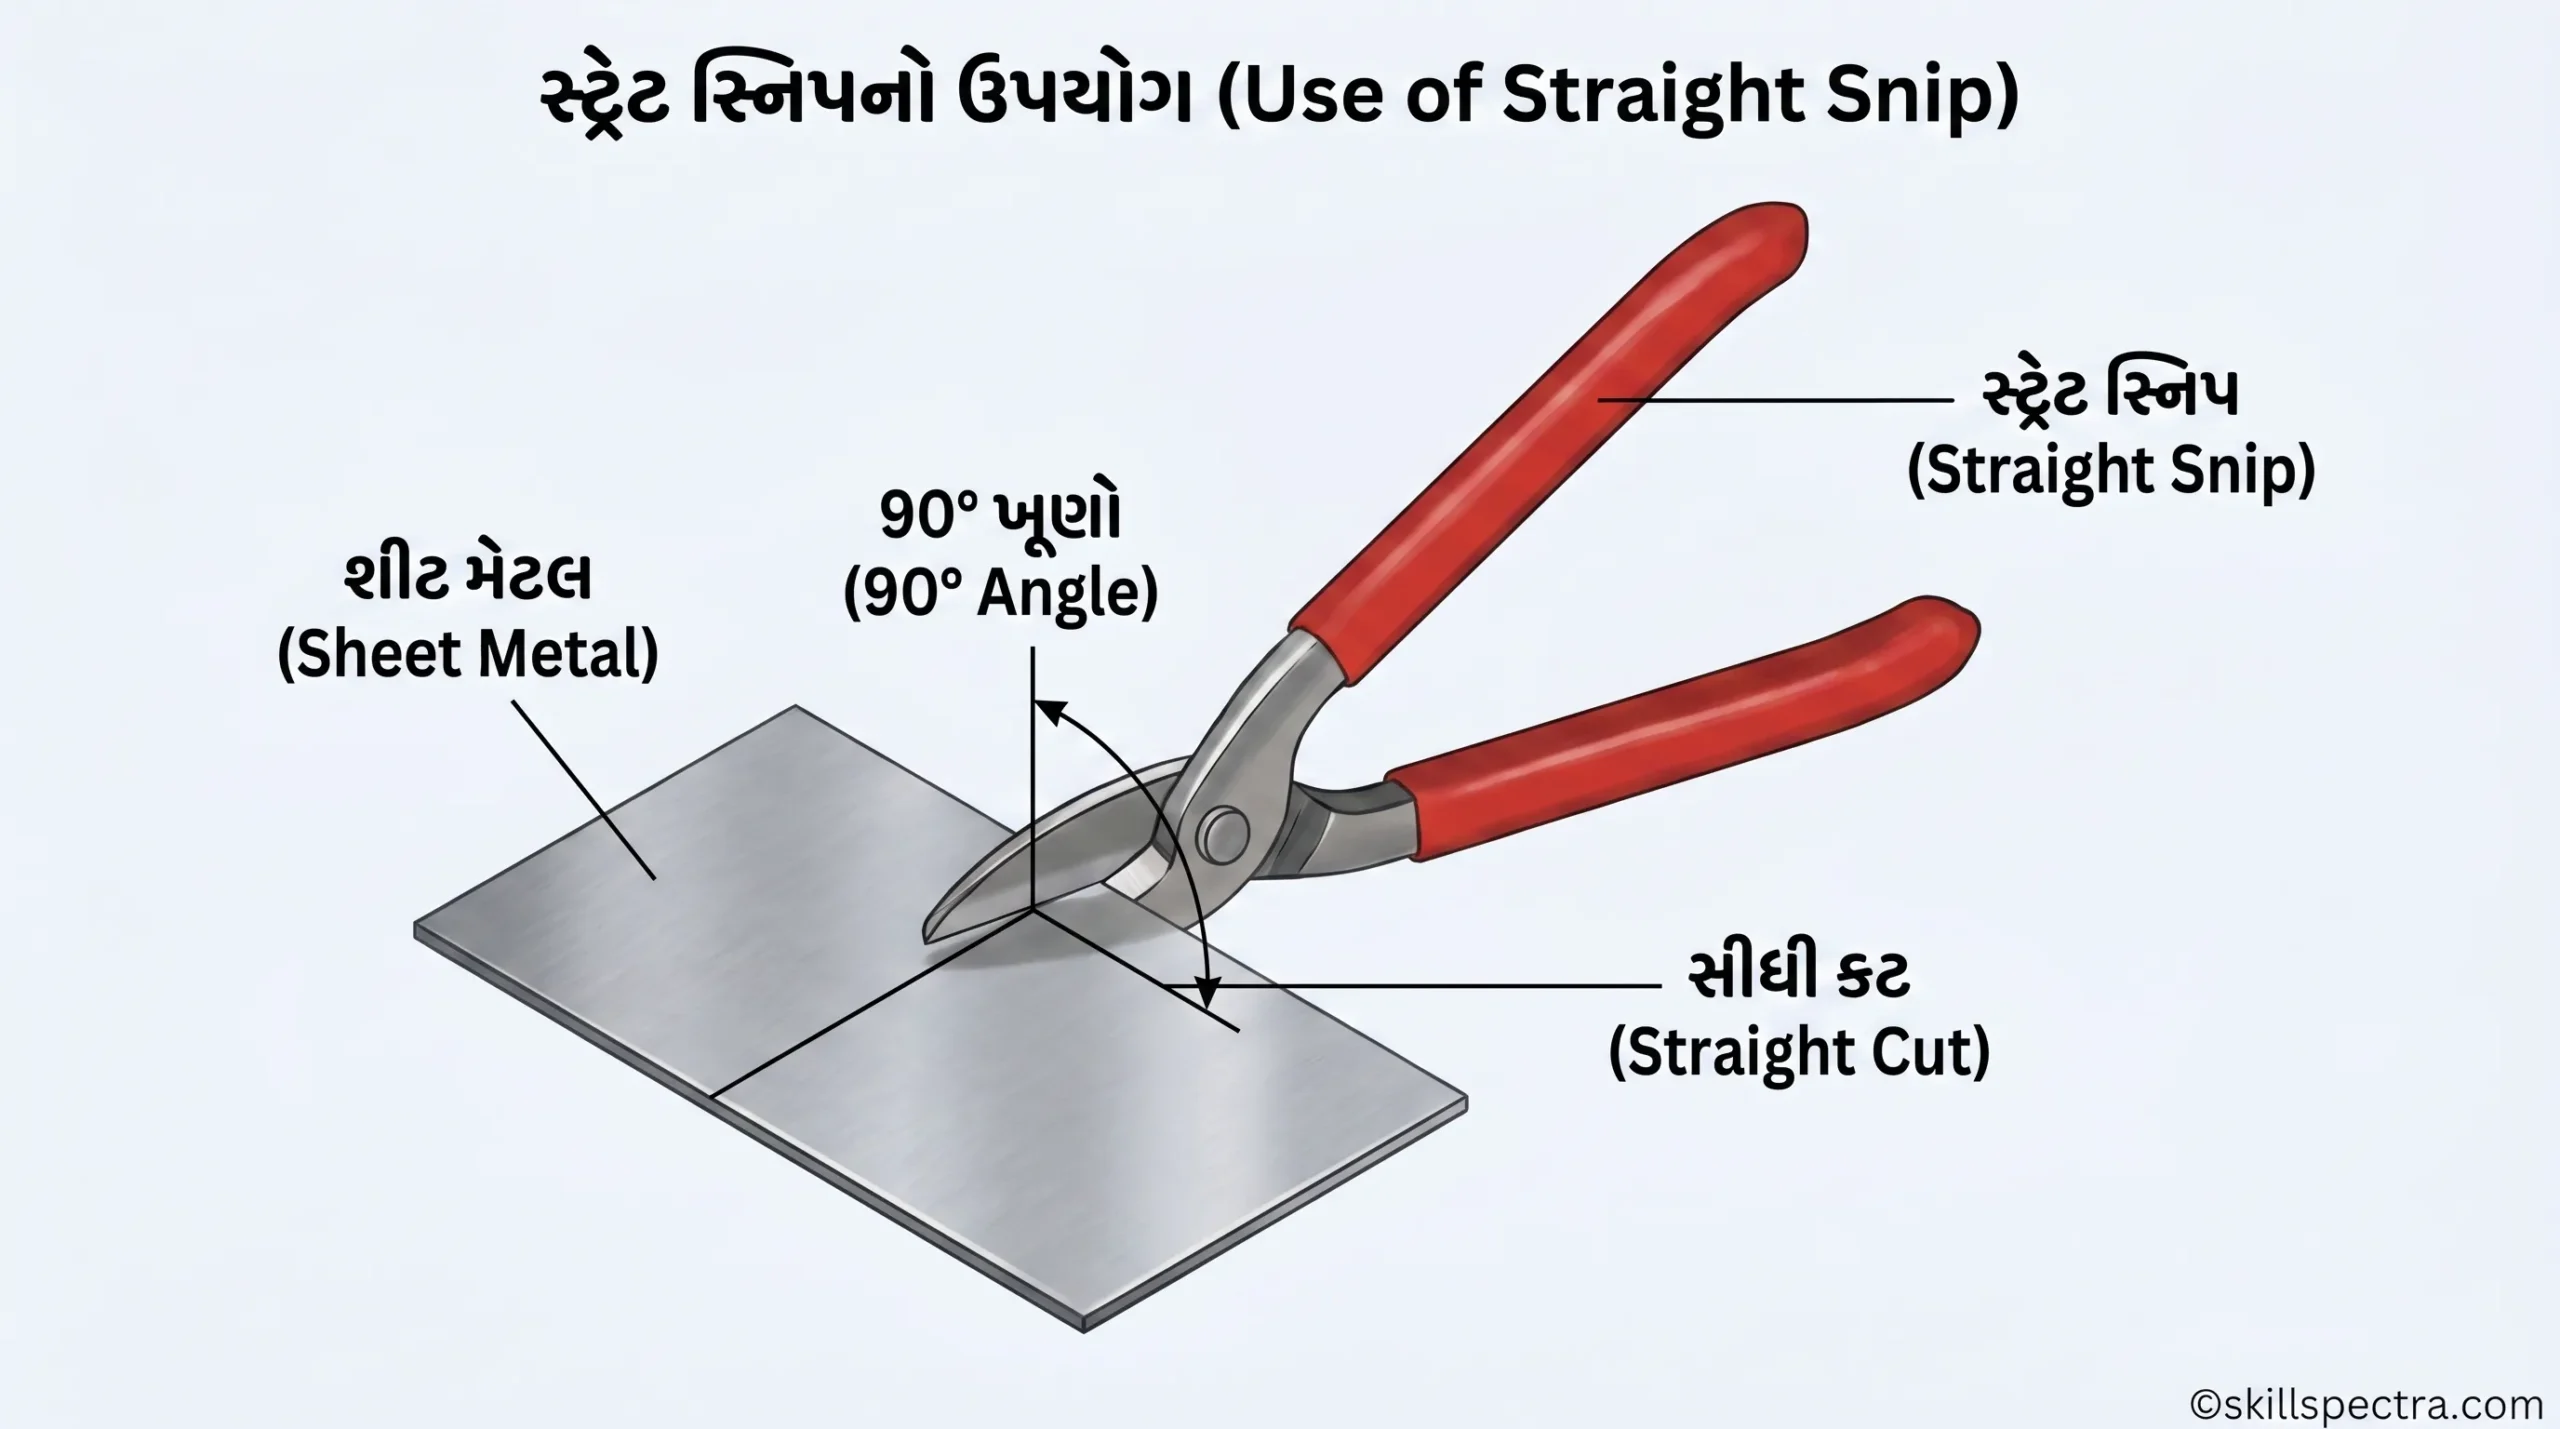
Straight Snips (Fig 1 & 2) | સ્ટ્રેટ સ્નિપ્સ ✂️
Straight snips નો ઉપયોગ સીધા કટ (straight cuts) અને મોટા બહારના વળાંકો (large external curves) બનાવવા માટે થાય છે.
Straight snips માં પાતળા બ્લેડ હોય છે જે ફક્ત વર્ટિકલ પ્લેન (vertical planes) પર જ મજબૂત હોય છે. તેથી, જ્યારે વધારાનો કચરો (surplus waste) દૂર કરવાનો હોય ત્યારે તે ફક્ત સીધા કટ અને બહારના વળાંકો માટે જ યોગ્ય છે.
કટિંગ કરતી વખતે, સ્નિપ્સની બ્લેડ માર્કિંગ (marking) ને ઢાંકવી જોઈએ નહીં, જેથી ચોકસાઈ જળવાઈ રહે.
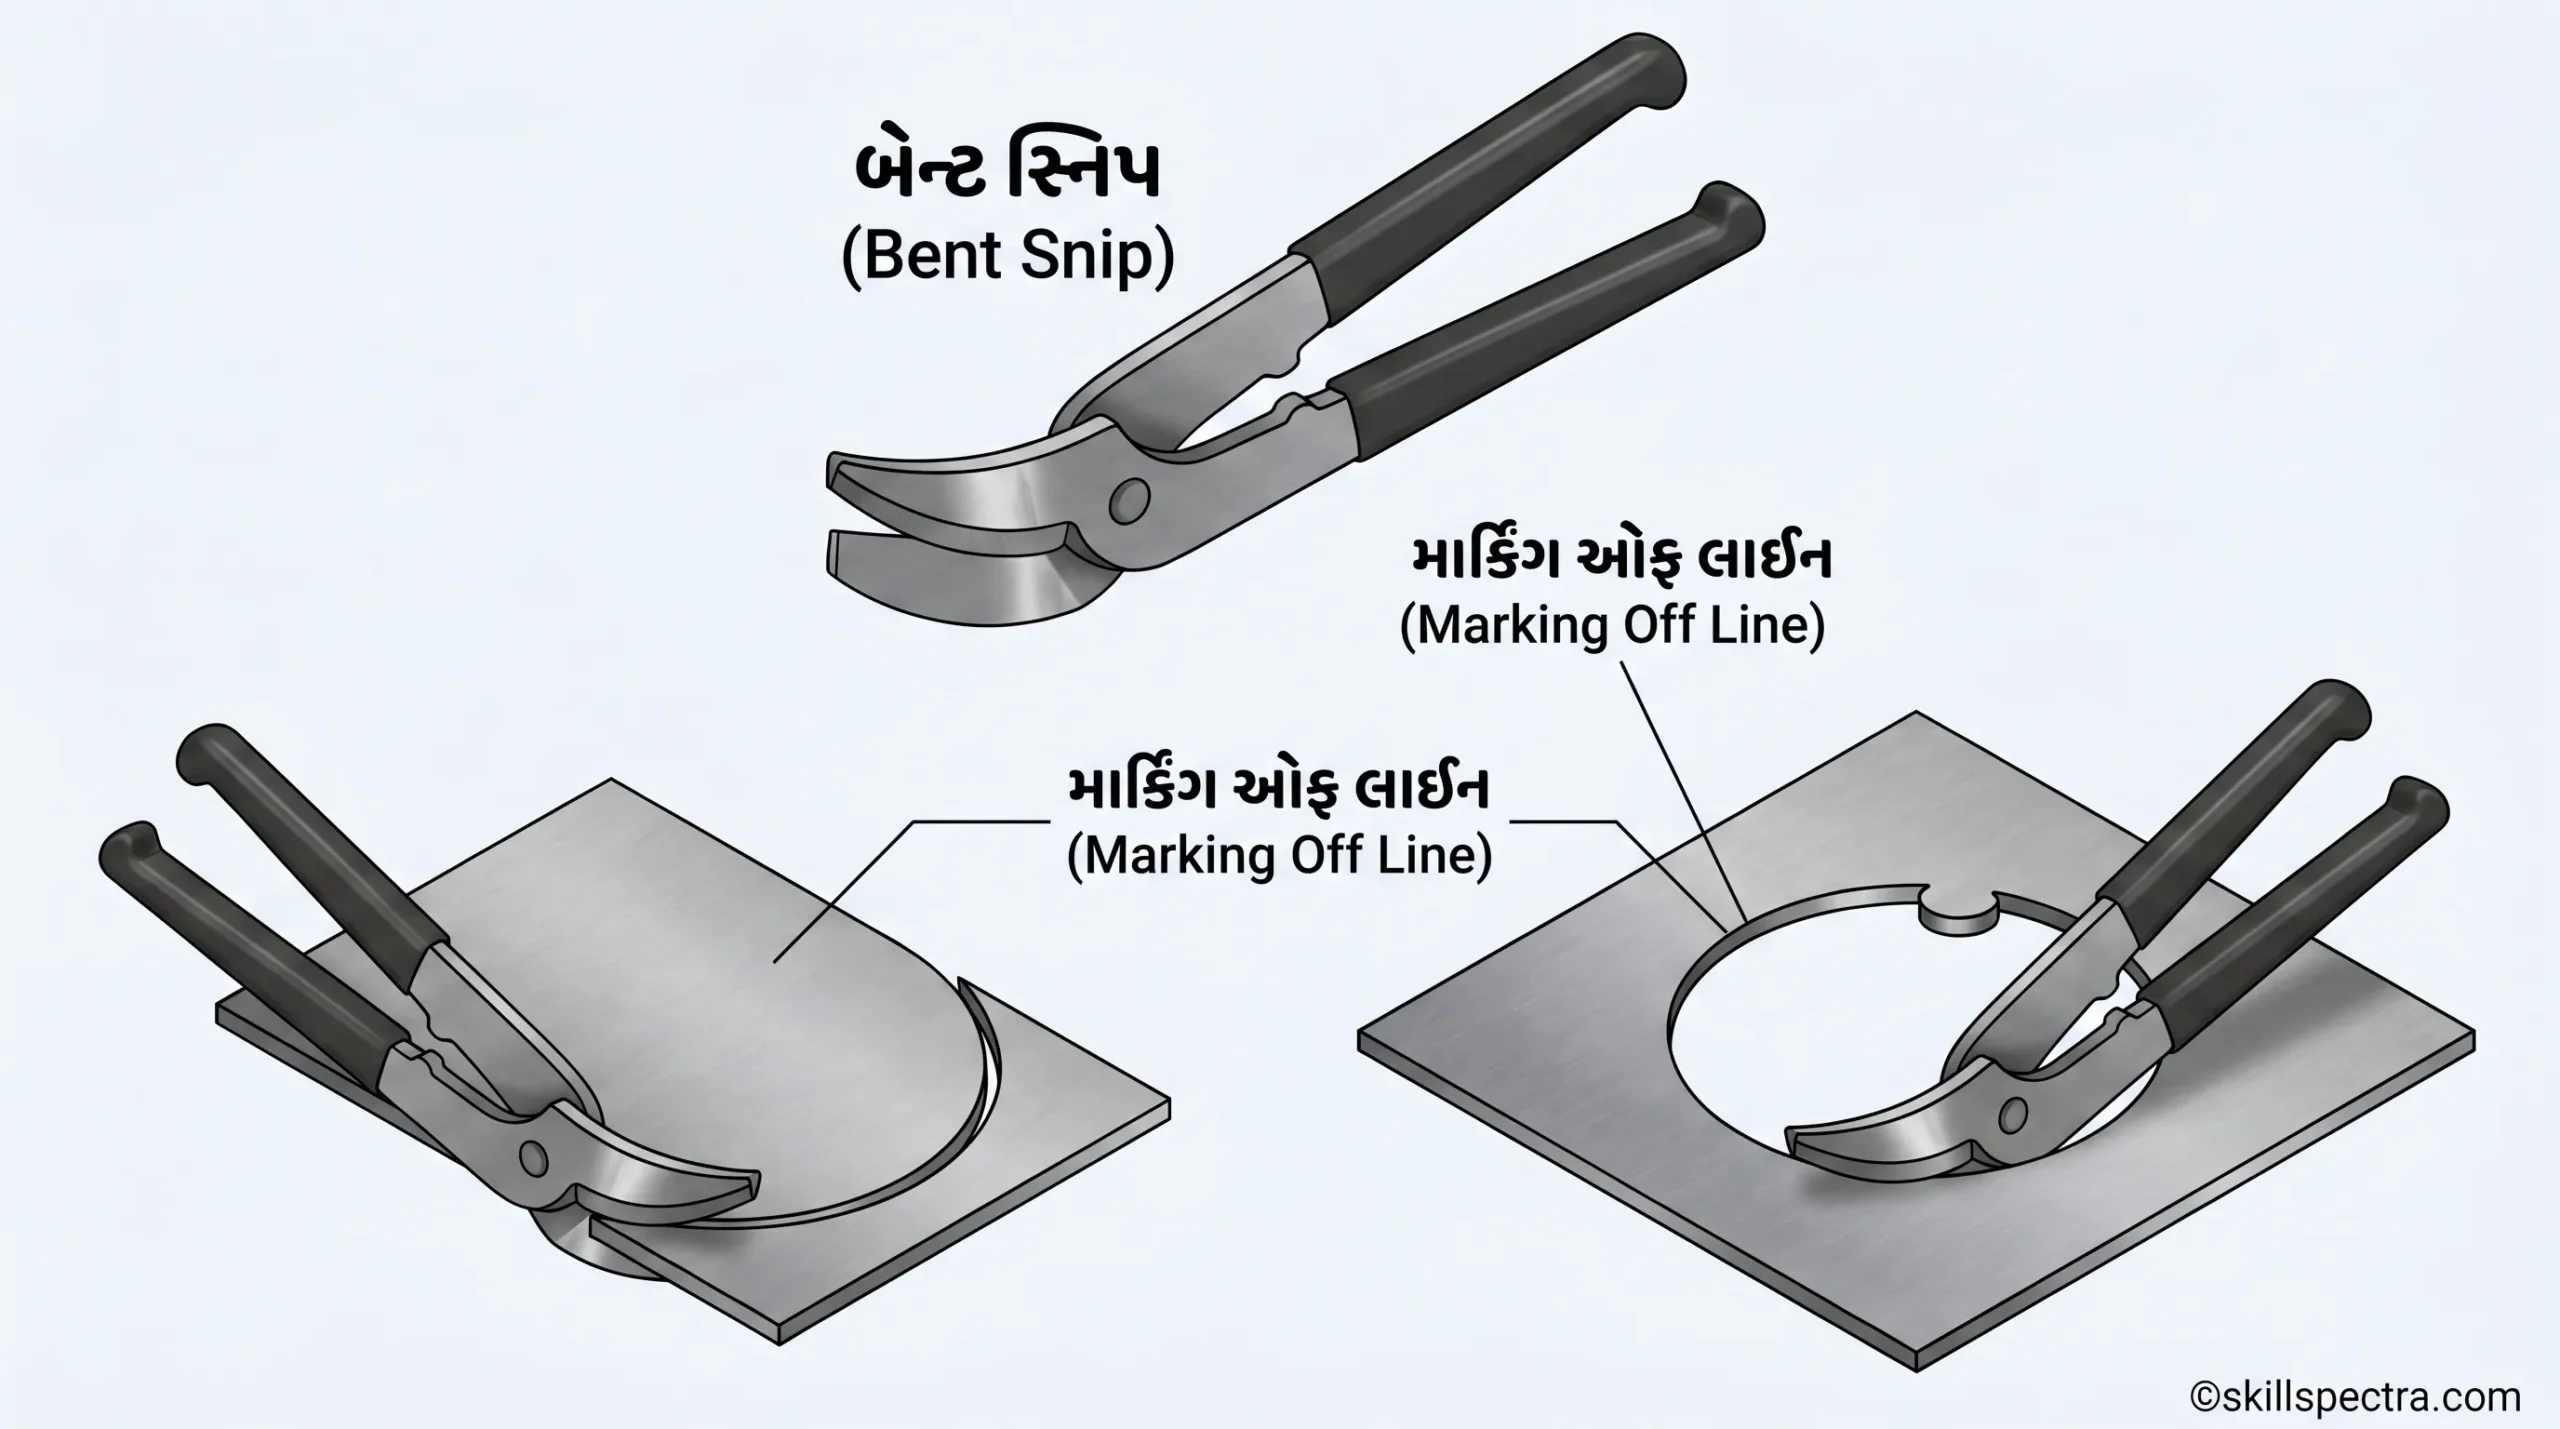
Bent Snips (Fig 3) | બેન્ટ સ્નિપ્સ ↪️
આ સ્નિપ્સમાં ગોળાકાર કટ (circular cuts) કરવા માટે વળાંકવાળા બ્લેડ (curved blades) હોય છે. તેનો ઉપયોગ શીટ મેટલમાં સિલિન્ડ્રિકલ (cylindrical) અથવા કોનિકલ (conical) કામના ટ્રિમિંગ (trimming) માટે પણ થાય છે.
Snip Specifications & Example (Fig 4) | સ્નિપ સ્પેસિફિકેશન 📏
સ્નિપ્સને તેની કુલ લંબાઈ (overall length) અને બ્લેડના આકાર (shape of the blade) દ્વારા ઓળખવામાં આવે છે.
Example: 200mm straight snip (Fig 4).
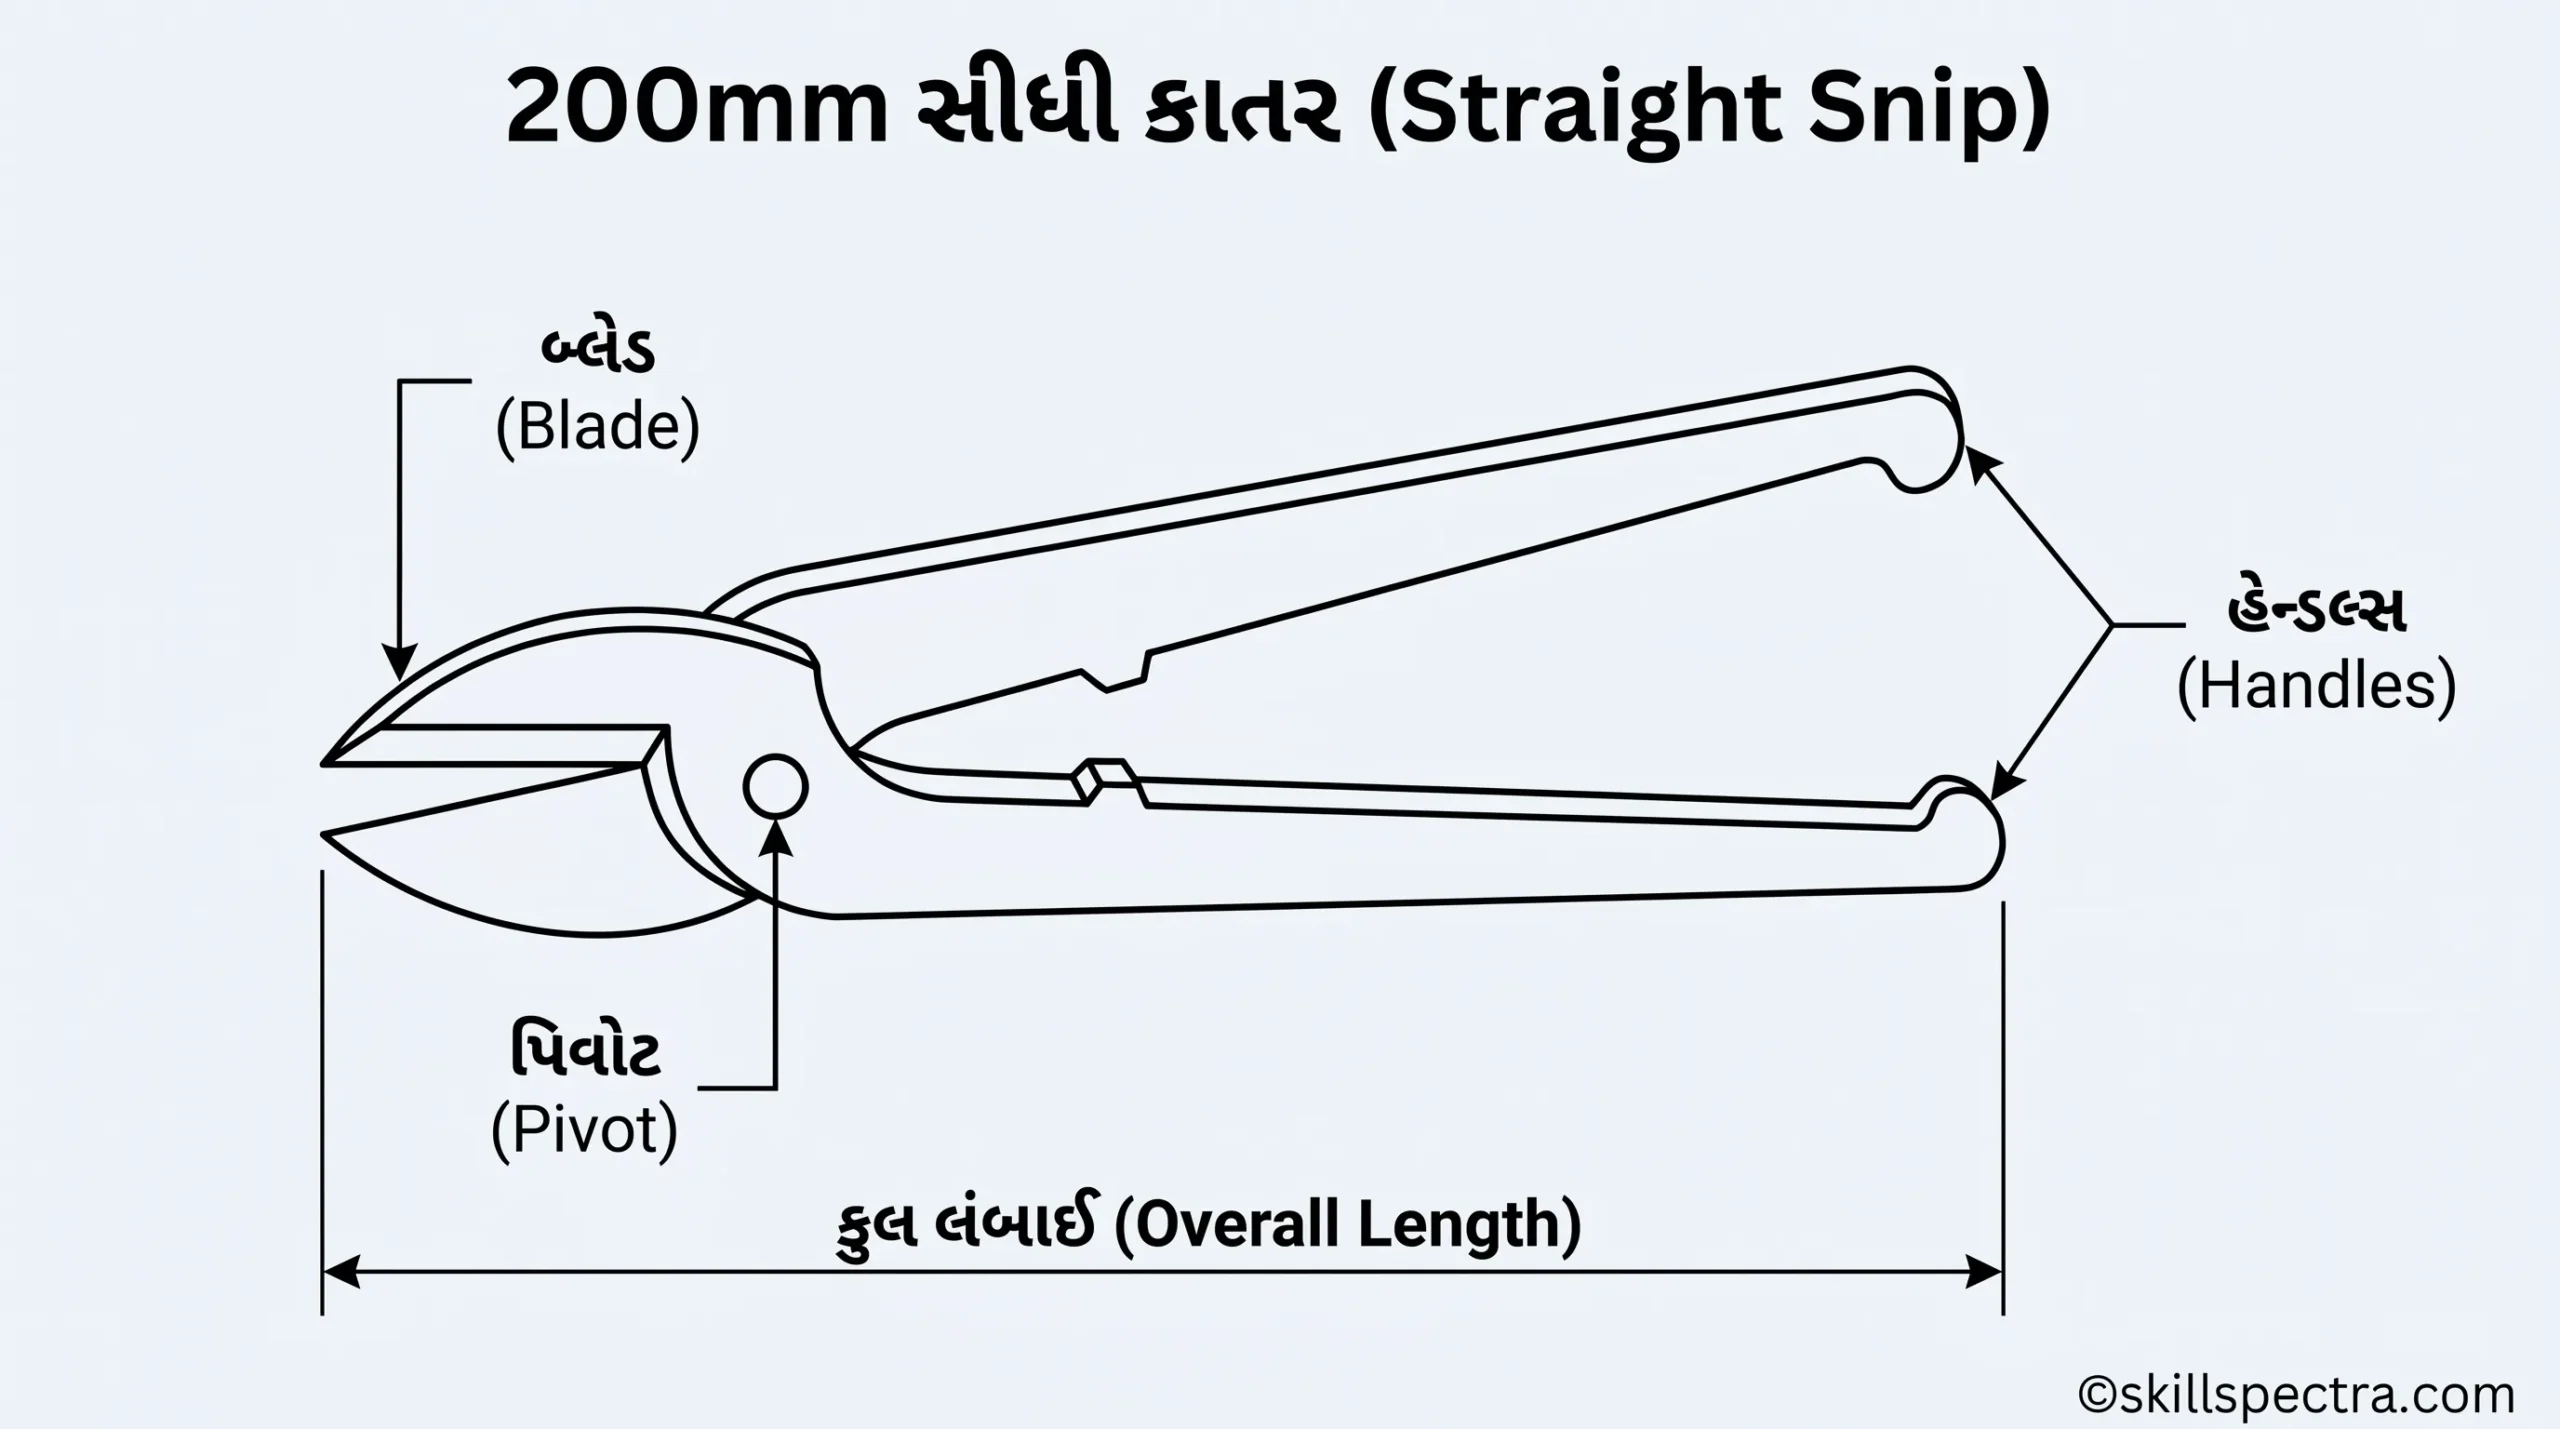
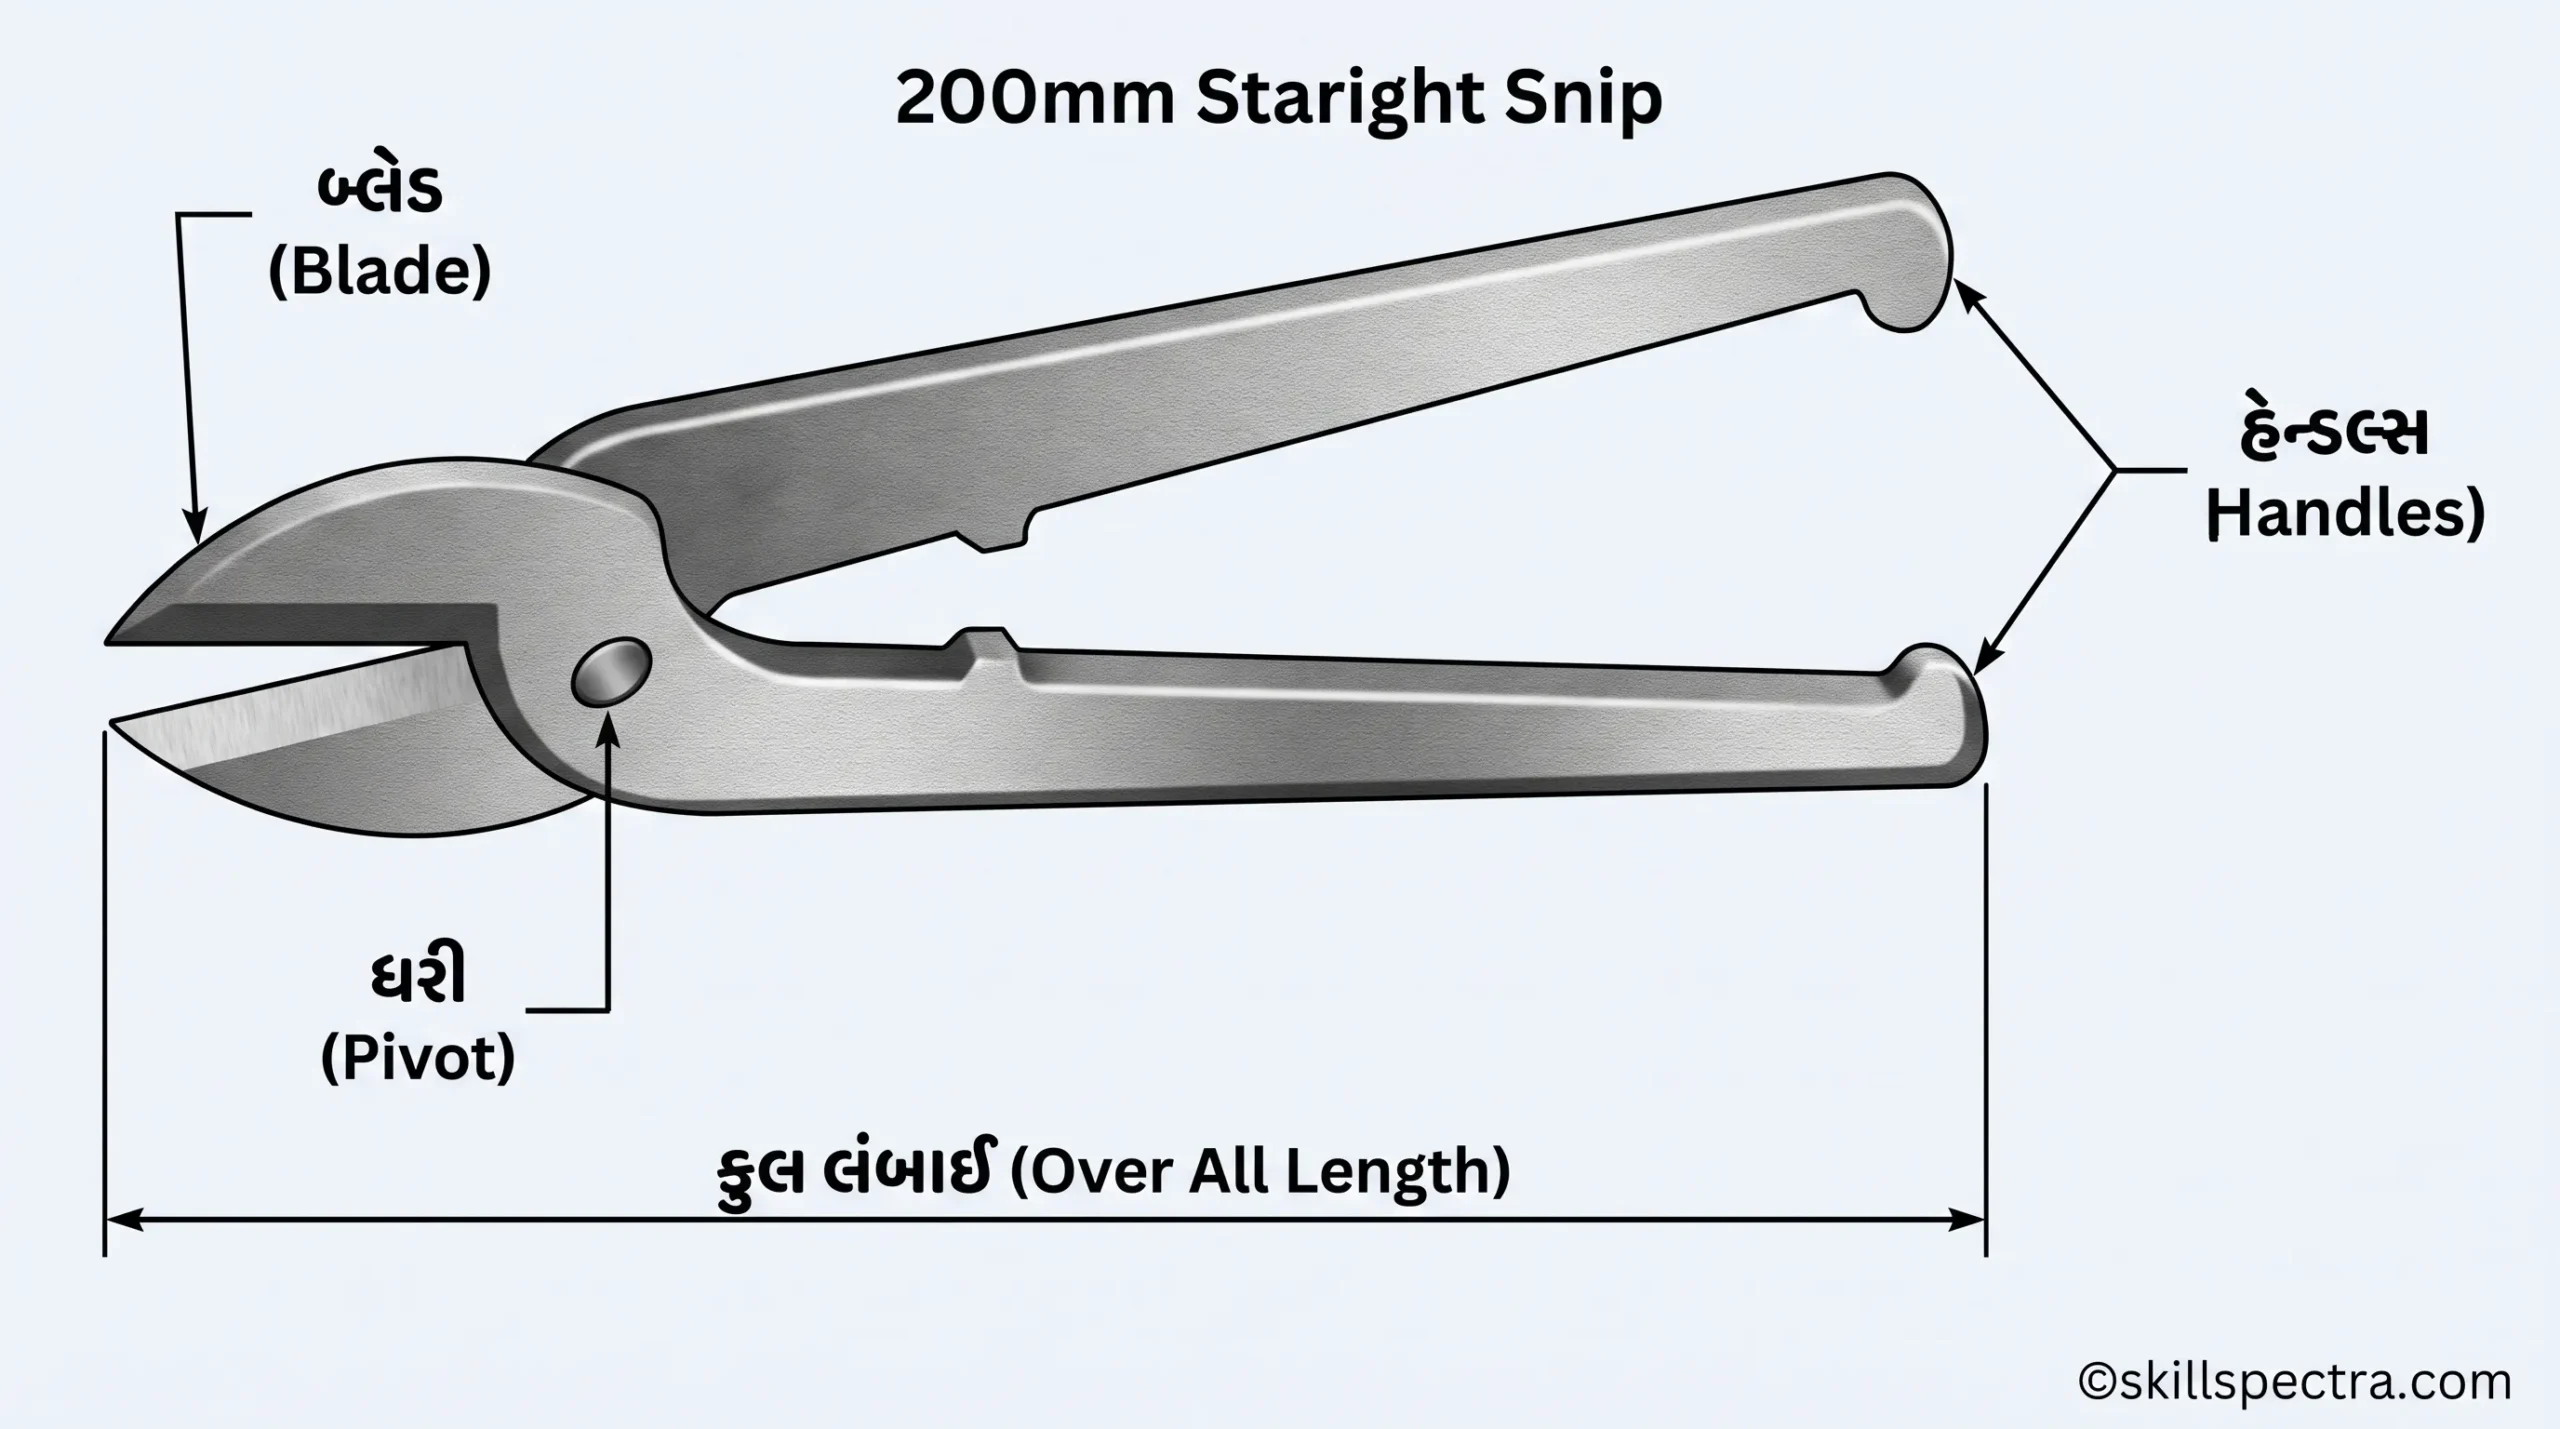
Parts of Snip (Fig 4 મુજબ):
- Blade: કાપવા માટેનો ભાગ.
- Pivot: જ્યાંથી બ્લેડ જોડાયેલા હોય છે.
- Handles: પકડવા માટેનો ભાગ.
- Over all length: આખી સ્નિપની લંબાઈ.
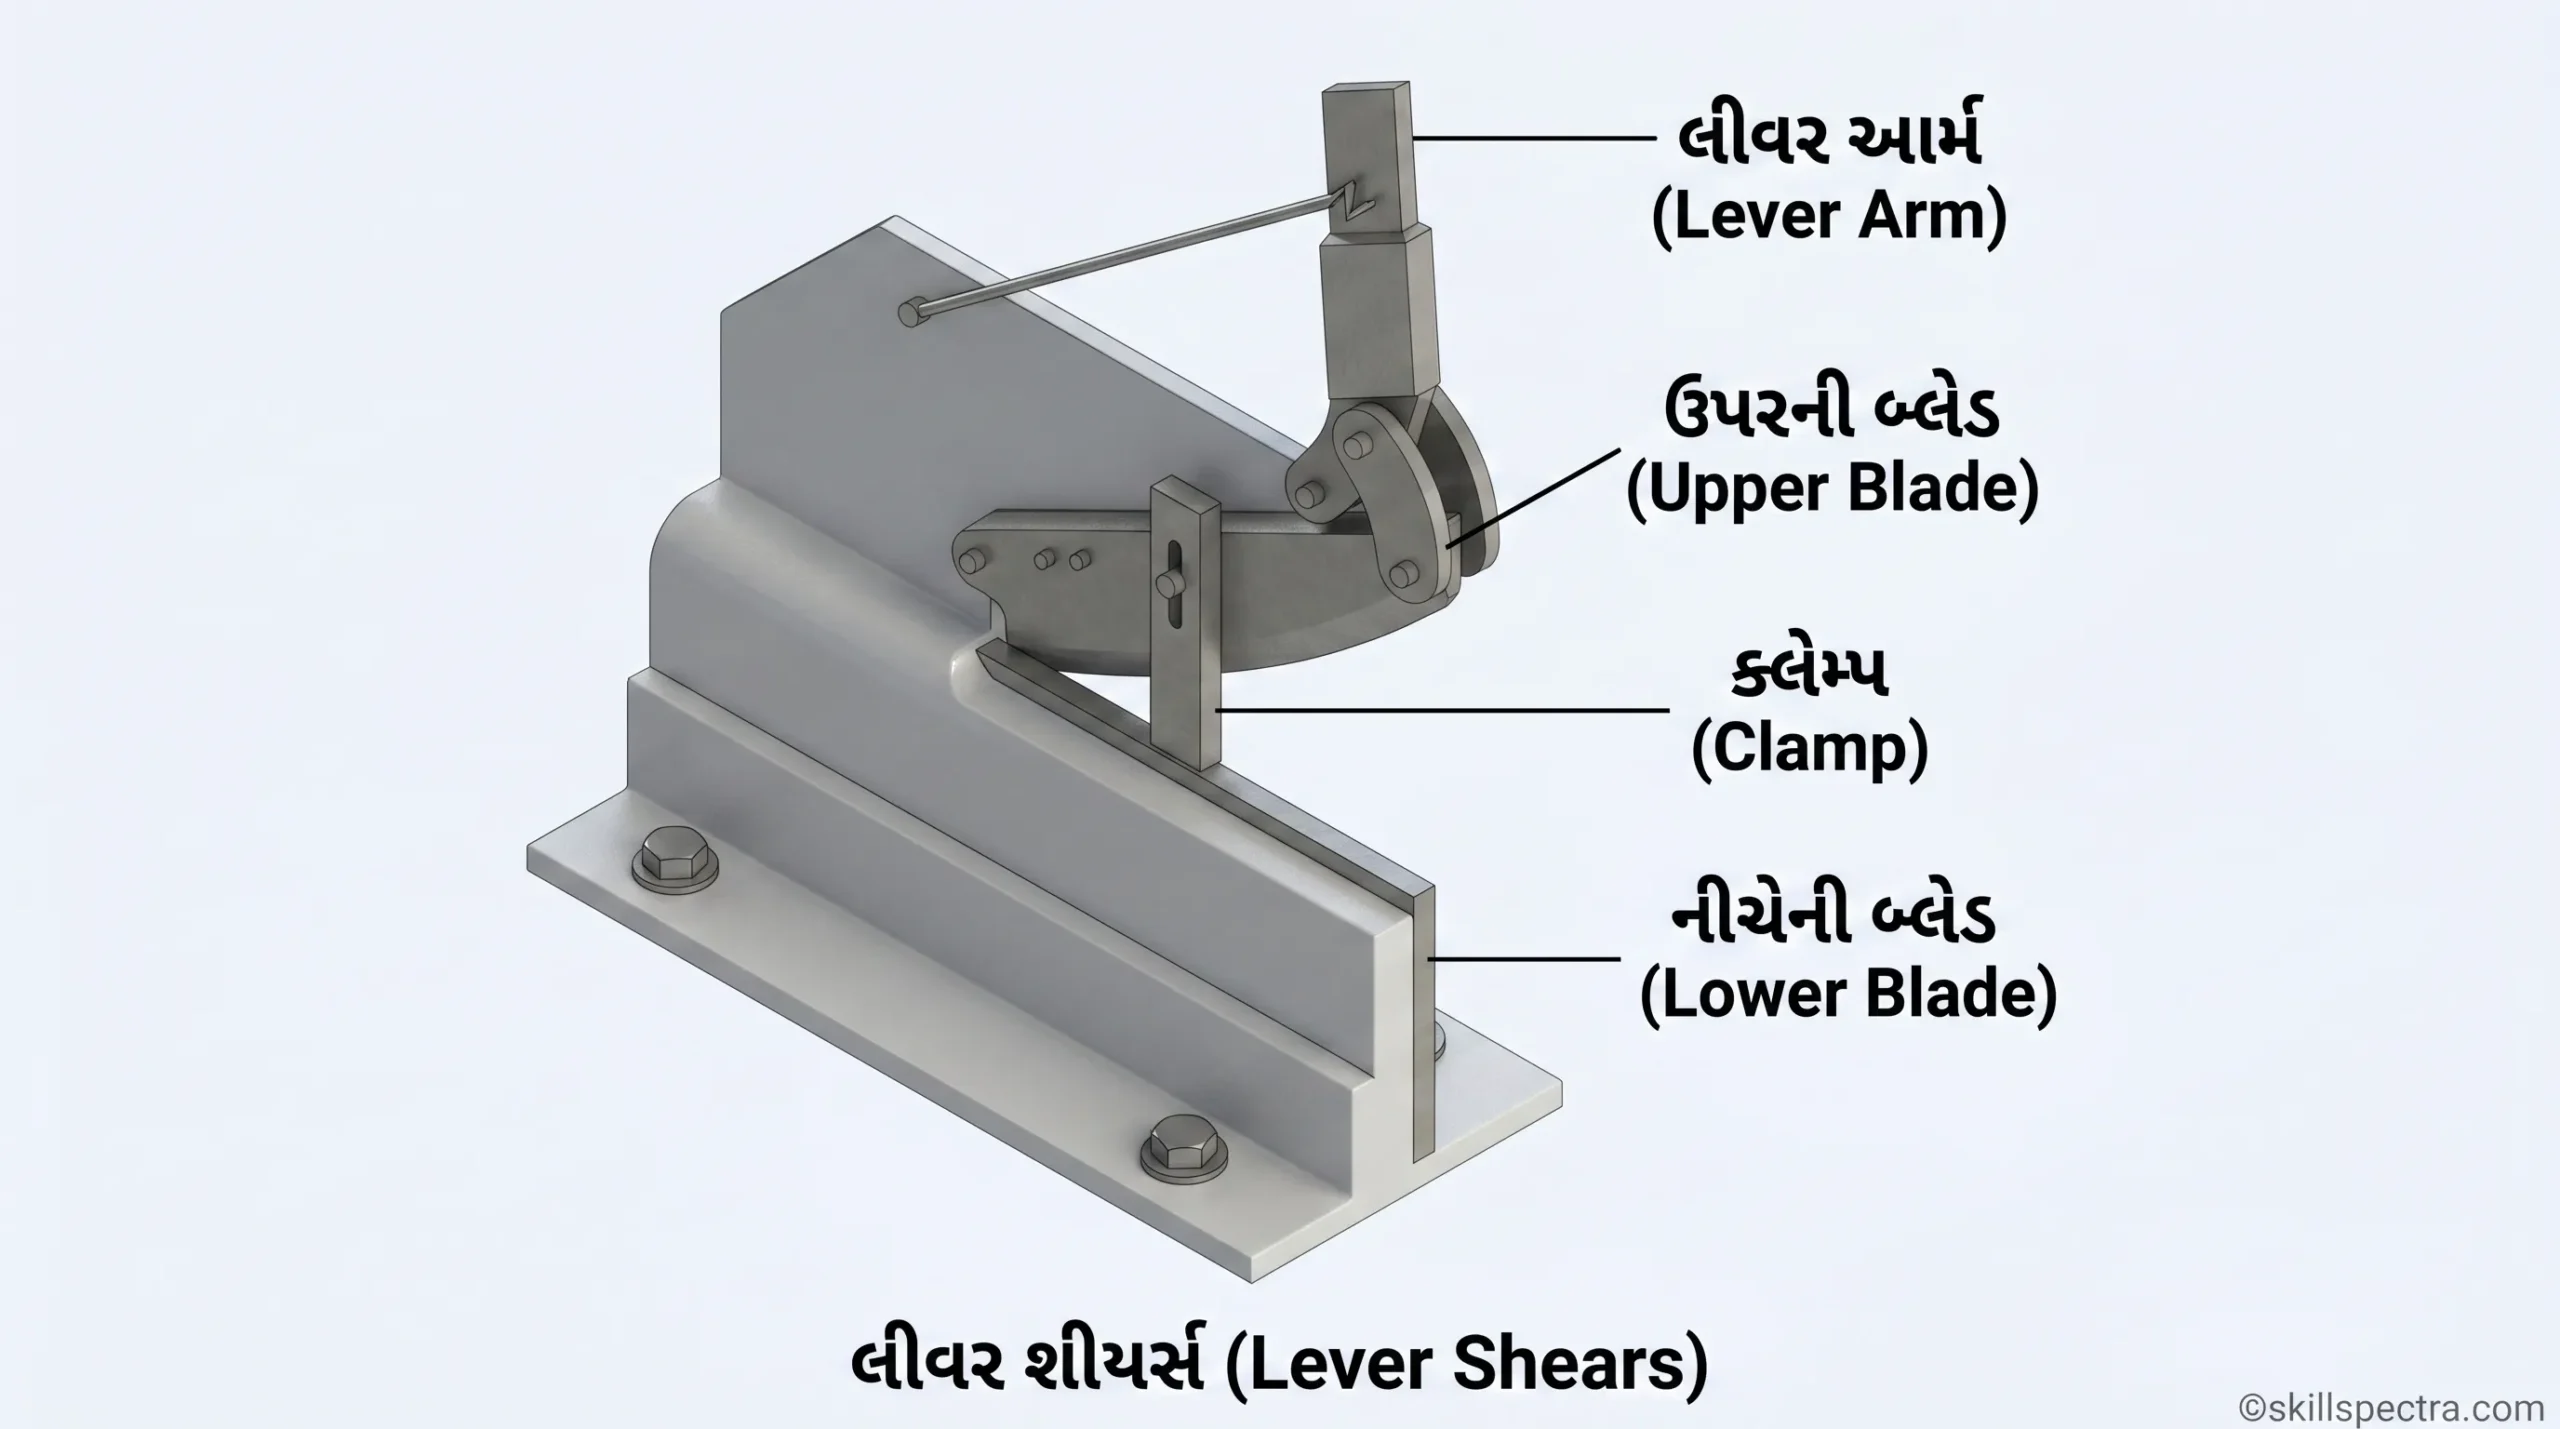
Lever Shears (Fig 5) | લીવર શીઅર્સ ⚙️
લીવર શીઅર્સનો ઉપયોગ એવી શીટ્સ કાપવા માટે થાય છે જે હેન્ડ સ્નિપ્સ (hand snips) થી કાપી શકાતી નથી.
લીવર શીઅરમાં એક ફિક્સ નીચેની બ્લેડ (fixed lower blade) અને એક હલનચલન કરતી ઉપરની બ્લેડ (moving upper blade) હોય છે.
શીટ કાપતી વખતે તે નમી ના જાય (tilting) તે માટે એક ક્લેમ્પિંગ ડિવાઇસ (clamping device) હોય છે, જેને શીટની જાડાઈ (thickness) મુજબ એડજસ્ટ કરી શકાય છે.
ઉપરની બ્લેડનું નાઈફ-એજ કટર વળાંકવાળું હોય છે જેથી કટિંગ પોઈન્ટ પર ઓપનિંગ એન્ગલ (opening angle) હંમેશા સમાન રહે.
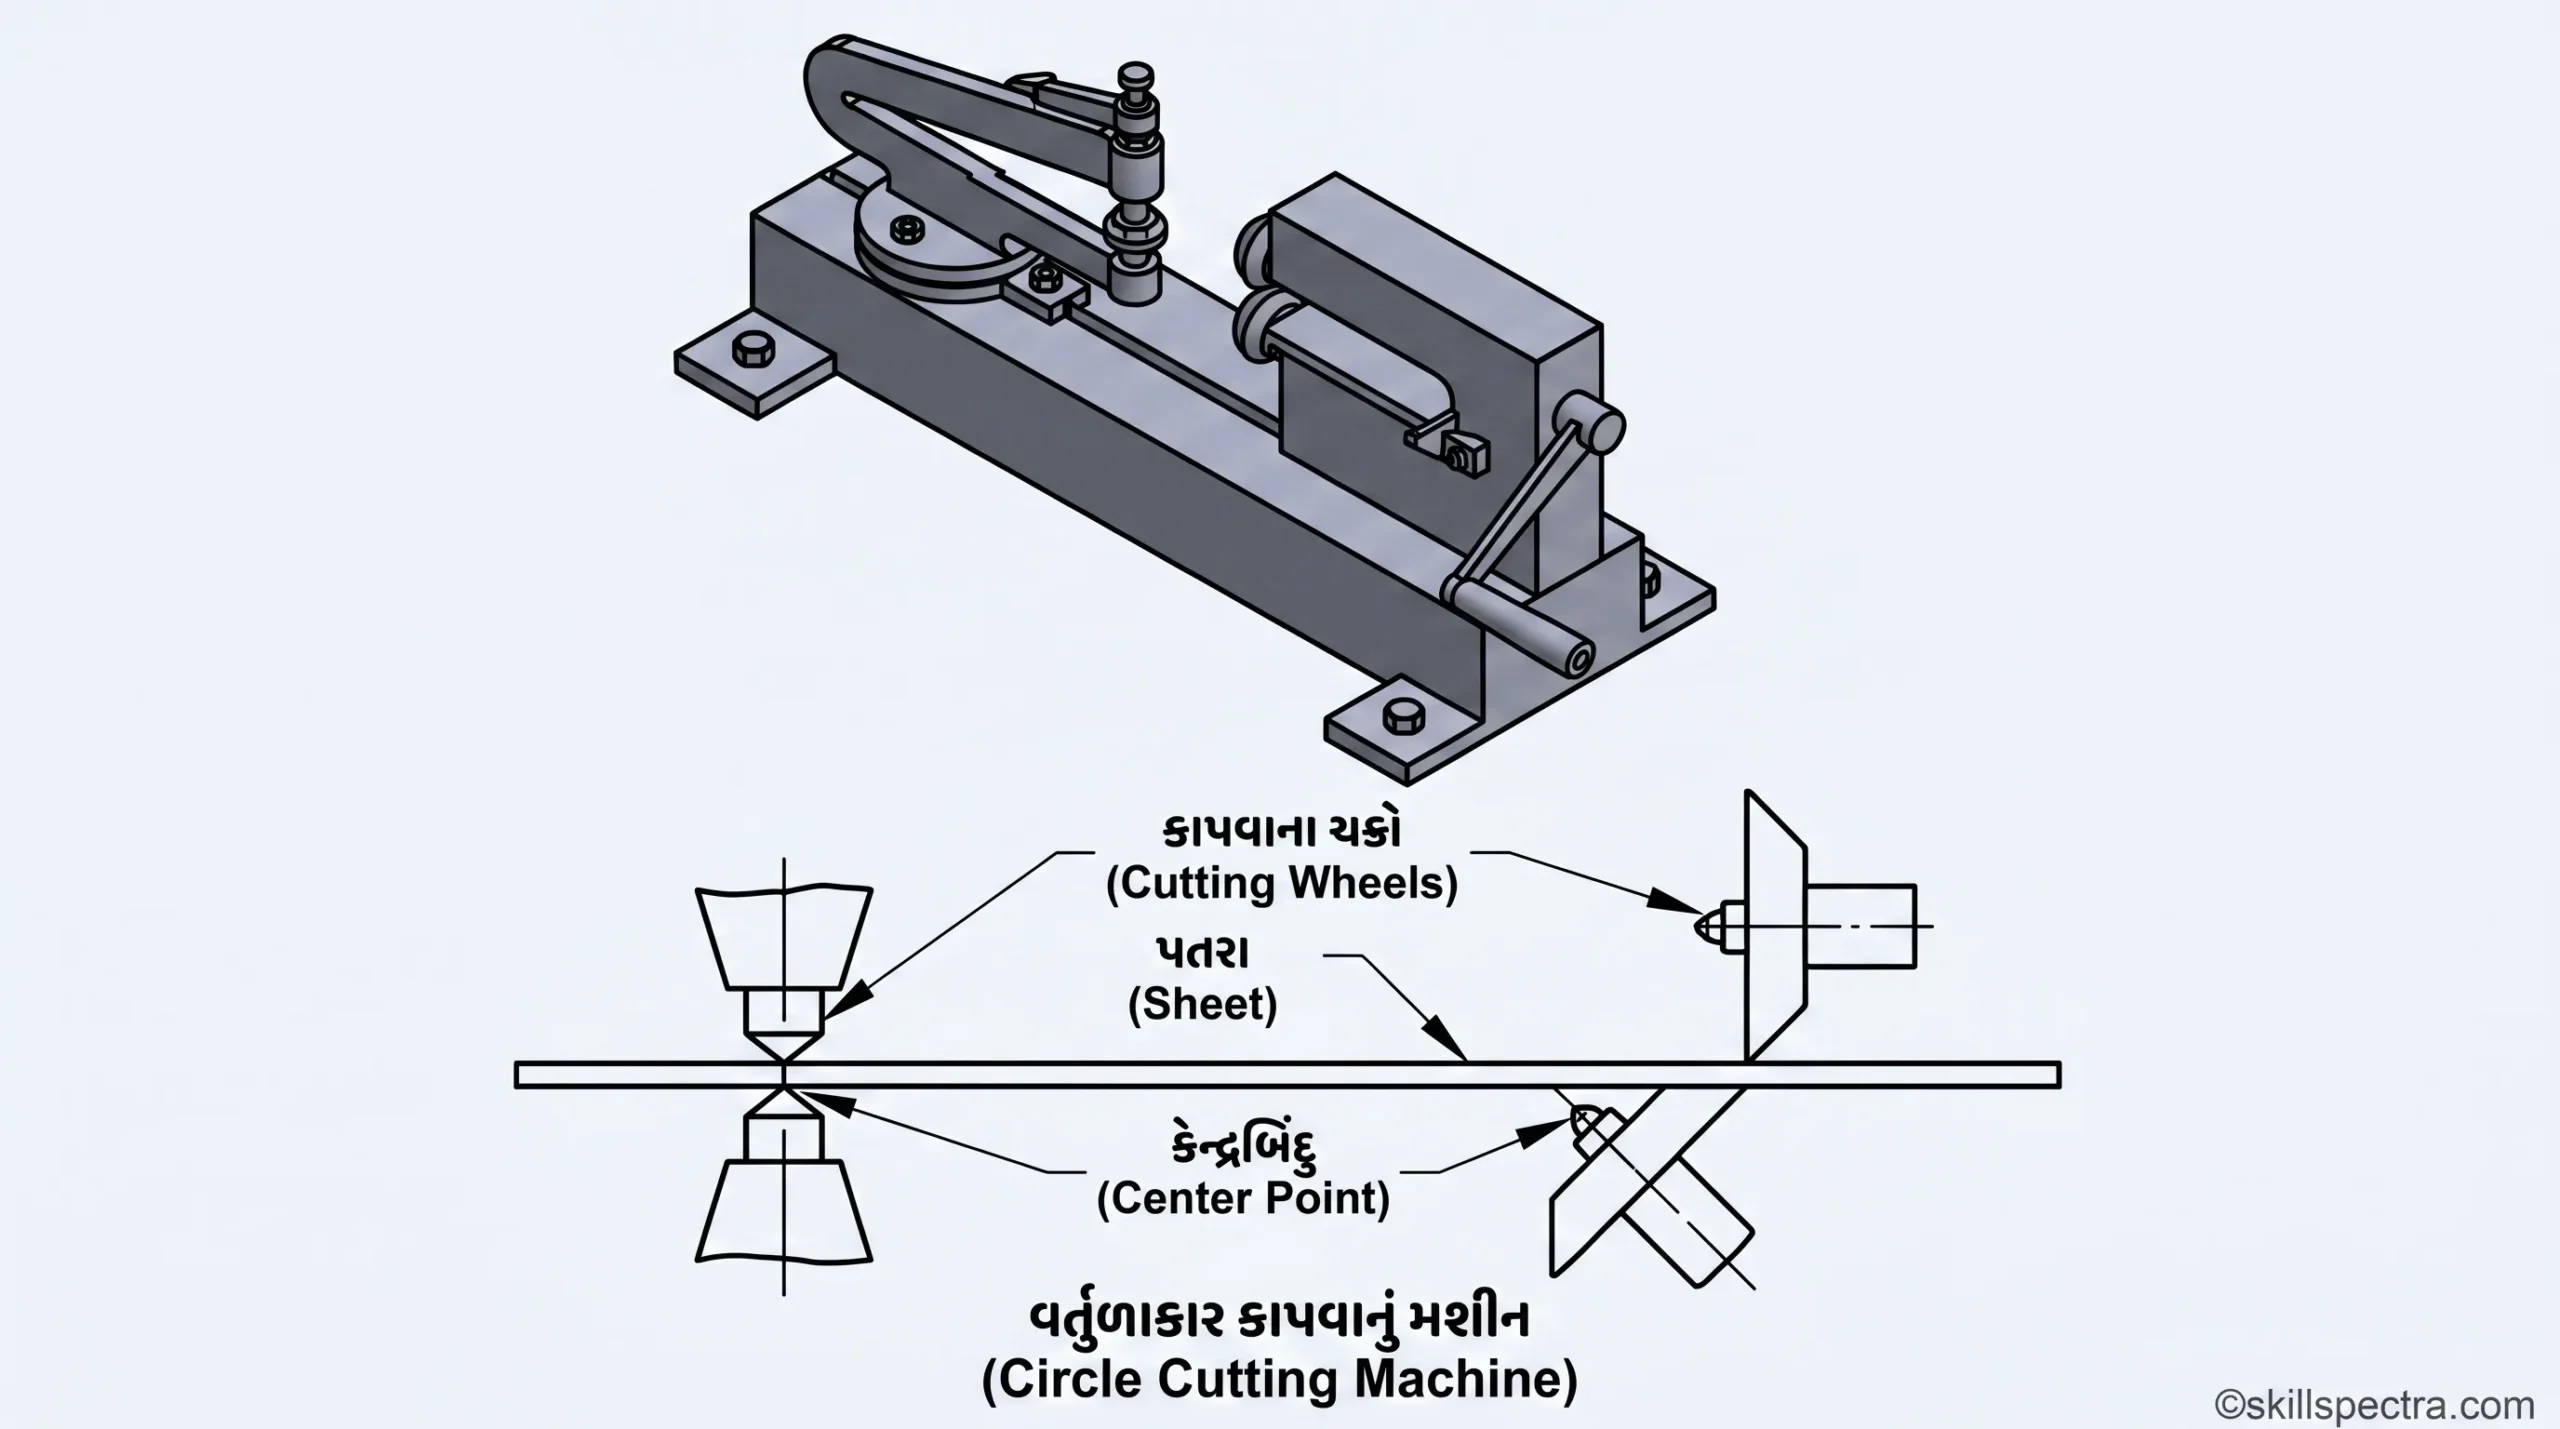
Circle cutting and curve cutting machines (Fig 6) | સર્કલ અને કર્વ કટિંગ મશીન ⭕
આ મશીનોનો ઉપયોગ ઈચ્છિત આકારના વર્તુળો (circles) અને વળાંકો (curves) કાપવા માટે થાય છે. જ્યારે વળાંક કાપતા હોઈએ ત્યારે શીટને હાથ દ્વારા માર્ગદર્શન (guided by hand) આપવું જરૂરી છે.

Keywords 🔍
- Primary Keywords: Mechanic Diesel ITI Lesson, Sheet Metal Cutting Tools Gujarati, Straight Snips vs Bent Snips, Lever Shears function.
- Secondary Keywords: ITI Automotive Theory, NSQF Level 4 Mechanic Diesel, Gujarati Technical Education, Sheet Metal Working Tools, How to use Snips.
- Focus Keyphrase: Sheet Metal Cutting Tools in Gujarati (શીટ મેટલ કટિંગ ટુલ્સ).
- Meta Description: Learn about Straight Snips, Bent Snips, and Lever Shears in this Gujarati-English mixed lesson for ITI Mechanic Diesel students. NSQF Revised 2022 syllabus.
Instructor Note: વિદ્યાર્થીઓને Fig 1 થી Fig 6 ના ડાયાગ્રામ બતાવીને પ્રેક્ટિકલ સમજૂતી આપવી જેથી તેઓ Pivot, Clamping, અને Blade angle ને સરળતાથી સમજી શકે. 👨🏫🔧
🛠️ Wrenches (રેન્ચ): Types, Features and Uses
નમસ્તે વિદ્યાર્થીમિત્રો! આજના લેસનમાં આપણે મિકેનિકલ એન્જિનિયરિંગ અને ઓટોમોબાઈલ સેક્ટરમાં સૌથી વધુ વપરાતા ટૂલ Wrenches (રેન્ચ) વિશે શીખીશું.
🎯 Objectives (ઉદ્દેશ્યો):
આ લેસનના અંતે તમે આ બાબતો શીખી શકશો:
- ડિફરન્ટ ટાઇપ્સના (different types) wrenches ના નામ જણાવી શકશો.
- દરેક ટાઇપના wrenches ના ફિચર્સ (features) સમજાવી શકશો.
🔧 Types of Wrenches (રેન્ચના પ્રકારો):
મુખ્યત્વે નીચે મુજબના રેન્ચનો ઉપયોગ થાય છે:
- Stillson pipe wrench (સ્ટિલસન પાઇપ રેન્ચ)
- Footprint pipe wrench (ફૂટપ્રિન્ટ પાઇપ રેન્ચ)
- Tension wrench (ટેન્શન રેન્ચ)
- Hexagon socket wrench (હેક્સાગોન સોકેટ રેન્ચ)
1️⃣ Stillson Pipe Wrenches (Fig 1 & 2)
આ રેન્ચનો ઉપયોગ અલગ-અલગ ડાયામીટર (wide range of diameters) ધરાવતી પાઈપોને પકડવા (gripping) અને ફેરવવા (turning) માટે થાય છે.
Parts and Construction (ભાગો અને બનાવટ):
- Fixed Jaw: તે હેન્ડલ સાથે ફિક્સ હોય છે અને તેમાં outward facing teeth (બહારની તરફના દાંતા) હોય છે.
- Spring-loaded Casing: હેન્ડલ સાથે એક pivot pin દ્વારા casing જોડાયેલું હોય છે.
- Adjustable Arm: આમાં inward facing teeth (અંદરની તરફના દાંતા) હોય છે, જે thread દ્વારા knurled adjusting nut સાથે જોડાયેલ હોય છે.
Working (કાર્ય કરવાની રીત): જ્યારે એકવાર jaws એડજસ્ટ થઈ જાય, ત્યારે spring loading તેમને વર્ક સાથે કોન્ટેક્ટમાં રાખે છે. Toggle action ને કારણે hardened serrations (દાંતા) પાઇપ પર મજબૂત પકડ બનાવે છે.
⚠️ નોંધ (Caution):
- Jaws પાઇપ પર નિશાન પાડશે, તેથી જો કોઈ burrs (તીક્ષ્ણ ધાર) પડે તો તેને ફાઈલ (file) થી દૂર કરો.
- પોલિશ્ડ (polished) કે પ્લેટેડ સરફેસ પર આનો ઉપયોગ ક્યારેય ન કરવો.
- Hardened materials ને આનાથી ન પકડવા, નહીંતર રેન્ચના દાંતા (serrations) ડેમેજ થઈ શકે છે.
2️⃣ Footprint Pipe Wrenches (Fig 3)
આ રેન્ચનો ઉપયોગ પાઈપો અને રાઉન્ડ સ્ટોકને પકડવા માટે થાય છે, ખાસ કરીને Confined Spaces (સાંકડી કે ઓછી જગ્યાઓ) માં.
Adjustment & Usage (એડજસ્ટમેન્ટ અને ઉપયોગ):
- Adjustment: આમાં એક removable pin હોય છે. આ પિનને યોગ્ય હોલમાં ફિટ કરીને હેન્ડલ્સ વચ્ચેનું અંતર સેટ કરવામાં આવે છે.
- Operation: Jaws ને પાઇપ પર પૂરી રીતે ધકેલો. હેન્ડલ્સને મજબૂત રીતે દબાવો (Squeeze). પાઇપ ફેરવવા માટે ફોલ્ડેડ સ્ટીલ હેન્ડલ પર ખેંચો. ફરીથી ફેરવવા માટે સ્ક્વિઝ રિલીઝ કરો, રેન્ચને પાછળ સ્લાઇડ કરો અને ફરીથી પ્રોસેસ રિપીટ કરો.
3️⃣ Tension Wrench (Fig 4)
Tension wrench એક torque limiting device તરીકે કામ કરે છે. તેનો ઉપયોગ નટ-બોલ્ટને એક ચોક્કસ હદ (predetermined degree) સુધી ટાઈટ કરવા માટે થાય છે.
Importance (મહત્વ):
- તે ફાસ્ટનર્સને તૂટતા અટકાવે છે.
- એન્જિનના સિલિન્ડર હેડ જેવા કમ્પોનન્ટ્સને વાંકા વળતા (warping) અટકાવે છે.
Types of Indicators:
- Direct Reading: જેમાં તમારે હેન્ડલ ખેંચતી વખતે ઇન્ડિકેટર પર રીડિંગ જોવું પડે છે.
- Signal Type: જેમાં તમે ટોર્ક સેટ કરો છો અને તેટલું ટોર્ક આવતા જ Audible click (અવાજ) આવે છે અથવા trigger pin રિલીઝ થાય છે.
✅ How to apply correct torque?
- નટ અને બોલ્ટના threads ચોખ્ખા હોવા જોઈએ.
- હેન્ડલ પર ધીમે-ધીમે અને એકસરખી રીતે બળ (increasing effort) લગાડવું જોઈએ.
📂 Keywords:
- Types of Wrenches in Gujarati
- Stillson Pipe Wrench usage
- Footprint Pipe Wrench features
- What is Tension Wrench?
- Automotive Mechanic Diesel Lesson Gujarati
- ITI Diesel Mechanic Tools Guide
- Mechanical hand tools explanation
- Torque setting with Tension Wrench