
Drilling machine (portable type) – પોર્ટેબલ ડ્રીલિંગ મશીન 🛠️
Objectives (ઉદ્દેશ્યો): આ લેસનના અંતે તમે નીચેની બાબતો શીખી શકશો:
- અલગ-અલગ પ્રકારના portable drilling machines ના નામ આપી શકશો.
- તેની ખાસિયતો (distinctive features) અને ઉપયોગો જણાવી શકશો.
Necessity (જરૂરિયાત): Portable hand drills નો ઉપયોગ એવા ચોક્કસ કાર્યો (jobs) માટે કરવામાં આવે છે જે stationary drilling machines (સ્થિર મશીન) પર હેન્ડલ કરી શકાતા નથી.
Types (પ્રકારો): પોર્ટેબલ ડ્રીલિંગ મશીન મુખ્યત્વે બે પ્રકારના હોય છે:
- Power operated (પાવરથી ચાલતા)
- Hand operated (હાથથી ચાલતા)
1. Power Operated drilling machines (પાવરથી ચાલતા ડ્રીલિંગ મશીન) ⚡
-
Electric hand drill (light duty) (Fig 1): આ મશીન અલગ-અલગ ફોર્મમાં ઉપલબ્ધ છે. તેમાં ડ્રીલ ચલાવવા માટે એક નાની electrical motor હોય છે. સ્પિન્ડલના છેડે એક drill chuck લગાવેલું હોય છે. Light duty માટે વપરાતા આ મશીનમાં સામાન્ય રીતે single speed હોય છે.
-
Electric hand drill (heavy duty) (Fig 2 and 3): આ ડ્રીલમાં એક વધારાનું ફીચર હોય છે, જેમાં ગિયર સિસ્ટમ દ્વારા drill speed ને બદલી શકાય છે. આ ખાસ કરીને મોટા વ્યાસના (larger diameter) હોલ પાડવા માટે ઉપયોગી છે.
-
Pneumatic hand drill (Fig 4): આ પ્રકારનું ડ્રીલ compressed air (દબાણયુક્ત હવા) દ્વારા ચલાવવામાં આવે છે. કેસિંગની અંદર એક air driven motor હોય છે, અને ડ્રીલને સરળતાથી ચલાવવા માટે એર પાઈપ સાથે હેન્ડલ લગાવેલું હોય છે.
Note: આ ડ્રીલનો ઉપયોગ ત્યાં થાય છે જ્યાં ઇલેક્ટ્રિક ડ્રીલ વાપરવાની મનાઈ હોય, જેમ કે explosives factories (વિસ્ફોટક કારખાના) અને petroleum refineries.
2. Hand operated drilling machines (હાથથી ચાલતા ડ્રીલિંગ મશીન) 🖐️
અલગ-અલગ પ્રકારના હાથેથી ચાલતા ડ્રીલ નીચે મુજબ છે. તેનો ઉપયોગ structural fabrication, sheet metal અને carpentry માં થાય છે, ખાસ કરીને જ્યાં વીજળી (electricity) ઉપલબ્ધ નથી.
- The ratchet drilling machine (Fig 5): આ મશીન સામાન્ય રીતે સ્ટ્રક્ચરલ ફેબ્રિકેશનમાં વપરાય છે. તેમાં Square head, taper shank drills નો ઉપયોગ થાય છે.
- The bevel gear type drilling machine (Fig 6): આનો ઉપયોગ 6mm સુધીના નાના હોલ પાડવા માટે થાય છે.
- The breast drilling machine (Fig 7): આ મશીન દ્વારા મોટા વ્યાસના હોલ પાડી શકાય છે કારણ કે તેમાં વધુ દબાણ (pressure) આપી શકાય છે. તેમાં 6 mm થી 12 mm સુધીના ડ્રીલ્સ વાપરી શકાય છે.
Drilling machines (bench and pillar type) – બેન્ચ અને પિલર પ્રકારના ડ્રીલિંગ મશીન 🏗️
Objectives (ઉદ્દેશ્યો): આ લેસનના અંતે તમે:
- ડ્રીલિંગ મશીનના પ્રકારો જાણી શકશો.
- bench type, pillar type અને radial drilling machines ના ભાગોના નામ જણાવી શકશો.
- આ ત્રણેય મશીનોની ખાસિયતોની સરખામણી કરી શકશો.
The principal types of drilling machines are:
- The sensitive bench drilling machine
- The pillar drilling machine
- The column drilling machine
- The radial arm drilling machine (radial drilling machine)
(નોંધ: સામાન્ય રીતે Column અને Radial પ્રકારના મશીન ઓછા વપરાય છે, તેથી અહીં માત્ર Sensitive અને Pillar પ્રકારના મશીનો સમજાવવામાં આવ્યા છે.)
The sensitive bench drilling machine (Fig 1): 🪑
આ સૌથી સાદું સેન્સિટિવ ડ્રીલિંગ મશીન છે. તેનો ઉપયોગ light duty work માટે થાય છે.
- આ મશીન 12.5 mm વ્યાસ સુધીના હોલ પાડી શકે છે.
- ડ્રીલ્સને chuck માં અથવા મશીન સ્પિન્ડલના tapered hole માં સીધા જ ફિટ કરવામાં આવે છે.
Speed Adjustment (Fig 2): ⚙️
Stepped pulley માં બેલ્ટની પોઝિશન બદલીને અલગ-અલગ સ્પિન્ડલ સ્પીડ મેળવી શકાય છે:
- I – High Speed (ઝડપી)
- II – Normal Speed (સામાન્ય)
- III – Less Speed (ધીમી) સામાન્ય ડ્રીલિંગ માટે વર્ક-સરફેસ હોરિઝોન્ટલ (આડી) રાખવામાં આવે છે. જો હોલ કોઈ એન્ગલ પર પાડવો હોય, તો ટેબલને નમાવી (tilted) શકાય છે.
The pillar drilling machine (Fig 3): 🏛️
આ sensitive bench drilling machine નું જ મોટું સ્વરૂપ છે.
- આ મશીનોને ફ્લોર પર માઉન્ટ કરવામાં આવે છે અને તેમાં શક્તિશાળી ઇલેક્ટ્રિક મોટર્સ હોય છે.
- તેનો ઉપયોગ heavy duty work (ભારે કામ) માટે થાય છે.
- આ મશીનોમાં ટેબલ સેટ કરવા માટે rack and pinion mechanism આપેલી હોય છે.
Radial drilling machines (Fig 4): 🌀
આ મશીનનો ઉપયોગ નીચેના કામો માટે થાય છે:
- Large diameter holes (મોટા વ્યાસના હોલ)
- એક જ સેટિંગમાં ઘણા બધા હોલ પાડવા માટે.
- Heavy and large workpieces (ભારે અને મોટા જોબ) માટે.
Features (ખાસિયતો):
- તેમાં એક radial arm હોય છે જેના પર spindle head માઉન્ટ થયેલું હોય છે.
- સ્પિન્ડલ હેડને રેડિયલ આર્મ પર ફેરવી શકાય છે અને ગમે ત્યાં લોક કરી શકાય છે.
- આ આર્મને પિલર (column) ની આસપાસ ફેરવી શકાય છે, એટલે કે ડ્રીલ આખા ટેબલ પર ગમે ત્યાં પહોંચી શકે છે.
- તેમાં variable-speed gearbox હોય છે જે r.p.m. ની વિશાળ રેન્જ પૂરી પાડે છે.
Keywords 🔑
- Mechanic Diesel ITI Lesson Gujarati
- Types of Drilling Machines in Gujarati
- Portable Drilling Machine Features
- Pillar Drilling Machine vs Bench Drilling Machine
- Radial Drilling Machine Application
- Electric Hand Drill vs Pneumatic Drill
- ITI Mechanic Diesel Fastening and Fitting
- Gujarati Technical Education Workshop Tools
- How to use Sensitive Bench Drill
- Hand Operated Drilling Machines Guide
Instructor Note: 📝 વિદ્યાર્થીઓને આકૃતિઓ (Figures) ધ્યાનથી જોવા અને દરેક ભાગ (যেমন Chuck, Spindle, Column, Table) ના નામ અંગ્રેજીમાં યાદ રાખવા પ્રોત્સાહિત કરવા. આ ટેકનિકલ નોલેજ તેમને વર્કશોપ પ્રેક્ટિકલમાં ખૂબ કામ લાગશે.
Keywords:
Cutting Speed and RPM, Drilling Work Holding Devices, Mechanic Diesel Theory in Gujarati, Drill Chuck and Sleeves, Morse Taper MT1 to MT5, ITI Machinist Theory, Drill Drift Use, Machine Vice for Drilling.
Cutting speed and RPM (કટિંગ સ્પીડ અને RPM) ⚙️
Objectives (ઉદ્દેશ્યો): આ લેસનના અંતે તમે આ બાબતો શીખી શકશો:
- Cutting speed ને વ્યાખ્યાયિત કરવી.
- Cutting speed નક્કી કરવા માટેના પરિબળો જણાવવા.
- Cutting speed અને R.P.M વચ્ચેનો તફાવત સમજવો.
- R.P.M સ્પિન્ડલ સ્પીડ નક્કી કરવી.
- ટેબલમાંથી ડ્રિલ સાઈઝ માટે R.P.M પસંદ કરવા.
For a drill to give satisfactory performance, it must operate at the correct cutting speed and feed. (ડ્રિલ દ્વારા સંતોષકારક પરફોર્મન્સ મેળવવા માટે, તે સાચી cutting speed અને feed પર ઓપરેટ થવું જોઈએ.)
Cutting speed એ એવી ગતિ છે કે જેના પર cutting edge મટીરીયલ પરથી પસાર થાય છે, અને તેને metres per minute માં દર્શાવવામાં આવે છે. Cutting speed ને ક્યારેક surface speed અથવા peripheral speed પણ કહેવામાં આવે છે. 📏
The selection of the recommended cutting speed for drilling depends on the materials to be drilled, and the tool material. (ડ્રિલિંગ માટે ભલામણ કરેલ cutting speed ની પસંદગી ડ્રિલ કરવાના મટીરીયલ અને ટૂલ મટીરીયલ પર આધાર રાખે છે.)
Tool manufacturers સામાન્ય રીતે વિવિધ મટીરીયલ માટે જરૂરી cutting speeds નું ટેબલ પ્રદાન કરે છે. ટેબલમાં આપેલી ભલામણ કરેલ cutting speed ના આધારે, R.P.M નક્કી કરવામાં આવે છે જેના પર ડ્રિલ ચલાવવાનું હોય છે.
Calculate R.P.M (R.P.M ની ગણતરી):
$V = \frac{\pi \times d \times n}{1000}$ m/min
$n = \frac{V \times 1000}{d \times \pi}$ r.p.m
જ્યાં,
- n = R.P.M
- v = cutting speed (m/min માં)
- d = diameter of drill (mm માં)
- $\pi$ = 3.14
Table: Cutting speeds for different materials (HSS ડ્રિલ માટે) 📊
| Material being drilled | Cutting speed (m/min) | | :— | :— | | Aluminium | 70-100 | | Brass | 35-50 | | Bronze (Phosphor) | 20-35 | | Cast Iron (grey) | 25-40 | | Copper | 35-45 | | LC/MC steel/ Alloy steel | 20-30 | | Thermosetting plastic | 5-8 |
Work – holding devices (કામ પકડવા માટેના સાધનો) 🗜️
Objectives (ઉદ્દેશ્યો): આ લેસનના અંતે તમે આ બાબતો શીખી શકશો:
- Work-holding devices નો હેતુ જણાવવો.
- કામ પકડવા માટે વપરાતા સાધનોના નામ આપવા.
- તેનો ઉપયોગ કરતી વખતે રાખવાની સાવચેતીઓ જણાવવી.
Workpieces to be drilled should be properly held or clamped. (જે વર્કપીસ પર ડ્રિલ કરવાનું છે તેને યોગ્ય રીતે પકડવો અથવા ક્લેમ્પ કરવો જોઈએ જેથી તે ડ્રિલની સાથે ફરે નહીં.) અયોગ્ય રીતે સુરક્ષિત કરેલું કામ ઓપરેટર માટે જોખમી બની શકે છે અને ડ્રિલ તૂટવાનું કારણ પણ બની શકે છે.
The machine vice (Fig 1): 🛠️ મોટાભાગના ડ્રિલિંગ કામો machine vice માં પકડી શકાય છે. ખાતરી કરો કે ડ્રિલ કામ પૂરું કર્યા પછી vice માં ન વાગે. આ હેતુ માટે, કામને parallel blocks પર ઉંચુ કરી શકાય છે જેથી કામ અને vice ના તળિયા વચ્ચે ગેપ રહે.
Workpieces which are not accurate may be supported by wooden pieces. (જે વર્કપીસ સચોટ નથી તેને લાકડાના ટુકડાઓ દ્વારા સપોર્ટ આપી શકાય છે.)
Clamps and bolts (Fig 2 to 5): 🔩 Drilling machine tables માં T-slots હોય છે જેમાં bolt heads ફિટ કરી શકાય છે. Clamps અને bolts નો ઉપયોગ કરીને, વર્કપીસને ખૂબ જ મજબૂતાઈથી પકડી શકાય છે. આ પદ્ધતિનો ઉપયોગ કરતી વખતે, packing શક્ય તેટલું કામ જેટલી જ ઊંચાઈનું હોવું જોઈએ અને બોલ્ટ કામની નજીક હોવો જોઈએ.
ત્યાં ઘણા પ્રકારના ક્લેમ્પ્સ છે (Fig 5):
- Finger clamp
- Goose neck clamp
- U-strap clamp
- Straight clamp
- Bent clamp
Drill – holding devices (ડ્રિલ પકડવા માટેના સાધનો) 🌀
Objectives (ઉદ્દેશ્યો):
- ડ્રિલ-હોલ્ડિંગ ડિવાઇસના પ્રકારો જણાવવા.
- Drill chucks ની વિશેષતાઓ જણાવવી.
- Drill sleeves ના કાર્યો જણાવવા.
- Drill drift ના કાર્યો જણાવવા.
મટીરીયલમાં સચોટ ડ્રિલિંગ કરવા માટે, ડ્રિલને મજબૂત રીતે પકડવા જરૂરી છે. સામાન્ય રીતે વપરાતા ડ્રિલ-હોલ્ડિંગ ડિવાઇસ drill chucks અને sleeves and sockets છે.
Drill chuck: Straight shank drills ને drill chucks માં પકડવામાં આવે છે. ડ્રિલને ફિક્સ કરવા અથવા કાઢવા માટે, ચકમાં pinion અને key અથવા knurled ring આપવામાં આવે છે. Drill chucks ને મશીન સ્પિન્ડલ પર arbor દ્વારા લગાડવામાં આવે છે.
Taper sleeves and sockets (Fig 1): Taper shank drills માં morse taper હોય છે. Sleeves અને sockets સમાન ટેપર સાથે બનાવવામાં આવે છે જેથી ડ્રિલનો ટેપર શેન્ક તેમાં ફિટ થઈ શકે. જ્યારે તે એન્ગેજ થાય છે, ત્યારે તે સારી wedging action આપે છે, તેથી જ morse tapers ને self-holding tapers કહેવામાં આવે છે.
Drills પાંચ અલગ અલગ સાઈઝના morse tapers સાથે આવે છે, જેને MT1 થી MT5 સુધી ક્રમાંકિત કરવામાં આવે છે. 🔢
ડ્રિલના શેન્ક અને મશીન સ્પિન્ડલ વચ્ચેના કદના તફાવતને ભરપાઈ કરવા માટે sleeves અથવા sockets નો ઉપયોગ થાય છે. જ્યારે ડ્રિલ ટેપર શેન્ક મશીન સ્પિન્ડલ કરતા નાનો હોય ત્યારે sleeves વપરાય છે, અને જ્યારે મોટો હોય ત્યારે sockets વપરાય છે.
Drill Drift (Fig 3): 🔨 મશીન સ્પિન્ડલમાંથી ડ્રિલ અને સોકેટ દૂર કરવા માટે drift નો ઉપયોગ કરો.
Safety Tip (સાવચેતી): While removing the drill from the sockets sleeves, don’t allow it to fall on the table or jobs. (સોકેટ અથવા સ્લીવમાંથી ડ્રિલ કાઢતી વખતે તેને ટેબલ અથવા જોબ પર પડવા દેશો નહીં.) (Fig 4) 🚫
Drill Bits અને Drill Angles: સંપૂર્ણ માર્ગદર્શન (ITI Mechanic Diesel) 🛠️
આ લેસન NSQF Level 4 મુજબ તૈયાર કરવામાં આવ્યું છે, જે Mechanic Diesel ના વિદ્યાર્થીઓ માટે અત્યંત ઉપયોગી છે.
Drill Bits 🔩
Objectives (ઉદ્દેશ્યો): આ લેસનના અંતે તમે આ બાબતો શીખી શકશો:
- Drills ના functions (કાર્યો) જણાવવા.
- Drill ના parts ના નામ આપવા.
- Drill ના દરેક ભાગના functions સમજાવવા.
Introduction (પરિચય)
Drilling એ workpiece પર holes (કાણાં) પાડવાની એક process છે. Drill નો ઉપયોગ એક tool તરીકે થાય છે. Drilling કરવા માટે drill ને ફેરવવામાં આવે છે (rotated) અને નીચેની તરફ દબાણ (downward pressure) આપવામાં આવે છે, જેથી tool મટિરિયલની અંદર ઉતરે છે (penetrate). (Fig 1 જુઓ)
Parts of a Drill (Drill ના ભાગો) 📐
Fig 2 માં drill ના વિવિધ ભાગો દર્શાવવામાં આવ્યા છે:
- Point: આ cone shaped છેડો છે જે cutting નું કામ કરે છે. તેમાં dead centre, lips અથવા cutting edges અને heel હોય છે. 📍
- Shank: આ drill નો driving end છે જે machine માં fit કરવામાં આવે છે. Shanks બે પ્રકારના હોય છે:
- Taper shanks: મોટા diameter ના drills માટે વપરાય છે.
- Straight shanks: નાના diameter ના drills માટે વપરાય છે.
- Tang: આ taper shank drill નો એક ભાગ છે જે drilling machine spindle ના slot માં fit થાય છે.
- Body (Fig 3): Point અને Shank વચ્ચેના ભાગને Body કહેવામાં આવે છે.
Body ના મુખ્ય ભાગો:
- Flutes: આ spiral (વળાંકવાળા) ખાંચા છે જે drill ની આખી લંબાઈમાં હોય છે. Flutes ના ફાયદા:
- Cutting edges બનાવવા માટે.
- Chips ને વળીને બહાર નીકળવા દેવા માટે.
- Cutting edge સુધી coolant પહોંચાડવા માટે. 💧
- Land/Margin: આ એક સાંકડી પટ્ટી (narrow strip) છે જે flutes ની આખી લંબાઈમાં ફેલાયેલી હોય છે. Drill નો diameter આ land/margin પરથી માપવામાં આવે છે.
- Body Clearance: Body નો આ એવો ભાગ છે જેનો diameter ઓછો કરવામાં આવે છે, જેથી drill અને hole વચ્ચે ઘર્ષણ (friction) ઓછું થાય.
- Web: આ એ metal column છે જે flutes ને અલગ પાડે છે. તે shank તરફ જતા ધીમે ધીમે જાડાઈમાં વધે છે.
Drill Angles (Drill ના ખૂણાઓ) 📐
Objectives:
- Twist drill ના વિવિધ angles ની યાદી બનાવવી.
- દરેક angle ના functions સમજાવવા.
- ISI મુજબ drill ના tool types જણાવવા.
- ISI મુજબ drill નું designation (નામકરણ) કરવું.
Angles ના પ્રકાર:
Drill માં અલગ અલગ હેતુ માટે વિવિધ angles હોય છે:
- Point Angle/Cutting Angle: સામાન્ય હેતુ (standard) માટે drill નો point angle 118° હોય છે. આ angle જે મટિરિયલમાં drilling કરવાનું હોય તેની hardness મુજબ બદલાય છે. (Fig 1)
- Helix Angle (Figs 2 to 4): Twist drills અલગ અલગ helix angles સાથે બનાવવામાં આવે છે. મટિરિયલ મુજબ ત્રણ પ્રકારના drills હોય છે:
- Type N: Normal low carbon steel માટે.
- Type H: Hard અને tenacious મટિરિયલ્સ માટે.
- Type S: Soft અને tough મટિરિયલ્સ માટે.
- Rake Angle (Fig 5): Rake angle એ flute નો angle (helix angle) છે.
- Clearance Angle (Fig 6): આ angle cutting edge ની પાછળ રાખવામાં આવે છે જેથી friction (ઘર્ષણ) અટકાવી શકાય. તે મટિરિયલમાં penetrate થવામાં મદદ કરે છે. સામાન્ય રીતે આ 8°-12° હોય છે. જો આ angle વધુ હોય તો cutting edge નબળી પડે છે, અને જો ઓછો હોય તો drill cut કરી શકશે નહીં. ⚠️
- Chisel Edge Angle/ Web Angle (Fig 7): આ chisel edge અને cutting lip વચ્ચેનો angle છે.
Designation of drills (Drill નું નામકરણ):
Twist drills ને નીચેની બાબતો દ્વારા ઓળખવામાં આવે છે:
- Diameter
- Tool type
- Material
- IS No.
Example: Twist drill 9.50 H – IS5101 – HS
- 9.50: Diameter
- H: Tool Type
- IS5101: IS Number
- HS: Material (High Speed Steel)
Recommended Drills for Different Materials 📋
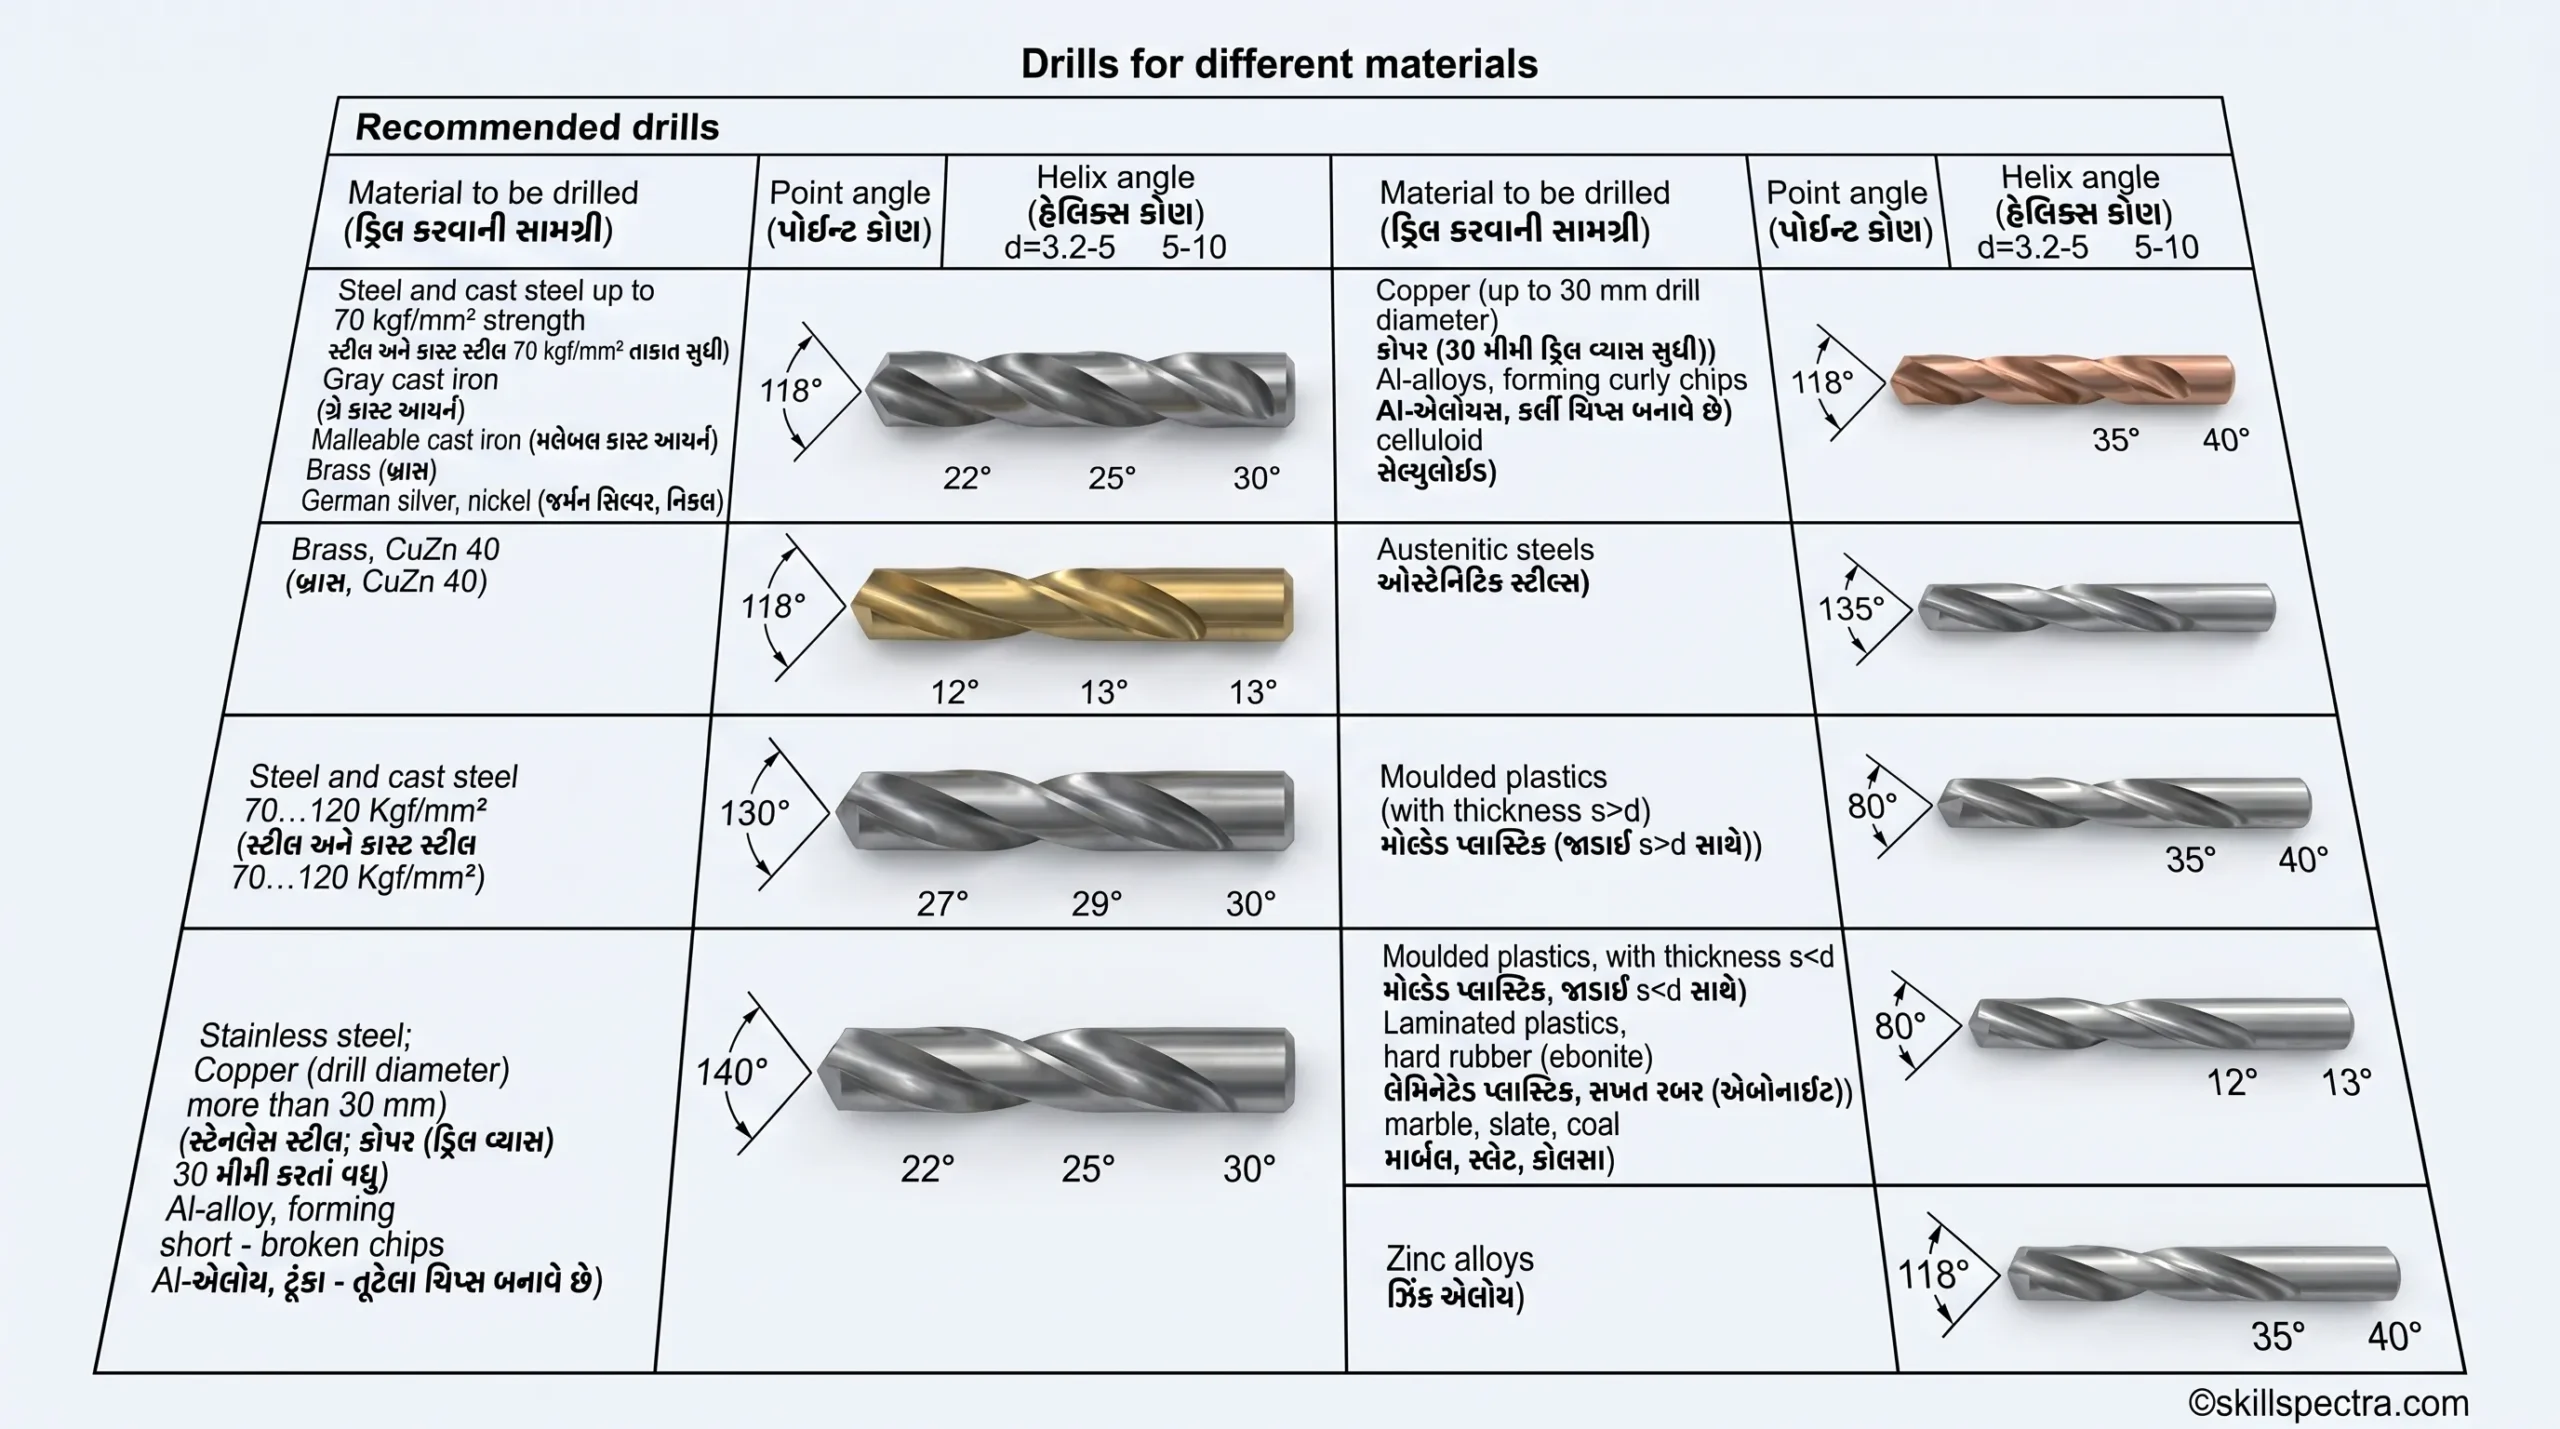
Keywords:
- Drill bits parts and functions in Gujarati
- Twist drill angles explanation
- ITI Mechanic Diesel theory notes
- What is Point Angle in Drill
- Types of Helix Angles N H S
- Drilling process in Gujarati
- Workshop Calculation and Science Drill bit
- Difference between Taper shank and Straight shank
EO Description:
આ લેખમાં Drill bits ના ભાગો (Tang, Shank, Flute, Point) અને Drill angles (Point angle, Helix angle, Clearance angle) વિશે ગુજરાતી અને અંગ્રેજી મિશ્રિત ભાષામાં ઊંડાણપૂર્વક સમજાવવામાં આવ્યું છે. ITI Mechanic Diesel ના વિદ્યાર્થીઓ માટે શ્રેષ્ઠ શિક્ષણ સામગ્રી.
Hand taps and dies (હેન્ડ ટેપ્સ અને ડાઈઝ) 🛠️
Objectives (ઉદ્દેશ્યો): આ લેસનના અંતે તમે આ બાબતો શીખી શકશો:
- State the uses of threading hand taps: થ્રેડીંગ હેન્ડ ટેપ્સના ઉપયોગો જણાવવા.
- State the features of hand taps: હેન્ડ ટેપ્સની વિશેષતાઓ (features) જણાવવી.
- Distinguish between different taps in a set: એક સેટમાં રહેલા અલગ અલગ ટેપ્સ વચ્ચે તફાવત પારખવો.
- Name the different types of tap wrenches: અલગ અલગ પ્રકારના ટેપ રેન્ચના (tap wrenches) નામ આપવા.
- State the uses of different types of wrenches: અલગ અલગ પ્રકારના રેન્ચના ઉપયોગો જણાવવા.
Use of hand taps (હેન્ડ ટેપ્સનો ઉપયોગ): 🔩
Hand taps are used for internal threading of components. (હેન્ડ ટેપ્સનો ઉપયોગ કમ્પોનન્ટ્સના અંદરના ભાગમાં આંટા પાડવા એટલે કે internal threading માટે થાય છે.)
Features (Fig 1) (વિશેષતાઓ):
- They are made from high carbon steel or high speed steel, hardened and ground. (તે હાઈ કાર્બન સ્ટીલ અથવા હાઈ સ્પીડ સ્ટીલમાંથી બનાવવામાં આવે છે, જેને હાર્ડન અને ગ્રાઉન્ડ કરવામાં આવે છે.)
- Threads are cut on the surface and are accurately finished. (તેની સપાટી પર આંટા કાપવામાં આવે છે અને તેને સચોટ રીતે ફિનિશિંગ આપવામાં આવે છે.)
- To form the cutting edges, the flutes are cut across the thread. (કટીંગ એજ બનાવવા માટે, થ્રેડની આરપાર flutes કાપવામાં આવે છે.)
Fig 1 ના ભાગો:
- Size of Square: સ્ક્વેરનો આકાર.
- Square Shank: ચોરસ સેંક.
- Thread: આંટા.
- Flute: ગ્રુવ્સ (ખાંચા).
- Cutting Face: કટીંગ ફેસ.
- Taper Thread: ટેપર થ્રેડ.
ફોર હોલ્ડિંગ અને ટર્નિંગ માટે, ટેપ્સના છેડા (shanks) સ્ક્વેર રાખવામાં આવે છે. ટેપ્સના છેડા chamfered (taper lead) હોય છે જેથી થ્રેડ શરૂ કરતી વખતે તેનું એલાઈનમેન્ટ (alignment) જળવાઈ રહે. ટેપ્સની સાઈઝ અને થ્રેડનો પ્રકાર સામાન્ય રીતે shank પર માર્ક કરવામાં આવે છે. અમુક કિસ્સામાં થ્રેડની pitch પણ માર્ક કરવામાં આવે છે. ટેપનો પ્રકાર (First, Second અથવા Plug tap) દર્શાવવા માટે પણ માર્કિંગ કરવામાં આવે છે.
Types of taps in a set (સેટમાં ટેપ્સના પ્રકારો): 📦
Hand taps for a particular thread are available as a set consisting of three pieces. (કોઈ ચોક્કસ થ્રેડ માટે હેન્ડ ટેપ્સ ત્રણ નંગના સેટમાં ઉપલબ્ધ હોય છે.) તે નીચે મુજબ છે:
- First tap or taper tap
- Second tap or intermediate tap
- Plug or bottoming tap
આ ત્રણેય ટેપ્સ taper lead સિવાય અન્ય તમામ ફીચર્સમાં સરખા હોય છે. (Fig 2 જુઓ)
- Taper tap: તેનો ઉપયોગ થ્રેડ શરૂ કરવા માટે થાય છે. થ્રુ હોલ્સ (through holes) માં આના દ્વારા પુરા આંટા પાડી શકાય છે.
- Bottoming tap (plug): તેનો ઉપયોગ બ્લાઈન્ડ હોલ (blind hole) માં યોગ્ય ઊંડાઈ સુધી ફિનિશિંગ આપવા માટે થાય છે.
- Identification: ટેપ્સને ઝડપથી ઓળખવા માટે તેના શેંક (shank) પર 1, 2 અને 3 નંબર અથવા રિંગ્સ (rings) ના માર્ક હોય છે.
- Taper tap: One ring (એક રિંગ)
- Intermediate tap: Two rings (બે રિંગ)
- Bottoming tap: Three rings (ત્રણ રિંગ)
Tap wrenches (ટેપ રેન્ચ): 🔧
Tap wrenches are used to align and drive the hand taps correctly into the hole to be threaded. (ટેપ રેન્ચનો ઉપયોગ ટેપને હોલમાં સીધી રાખવા અને તેને ફેરવવા માટે થાય છે.)
Types of tap wrenches:
- Double ended adjustable wrench
- T-handle tap wrench
- Solid type tap wrench
1. Double ended adjustable tap wrench or bar type tap wrench (Fig 3): આ સૌથી વધુ વપરાતો ટેપ રેન્ચ છે. તે વિવિધ સાઈઝમાં ઉપલબ્ધ છે. આ રેન્ચ મોટા ડાયામીટરના ટેપ્સ માટે વધુ યોગ્ય છે અને ત્યાં વાપરી શકાય છે જ્યાં રેન્ચ ફેરવવા માટે પૂરતી જગ્યા હોય. યોગ્ય સાઈઝનો રેન્ચ પસંદ કરવો ખૂબ જરૂરી છે.
2. T-Handle tap wrench (Fig 4): આમાં બે જૉ (jaws) સાથેનું એડજસ્ટેબલ ચક અને ફેરવવા માટે હેન્ડલ હોય છે. આ રેન્ચ મર્યાદિત જગ્યા (restricted places) માં કામ કરવા માટે ઉપયોગી છે અને તેને એક હાથે પણ ફેરવી શકાય છે. તે મોટા ડાયામીટરના ટેપ્સ માટે યોગ્ય નથી.
3. Solid type tap wrench (Fig 5): આ રેન્ચ એડજસ્ટેબલ હોતા નથી. તેઓ માત્ર અમુક ચોક્કસ સાઈઝના ટેપ્સ જ પકડી શકે છે. આનાથી ખોટી લંબાઈના રેન્ચનો ઉપયોગ ટાળી શકાય છે અને ટેપ્સને નુકસાન થતું અટકાવી શકાય છે.
Tap drill size (ટેપ ડ્રીલ સાઈઝ) 📏
Objectives:
- State the tap drill size.
- Choose tap drill sizes for different threads from tables.
- Calculate the tap drill sizes for ISO metric and ISO inch.
What is Tap drill size?
થ્રેડ પાડવા માટે ટેપનો ઉપયોગ કરતા પહેલા, હોલ ડ્રીલ કરવો પડે છે. હોલનો ડાયામીટર એવો હોવો જોઈએ કે હોલમાં ટેપને થ્રેડ કાપવા માટે પૂરતું મટીરીયલ (material) મળી રહે.
Formula for ISO Metric Thread (M10 x 1.5 thread માટે ઉદાહરણ):
- Minor diameter = Major diameter – 2 x depth
- Depth of thread = 0.6134 x pitch of a screw
- 2 depth of thread = 0.6134 x 2 x pitch
- = 1.226 x 1.5 mm = 1.839 mm
- Minor dia (D1) = 10 mm – 1.839 mm = 8.161mm or 8.2 mm
Practical Approach for Tap Drill Size: વધુ વ્યવહારુ ગણતરી માટે આ ફોર્મ્યુલા વપરાય છે:
Tap drill size = Major diameter – pitch
- = 10 mm – 1.5 mm = 8.5 mm
ISO Inch (Unified) threads Formula:
Tap Drill size = Major diameter – (1 / Number of thread per inch)
Example for 5/8″ UNC thread:
- Tap drill size = 5/8″ – 1/11″
- = 0.625″ – 0.091″ = 0.534″
- The next drill size is 17/32″ (0.531 inches).
TABLE FOR TAP DRILL SIZES – ISO METRIC 📊
Keywords:
- Hand taps and dies in Gujarati
- ITI Mechanic Diesel lessons Gujarati
- Tap drill size formula ISO Metric
- Types of tap wrenches
- Taper tap vs Bottoming tap explained
- Internal threading tools Gujarati
- Mechanic Diesel Theory Exercise 1.3.22-24
ગિયર અપ! ⚙️ આ માહિતી તમારા એન્જિનિયરિંગ અને ટેકનિકલ અભ્યાસમાં ખૂબ જ ઉપયોગી સાબિત થશે. વધુ અપડેટ્સ માટે જોડાયેલા રહો!
Keywords:
Mechanic Diesel ITI notes, Die and die stock in Gujarati, Hand reamers technical theory, Lapping process in Gujarati, Reaming hole size calculation, ITI Mechanical Engineering Lesson, Workshop Calculation and Science, Diesel Mechanic NSQF Level 4.
Die and die stock (ડાઈ અને ડાઈ સ્ટોક) 🛠️
Objectives: આ લેસનના અંતે તમે આ બાબતો શીખી શકશો:
- Die ના વિવિધ પ્રકારોના નામ જણાવી શકશો.
- દરેક પ્રકારની die ના features (લક્ષણો) જણાવી શકશો.
- દરેક પ્રકારની die ના ઉપયોગો જણાવી શકશો.
- દરેક પ્રકારની die માટે વપરાતા diestock ના નામ આપી શકશો.
Uses of Dies (ડાઈના ઉપયોગો): Threading dies નો ઉપયોગ cylindrical workpieces (નળાકાર વર્કપીસ) પર external threads (બહારના આંટા) પાડવા માટે થાય છે. (Fig 1)
Types of Dies (ડાઈના પ્રકારો): નીચે મુજબના ડાઈના વિવિધ પ્રકારો છે:
- Circular Split Die (Button die)
- Half Die
- Adjustable screw plate die
Circular split die/button die (Fig 2): આ ડાઈમાં એક slot cut કરેલો હોય છે જે સાઈઝમાં સહેજ variation (ફેરફાર) કરવાની પરવાનગી આપે છે.
જ્યારે તેને diestock માં પકડવામાં આવે છે, ત્યારે adjusting screws નો ઉપયોગ કરીને તેની સાઈઝમાં ફેરફાર કરી શકાય છે. આનાથી depth of cut (કાપની ઊંડાઈ) વધારી કે ઘટાડી શકાય છે. જ્યારે side screws ને tighten કરવામાં આવે છે, ત્યારે die સહેજ બંધ (close) થાય છે. (Fig 3)
Depth of cut ને adjust કરવા માટે, centre screw ને આગળ વધારવામાં આવે છે અને groove માં lock કરવામાં આવે છે. આ પ્રકારના die stock ને button pattern stock કહેવામાં આવે છે.
Half Die (Fig 4): Half dies બાંધણીમાં (construction) વધુ મજબૂત હોય છે. Adjustments સરળતાથી કરી શકાય છે જેથી depth of cut વધારી કે ઘટાડી શકાય. આ dies matching pairs (જોડીમાં) ઉપલબ્ધ હોય છે અને તેનો ઉપયોગ સાથે જ કરવો જોઈએ.
Diestock ના screw ને adjust કરીને, die ના ટુકડાઓને નજીક લાવી શકાય છે અથવા દૂર કરી શકાય છે. તેમને ખાસ die holder ની જરૂર પડે છે.
Adjustable screw plate die (Fig 5): આ half die જેવી જ બે ટુકડાવાળી (two piece) ડાઈનો બીજો પ્રકાર છે. આ split die કરતા વધુ સારું adjustment પૂરું પાડે છે. ડાઈના બે અડધા ભાગને threaded plate (guide plate) દ્વારા collar માં સુરક્ષિત રીતે પકડવામાં આવે છે, જે threading કરતી વખતે guide તરીકે પણ કામ કરે છે.
જ્યારે die ના ટુકડાઓને collar માં મૂક્યા પછી guide plate ને tighten કરવામાં આવે છે, ત્યારે die ના ટુકડાઓ યોગ્ય રીતે locate થાય છે અને મજબૂતીથી પકડાય છે. (Fig 5)
Die ના અડધા ભાગના નીચેનો ભાગ tapered હોય છે જેથી thread શરૂ કરવા માટે lead મળી રહે. દરેક die head ની એક બાજુ પર serial number છાપેલ હોય છે. બંને ટુકડાઓ પર એક જ serial number હોવો જોઈએ.
Die nut (solid die) (Fig 7): Die nut નો ઉપયોગ damaged threads ને chasing (સાફ કરવા) અથવા reconditioning કરવા માટે થાય છે. Die nut ને spanner (પાના) વડે ફેરવવામાં આવે છે. Die nuts વિવિધ સ્ટાન્ડર્ડ અને આંટાની સાઈઝમાં ઉપલબ્ધ છે.
⚠️ નોંધ: Die nuts નો ઉપયોગ નવા આંટા (new threads) પાડવા માટે થવો જોઈએ નહીં.
Hand reamers (હેન્ડ રીમર્સ) 🔧
Objectives: આ લેસનના અંતે તમે આ બાબતો શીખી શકશો:
- Reamers ના ઉપયોગો જણાવી શકશો.
- Reaming ના ફાયદાઓ જણાવી શકશો.
- Hand reamers અને machine reamers વચ્ચેનો તફાવત જણાવી શકશો.
- Reamer ના વિવિધ ભાગો (elements) ના નામ આપી શકશો.
What is reamer? (રીમર શું છે?): Reamer એ એક multi-point cutting tool છે જેનો ઉપયોગ અગાઉ ડ્રિલ કરેલા હોલને ચોક્કસ સાઈઝમાં મોટા કરવા (enlarge) અને finish કરવા માટે થાય છે. (Fig 1)
Advantages of ‘reaming’ (રીમિંગના ફાયદા):
- Reaming દ્વારા ઉચ્ચ ગુણવત્તાવાળી surface finish અને ચોક્કસ dimensional accuracy મળે છે.
- તેમજ નાના હોલ કે જેને અન્ય પ્રક્રિયા દ્વારા finish કરી શકાતા નથી, તેને reaming થી finish કરી શકાય છે.
Classification of reamers (રીમર્સનું વર્ગીકરણ): Reamers ને hand reamers અને machine reamers તરીકે વર્ગીકૃત કરવામાં આવે છે. (Fig 2 and 3)
Hand reamer દ્વારા reaming મેન્યુઅલી (હાથથી) કરવામાં આવે છે જેના માટે ઉચ્ચ કૌશલ્ય (skill) ની જરૂર હોય છે. Hand reamers ને સીધા shanks હોય છે અને છેડે tap wrenches પકડવા માટે ‘square’ હોય છે. (Fig 2)
Machine reamers ને machine tools ના spindles પર floating chuck દ્વારા ફિટ કરવામાં આવે છે અને reaming માટે ફેરવવામાં આવે છે. Machine reamers ને machine spindles પર પકડવા માટે Morse taper shanks આપવામાં આવે છે. (Fig 3)
Parts of a hand reamer (હેન્ડ રીમરના ભાગો): Hand reamer ના ભાગો Fig 4 માં દર્શાવેલ છે. જેમાં Cutting edge length, Body, Recess length, Shank, Square, Axis, Overall length, Bevel lead, Taper lead વગેરેનો સમાવેશ થાય છે.
Hole size for reaming (રીમિંગ માટે હોલની સાઈઝ) 📏
Objective: આ લેસનના અંતે તમે reaming માટે હોલની સાઈઝ નક્કી કરી શકશો.
Hand અથવા machine reamer થી reaming કરવા માટે, ડ્રિલ કરેલો હોલ reamer ની સાઈઝ કરતા નાનો હોવો જોઈએ. ડ્રિલ કરેલા હોલમાં reamer દ્વારા ફિનિશિંગ કરવા માટે પૂરતી ધાતુ હોવી જોઈએ. વધુ પડતી ધાતુ reamer ની cutting edge પર તાણ પેદા કરશે અને તેને નુકસાન પહોંચાડશે.
Calculating drill size for reamer (રીમર માટે ડ્રિલ સાઈઝની ગણતરી): વર્કશોપમાં સામાન્ય રીતે નીચેના સૂત્ર (formula) નો ઉપયોગ થાય છે:
Drill size = Reamed size – (undersize + oversize) of drilled hole.
- Finished size: Reamed size એટલે કે reamer નો વ્યાસ (diameter).
- Undersize: ટેબલ મુજબ હોલના વ્યાસ પર આધારિત ઘટાડો. (ટેબલ-1 જુઓ)
- Oversize: સામાન્ય રીતે માનવામાં આવે છે કે twist drill તેના વ્યાસ કરતા થોડો મોટો હોલ પાડશે. ગણતરી માટે આ oversize 0.05 mm લેવામાં આવે છે.
TABLE -1: Undersizes for reaming | Diameter of ready reamed hole (mm) | Undersizes of rough bored hole (mm) | | :— | :— | | Under 5 | 0.1….0.2 | | 5….20 | 0.2….0.3 | | 21….50 | 0.3….0.5 | | Over 50 | 0.5….1 |
Keywords:
Mechanic Diesel ITI Theory, Lapping Process in Gujarati, Reaming Defects and Remedies, Oversize of Drilled Hole, Lapping Abrasives and Vehicles, Workshop Calculation and Science, ITI Mechanic Diesel Study Material.
Oversize of Drilled Hole (ડ્રિલ્ડ હોલનું ઓવર સાઈઝ) 🛠️
સામાન્ય રીતે એવું માનવામાં આવે છે કે એક twist drill તેના ડાયામીટર (diameter) કરતા મોટો હોલ બનાવશે. કેલ્ક્યુલેશનના હેતુ માટે, બધા ડાયામીટરના ડ્રીલ માટે oversize ને 0.05 mm ગણવામાં આવે છે. હલકી ધાતુઓ (light metals) માટે, undersize 50% વધારે હશે.
Example (ઉદાહરણ): 📝
Mild steel પર 10mm reamer થી રીમિંગ કરવાનું છે. રીમિંગ કરતા પહેલા ડ્રીલિંગ માટે હોલનો ડાયામીટર શું હોવો જોઈએ?
Formula: Drill size = Reamed size – (undersize + oversize) (finished size) $Drill \ size = 10mm$
- Table મુજબ Undersize = $0.2 mm$
- Oversize = $0.05 mm$, finished size = $0.05 + 0.2 = 0.25mm$
- Drill size = 10mm – 0.25mm = 9.75mm
નીચેના reamers માટે drill hole sizes નક્કી કરો: i) 15mm ________ ii) 44mm ________ iii) 4mm ________ iv) 19mm ________
DEFECTS IN REAMING – CAUSES AND REMEDIES ⚠️
(રીમિંગમાં ખામીઓ – કારણો અને ઉપાયો)
જો reamed hole undersize હોય, તો તેનું કારણ એ છે કે reamer ઘસાઈ (worn out) ગયેલ છે. રીમિંગ શરૂ કરતા પહેલા હંમેશા reamer ની સ્થિતિ તપાસો.
સારી surface finish મેળવવા માટે, રીમિંગ કરતી વખતે coolant નો ઉપયોગ કરો. મેટલના ચિપ્સને દૂર કરવા માટે reamer ને વારંવાર બહાર કાઢો અને ધીમે ધીમે આગળ વધો.
1. Reamer hole undersize (હોલ નાનો હોવો):
જો ઘસાઈ ગયેલું reamer વાપરવામાં આવે, તો તેના પરિણામે reamed hole undersize બની શકે છે. આવા reamers નો ઉપયોગ કરશો નહીં.
2. Surface finish rough (સપાટી ખરબચડી હોવી):
તેના કારણો નીચે મુજબના કોઈપણ એક અથવા મિશ્રણ હોઈ શકે છે:
- Incorrect application (ખોટી રીતે ઉપયોગ).
- Swarf accumulated in reamer flutes (રીમરની ખાંચોમાં કચરો ભરાવો).
- Inadequate flow of coolant (કુલન્ટનો અપૂરતો પ્રવાહ).
- Feed rate too fast (ફીડ રેટ ખૂબ ઝડપી હોવો).
નોંધ: રીમિંગ કરતી વખતે steady અને slow feed rate રાખો. લુબ્રિકન્ટનો પૂરતો પુરવઠો સુનિશ્ચિત કરો. Reamer ને ક્યારેય ઉંધી (reverse) દિશામાં ફેરવશો નહીં. 🚫
Excessive application of the abrasive compound will result in the rolling action of the abrasive between the work and the plate developing in inaccuracies. (Abrasive compound નો વધુ પડતો ઉપયોગ કરવાથી work અને plate વચ્ચે abrasive ની rolling action થશે, જેના કારણે ચોકસાઈમાં (inaccuracies) ખામી આવી શકે છે.)
📍 Lapping Process અને Charging (લેપિંગ પ્રક્રિયા)
The surface of the flat lap should be finished true by scraping before charging. લેપિંગ (Charging) કરતા પહેલા flat lap ની સપાટીને scraping દ્વારા એકદમ સચોટ રીતે finish કરવી જોઈએ.
After charging the plate, wash of all the loose abrasives using kerosene. Plate ને charge કર્યા પછી, બધા જ વધારાના છૂટા (loose) abrasives ને kerosene નો ઉપયોગ કરીને ધોઈ નાખવા જોઈએ.
Then place the workpiece on the plate and move along and across, covering the entire surface areas of the plate. ત્યારબાદ workpiece ને plate પર મૂકો અને તેને આખી સપાટી પર આગળ-પાછળ અને આજુબાજુ (along and across) ફેરવો.
When carrying out fine lapping, the surface should be kept moist with the help of kerosene. જ્યારે fine lapping કરવાનું હોય ત્યારે, સપાટીને kerosene ની મદદથી ભીની (moist) રાખવી જોઈએ.
While lapping the lapping compound collects in the serrations and rolls in and out as the work a moved. Lapping કરતી વખતે, lapping compound સપાટીના ખાંચાઓ (serrations) માં જમા થાય છે અને જેમ જેમ કામ આગળ વધે છે તેમ તેમ તે અંદર-બહાર રોલ થાય છે.
Before commencing lapping of the component, The cast iron plate should be CHARGED with abrasive particles. કોઈપણ component નું lapping શરૂ કરતા પહેલા, cast iron plate ને abrasive particles દ્વારા CHARGE કરવી જોઈએ.
This is a process by which the abrasive particles are embedded on to the surfaces of the laps which are comparatively softer than the component being lapped. આ એક એવી પ્રક્રિયા છે જેમાં abrasive particles ને lap ની સપાટી પર બેસાડવામાં (embedded) આવે છે, જે સામાન્ય રીતે જેનું લેપિંગ કરવાનું છે તે component કરતા નરમ (softer) હોય છે.
For charging the cast iron lap apply a thin coating of the abrasive compound over the surface of the lapping plate. Cast iron lap ને charge કરવા માટે, lapping plate ની સપાટી પર abrasive compound નું પાતળું પડ (thin coating) લગાવો.
Use a finished hard steel block and press the cutting particles into the lap. એક તૈયાર થયેલા hard steel block નો ઉપયોગ કરો અને cutting particles ને lap ની અંદર દબાવો.
While doing so, rubbing should be kept to the minimum. આમ કરતી વખતે, ઘસવાનું (rubbing) ઓછામાં ઓછું રાખવું જોઈએ.
When the entire surface of the lapping plate is charged, the surface will have a uniform grey appearance. જ્યારે lapping plate ની આખી સપાટી charge થઈ જશે, ત્યારે તે સપાટી એકસમાન રાખોડી (uniform grey) રંગની દેખાશે.
If the surface is not fully charged, bright spots will be visible here and there. જો સપાટી પૂરેપૂરી charge નહીં થઈ હોય, તો ત્યાં અહીં-તહીં ચમકતા ડાઘા (bright spots) દેખાશે.
💧 Wet and Dry Lapping (ભીનું અને સૂકું લેપિંગ)
Lapping can be carried out either wet or dry. Lapping પ્રક્રિયા wet (ભીની) અથવા dry (સૂકી) એમ બંને રીતે કરી શકાય છે.
In wet lapping there is surplus oil and abrasives on the surface of the lap. Wet lapping માં lap ની સપાટી પર વધારાનું તેલ (surplus oil) અને abrasives હોય છે.
As the workpiece which is being lapped is moved on the lap, there is movement of the abrasive particles also. જ્યારે workpiece ને lap પર ફેરવવામાં આવે છે, ત્યારે તેની સાથે abrasive particles ની પણ હિલચાલ થાય છે.
In the dry method the lap is first charged by rubbing the abrasives on the surface of the lap. Dry method માં, સૌ પ્રથમ lap ની સપાટી પર abrasives ઘસીને તેને charge કરવામાં આવે છે.
The surplus oil and abrasives are then washed off. ત્યારબાદ વધારાનું તેલ અને abrasives ધોઈ નાખવામાં આવે છે.
The abrasives embedded on the surface of the lap will only be remaining. ફક્ત lap ની સપાટીમાં બેસી ગયેલા (embedded) abrasives જ બાકી રહેશે.
The embedded abrasives act like a fine oilstone when metal pins to be lapped are moved over the surface with light pressure. જ્યારે metal pins ને હળવા દબાણ સાથે સપાટી પર ફેરવવામાં આવે છે, ત્યારે આ embedded abrasives એક fine oilstone ની જેમ કામ કરે છે.
However, while lapping, the surface being lapped is kept moistened with kerosene or petrol. જોકે, lapping કરતી વખતે જે સપાટીનું લેપિંગ થાય છે તેને kerosene અથવા petrol થી ભીની રાખવામાં આવે છે.
Surfaces finished by the dry method will have better finish and appearance. Dry method દ્વારા finish કરેલી સપાટી વધુ સારી finish અને સુંદર દેખાવ (appearance) ધરાવે છે.
Some prefer to do rough lapping by wet method and finish by dry lapping. કેટલાક લોકો rough lapping માટે wet method અને અંતિમ finishing માટે dry lapping પસંદ કરે છે.
🛠️ Lapping Materials and Lapping Compounds:
🎯 Objectives (ઉદ્દેશ્યો)
At the end of this lesson you shall be able to: આ પાઠના અંતે તમે નીચેની બાબતો કરવા માટે સક્ષમ હશો:
- Name the different types of lap materials (અલગ-અલગ પ્રકારના lap materials ના નામ આપી શકશો)
- State the qualities of different lap materials (વિવિધ lap materials ના ગુણો જણાવી શકશો)
- Name the different types of abrasive materials used for lapping (લેપિંગ માટે વપરાતા વિવિધ abrasive materials ના નામ આપી શકશો)
- Distinguished between the application of different lapping abrasives (વિવિધ lapping abrasives ના ઉપયોગ વચ્ચેનો તફાવત સમજી શકશો)
- State the function of lapping vehicles (Lapping vehicles ના કાર્યો જણાવી શકશો)
- Name the solvents used in lapping (Lapping માં વપરાતા solvents ના નામ આપી શકશો)
🏗️ Lap Materials (લેપ માટે વપરાતી સામગ્રી)
The material used for making laps should be softer than the workpiece being lapped. Lap બનાવવા માટે વપરાતું મટીરીયલ, જે workpiece નું લેપિંગ કરવાનું છે તેના કરતા નરમ (softer) હોવું જોઈએ.
This helps to charge the abrasives on the lap. આનાથી abrasives ને lap પર charge કરવામાં મદદ મળે છે.
If the lap is harder than the workpiece, the workpiece will get charged with the abrasives and cut the lap instead of the workpiece being lapped. જો lap એ workpiece કરતા વધુ સખત (harder) હશે, તો workpiece પોતે charge થઈ જશે અને workpiece ને બદલે lap ને કાપવા માંડશે.
Laps are usually made of: Laps સામાન્ય રીતે નીચેનામાંથી બનાવવામાં આવે છે:
- Close grained iron
- Copper
- Brass or lead
The best material used for making lap is cast iron, but this cannot be used for all applications. Lap બનાવવા માટેનું શ્રેષ્ઠ મટીરીયલ cast iron છે, પરંતુ તેનો ઉપયોગ દરેક જગ્યાએ થઈ શકતો નથી.
When there is excessive lapping allowance, copper and brass laps are preferred as they can be charged more easily and cut more rapidly than cast iron. જ્યારે lapping allowance વધુ હોય, ત્યારે copper અને brass laps ને વધુ પસંદ કરવામાં આવે છે કારણ કે તે સરળતાથી charge થઈ શકે છે અને cast iron કરતા ઝડપથી cutting કરે છે.
Lead is an inexpensive form of lap commonly used for holes. Lead એ એક સસ્તું (inexpensive) lap મટીરીયલ છે જે સામાન્ય રીતે કાણાં (holes) ના લેપિંગ માટે વપરાય છે.
Lead is cast to the required size on steel arbor. Lead ને સ્ટીલની ધરી (steel arbor) પર જરૂરી સાઈઝ મુજબ ઢાળવામાં (cast) આવે છે.
These laps can be expanded when they are worn out. જ્યારે આ laps ઘસાઈ જાય, ત્યારે તેને વિસ્તૃત (expand) કરી શકાય છે.
Charging the lap is much quicker. આમાં lap ને charge કરવાની પ્રક્રિયા ઘણી ઝડપી હોય છે.
💎 Lapping Abrasives (લેપિંગ એબ્રેસિવ્સ)
Abrasives of different types are used for lapping. લેપિંગ માટે અલગ અલગ પ્રકારના abrasives વપરાય છે.
The commonly used abrasives are: સામાન્ય રીતે વપરાતા abrasives:
- Silicon carbide
- Aluminium oxide
- Boron carbide
- Diamond
Silicon carbide: This is an extremely hard abrasive. Silicon carbide: આ ખૂબ જ સખત (extremely hard) abrasive છે.
Its grit is sharp and brittle. તેની કણીઓ (grit) તીક્ષ્ણ અને બરડ (brittle) હોય છે.
While lapping the sharp cutting edges continuously break down exposing new cutting edges. Lapping દરમિયાન તેની તીક્ષ્ણ ધાર સતત તૂટે છે અને નવી cutting edges બહાર આવે છે.
Due to this reason this is considered as very ideal for lapping hardened steel and cast iron, particularly where heavy stock removal is required. આ કારણે, તે hardened steel અને cast iron ના લેપિંગ માટે ખૂબ જ આદર્શ (ideal) ગણાય છે, ખાસ કરીને જ્યાં વધુ પડતું મટીરીયલ (heavy stock removal) દૂર કરવાનું હોય.
Aluminium oxide: Aluminium oxide is sharp but tougher than silicon carbide. Aluminium oxide: આ તીક્ષ્ણ છે પરંતુ silicon carbide કરતા વધુ મજબૂત (tougher) છે.
Aluminium oxide is used in un-fused and fused forms. Aluminium oxide નો ઉપયોગ un-fused અને fused બંને સ્વરૂપમાં થાય છે.
Un-fused alumina (aluminium oxide) removes stock effectively and is capable of obtaining high quality finish. Un-fused alumina અસરકારક રીતે મટીરીયલ દૂર કરે છે અને ઉચ્ચ ગુણવત્તાવાળી finish (high quality finish) આપે છે.
Fused alumina is used for lapping soft steels and nonferrous metals. Fused alumina નો ઉપયોગ soft steels અને non-ferrous (બિન-લોહ) ધાતુઓના લેપિંગ માટે થાય છે.
Boron Carbide: This is an expensive abrasive material which is next to diamond in hardness. Boron Carbide: આ એક મોંઘું (expensive) abrasive છે જે સખતપણામાં (hardness) હીરા (diamond) પછી બીજા ક્રમે આવે છે.
While it has excellent cutting properties, it is used because of the high cost only in special application like dies and gauges. તે ઉત્તમ cutting ગુણધર્મો ધરાવે છે, પરંતુ તેની ઊંચી કિંમતને કારણે તેનો ઉપયોગ ફક્ત dies અને gauges જેવી ખાસ વસ્તુઓમાં જ થાય છે.
Diamond: This being the hardest of all materials. Diamond (હીરો): આ તમામ પદાર્થોમાં સૌથી સખત (hardest) છે.
It is used for lapping tungsten carbide. તેનો ઉપયોગ tungsten carbide ના લેપિંગ માટે થાય છે.
Rotary diamond laps are also prepared for accurately finishing very small holes which cannot be ground. ખૂબ જ નાના કાણાં (small holes) જેને ગ્રાઉન્ડ કરી શકાતા નથી, તેના સચોટ ફિનિશિંગ માટે Rotary diamond laps તૈયાર કરવામાં આવે છે.
🛢️ Lapping Vehicles (લેપિંગ વિહિકલ્સ)
Lapping vehicles: In the preparation of lapping compounds the abrasive particles are suspended in vehicles. Lapping vehicles: Lapping compounds તૈયાર કરતી વખતે abrasive particles ને અમુક પ્રવાહી એટલે કે vehicles માં મિશ્રિત (suspended) કરવામાં આવે છે.
This helps to prevent concentration of abrasives on the lapping surfaces and regulates the cutting action and lubricates the surfaces. આનાથી abrasives એક જ જગ્યાએ જમા થતા અટકે છે, cutting પ્રક્રિયાને નિયંત્રિત કરે છે અને સપાટી પર લુબ્રિકેશન પૂરું પાડે છે.
The commonly used vehicles are: સામાન્ય રીતે વપરાતા vehicles:
- Water soluble cutting oils (પાણીમાં દ્રાવ્ય કટિંગ ઓઈલ)
- Vegetable oils (વનસ્પતિ તેલ)
- Machine oils (મશીન ઓઈલ)
- Petroleum jelly or grease (પેટ્રોલિયમ જેલી અથવા ગ્રીસ)
- Vehicles with oil or grease base used for lapping ferrous metals. (Ferrous metals માટે તેલ અથવા ગ્રીસ આધારિત vehicles)
Metals like copper and its alloys and other non-ferrous metals are lapped using soluble oil, bentonite etc. Copper અને તેની મિશ્ર ધાતુઓ તથા અન્ય non-ferrous ધાતુઓનું લેપિંગ soluble oil અને bentonite વગેરેનો ઉપયોગ કરીને કરવામાં આવે છે.
In addition to the vehicles used in making the lapping compound, solvents like water, kerosene, etc are also used at the time of lapping. Lapping compound બનાવવામાં વપરાતા vehicles ઉપરાંત, લેપિંગ કરતી વખતે પાણી અને કેરોસીન (kerosene) જેવા દ્રાવકો (solvents) નો પણ ઉપયોગ થાય છે.
🔑 Keywords:
- Lapping Process in Gujarati
- Mechanic Diesel Lapping Lesson
- Lapping Abrasives and Vehicles
- Silicon Carbide vs Aluminium Oxide Lapping
- How to charge a lapping plate
- Difference between Wet and Dry Lapping
- ITI Automotive Theory Lapping
- Lap Materials for Engineering
- Lapping materials and compounds tutorial
- Workshop Calculation and Science Lapping notes
💡 Instructor Tip: વિદ્યાર્થીઓને સમજાવો કે લેપિંગ એ ફાઈનલ ફિનિશિંગ પ્રોસેસ છે, તેથી તેમાં વપરાતા એબ્રેસિવ્સની સાઈઝ ખૂબ જ મહત્વની છે!